


LoRaベースのスマートシティ大気質モニタリング
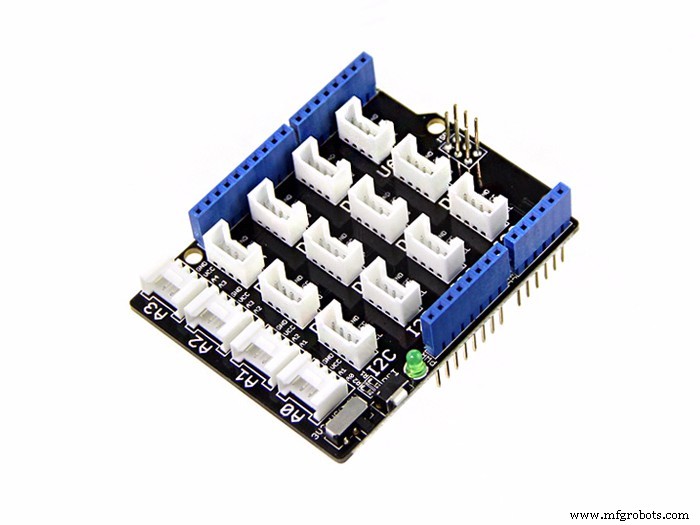
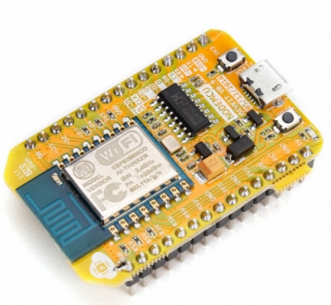
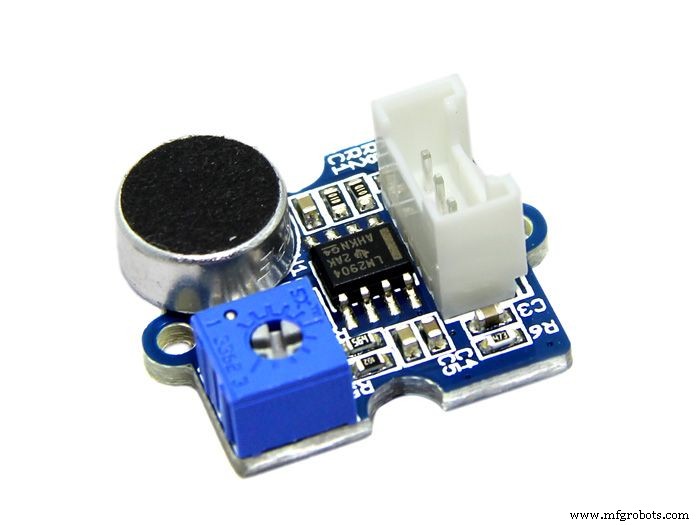
コンポーネントと消耗品
> 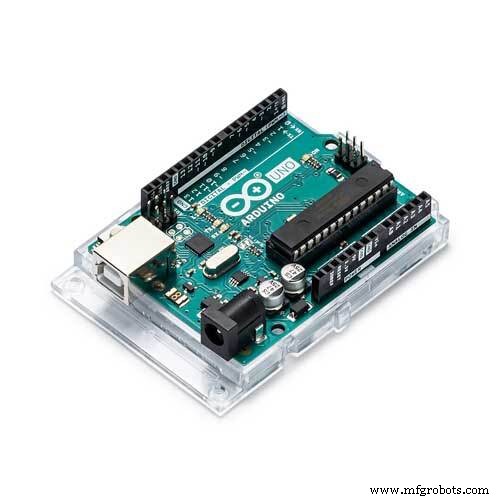 |
| × | 1 | |||
 |
| × | 1 | |||
 |
| × | 1 | |||
 |
| × | 1 | |||
 |
| × | 1 | |||
| × | 1 | ||||
| × | 1 | ||||
| × | 1 | ||||
| × | 1 | ||||
 |
| × | 1 |
必要なツールとマシン
>  |
|
アプリとオンラインサービス
>  |
| |||
 |
| |||
 |
|
このプロジェクトについて
スマートシティと大気の質
世界銀行は、スマートシティをテクノロジー集約型の都市と定義しています。これは、非常に効率的な公共サービスを意味します。
スマートシティの基本的な特徴の1つは、持続可能な環境を提供することです。持続可能な環境のためには、汚染源を特定し、それらを軽減するために環境条件を監視する必要があります。これに関連して、政府と市民に同様にリアルタイムの情報を提供するために、何千もの大気質センサーが配置されています。このデータは有用な情報に変換できるため、交通計画を行うか、徒歩で通勤するのに最適なルートを知るかなど、より適切な意思決定を行うことができます。
大気質検知は、スマートシティのビジョンによく適合します。これまで利用できなかった都市に関する情報を提供し、人々が生活の質を向上させる決定を下せるようにします。
問題と解決策
大都市での大気汚染のレベルの増加は、それが人間の健康に与えるリスクのために大きな懸念となっています。この文脈において、技術は汚染の監視とその影響の可能な緩和において非常に有用なツールになりました。特に、さまざまな汚染物質を測定するために相互接続されたセンサーを使用するモノのインターネット(IoT)パラダイムを使用するさまざまな提案があります。低コストの大気質監視センサーノードのネットワークを展開して、大気質と気象パラメータを監視できます。したがって、汚染源の検出を通じて、市は是正措置を講じ、環境衛生を改善することができます。洪水や降雨監視ソリューションなどの災害検知システムを周囲に設置する。壊滅的な事態が発生した場合は、事前に市民に警告することができます。全体論的な見方が導き出せるため、当局はデータ主導のインフラストラクチャとポリシー計画の決定を下すことができます。
プロジェクト計画
このプロジェクトでは、ノイズ、温度、湿度、空気の質など、いくつかの最も重要な環境パラメータを監視します。ワイヤレス通信プロトコルを介してリアルタイムデータをクラウドプラットフォームに送信します。機器は、バッテリーバックアップを備えた太陽光発電で完全に稼働します。デバイスからのデータには、データを目的の形式で視覚化および分析するダッシュボードからアクセスできます。
スマートシティの大気質を監視するには、センサーノードをさまざまな場所に配置する必要があります。消費電力とコストの観点から、すべてのセンサーノードを個別にクラウドに接続することはお勧めできません。むしろ、小さなエリアのすべてのセンサーノードからデータを収集し、単一のゲートウェイからすべてのデータをクラウドに公開することをお勧めします。 LoRaは私たちにこの利点を与えることができるので、私はプロジェクトにLoRaを選択しました。
<図>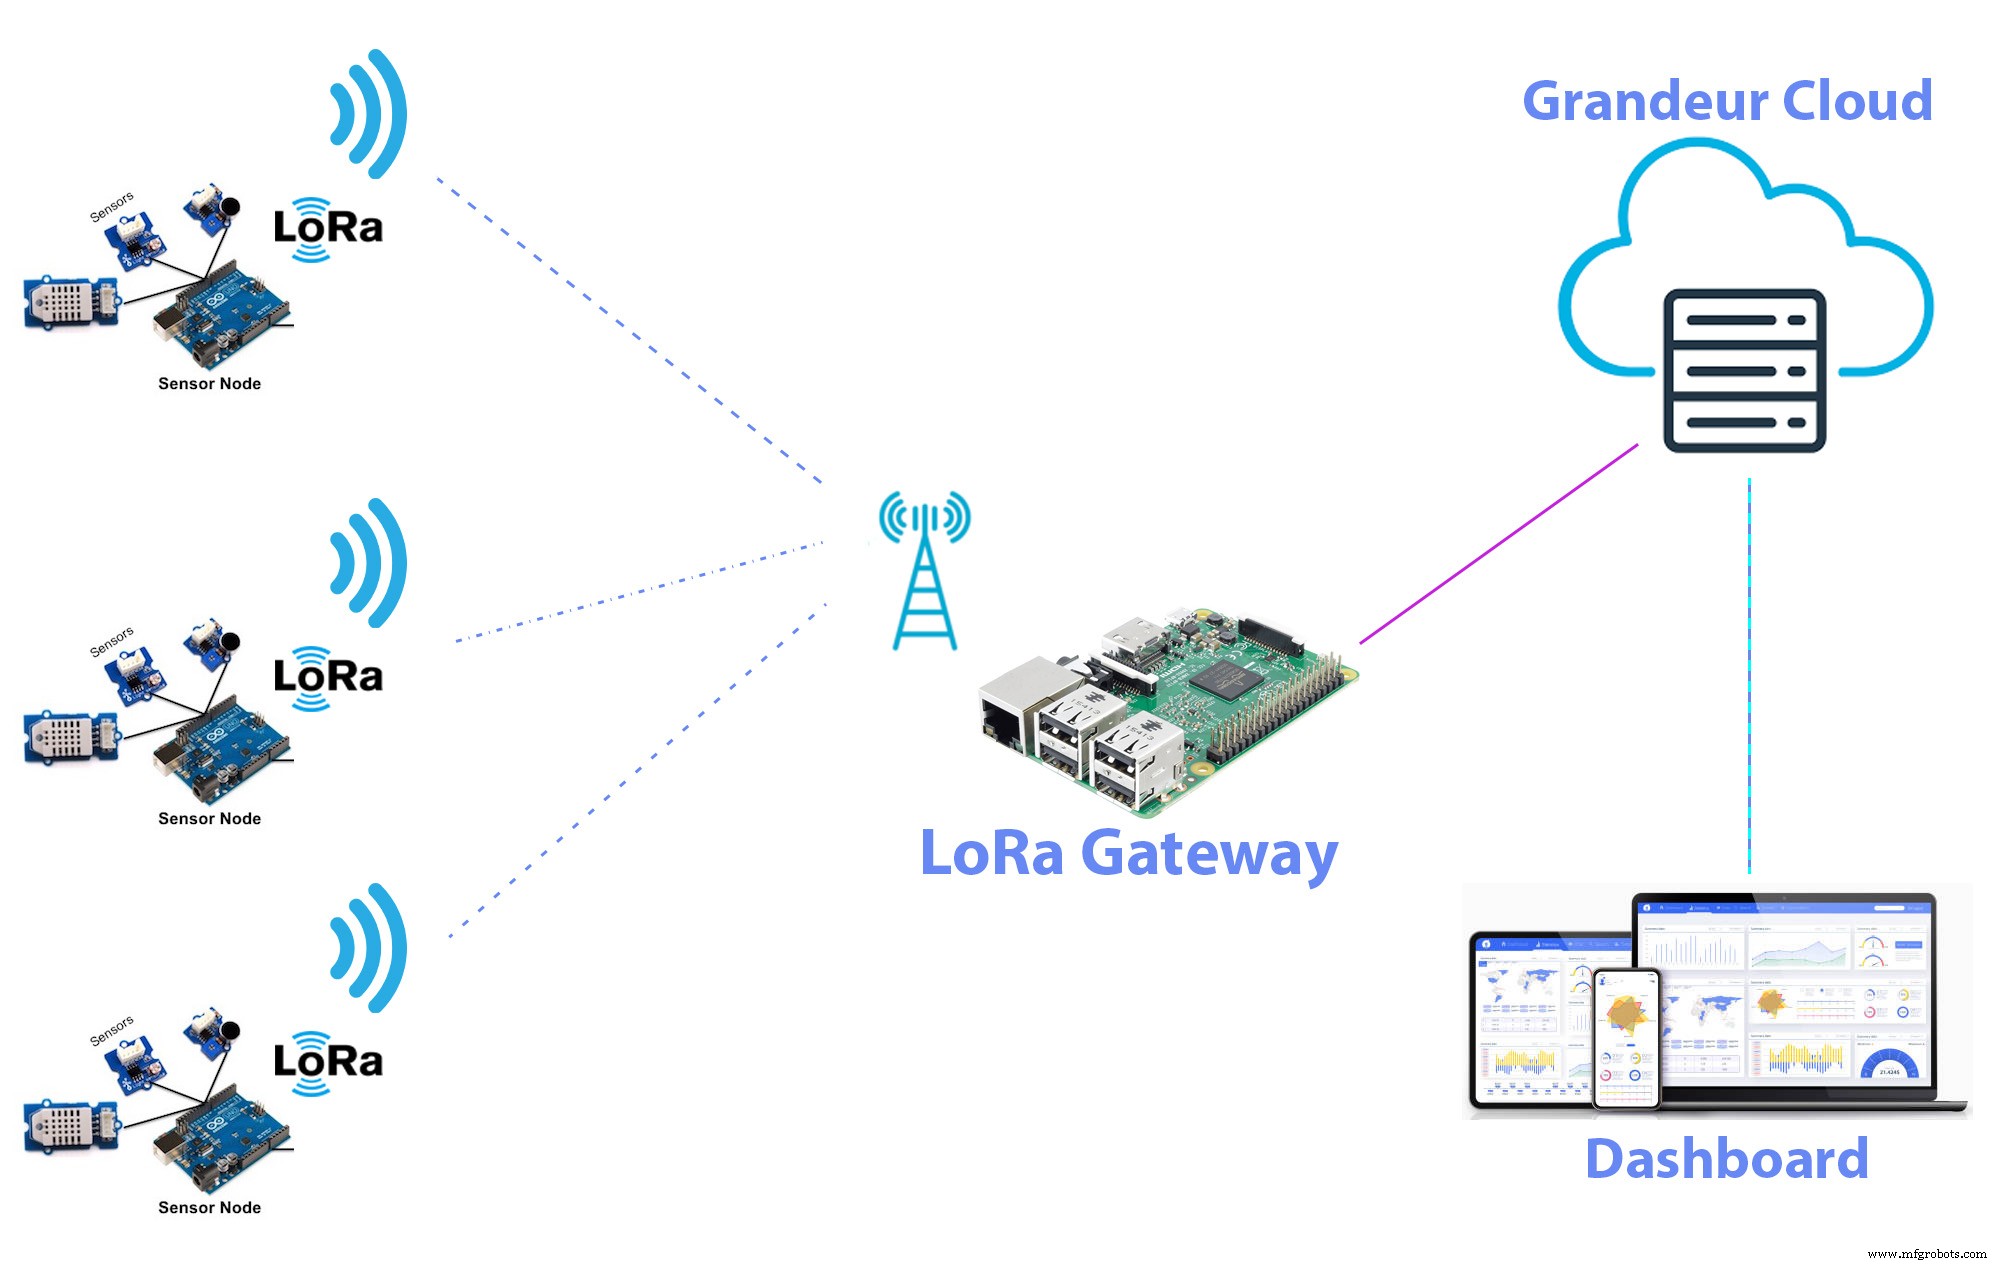
クラウドサービスでは、プロジェクトにGrandeurを使用しています。 Grandeurは、ドラッグアンドドロップ方式を使用してグラフウィジェットを作成することにより、データを保存し、データを視覚化できる、比較的新しいメーカーフレンドリーなIoTプラットフォームです。また、Arduino、JavaScript、およびPythonSDKにサンプルコードを提供します。そのため、Arduino、NodeMCU、RaspberryPiを使用してサービスに簡単に接続できます。
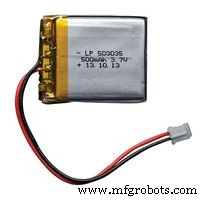
センサーノードに電力を供給する最良の方法は、ソーラーパネルを使用することです。センサーノードは別の離れた場所に配置されており、バッテリーを頻繁に交換したり、ユーティリティソースから電力を供給したりすることが常に可能であるとは限りません。ソーラーパネルとリチウムイオン電池を使用してセンサーノートに電力を供給しています。
センサーノードの作成
空気の質、騒音レベル、温度、湿度を監視したい。そこで、Grove空気質センサー、Groveノイズセンサー、GroveDHT11温度湿度センサーを使用しました。 Groveセンサーの良い点の1つは、Groveベースシールドを使用して、はんだ付けなしですべてのGroveセンサーをArduinoに接続できることです。
<図>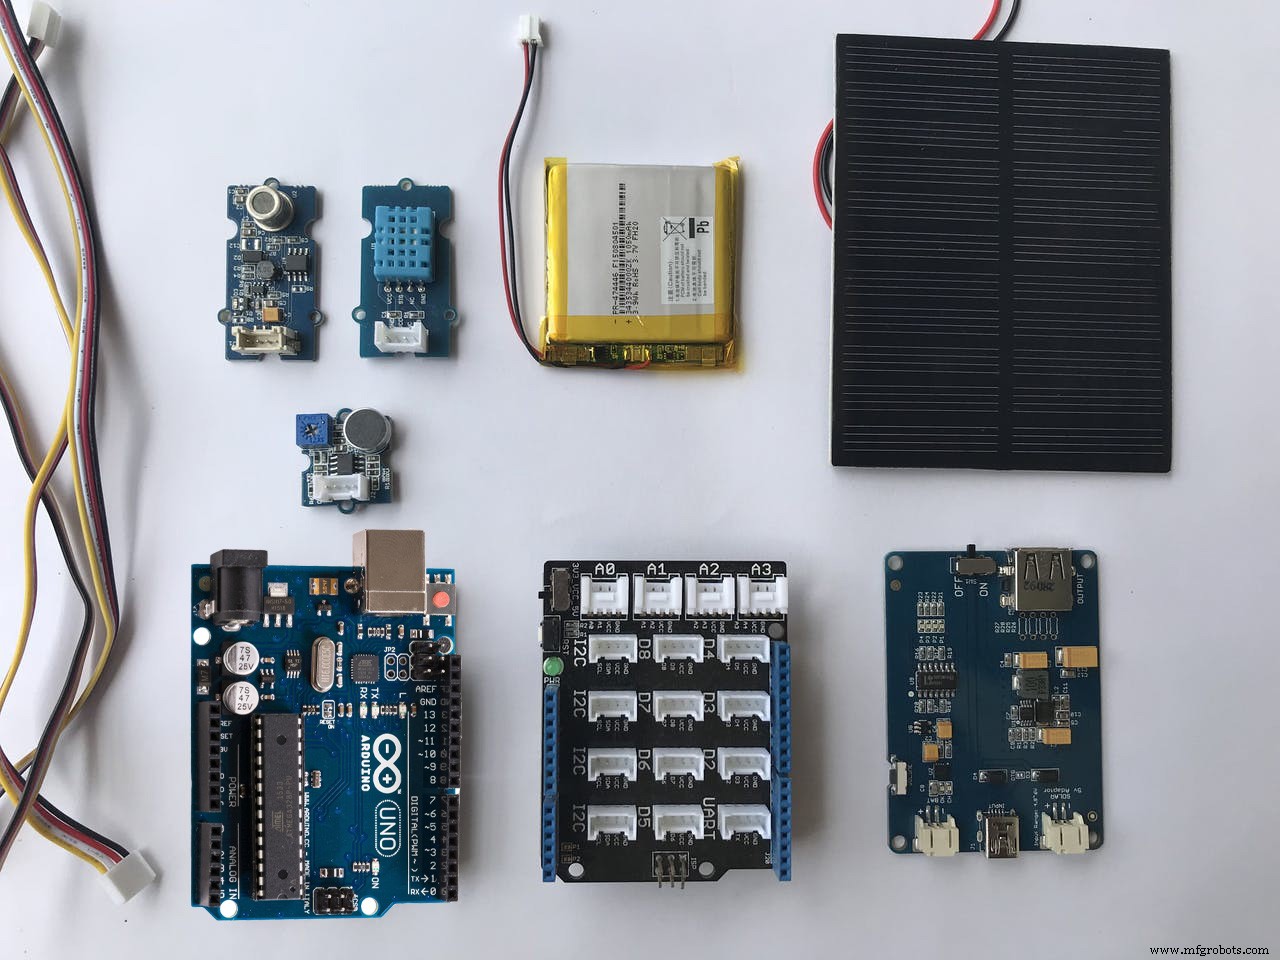
回路に電力を供給するために、私はGrove1Wソーラーパネルとリチウムイオン電池を使用しました。ソーラーパネルを使用してバッテリーを充電するには、5Vブーストコンバーターを内蔵したSeeed LiPo RiderProソーラー充電器を使用しました。そのため、LiPoRiderの出力を使用してArduinoを簡単に実行できます。
ここで使用されるコンポーネントのほとんどは、Seeedstudio.comで入手できます。次の画像は、センサーノードのすべてのコンポーネントのプラグアンドプレイテスト接続を示しています。
<図>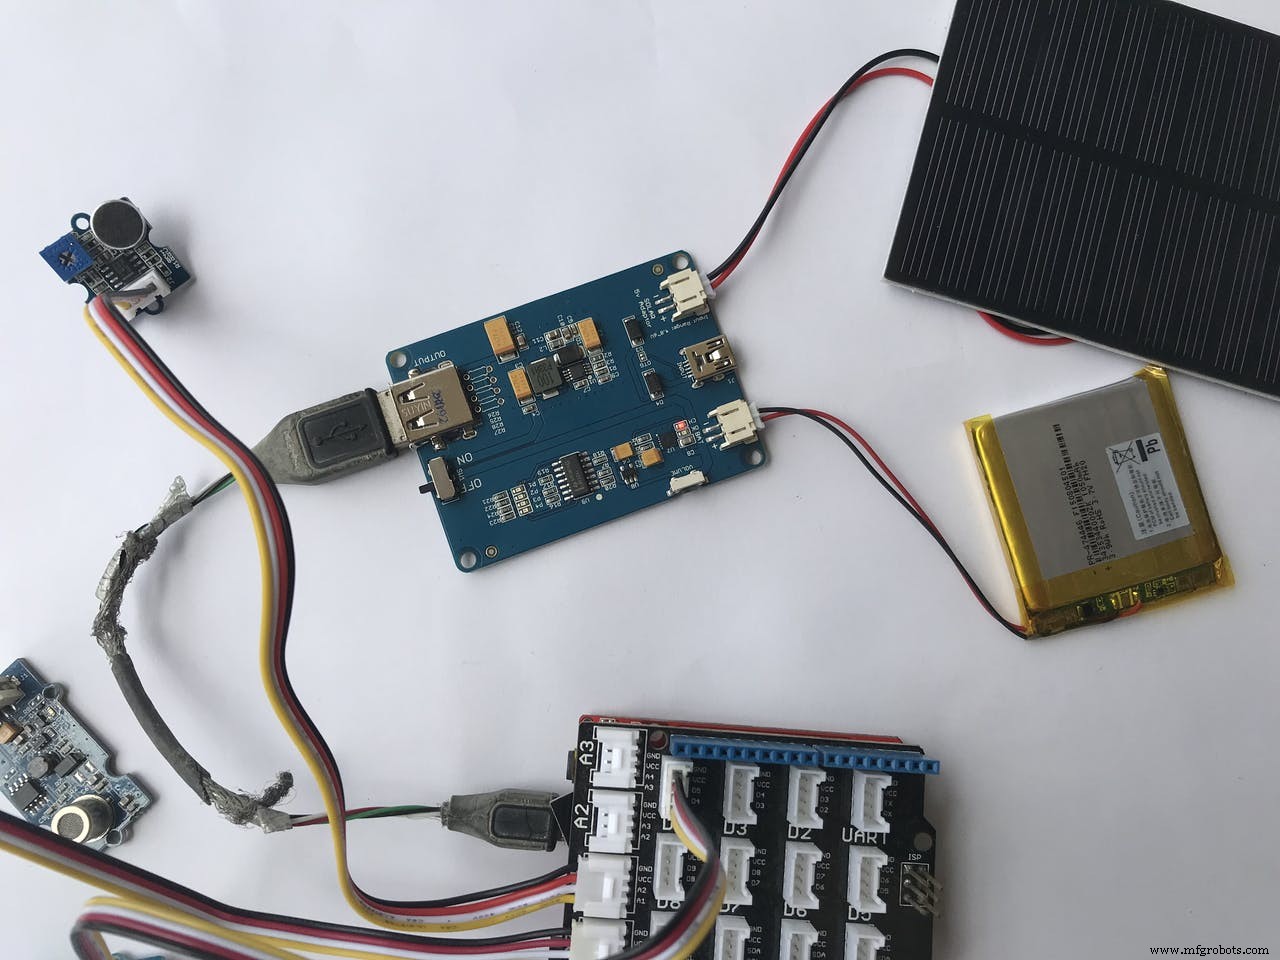
センサーデータをIoTゲートウェイに送信するために、ReyaxLoRaトランシーバーを使用しました。次の画像は、ピンダイアグラム付きのReyax RYLR998Loraモジュールを示しています。
<図>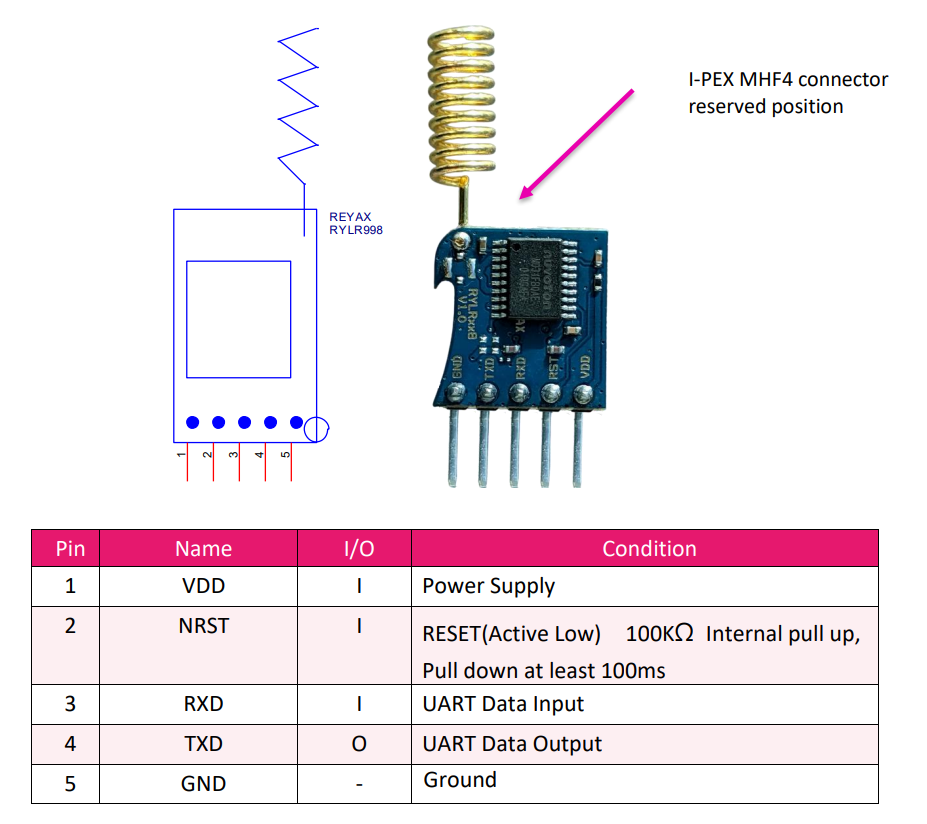
Arduino BaseShieldに接続するためのReyaxRYLR998LoRaエンジンの準備
RYLR998には5つのオスピン出力があり、Groveベースシールドとは互換性がありません。それをGroveShieldに接続するために、5ピンのメスヘッダーを備えたperfboardにGroveケーブルをはんだ付けしました。回路の接続は次のとおりです。
<図>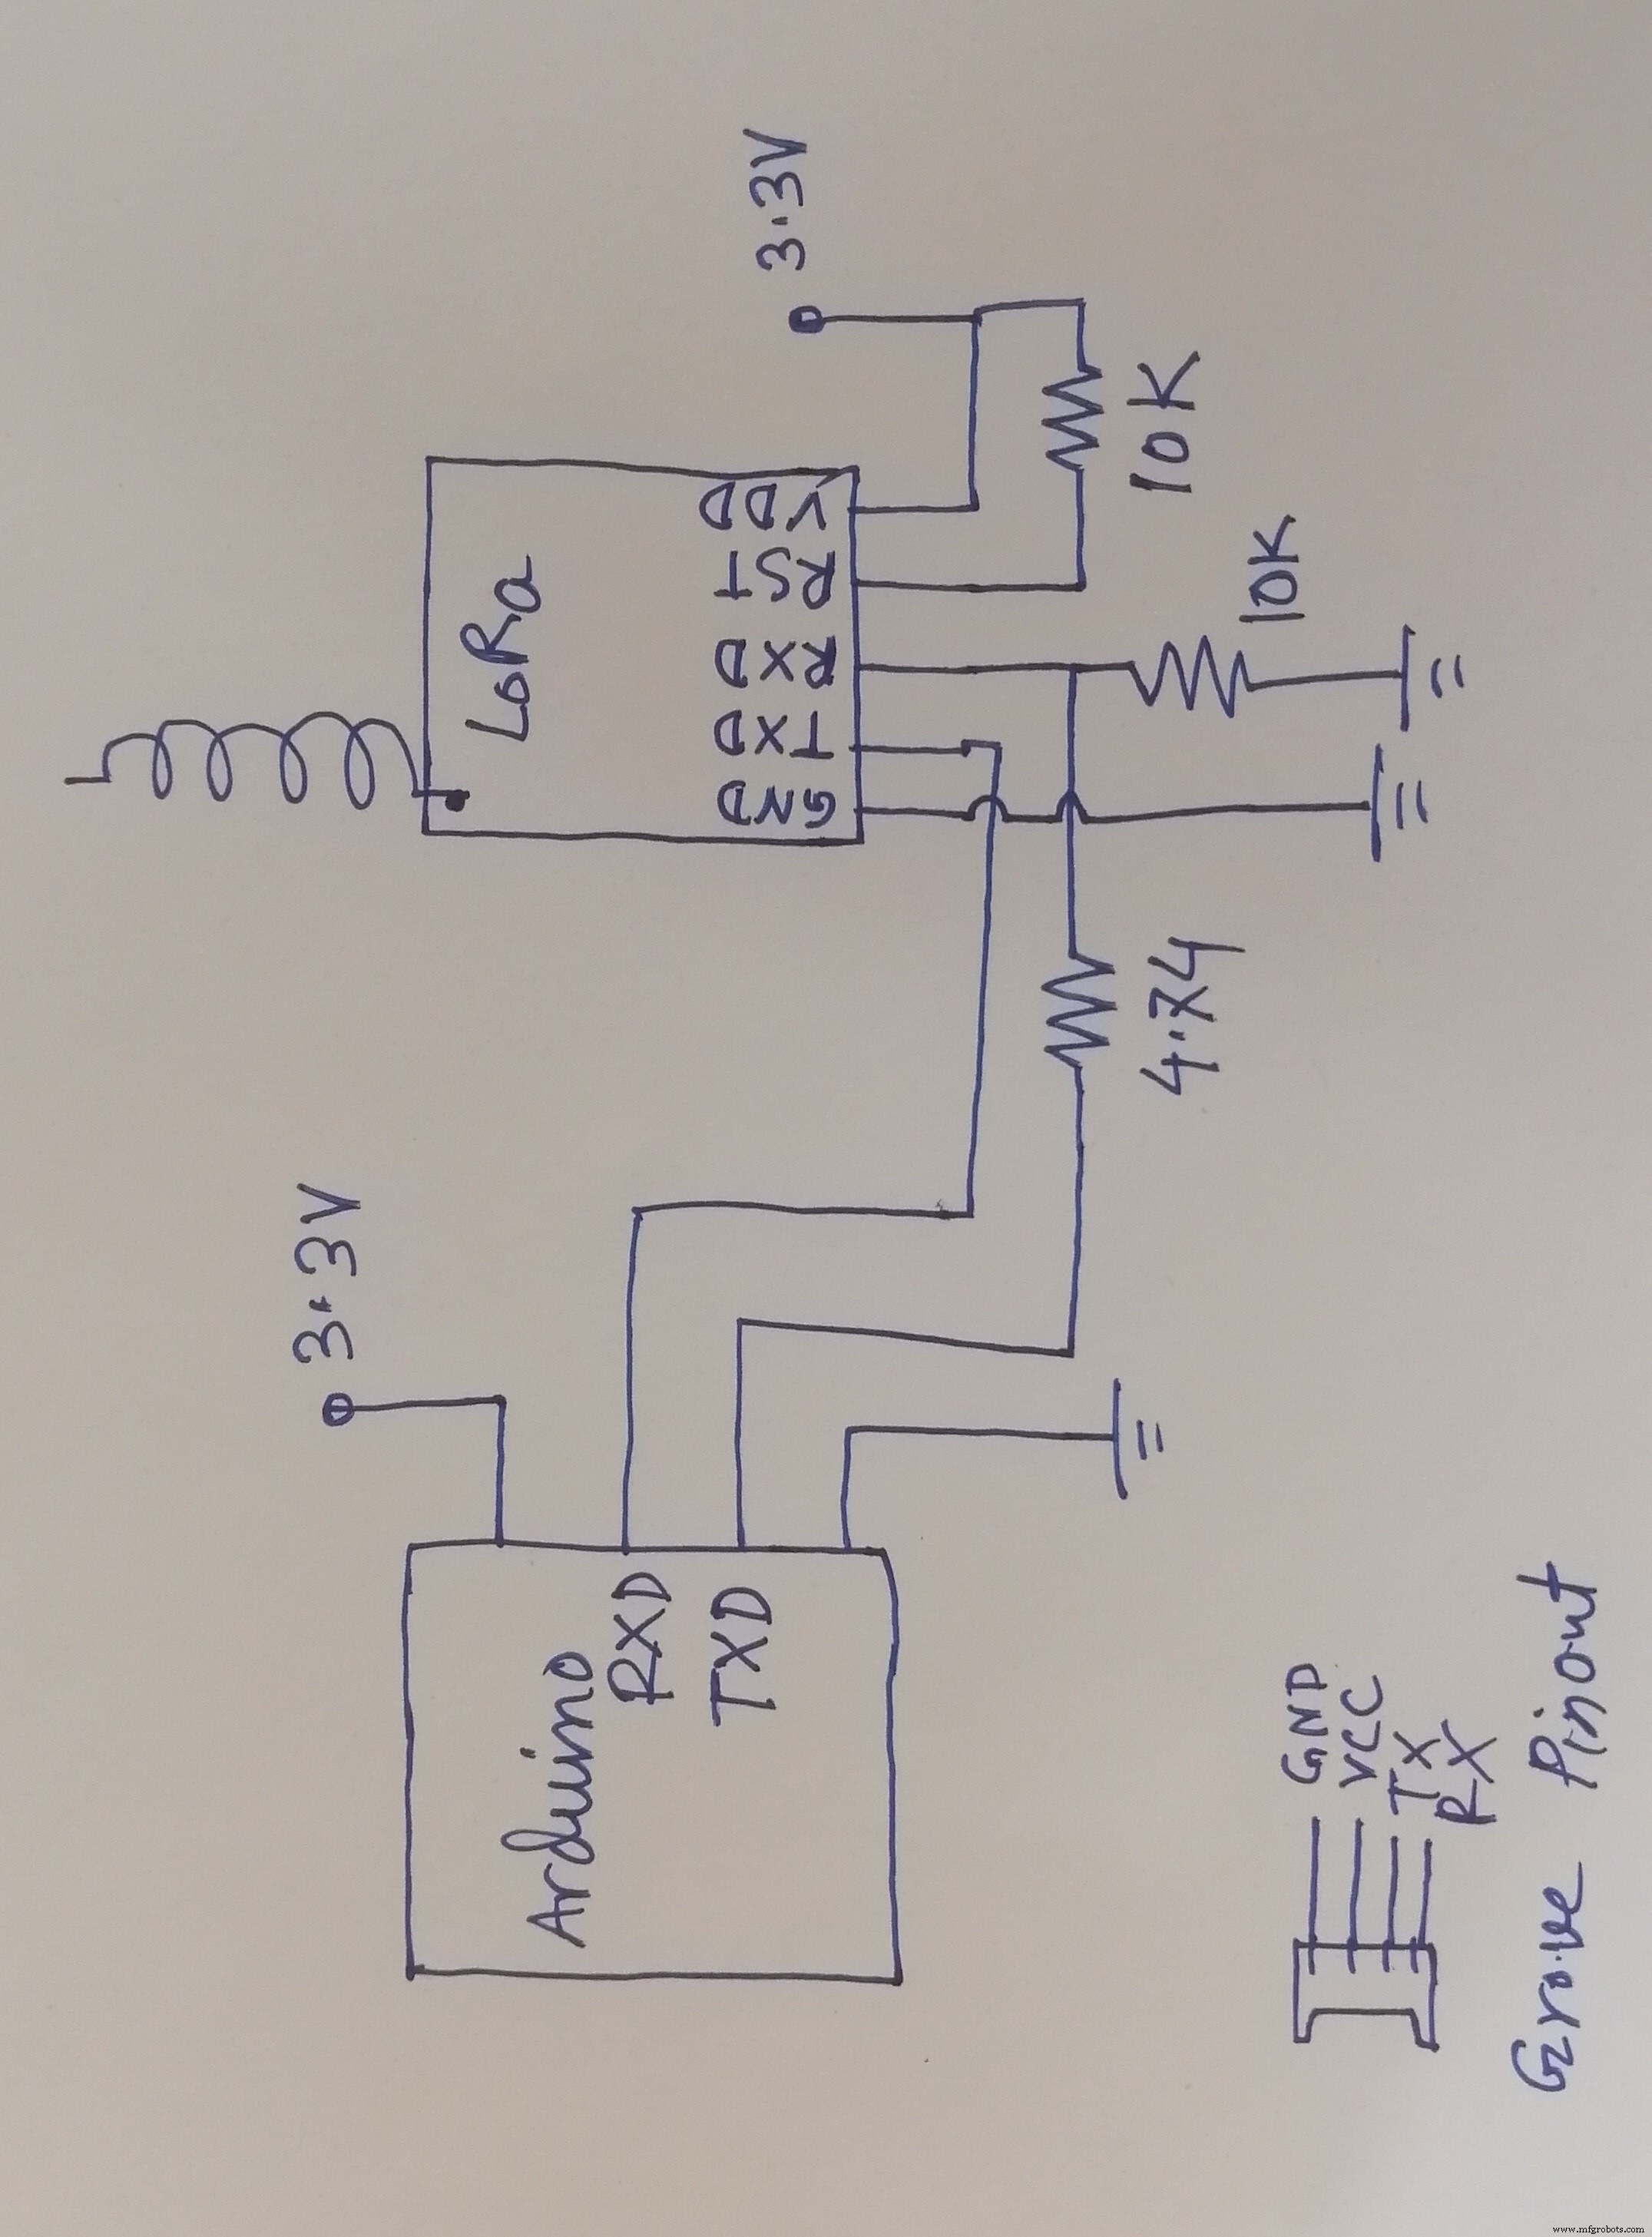
RYLR998 LoRaモジュールは、最大3.6Vで安全に動作できます。 Arduino TXピンは、LoRaにとって安全ではない5V出力を生成します。そこで、分圧器を使用してArduinoTXピンから3.4Vを取得しました。一方、ArduinoRXピンは3.3Vロジックで完全に動作します。そこで、LoRaのTXピンをArduinoのRXピンに直接接続しました。通常の動作では、LoRaのRSTピンはハイ状態である必要があります。
これで、上記のLoRaモジュールは、次のコンバータ回路を使用してベースシールドに簡単に接続できます。
<図>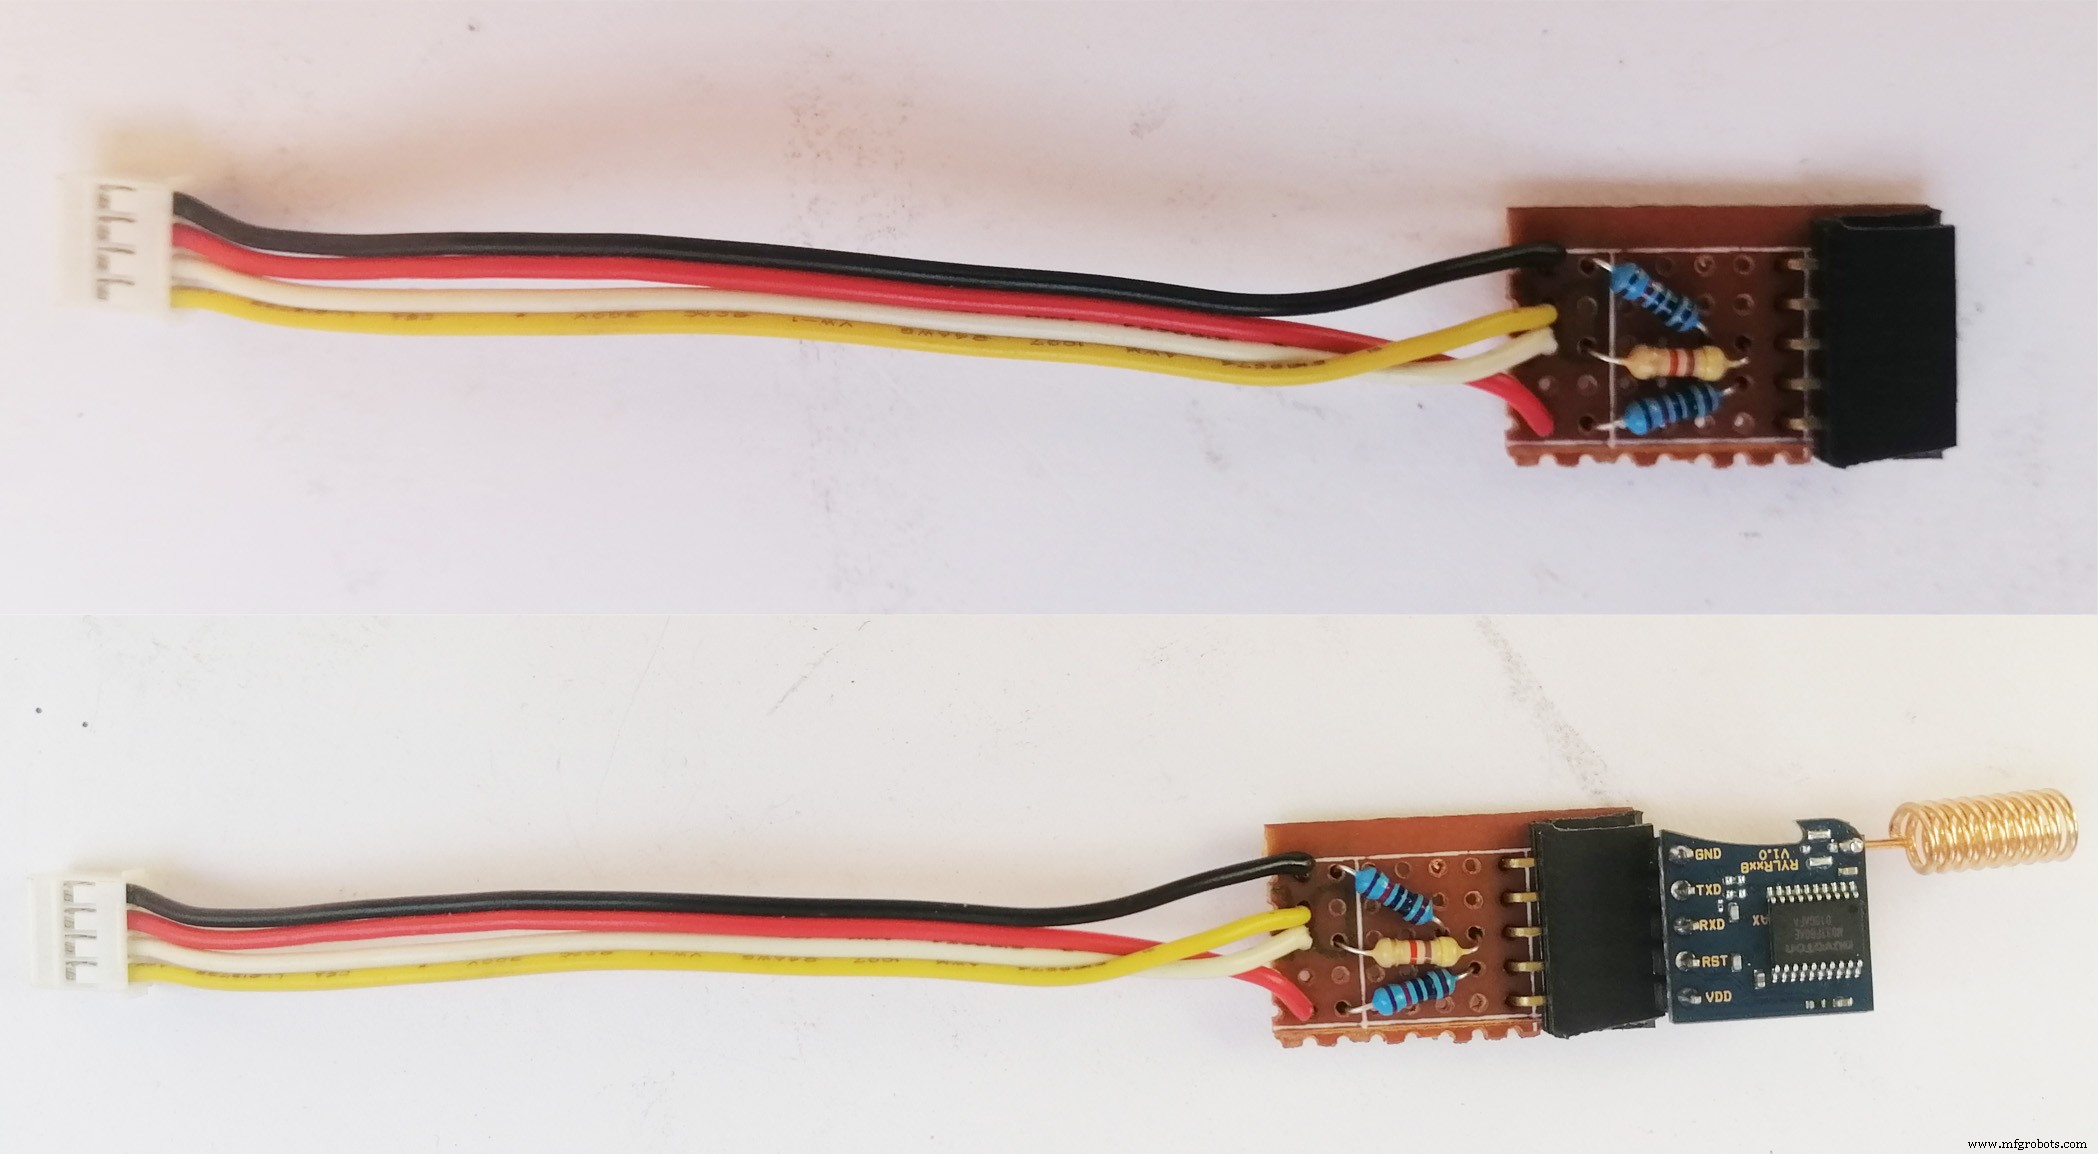
ただし、モジュールをベースシールドに接続する前に、ベースシールドの電源ボタンが下の画像のように3.3Vの位置にあることを確認してください。
<図>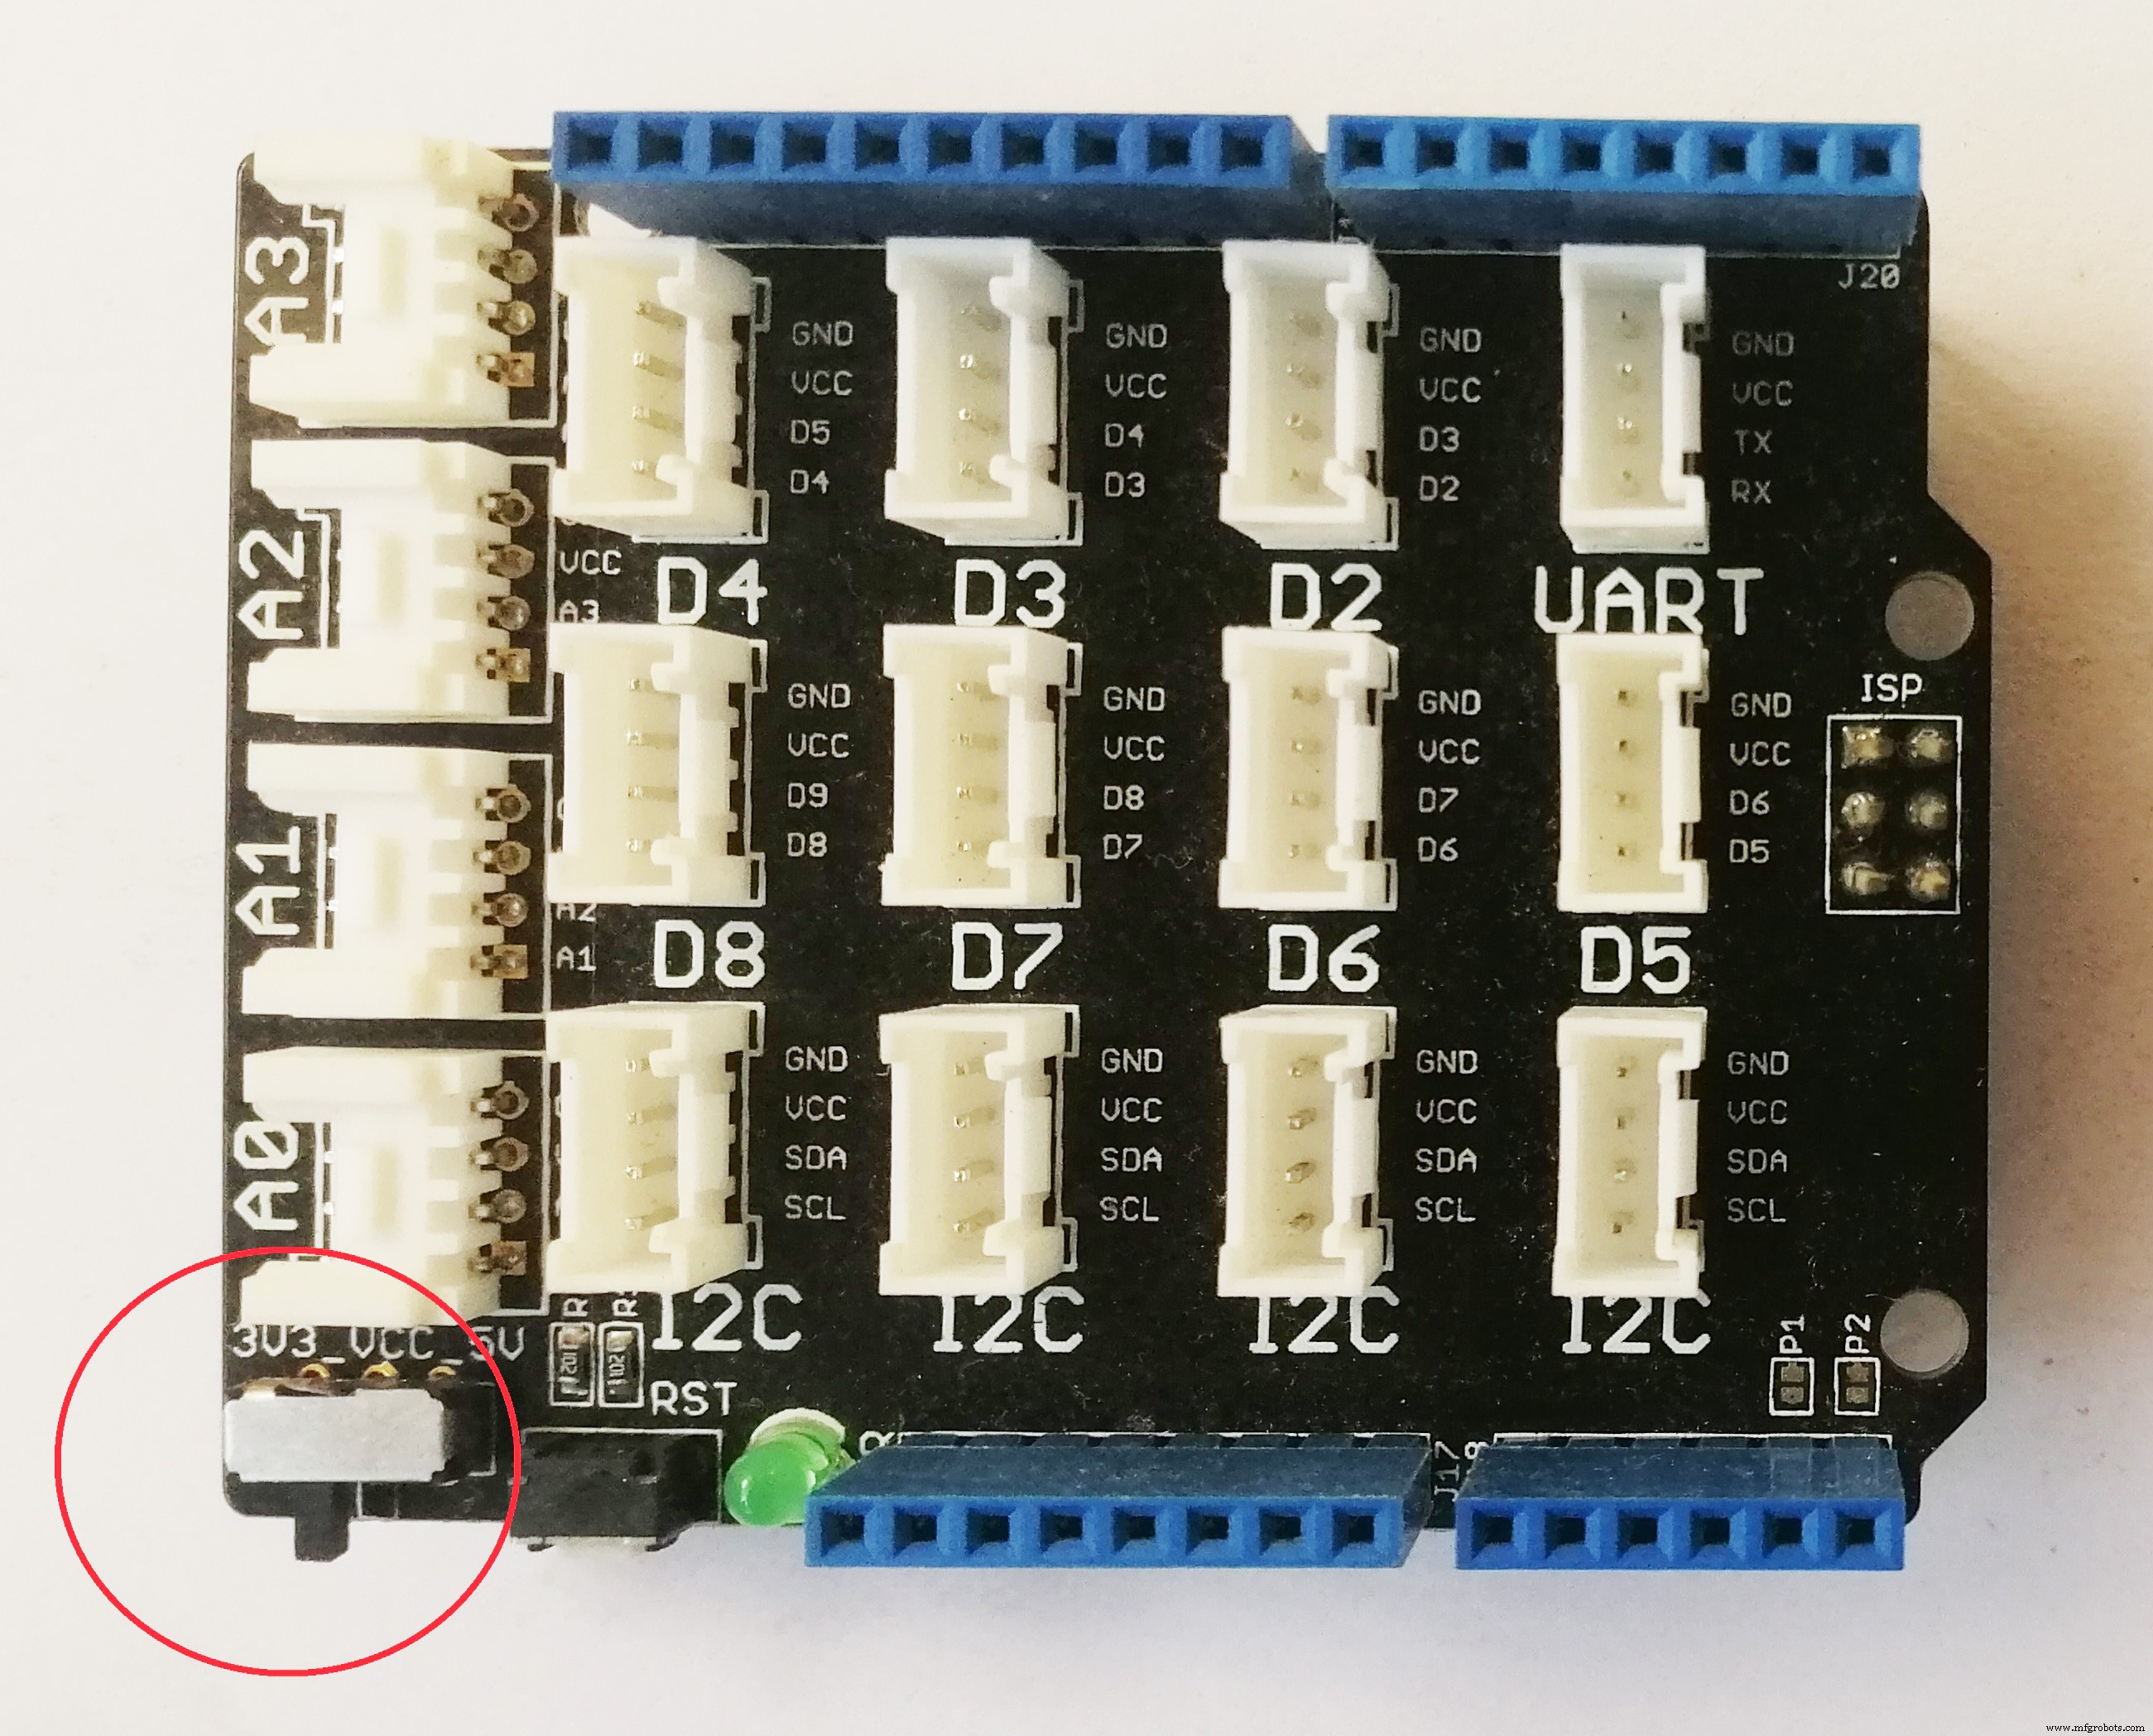
LoRaモジュールをベースシールドに接続した後、ArduinoからモジュールにATコマンドを送信してテストできます。
<図>
RYLR896LoRaトランシーバーを使用した通信
2つのLoRaモジュール間の通信を確立するには、アドレスによってお互いを見つけることができなければなりません。 LoRaエコシステムのアドレス指定スキームは、モジュールと実装に少し依存します。簡単に言えば、このモジュールを使用すると、ネットワークIDとアドレスを設定できます。同じネットワーク(同じネットワークID)上のモジュールは相互に通信できます。各モジュールは、ネットワーク内で一意のID(アドレス)を持つことになっています。モジュールのアドレスが0の場合、そのモジュールはネットワーク上のすべてのデバイスからデータを受信できます。
すべてのモジュールにはデフォルトの周波数、ネットワークID、およびアドレスが付属していますが、デフォルト値を変更する必要がある場合があります。上記のモジュールのデフォルトのネットワークIDは18で、アドレスは0です。
デモプロジェクトでは、現時点では何も変更する必要はありません。ただし、パラメータを変更する場合は、ATコマンドの詳細についてデータシートを確認してください。
<図>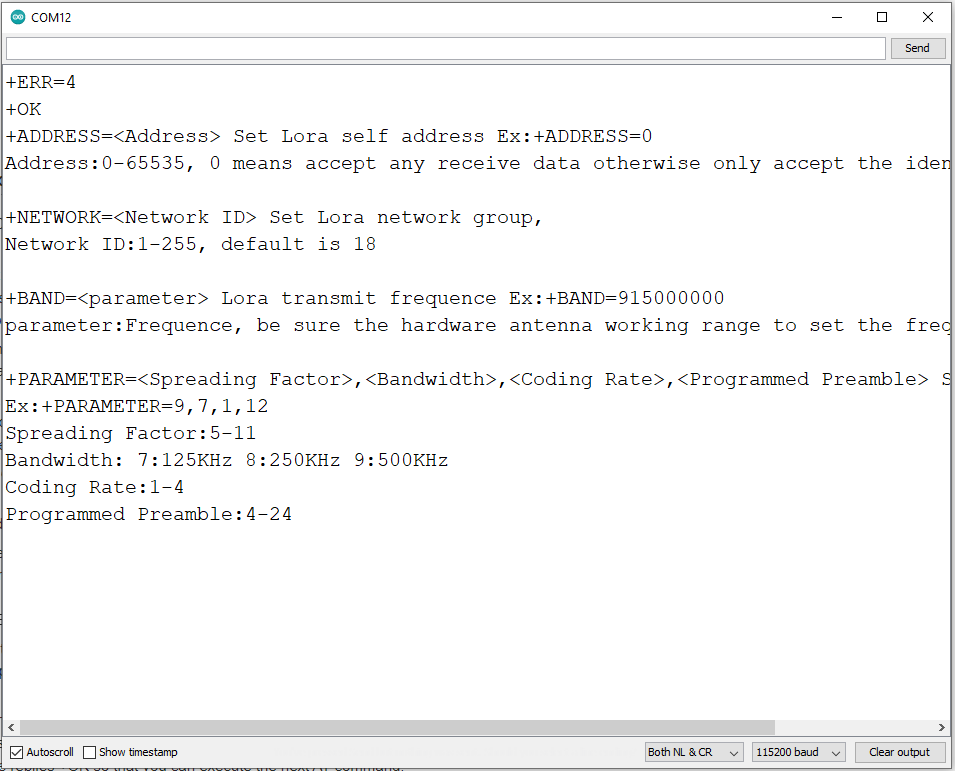
メッセージ(HELLO RECEIVER!)を送信するには、コマンド「AT + SEND =0、15、HELLORECEIVER!」を送信する必要があります。モジュールのシリアル接続で。最初のパラメータ値「0」は、レシーバモジュールのアドレスです。次の値「15」は、送信される文字数/バイト数です。 3番目のパラメーター値は、送信されるメッセージ「HELLO RECEIVER!」(15文字)です。
センサーノードのコード
次のコードは、センサーノードがすべてのセンサーデータを収集してIoTゲートウェイに送信するために開発されました。
#include "AirQuality.h" //グローブエアクオリティライブラリ
#include "Arduino.h"
#include "DHT.h"
# define DHTPIN 4 //接続されているデジタルピンDHTセンサー
#define DHTTYPE DHT11 //センサーのモデルDHT11
DHT dht(DHTPIN、DHTTYPE);
AirQuality airqualitysensor;
int current_quality =-1;
const int sampleWindow =50; //サンプルウィンドウの幅(mS)(50 mS =20Hz)
unsignedintサンプル;
フロートノイズ;
フロート温度、湿度;
int airQuality;
// ---------------------------------------------- ----------------------------------------------
//セットアップ
// ------------------------------------------ -------------------------------------------------- -
void setup()
{
Serial.begin(115200); // loraのシリアル
airqualitysensor.init(14);
dht.begin();
}
// ----- -------------------------------------------------- -------------------------------------
//メインループ
/ / ------------------------------------------------- -------------------------------------------
void loop()
{
ノイズ=calculate_sound_in_db();
airQuality =calculate_air_quality();
calculate_temp_humid();
文字列温度=文字列(temp);
文字列の湿度=String(humid);
String sound =String(noise);
String air =String(airQuality);
文字列の値=String(temperature)+ "、" + String(humidity)+ "、" + String(sound)+ "、" + String(air);
String cmd ="AT + SEND =0、" + String (values.length())+ "、" + values; // AT + SEND =<アドレス>、<ペイロード長>、<データ>
Serial.println(cmd); // loraに送信
delay(15000);
}
//この関数はサウンドレベルをdB単位で計算します
floatcalculate_sound_in_db(){
unsigned long startMillis =millis(); //サンプルウィンドウの開始
float peakToPeak =0; //ピークツーピークレベル
unsigned int signalMax =0; //最小値
unsigned int signalMin =1024; //最大値
// 50mSのデータを収集します
while(millis()-startMillis
sample =analogRead(A1); //マイクから読み取り値を取得
if(sample <1024)//偽の読み取り値を破棄
{
if(sample> signalMax)
{
signalMax =sample; //最大レベルのみを保存します
}
else if(sample
signalMin =sample; //最小レベルのみを保存します
}
}
}
peakToPeak =signalMax --signalMin; // max --min =ピーク-ピーク振幅
//Serial.println(peakToPeak); //キャリブレーションされたデシベルを書き込みます
float db =map(peakToPeak、0,1000,48,120); //デシベル用に調整
//Serial.print(db); //キャリブレーションされたデシベルを書き込みます
//Serial.println("dB "); //単位を書き込む
return db;
}
intcalculate_air_quality(){
current_quality =airqualitysensor.slope();
/ *
if(current_quality> =0)//有効なデータが返された場合。
{
if(current_quality ==0)
Serial.println( "高汚染!強制信号アクティブ");
else if(current_quality ==1)
Serial.println( "高汚染!");
else if(current_quality ==2)
Serial.println( "低汚染! ! ");
else if(current_quality ==3)
Serial.println(" Fresh air ");
}
* /
return current_quality;
}
voidcalculate_temp_humid(){
//読み取り温度または湿度は約250ミリ秒かかります!
//センサーの読み取りも最大2秒古い場合があります '(その非常に遅いセンサー)
float h =dht.readHumidity();
//温度をCelsius(デフォルト)として読み取ります
float t =dht.readTemperature();
// C読み取りが失敗した場合は、早期に終了します(再試行します)。
if(isnan(h)|| isnan(t)){
//Serial.println("DHTセンサーからの読み取りに失敗しました! ");
return;
}
temp =t;
湿度=h;
/ *
Serial.print( "湿度:");
Serial.print(h);
Serial.print( "%\ t ");
Serial.print(" Temperature: ");
Serial.print(t);
Serial.print(" * C ");
* /
}
//空気品質センサーの割り込みサービスルーチン
ISR(TIMER1_OVF_vect)
{
if(airqualitysensor.counter ==61)// set検出された湿度として2秒
{
airqualitysensor.last_vol =airqualitysensor.first_vol;
airqualitysensor.first_vol =analogRead(A0);
airqualitysensor.counter =0;
airqualitysensor.timer_index =1;
PORTB =PORTB ^ 0x20;
}
else
{
airqualitysensor.counter ++;
}
} コードは15秒ごとにセンサーデータを送信します。要件に応じてタイミングを変更してください。
アップロードとテスト
次に、すべてのセンサーを接続し、上記のコードをアップロードして、シリアルモニターでテストします。ソースファイルはコードセクションに添付されています。
<図>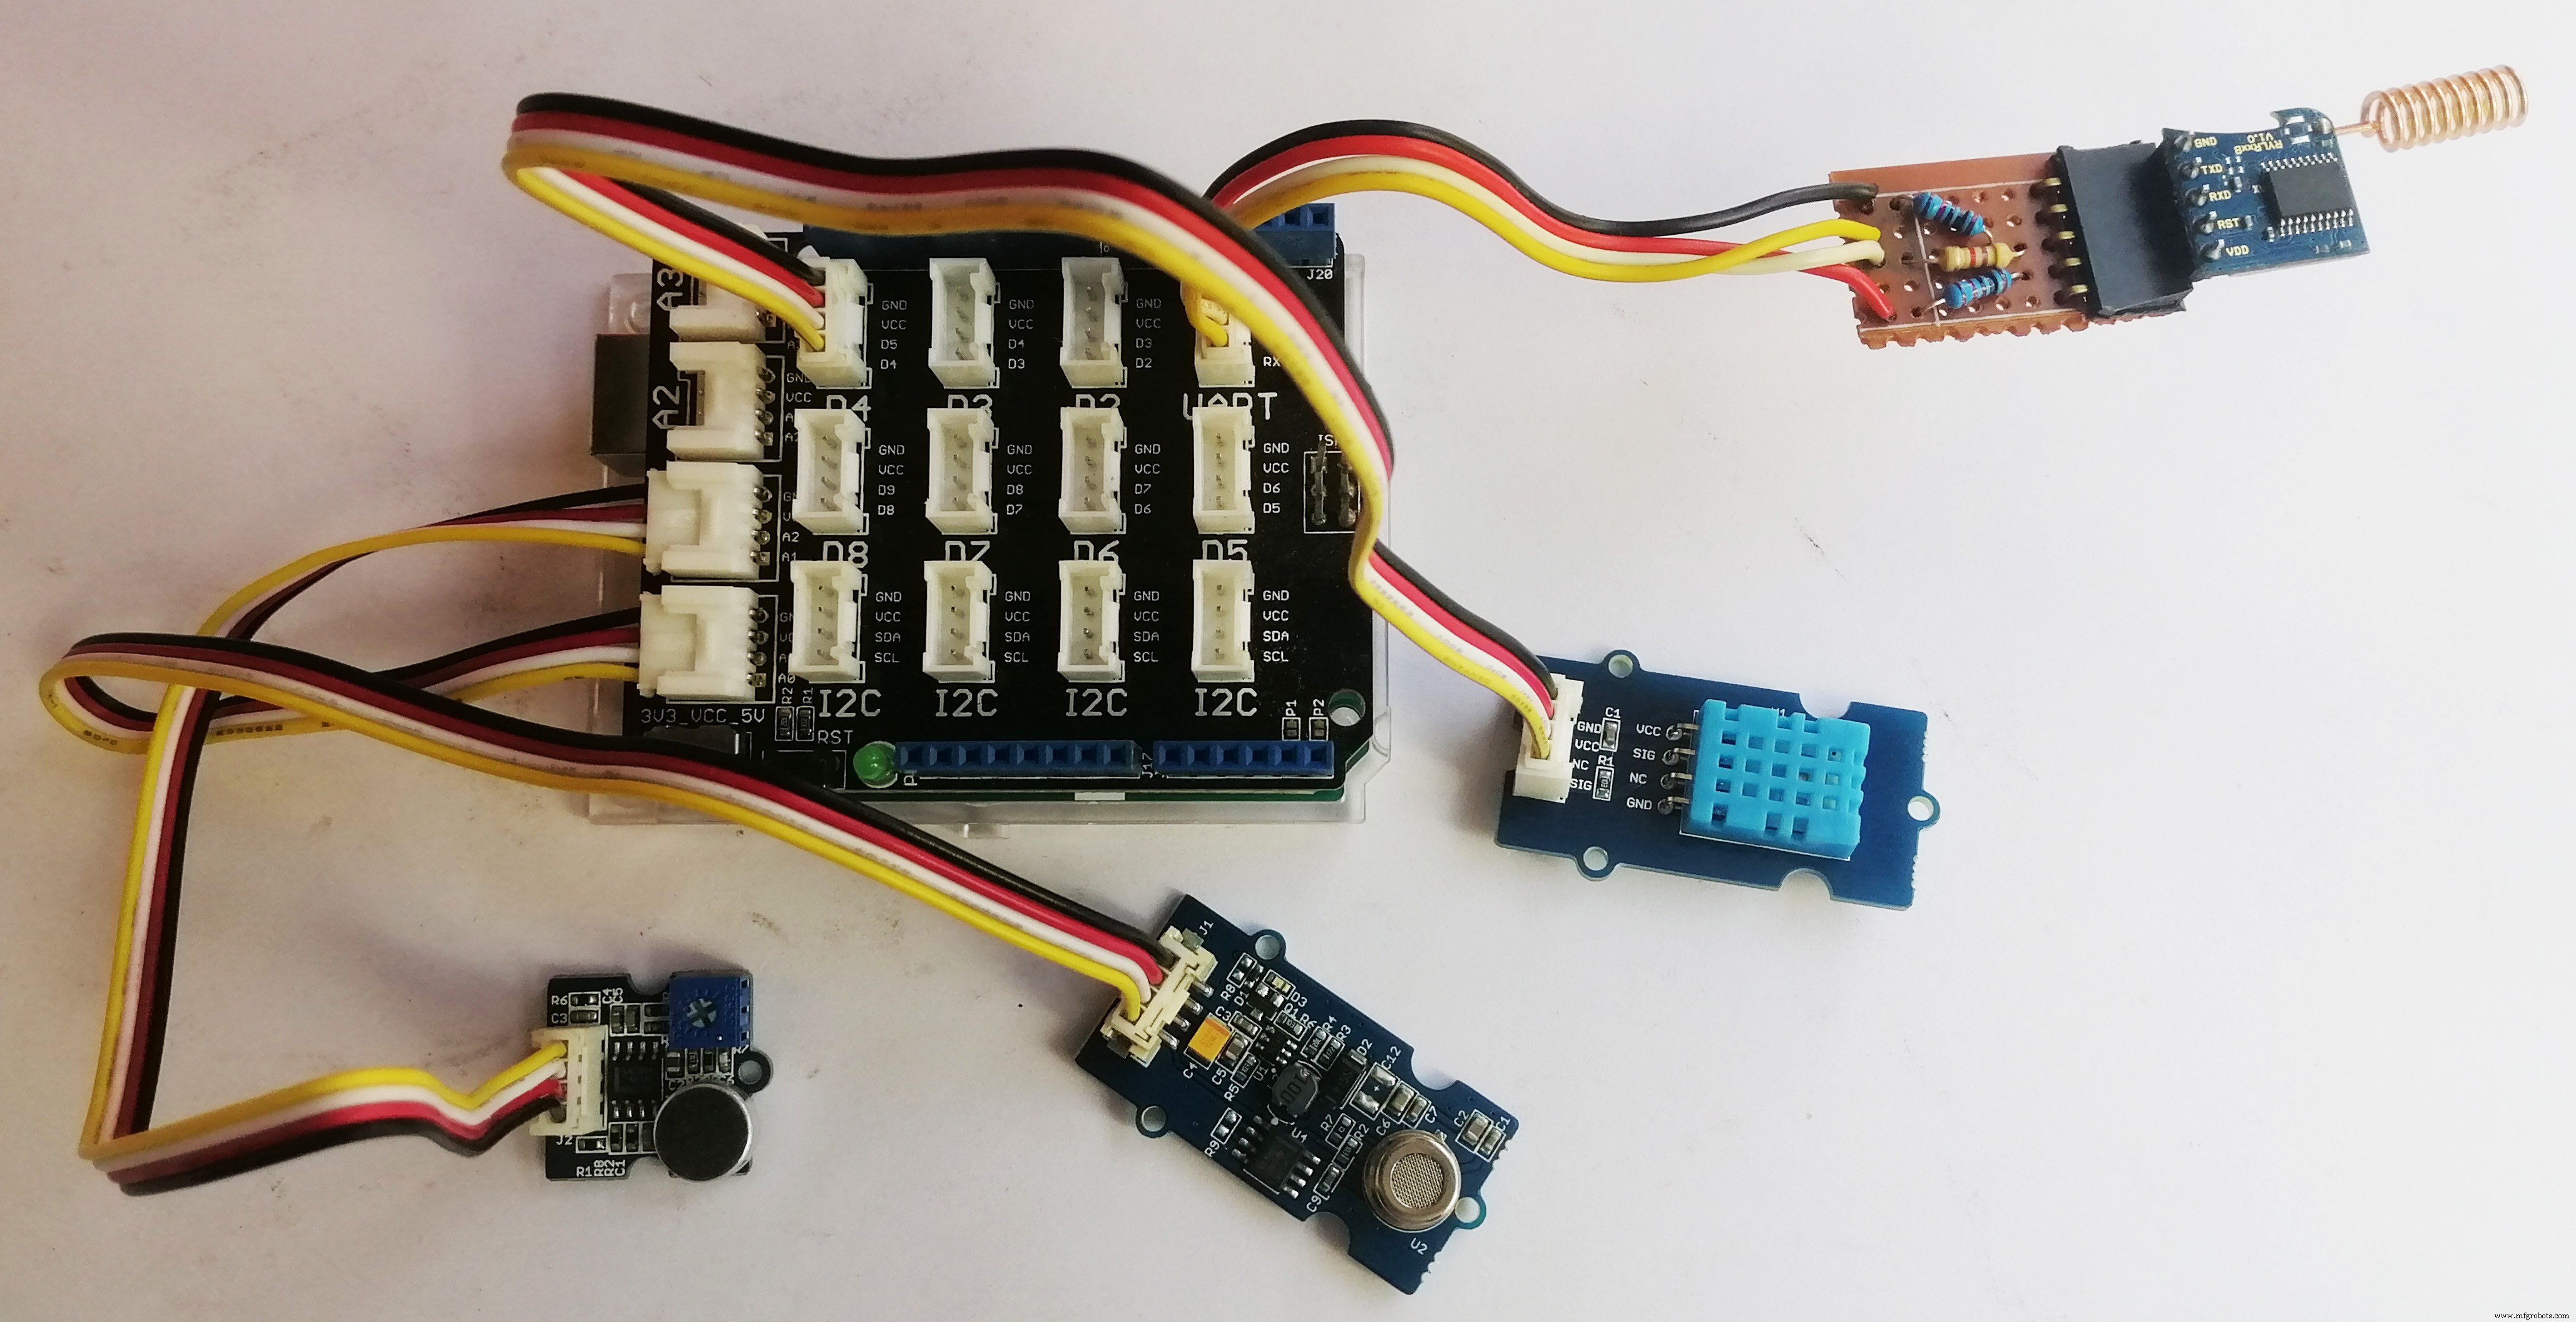 <図>
<図> 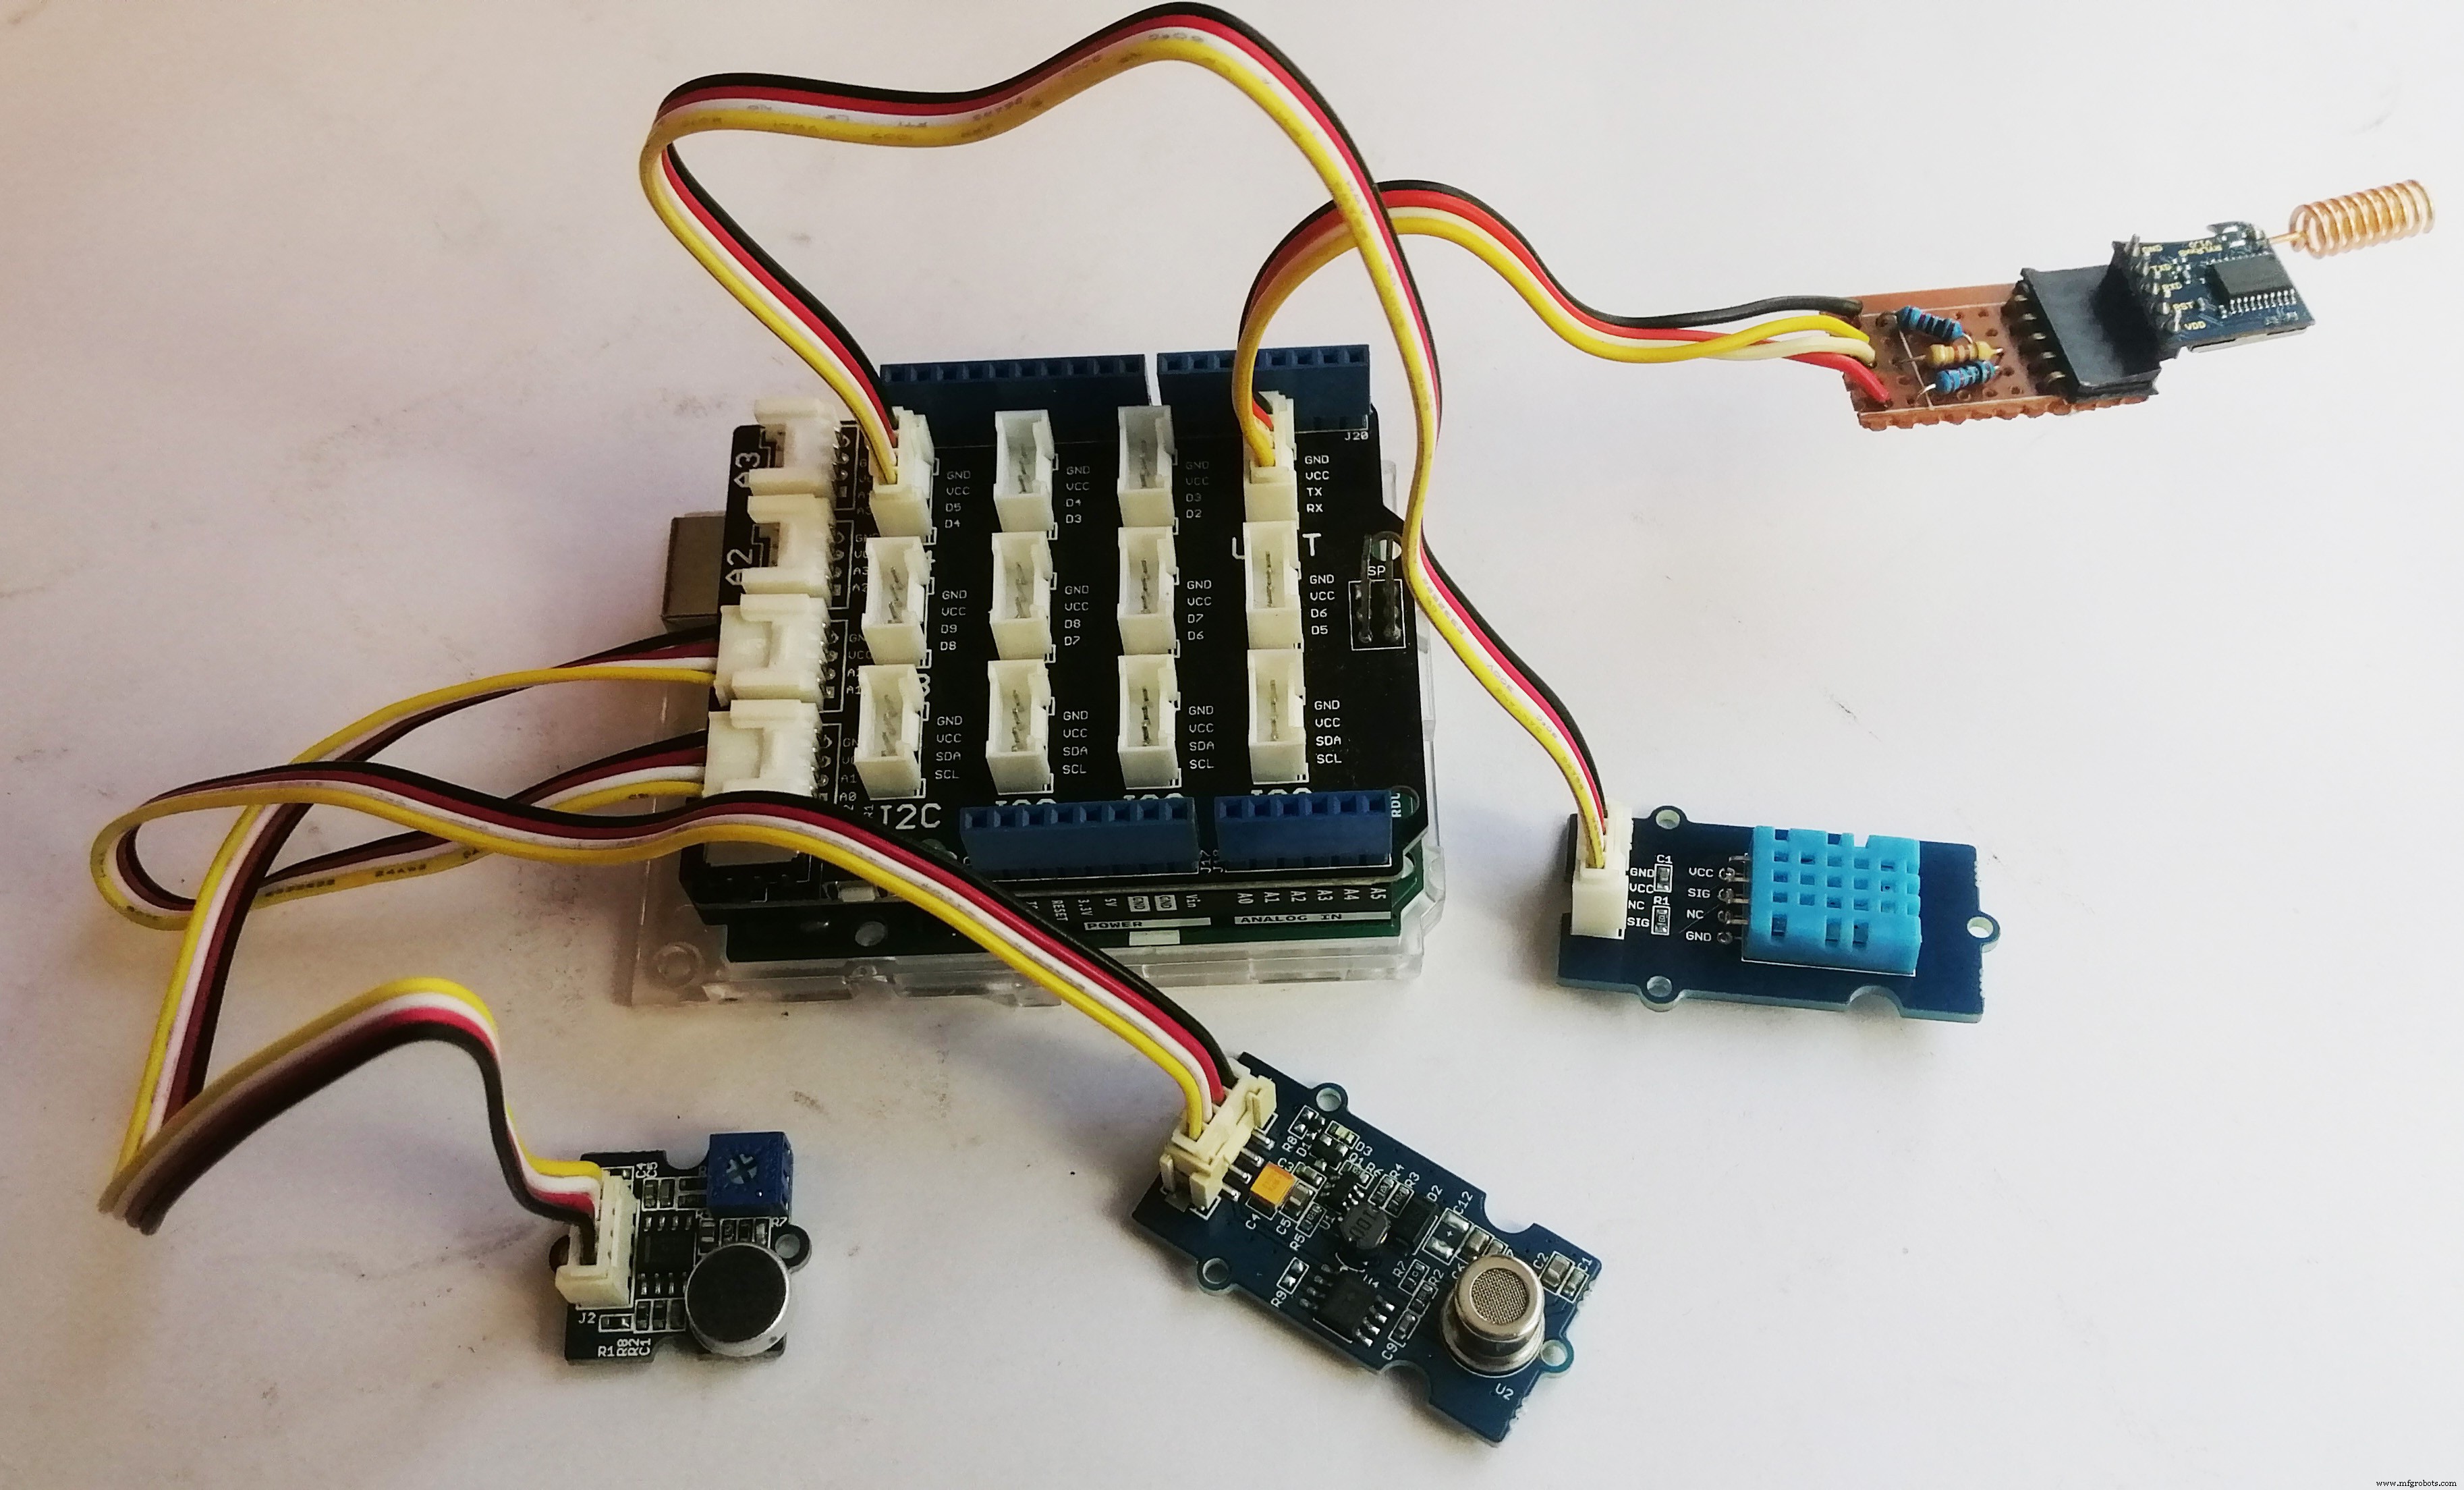
ボックス内にコンポーネントを配置する
次に、すべてのセンサーとバッテリーをボックス内に配置します。まず、添付ファイルセクションに添付されている2つのSTLファイルを3Dプリントします。印刷された画像は次の画像のように見えます。
<図> <図>
<図> 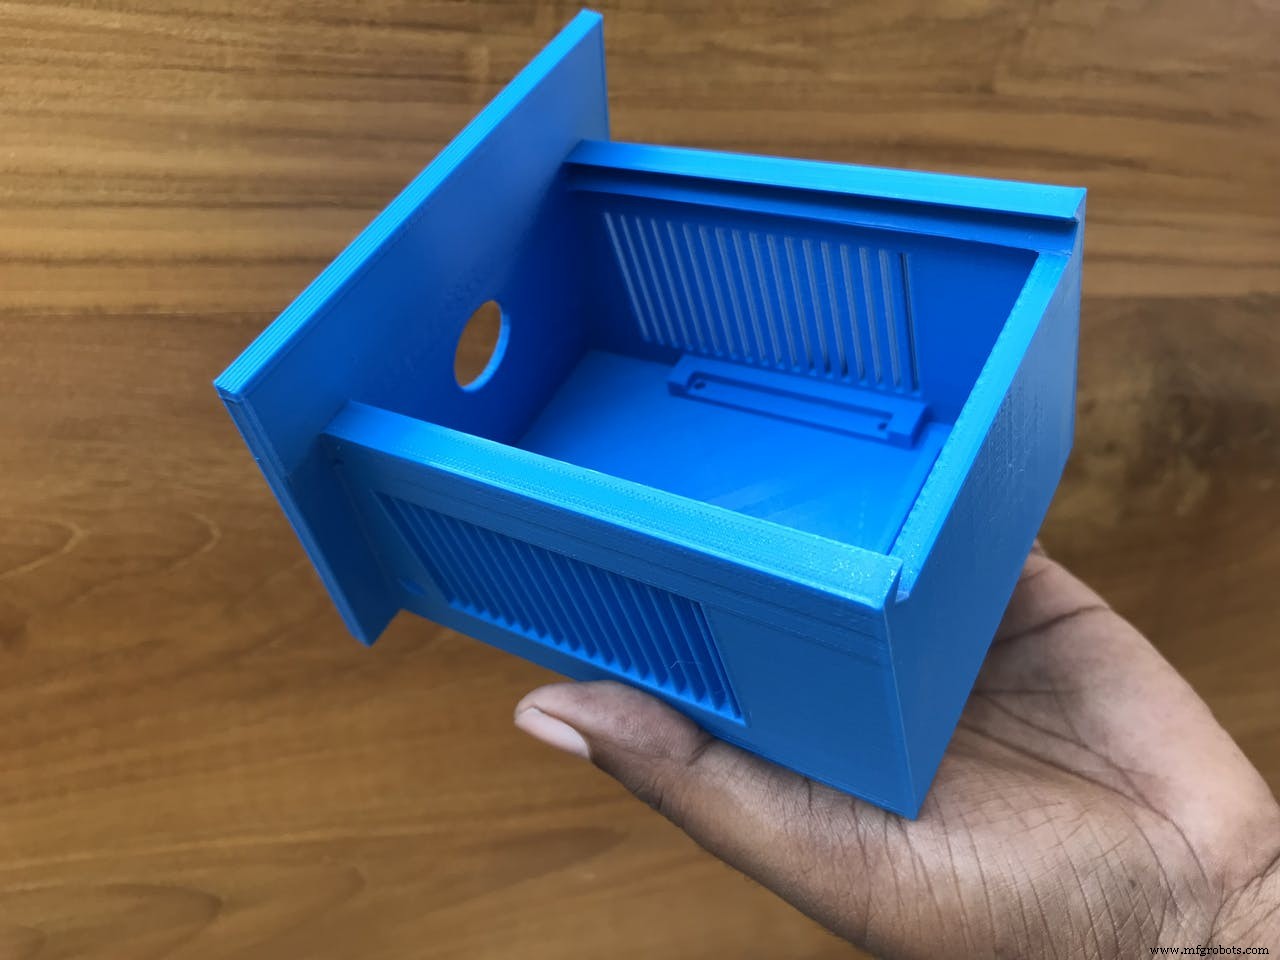 <図>
<図> 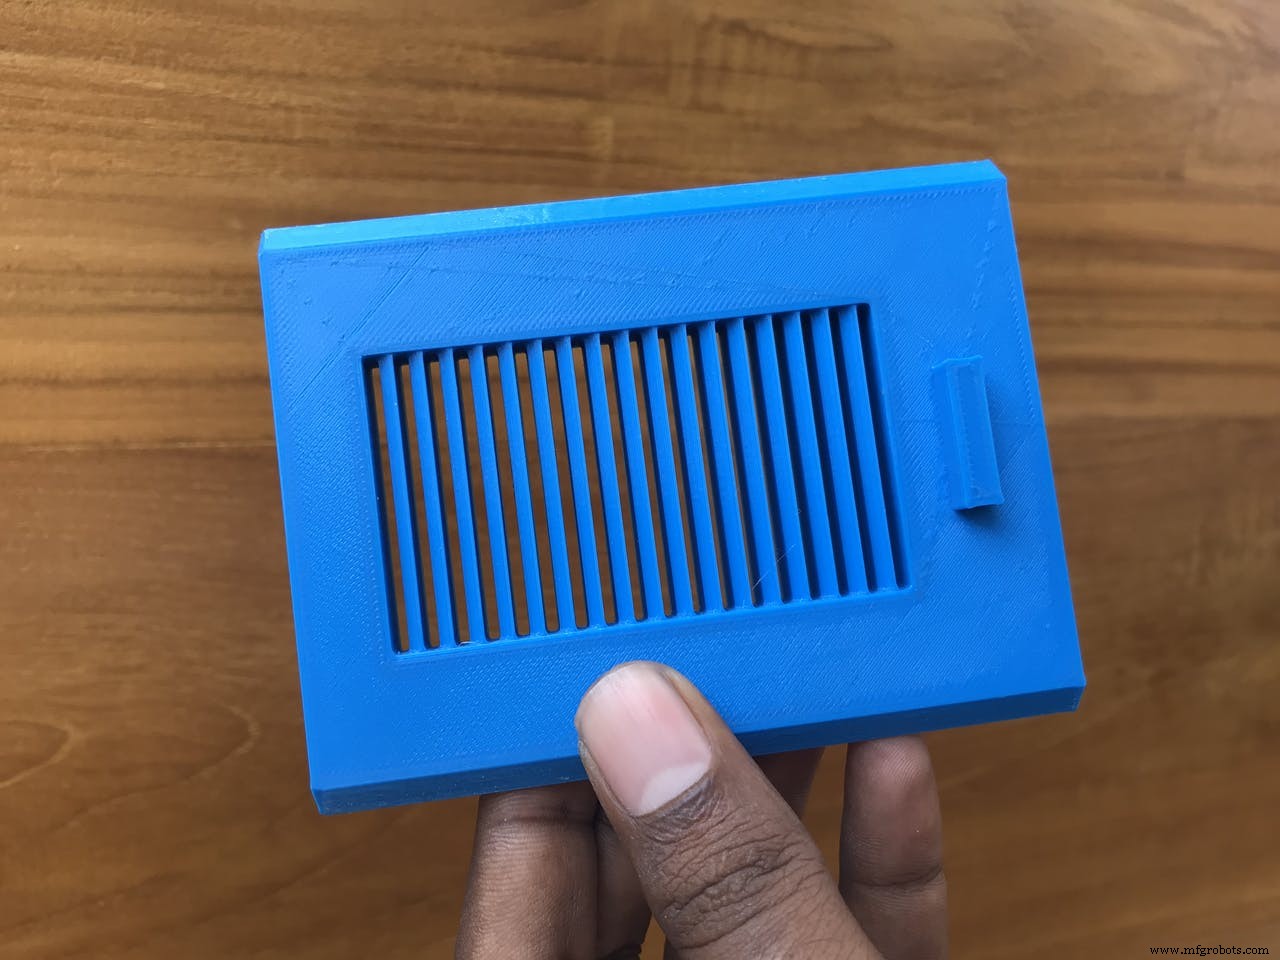
完全なボックスは次のようになります。プリンタの品質に基づいて送信ベースが必要になる場合があります。
<図>
ボックスを準備した後、最初にボックスの上部にソーラーパネルを取り付けました。ボックス内の接続ワイヤを上部の穴に通します。
<図>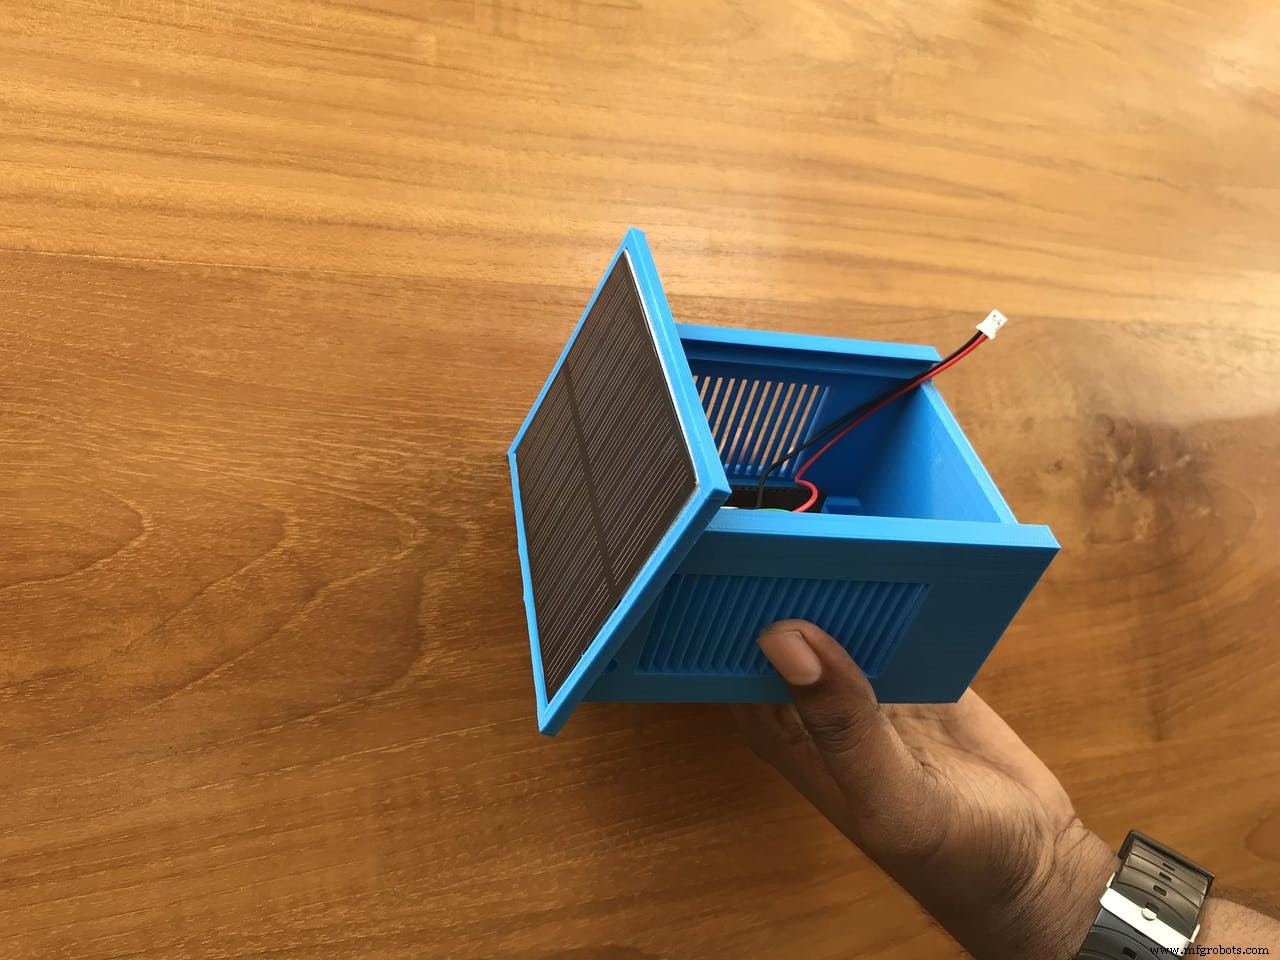 <図>
<図> 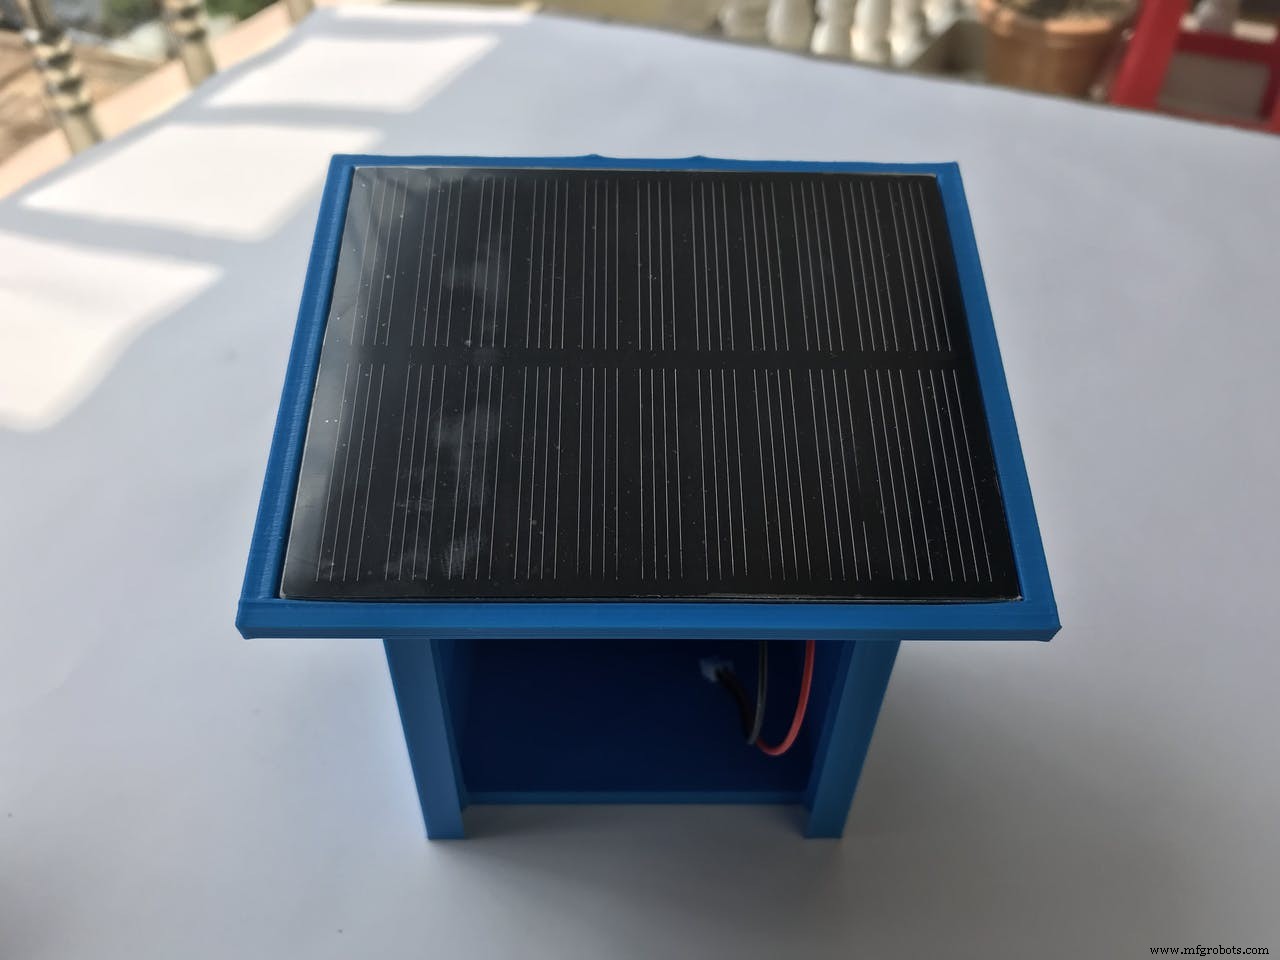
次に、ベースシールドが取り付けられたArduinoを、最初にホットグールまたは両面テープで配置します。他のセンサーを1つずつ配置し、ホットグルーを使用して固定された場所に取り付けます。
<図>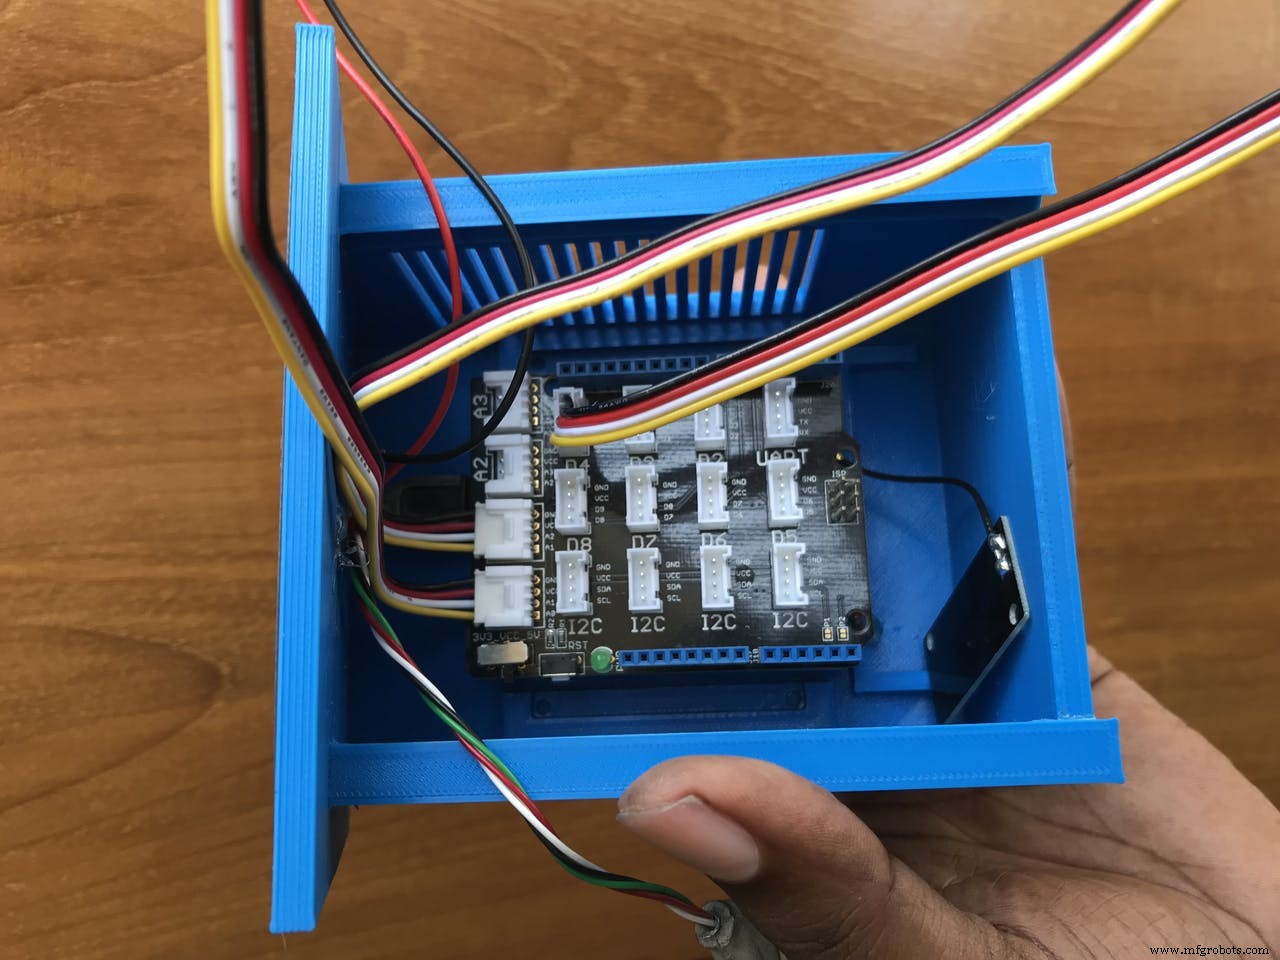 <図>
<図> 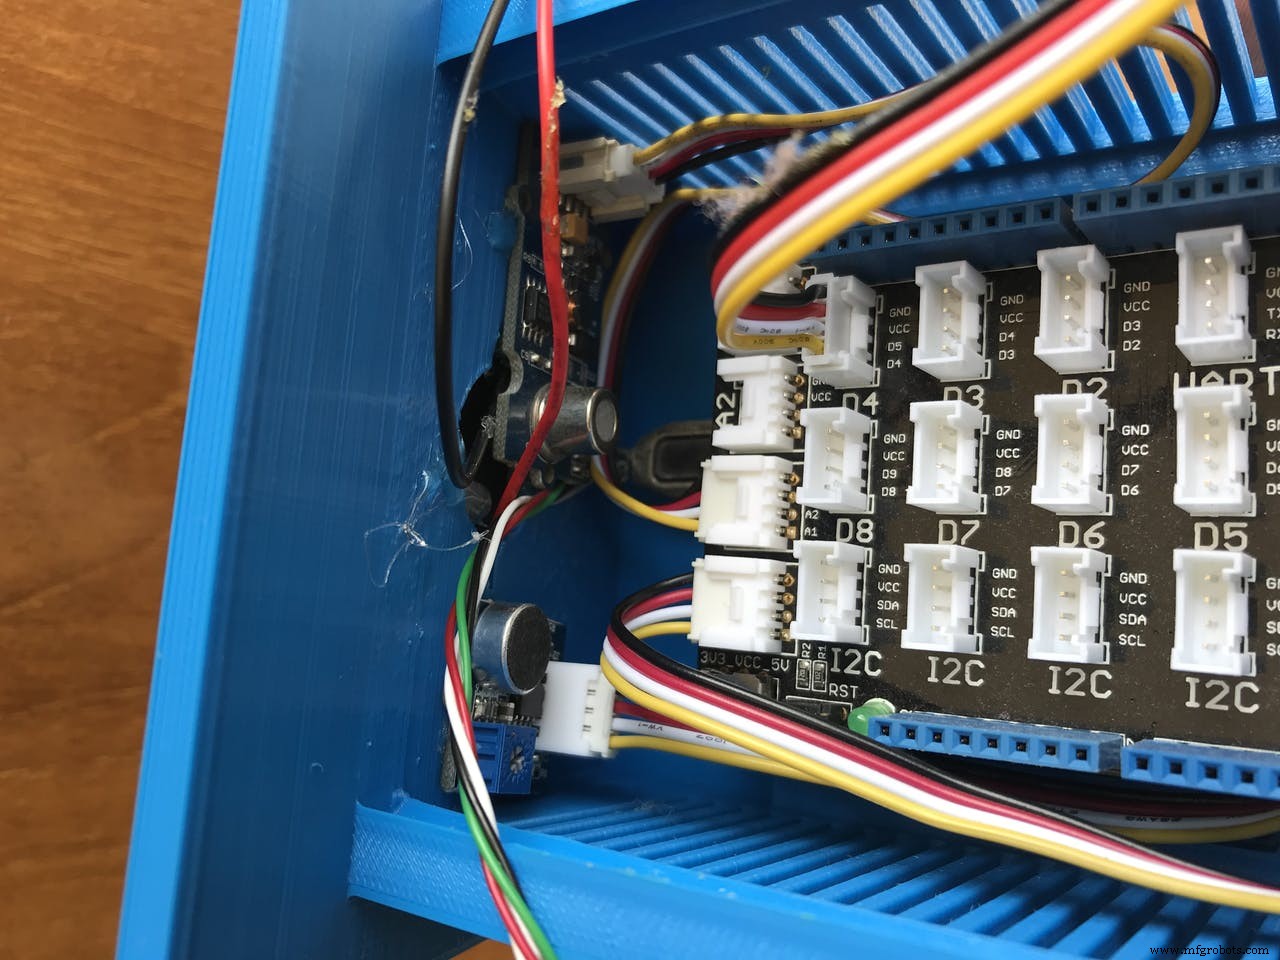 <図>
<図> 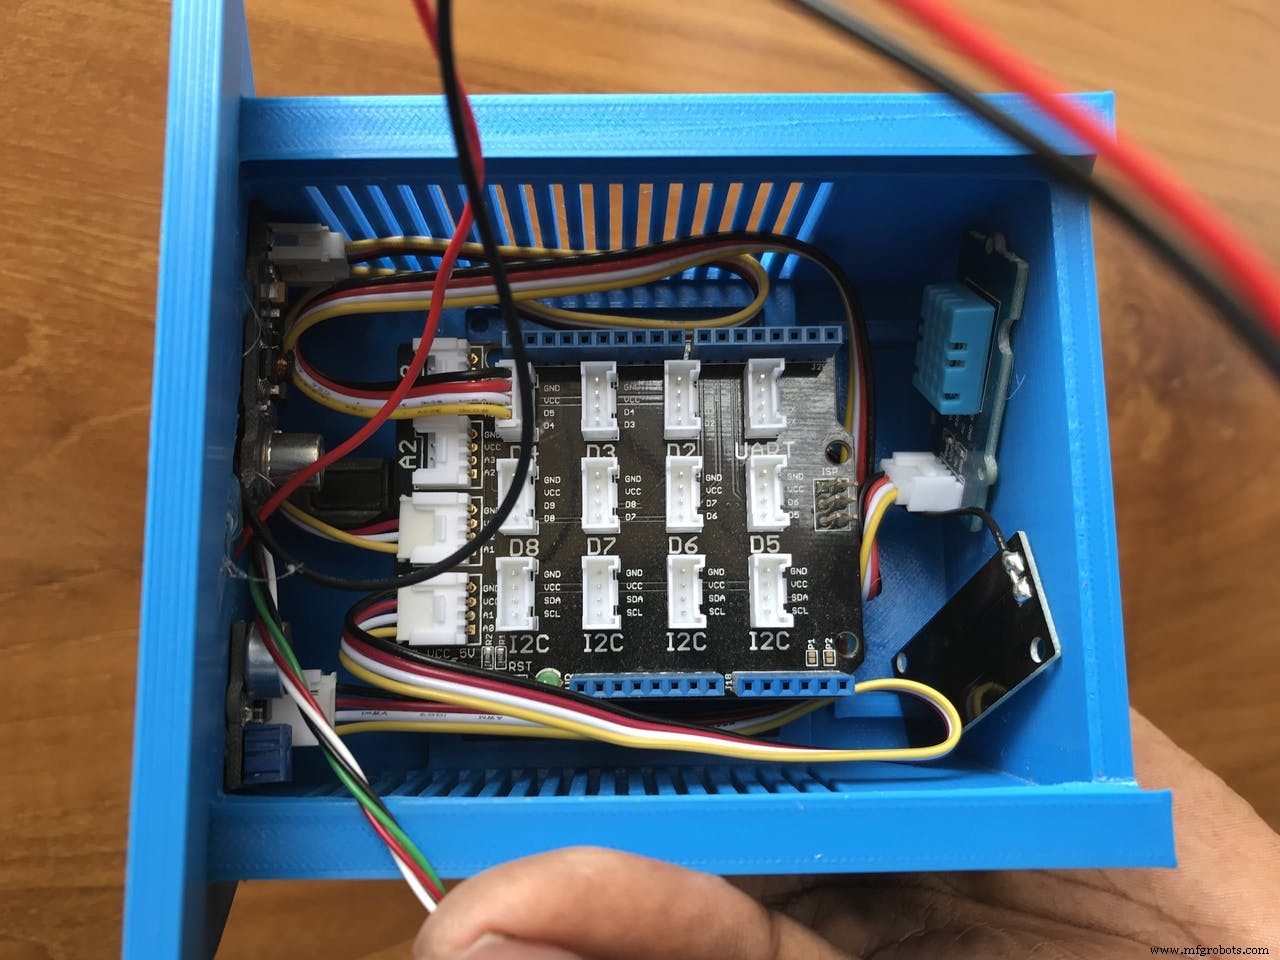
バッテリーとliporider proを配置し、最後にLoRaモジュールを追加します。
<図>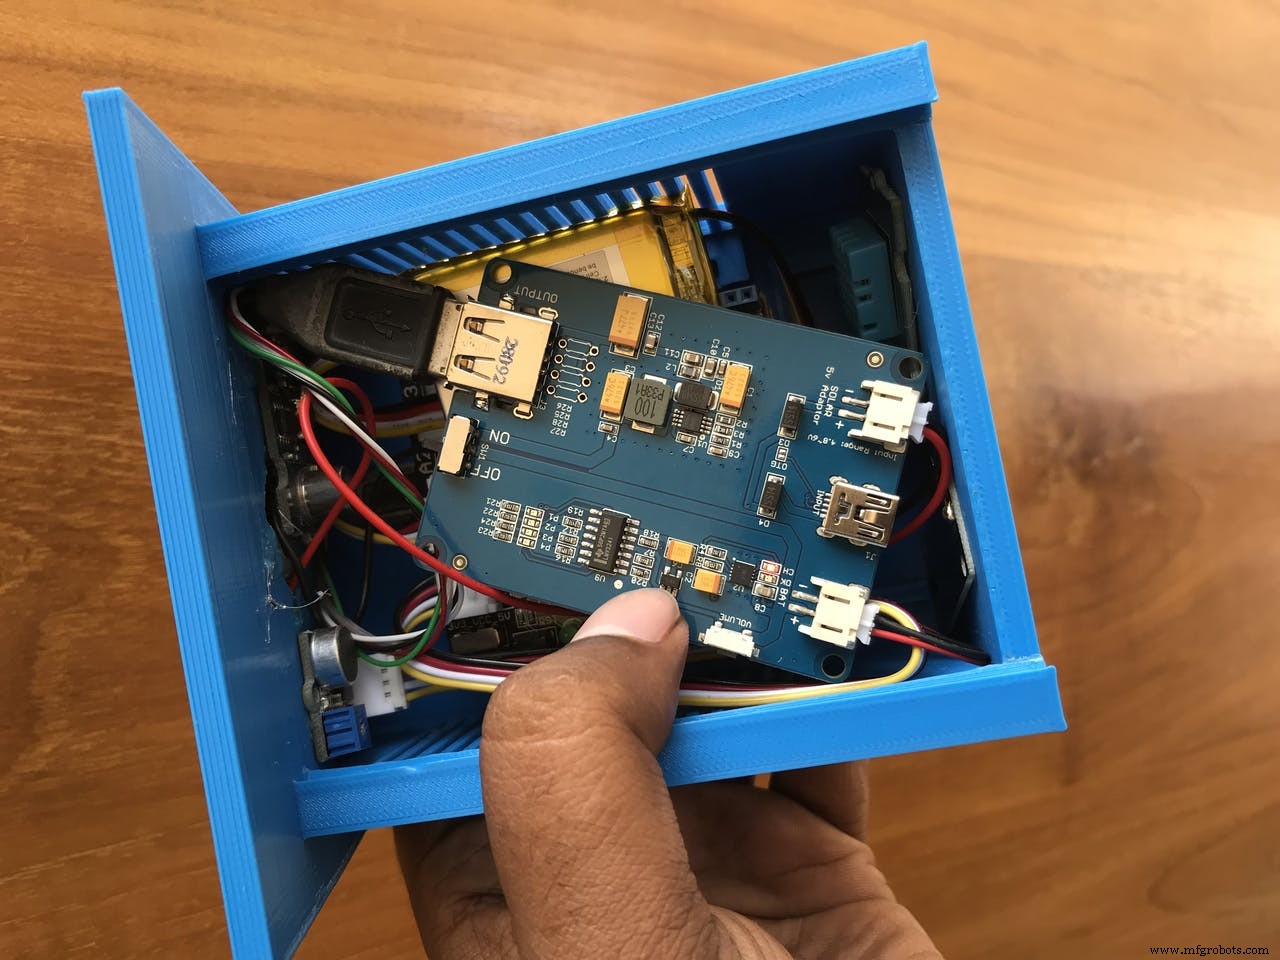
センサーノードをデプロイする準備ができました。
<図>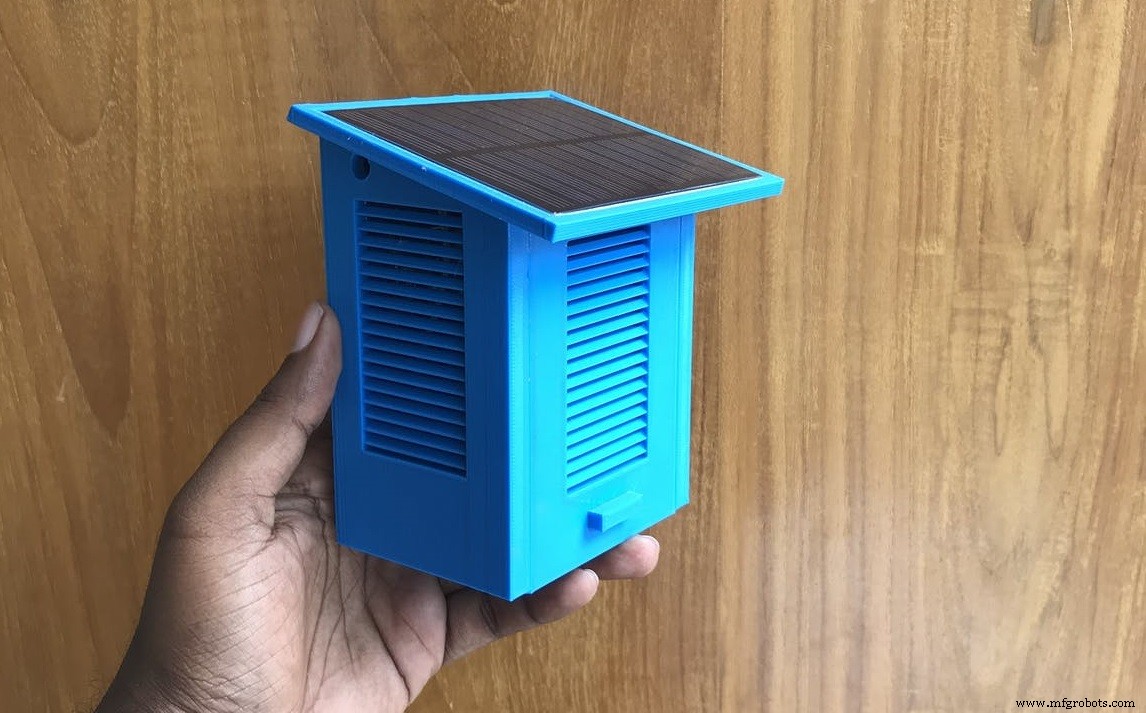
Grandeurの構成
Grandeurは、仮想デバイスとユーザーのペアが作成されるIoTデバイスにバックエンドサービスを提供します。デバイスモデルは、作成時に、読み取りと書き込みが可能なさまざまな変数(温度、湿度、noise_level、air_quality)を含むJSONオブジェクトとして記述されます。 Grandeur Canvasは、グラフィカルウィジェットを使用してペアリングされたデバイスのデバイス状態を視覚化するために使用できるWebアプリです。
Grandeurを使用するには、アカウントを作成し、プラットフォームでいくつかの重要な構成を行う必要があります。彼らのウェブサイトをチェックしてください https://grandeur.dev/ ゲームに参加します。
1. rootアカウントにログインした後、新しいプロジェクトを作成します :
<図>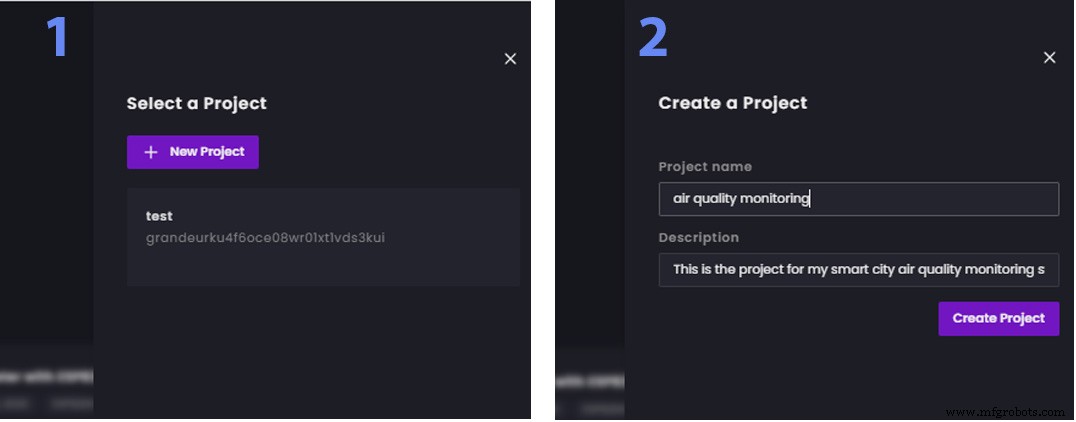
2. 新しいユーザーアカウントを作成します アカウントの追加から [ホーム]タブまたは[アカウント]タブからのオプション。後で、今作成したメールアドレスとパスワードを使用してアプリにサインインします。これはGrandeurのもう1つの優れた機能です。複数のユーザーがメールアドレスとパスワードでログインすることでアプリを使用できます 。各ユーザーは自分のデバイスをペアリングでき、1人のユーザーがペアリングしたデバイスは他のユーザーが使用できなくなります。認証はGrandeurの中核に構築されています。ユーザーの作成を以下に示します:
<図>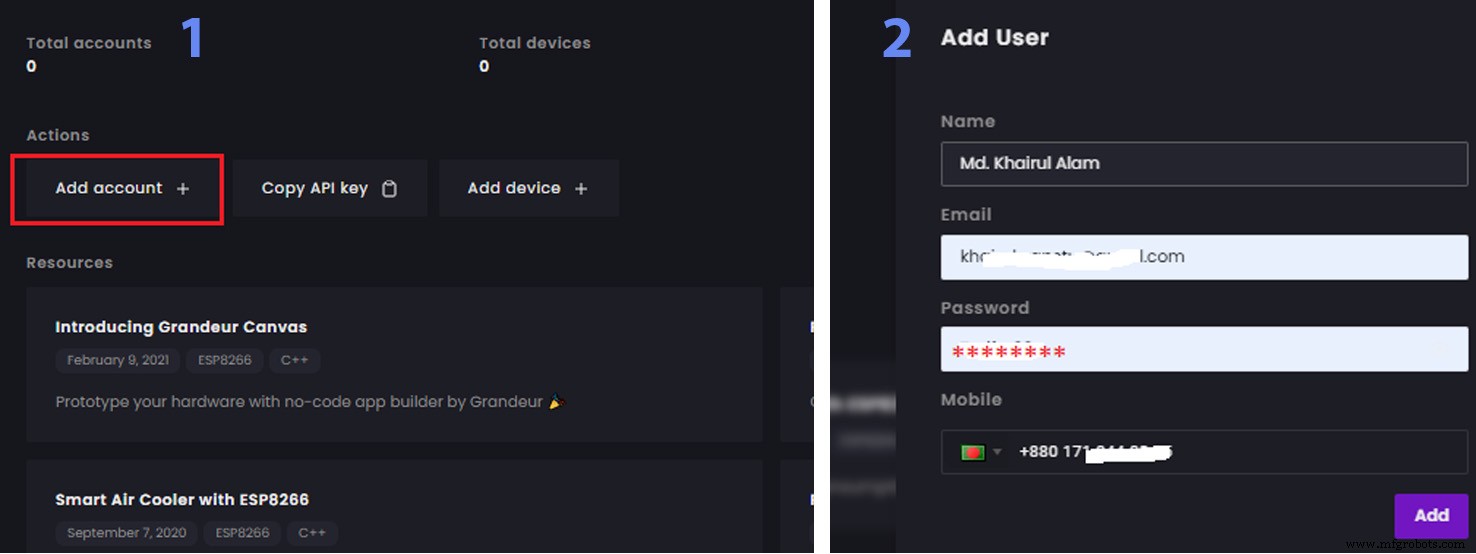
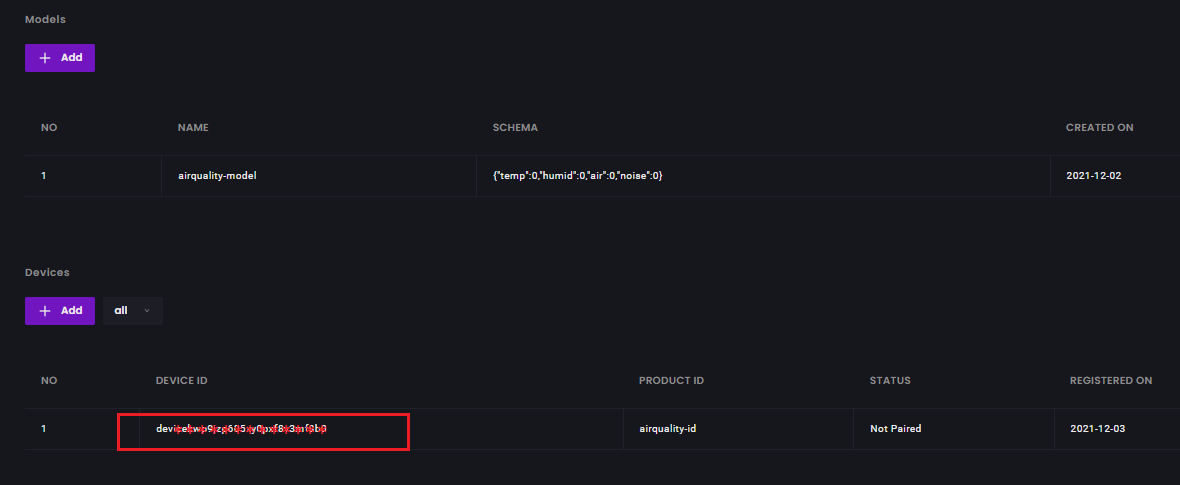
3.次に、新しいデバイスを作成します [デバイス]タブから。この操作により、ハードウェアのコードを作成するときに使用する新しい一意のデバイスIDが生成されます。このデバイスIDは、APIを使用してGrandureに接続するために必要です。デバイスを作成すると、accessTokenも生成されます。 コピーすることを忘れないでください。ハードウェアコードで使用され、ダイアログを閉じた後はアクセスできなくなります 。次の手順を使用してデバイスを追加する前に、デバイスモデルを追加する必要があります。デバイスモデルは、デバイスとの間で通信できる変数を記述するために使用されます。
<図>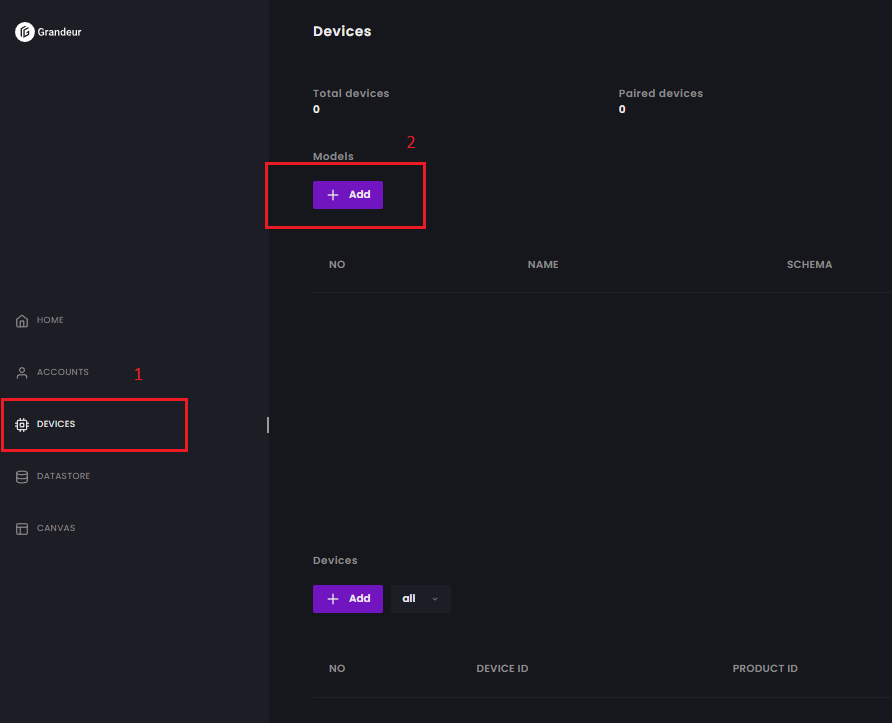
モデルから追加をクリックします モデル名を付けます。スキーマにすべての変数(この場合は4)をJSON形式で配置します。この時点で値0を保持します。これらの変数は、デバイスノードからデータを送信するときに自動的に更新されます。
{"temp":0、 "humid":0、 "air":0、 "noise":0} <図> 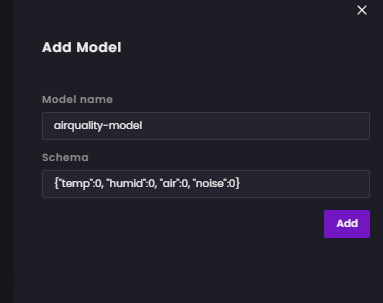
スキーマを配置した後、[追加]をクリックします。
<図>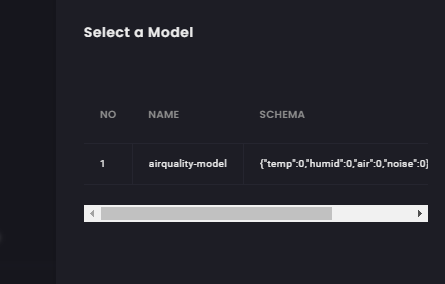
デバイスモデルを追加したら、[デバイスから追加]オプションをクリックし、作成したモデルを選択して、モデルをデバイスにリンクします。
<図>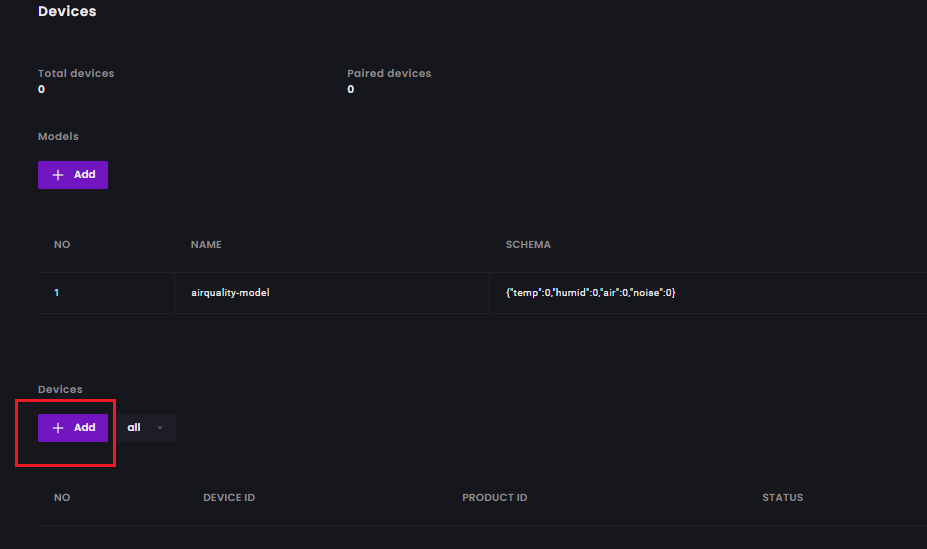
<図>
デバイスIDを指定し、クリックして登録します。
<図>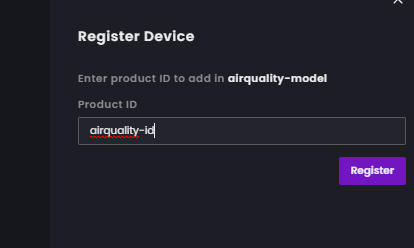
アクセストークンをコピーすると、ハードウェアコードで使用され、ダイアログを閉じた後はアクセスできなくなります。
<図>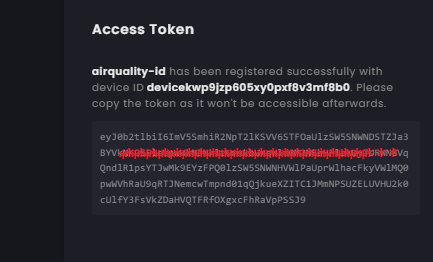
デバイスが正常に作成され、デバイスIDも書き留めます。コーディングにも必要になります。
<図>
<図>
デバイスとペアリングされていない限り、ユーザーはデバイスを操作できません。 デバイスをペアリングするには2つの方法があります :1)クラウドダッシュボードを使用するか、2) pairDevice()を使用してWebアプリを使用する デバイスAPIの機能。この2番目の方法は、生産の観点から見ると非常に重要です。これでハードウェア製品を出荷できるようになり、ユーザーはアプリにサインインして、ハードウェアをペアリングすることでハードウェアの所有権を宣言できます。クラウドダッシュボードを使用してデバイスをユーザーとペアリングする方法は次のとおりです。
デバイスをペアリングするには、[ペアリング]をクリックしてアカウントを選択します。次のステップに進む準備ができています。
<図>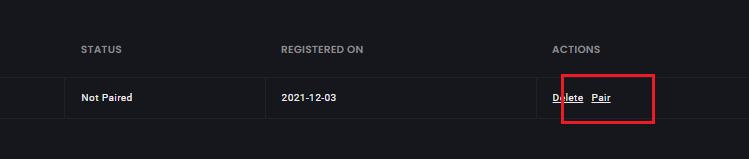
<図>

4.ここでキャンバスを作成します。
ダッシュボードの左側のメニューで、キャンバスをクリックするか、https://canvas.grandeur.techにアクセスします。 Canvasに初めてアクセスする場合は、承認 ボタンが表示されます。承認により、Canvasはプロジェクトのユーザーとデバイスにアクセスできます。 [承認]ボタンをクリックすると、Grandeurダッシュボードにリダイレクトされ、Canvasにバインドするプロジェクトを選択するように求められます。
グラフウィジェットを選択してクリックします。 [構成]メニューが表示されたら、クリックして構成してグラフのタイトルを付け、このグラフに値を表示する変数を設定します。
<図>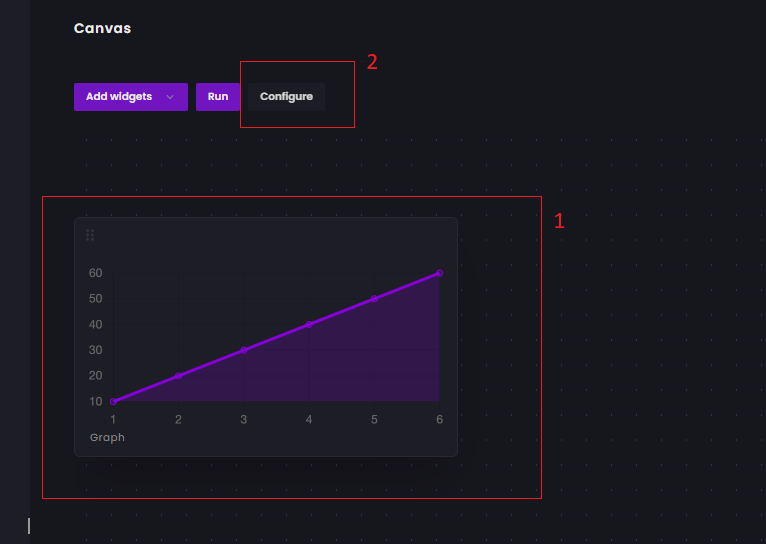
クリックして保存します。
<図>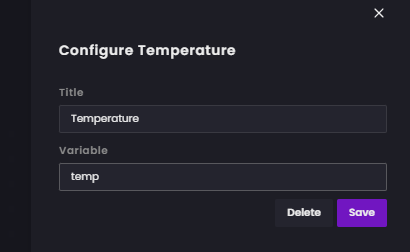
同じ手順に従って、4つの変数に4つのグラフウィジェットを追加します。
<図>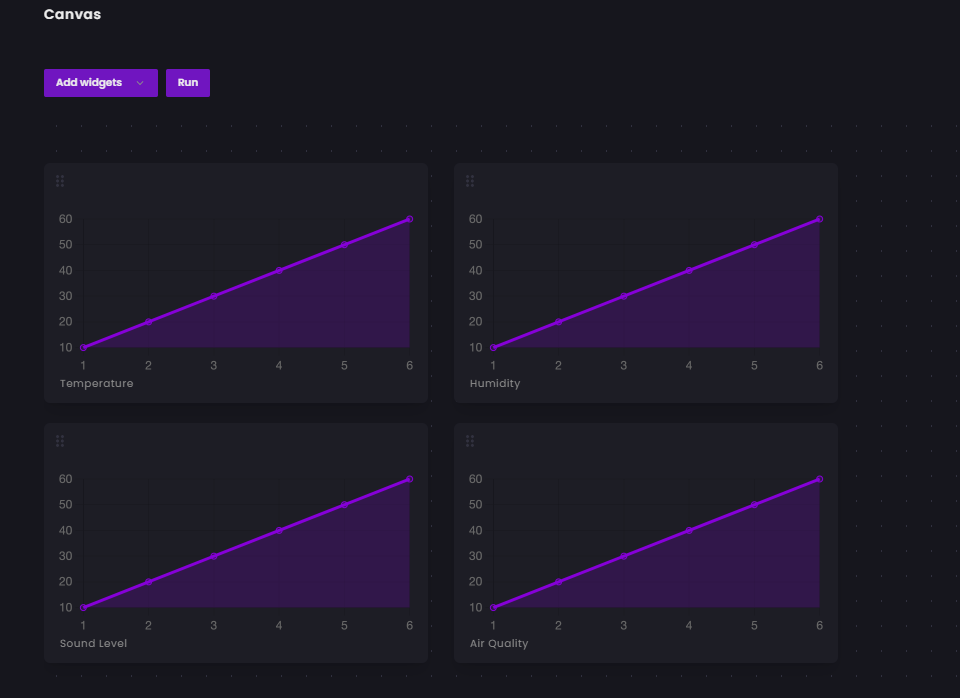
After connecting Canvas to your project, you may see a login screen. You need to log in here as a user of your project that you created earlier, for which you need to create a user account in your project. You can do that by visiting accounts page of the dashboard. Then you can log in to Canvas by using the credentials of this new user.
Preparing IoT LoRa Gateway
In a simple way, an IoT Gateway is like home or office network router or gateway that connects sensors, IoT modules, and smart devices to the cloud. Such a gateway facilitates communication between your devices, maintains security, and provides an admin interface where you can perform basic functions.
A true IoT gateway contains communication technologies connecting end-devices (sensors, actuators, or more complex devices) and backend platforms (data, device, and subscriber management) to the gateway. It has a computing platform allowing pre-installed or user-defined applications to manage data (for routing and computing at the edge), devices, security, communication, and other aspects of the gateway.
Raspberry Pi can be a good option for a gateway with lots of flexibility but to keep it simple I am using Node MCU as a gateway for this project. Node MCU will receive the data from the LoRa module using UART. Then using Arduino SDK we will upload the data to the Grandeur cloud platform.
<図>
Firmware for the Gateway
The following code was developed for the gateway using Arduino SDK provided by Grandeur cloud. Data is received in string form from the LoRa using the UART port. Then the received data is processed to separate the individual variable from the comma-separated string value. The values are then sent to Grandeur using WiFi. The following function was used to separate the variables.
void process_received_data(){

 start_pos =inputString.indexOf(start_val);
 end_pos =inputString.indexOf(end_val);
 String data_string =inputString.substring(start_pos+1, end_pos-1);
 //Serial.println(data_string);
 //identifying commas inn the string
 int firstCommaIndex =data_string.indexOf(',');
 int secondCommaIndex =data_string.indexOf(',', firstCommaIndex+1);
 int thirdCommaIndex =data_string.indexOf(',', secondCommaIndex+1);
 //seperating comma seperated value from the data string
 String temperature =data_string.substring(0, firstCommaIndex);
 String humidity =data_string.substring(firstCommaIndex+1, secondCommaIndex);
 String noise_level =data_string.substring(secondCommaIndex+1, thirdCommaIndex);
 String air_auality =data_string.substring(thirdCommaIndex+1);

 //Serial.println(temperature);
 //Serial.println(humidity);
 //Serial.println(noise);
 //Serial.println(air_auality);

 temp =temperature.toFloat();
 humid =humidity.toFloat();
 noise =noise_level.toFloat();
 air =air_auality.toFloat();

 Serial.println(temp);
 Serial.println(humid);
 Serial.println(noise);
 Serial.println(air);

 inputString ="";
 stringComplete =false;
 }
The complete code is attached in the code section.
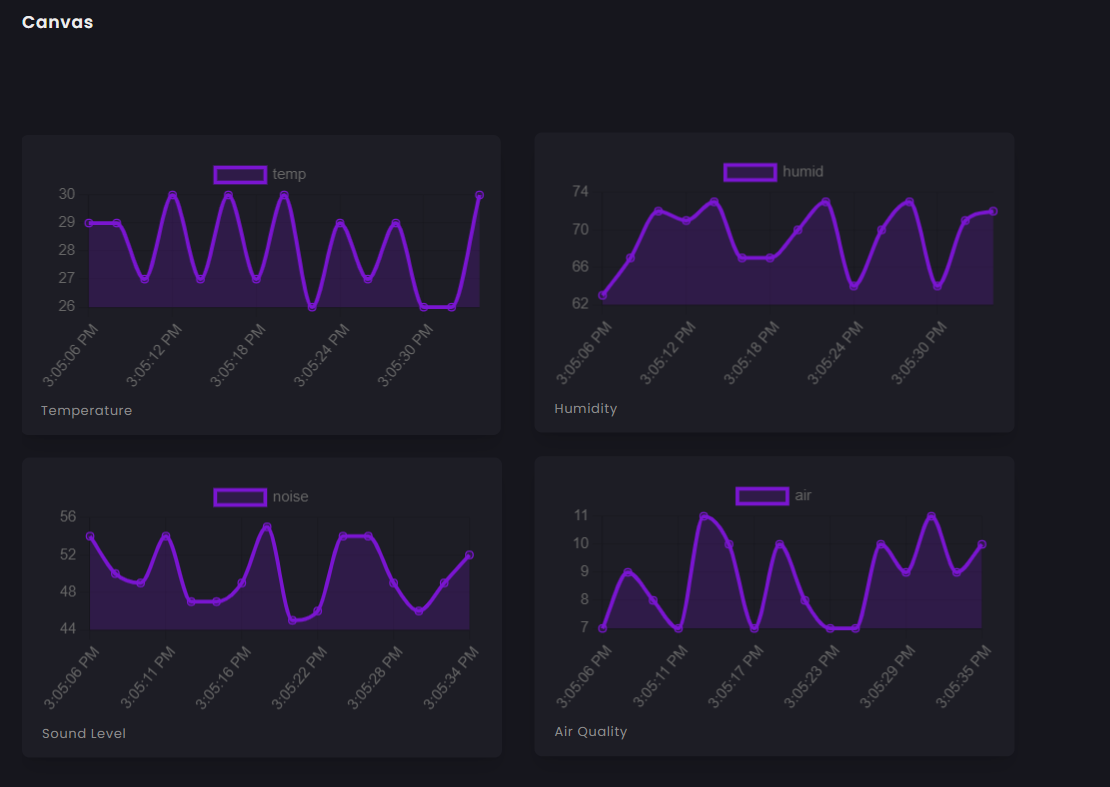
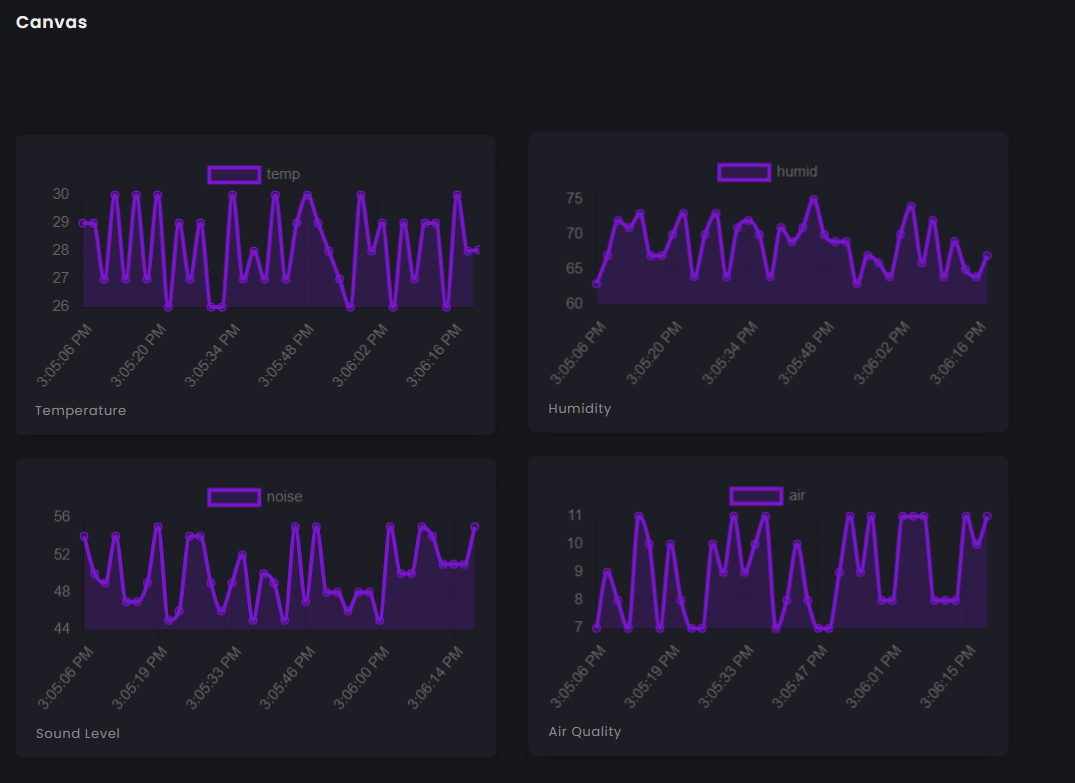
Data Visualization <図>
<図>
Code
- Code for Sensor Node
- Code for Gateway
Code for Sensor NodeArduino
This code is for the sensor device that collects sensors data and sent the data to the IoT gateway using LoRa.#include "AirQuality.h" //grove air quality library#include "Arduino.h"#include "DHT.h"#define DHTPIN 4 // what digital pin DHT sensor connected to#define DHTTYPE DHT11 // model of the sensor DHT11 DHT dht(DHTPIN, DHTTYPE);AirQuality airqualitysensor;int current_quality =-1;const int sampleWindow =50; // Sample window width in mS (50 mS =20Hz)unsigned int sample;float noise;float temp, humid;int airQuality; //-------------------------------------------------------------------------------------------- // SETUP //--------------------------------------------------------------------------------------------void setup() { Serial.begin(115200); //Serial for lora airqualitysensor.init(14); dht.begin();} //--------------------------------------------------------------------------------------------// MAIN LOOP//-------------------------------------------------------------------------------------------- void loop() { noise =calculate_sound_in_db(); airQuality =calculate_air_quality(); calculate_temp_humid(); String temperature =String(temp); String humidity =String(humid); String sound =String(noise); String air =String(airQuality); String values =String(temperature)+","+ String(humidity)+","+ String(sound)+","+ String(air); String cmd ="AT+SEND=0,"+String(values.length())+","+values; //AT+SEND=,, Serial.println(cmd); //sent to lora delay(15000);}//this function calculate sound level in dBfloat calculate_sound_in_db(){ unsigned long startMillis=millis(); // Start of sample window float peakToPeak =0; // peak-to-peak level unsigned int signalMax =0; //minimum value unsigned int signalMin =1024; //maximum value // collect data for 50 mS while (millis() - startMillis signalMax) { signalMax =sample; // save just the max levels } else if (sample =0)// if a valid data returned. { if (current_quality==0) Serial.println("High pollution! Force signal active"); else if (current_quality==1) Serial.println("High pollution!"); else if (current_quality==2) Serial.println("Low pollution!"); else if (current_quality ==3) Serial.println("Fresh air"); } */ return current_quality;}void calculate_temp_humid(){ // Reading temperature or humidity takes about 250 milliseconds! // Sensor readings may also be up to 2 seconds 'old' (its a very slow sensor) float h =dht.readHumidity(); // Read temperature as Celsius (the default) float t =dht.readTemperature(); // Check if any reads failed and exit early (to try again). if (isnan(h) || isnan(t)) { //Serial.println("Failed to read from DHT sensor!");戻る; } temp =t; humid =h; /* Serial.print("Humidity:"); Serial.print(h); Serial.print(" %\t"); Serial.print("Temperature:"); Serial.print(t); Serial.print(" *C "); */}//interrupt service routine for air quality sensorISR(TIMER1_OVF_vect){ if(airqualitysensor.counter==61)//set 2 seconds as a detected duty { airqualitysensor.last_vol=airqualitysensor.first_vol; airqualitysensor.first_vol=analogRead(A0); airqualitysensor.counter=0; airqualitysensor.timer_index=1; PORTB=PORTB^0x20; } else { airqualitysensor.counter++; }} Code for GatewayArduino
Receives data from the sensor nodes, process the data and sends to Grandeur cloud/* Including the SDK and WiFi library */#include#include #include SoftwareSerial LORA(D7, D8);/* Configurations */String deviceID ="your device id";String apiKey ="your api key";String token ="your device token";/* WiFi credentials */String ssid ="your wifi ssid";String password ="your wifi password";/* Create variable to hold project and device */Grandeur::Project project;Grandeur::Project::Device device;/* Variable to keep track of connection state and time */int connected =0;uint32_t lastUpdate =0;String inputString =""; // a string to hold incoming databoolean stringComplete =false; // whether the string is complete//:and % was set from the transmitter node for the eage of data separationchar start_val =':';char end_val ='%';int start_pos =0;int end_pos =0;float temp =0;float humid =0;float air =0;float noise =0;/* Function to check device's connection status */void onConnection(bool status) { switch(status) { case CONNECTED:Serial.println("Device is connected to the cloud."); /* Record connection state and time */ connected =1; lastUpdate =millis();戻る; case DISCONNECTED:Serial.println("Device is disconnected from the cloud."); connected =0;戻る; }}/* Function to connect to WiFi */void connectWiFi() { /* Set mode to station */ WiFi.mode(WIFI_STA); /* Connect using the ssid and password */ WiFi.begin(ssid, password); /* Block till the WiFi is connected */ while (WiFi.status() !=WL_CONNECTED) { delay(500); Serial.print("."); } /* Print message */ Serial.println(""); Serial.println("WiFi connected"); /* And IP address */ Serial.println(WiFi.localIP());}/* Function to confirm that data has been updated */void dataCallback(const char* code, Var res) { /* If the update was recorded successfully */ if(code =="DEVICE-DATA-UPDATED") { //Serial.println("Updated DATA"); /* Get data */ double temp_data =(double) res["update"]["temp"]; double humid_data =(double) res["update"]["humid"]; double noise_data =(double) res["update"]["noise"]; double air_data =(double) res["update"]["air"]; /* Print */ Serial.printf("Temperature:%f Humidity:%f Noise Level:%f Air Quality:%f\n", temp_data, humid_data, noise_data, air_data);戻る; } /* If the summary could not be updated. */ Serial.println("Failed to Update DATA"); return;}/* Function to send updated current and power readings */void sendUpdate() { Var data; //JSON data format set in Grandeur:{"temp":0, "humid":0, "air":0, "noise":0} data["temp"] =temp; data["humid"] =humid; data["noise"] =noise; data["air"] =air; /* Record update */ //device.data().set("", data, dataCallback); //send JSON device.data().set("temp", temp, dataCallback); device.data().set("humid", humid, dataCallback); device.data().set("noise", noise, dataCallback); device.data().set("air", air, dataCallback); //delay(2000);}void setup() { /* Begin the serial */ Serial.begin(9600); LORA.begin(115200); inputString.reserve(200); /* Connect to WiFi */ connectWiFi(); /* Initializes the global object "grandeur" with your configurations. */ project =grandeur.init(apiKey, token); /* Get reference to device */ device =project.device(deviceID); /* Sets connection state update handler */ project.onConnection(onConnection);}void loop() { serialEvent(); project.loop(WiFi.status() ==WL_CONNECTED); /* Send update to server */ if (stringComplete) { process_received_data(); if (connected) sendUpdate(); }}void serialEvent() { while (LORA.available()) { // get the new byte:char inChar =(char)LORA.read(); // if the incoming character is a newline, set a flag // so the main loop can do something about it:if (inChar =='\n') { stringComplete =true; } else // add it to the inputString:inputString +=inChar; }}void process_received_data(){ start_pos =inputString.indexOf(start_val); end_pos =inputString.indexOf(end_val); String data_string =inputString.substring(start_pos+1, end_pos-1); //Serial.println(data_string); //identifying commas inn the string int firstCommaIndex =data_string.indexOf(','); int secondCommaIndex =data_string.indexOf(',', firstCommaIndex+1); int thirdCommaIndex =data_string.indexOf(',', secondCommaIndex+1); //seperating comma seperated value from the data string String temperature =data_string.substring(0, firstCommaIndex); String humidity =data_string.substring(firstCommaIndex+1, secondCommaIndex); String noise_level =data_string.substring(secondCommaIndex+1, thirdCommaIndex); String air_auality =data_string.substring(thirdCommaIndex+1); //Serial.println(temperature); //Serial.println(humidity); //Serial.println(noise); //Serial.println(air_auality); temp =temperature.toFloat(); humid =humidity.toFloat(); noise =noise_level.toFloat(); air =air_auality.toFloat(); Serial.println(temp); Serial.println(humid); Serial.println(noise); Serial.println(air); inputString =""; stringComplete =false; }
Custom parts and enclosures
Schematics
製造プロセス