


初心者に最適な 3D プリンター (2022 年更新)!
3D プリントを開始することは、想像以上に困難な場合があります。実際、ベッドを適切に水平にする方法がわからなかったので、最初の経験はかなりラフでした。組み立てプロセスは期待どおりに進みませんでした。ベルトが緩すぎてプリンターがスキップしましたギアとプリント全体が片側にシフトするなど.
この記事では、簡単に使い始めることができるプリンターと、すべてをセットアップして実行するのに少し時間がかかるプリンターについて説明します。箱から出してすぐに使えるもの。
どの種類のプリンターが必要かは、あなた次第です。実行しやすい種類、またはエキスパートになることを余儀なくされる種類。
私がリストしている 2 種類のプリンター
すべての FDM 3D プリンターは同じように機能します。最終結果を作成するために、プラスチックのさまざまな層を互いの上に押し出すことによって.
ただし、一部のプリンターは、自動ベッド レベリング、一般的な改善されたワークフローと使いやすさなどの機能が既に組み込まれているため、他のプリンターよりも使いやすく、ベッドのレベリングは通常、正しく行うのが最も難しい部分です。 3D プリントを始めたばかりのとき。
2 種類のプリンターをリストします。 私が考える最も使いやすいもの 、ただし、プリンターの操作方法やトラブルシューティングの方法を学ぶ必要がないため、3D 印刷についてはほとんど教えていません。最初の印刷プロセスを難しくしますが、3D 印刷についてより多くのことを教えてくれるものです。 一般的には、手動でベッドを水平にする方法、特定の問題のトラブルシューティングなどを学ぶ必要があるためです。
Prusa MK3S+ のような完全な機能を備えていないプリンタは、非常に簡単にアップグレードおよび改造できることに注意してください。これは、将来アップグレードできることを意味するだけでなく、実際に交換する方法を学ぶのにも役立ちます。これにより、プリンターに何か問題が発生した場合に、すべての機能と交換方法がわかるため、後で問題を簡単に修正できます。
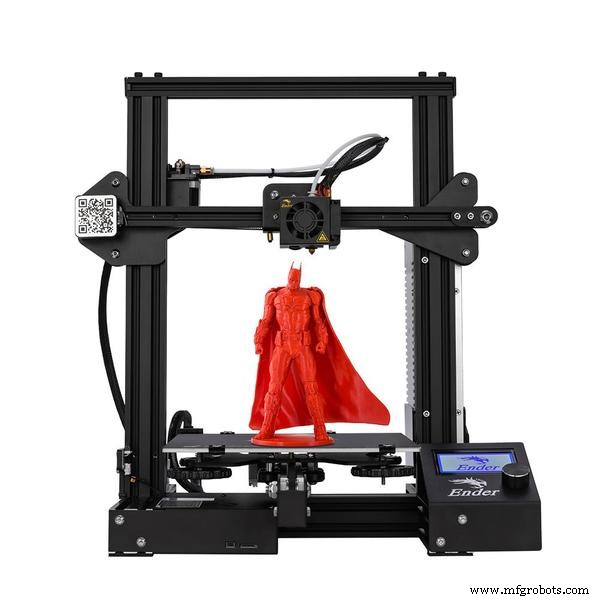
私の特定のケースでは、プリンターをいじるのが好きなので、大好きです。 私の Ender 3 Pro は、時間をかけて BLTouch (ベッド レベリング センサー) を取り付け、すべての冷却ファンを交換して静かにし、新しいエクストルーダーを取り付け、そのための追加のモッドを多数印刷したためです。
印刷が簡単な 3D プリンター
ここでは、プラグ アンド プレイと見なすことができるプリンター、つまり、最初のキャリブレーション プロセスを実行する以外にセットアップを必要としないプリンターを含めます。これは、これらのタイプのプリンターでは通常自動です。
また、これらのプリンターは変更やアップグレードができないことにも注意してください。さまざまなコンポーネントを交換してプリンターを改善したい場合は、次のセクションに記載されているものに投資することを検討してください.
オリジナル Prusa MK3S+
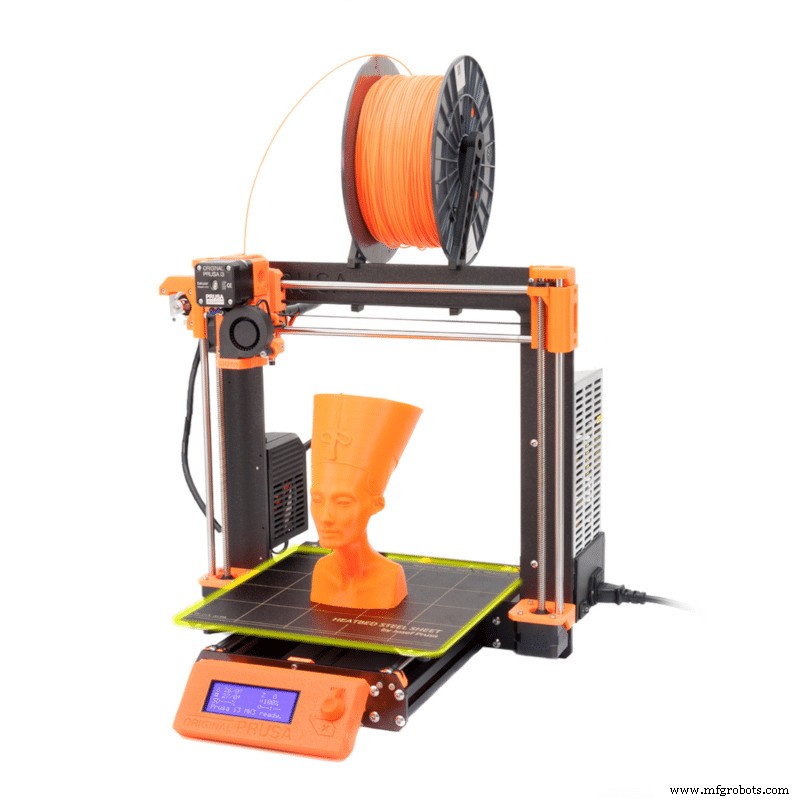
Prusa MK3S+ は、現在市場に出回っている最も有名な 3D プリンターの 1 つです。印刷ファームのセットアップを検索した場合、通常、MK3 が唯一のプリンターとして表示されます。これは、その信頼性が高いためです。ダイレクトドライブエクストルーダーを使用しているため(非常に柔軟で研磨性のあるフィラメントでさえ印刷できます)、印刷できる膨大な数の材料と、Prusa が独自のスライシングソフトウェアも提供しているため、すべてのシングルでテストされたプロファイルが付属しています。
特に事前に構築されたものを購入した場合は、最初のキャリブレーション設定を行うだけで完了なので、設定して使い始めるのが最も簡単なプリンターの 1 つです。
また、自動ベッド レベリングと取り外し可能な磁気ビルド プレート (プラスチック ジェストが印刷された表面) を備えており、モデルをすばやく取り外すことができます。
予算を気にせず、ただ機能する高品質のプリンターを手に入れたいだけなら、MK3S+ は間違いなくそれです。
| 押出機タイプ: | ダイレクトドライブ |
| ベッド レベリング センサー タイプ: | 誘導 |
| フィラメント振れセンサー | はい |
| ビルドボリューム | 250mm X 210mm X 210mm |
| ベッドタイプ | PEI ばね鋼板 |
| 押出機タイプ: | ボーデン |
| ベッド レベリング センサー タイプ: | 誘導 |
| フィラメント振れセンサー | いいえ (別途購入) |
| ビルドボリューム | 180mm X 180mm X 180mm |
| ベッドタイプ | PEI ばね鋼板 |
| 押出機タイプ: | ダイレクト ドライブ (Titan Extruder) |
| ベッド レベリング センサー タイプ: | 物理ホール効果センサー (機械式) |
| フィラメント振れセンサー | はい |
| ビルドボリューム | 220mm X 220mm X 250mm |
| ベッドタイプ | 強化ガラス |

| 押出機タイプ: | ボーデン |
| ベッド レベリング センサー タイプ: | 誘導 |
| フィラメント振れセンサー | はい |
| ビルドボリューム | 255mm X 255mm X 260mm |
| ベッドタイプ | フレキシブル |
| 押出機タイプ: | ボーデン |
| ベッド レベリング センサー タイプ: | なし |
| フィラメント振れセンサー | はい |
| ビルドボリューム | 150mm X 150mm X 150mm |
| ベッドタイプ | 磁気 |
| Extruder Type: | Bowden |
| Bed Leveling Sensor Type: | None |
| Filament Runout sensor | No |
| Build Volume | 220mm X 220mm X 250mm |
| Bed Type | Flexible, Glass |
You can find the Ender 3 here: Amazon、Banggood、オンラインの 3D プリンター。
TEVO Tarantula
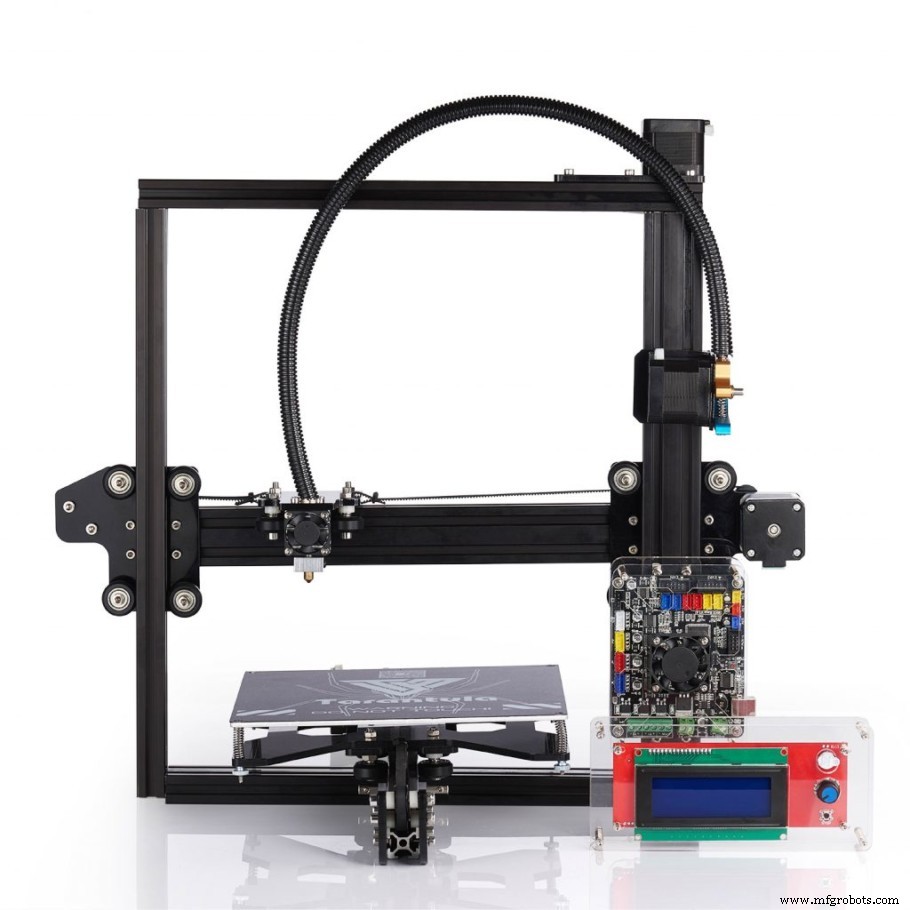
The Tevo Tarantula is based on the Reprap I3 3D printer, which is a proven design that a lot of printers are also based on, and even though it’s already been released a couple years ago it’s still a great little printer that sells for well under $200. Of course, you could also get the pro.
The reason that I included the Tarantula in this list is because it comes as a kit that you need to completely assemble by yourself, and while this may take you a couple hours, you will learn how everything on the printer works, what each component is for, and you will have a much easier time troubleshooting specific issues down the line compared to if you went with a completely assembled printer.
This also means that upgrading and swapping out components will be a breeze for you as well.
In addition to this, it doesn’t feature auto-bed leveling which is actually quite a hard process to learn in the beginning, but it’s an essential skill to learn since it will allow you to use any other 3D printer properly and set the initial layer height without issues in the future.
The Tarantula is a Bowden-style printer, meaning that you will be mainly limited to printing with PLA, ABS, PETG and some forms of TPU, and at temperatures not higher than 245°C since this may cause the PTFE tube to burn slightly and get damaged, plus the fumes that it releases can be harmful to you.
If you’re someone who is technically skilled and who likes to take their time putting a machine like this together, then the Tevo Tarantula is a great buy.
| Extruder Type: | Bowden |
| Bed Leveling Sensor Type: | None |
| Filament Runout sensor | No |
| Build Volume | 200mm X 200mm X 200mm |
| Bed Type | Buildtak |
You can find the TEVO Tarantula here: Amazon、Banggood、オンラインの 3D プリンター。
FLSUN Q5 (Delta Printer)
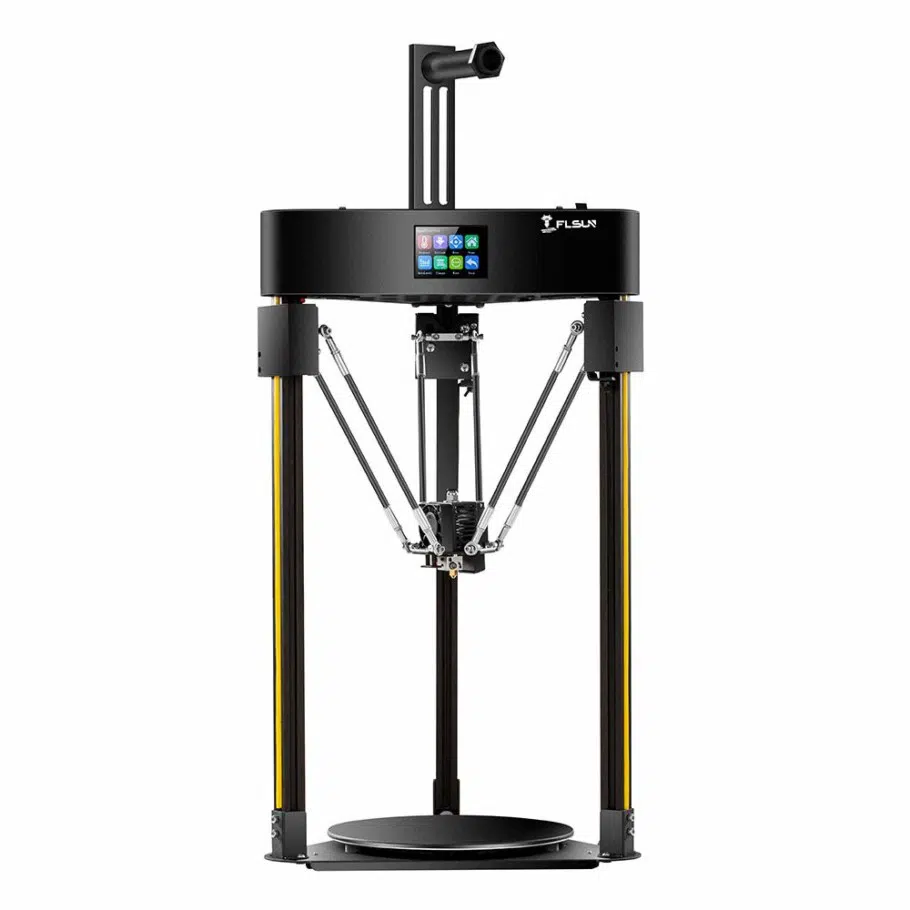
The FLSUN Q5 is a Delta printer, which means that it uses three arms to support the extruder instead of having X, Y, and Z Axis, and each arm can only move up and down, but by moving each arm independently the extruder is able to move in all directions.
Delta printers are known for their high print speeds, and the FLSUN Q5 Delta is no different, plus they are more fun to watch when printing.
The FLSUN Q5 feature a 27-point auto bed leveling system, a 32-bit mainboard, power loss recovery (resumes print without having to start over), and it is a Bowden-style printer, which means that you’ll be a bit more limited on the materials you can use (PLA, PETG, ABS, some TPUs).
The cooling fan is a bit loud and it’s the first part I’d recommend you upgrade once you get the printer, but the stepper motors are very quiet thanks to the mainboard drivers.
Delta printers are known for printing fast, and on paper this machine can print really fast, however, the lack of linear advance results in over- and under-extrusion artifacts at fast speeds, and if you’re not printing huge parts, then the maximum stock acceleration of 1000mm/s² will hinder you quite a bit.
One additional issue is that the screen is handled directly by the mainboard and not by a separate controller, which means that when you update a setting the printer moves may stutter and cause artifacts.
Other than that, the FLSUN Q5 is an amazing printer considering the low price of about $250.
| Extruder Type: | Bowden |
| Bed Leveling Sensor Type: | None |
| Filament Runout sensor | Yes |
| Build Volume | 200mm(diameter)*200m |
| Bed Type | Glass with ceramic goating |
You can find the FLSUN Q5 Delta here: Amazon、Banggood、オンラインの 3D プリンター。
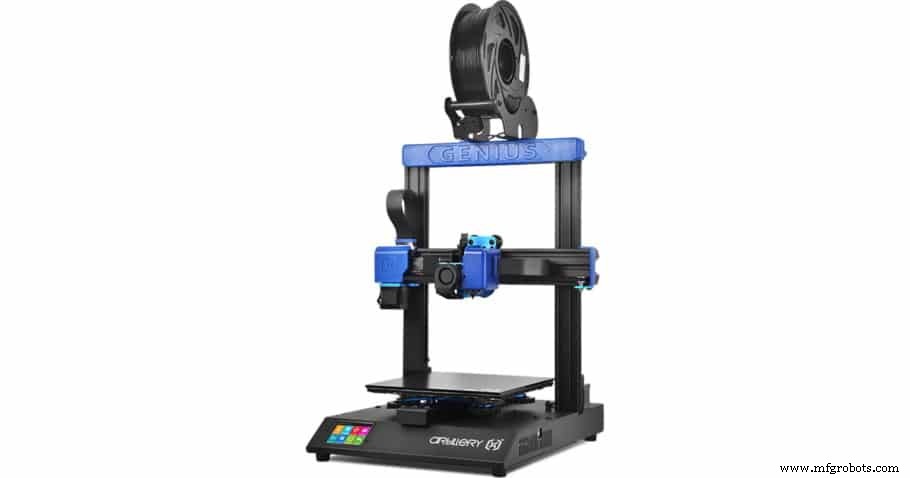
Artillery Genius (not Pro)

The Artillery Genius already comes semi pre-assembled and not as a complete DIY kit, meaning that you should have it un and running in about 30 minutes without any hassle, since the instructions are really clear.
It’s fairly more expensive than the previous printers on this section of the list, but it could also be considered a better printer overall since it features a direct drive extruder, which can print with more materials and generally at higher temperatures than a printer with a Bowden extruder, it also comes 2x Z-axis for more stable printing, a filament runout sensor, and more features not included in printers such as the Ender 3, Tevo Tarantula, etc.
The reason I included it in this list is because, even though it costs a little more, you won’t need to upgrade it down the line since it already comes with a direct drive extruder system, and it’s also a bit quieter than the stock Ender 3, for example, making it a great investment for anyone who just wants something that works well.
Lastly, it features a touch screen that makes operating the printer a little easier than having to scroll through the settings using the knob.
| Extruder Type: | Direct Drive (Titan Extruder) |
| Bed Leveling Sensor Type: | None |
| Filament Runout sensor | Yes |
| Build Volume | 220mm X 220mm X 250mm |
| Bed Type | Tempered Glass |
You can find the Artillery Genius here :Amazon, Banggood, 3D Printers Online.
Creality CR-10 Series
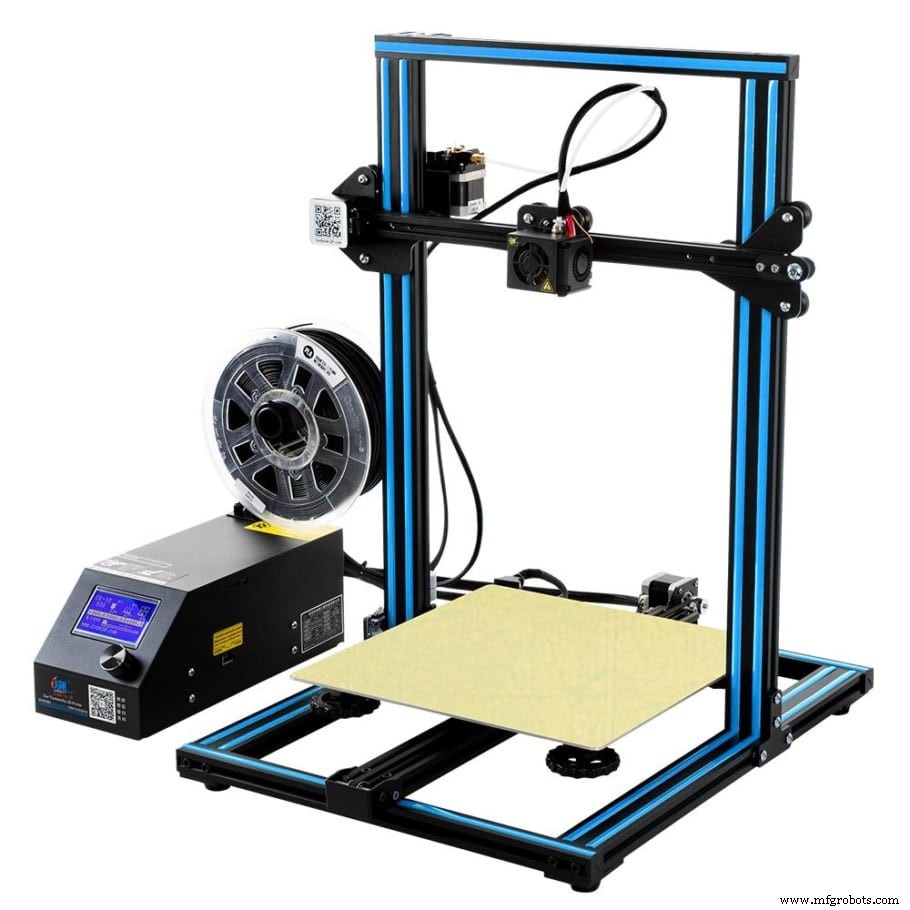
The Creality CR-10 has been one of the best budget printers to ever have been released, and now it’s gone through a couple iterations, each of which comes with some additional built-in features.
The Stock CR-10 is a very barebones machine that comes with just the essentials and it’s very similar to the Ender 3 in almost every regard, with the main difference being print volume, since the CR-10 is much bigger than the Ender 3.
The Original CR-10 features a Bowden extruder, a build volume of 300×300×400mm, and it’s a 12V printer, which makes replacing the cooling fans a lot easier since on printers such as the Ender 3 you need to use buck converters to down-step the voltage from 24V to 12V. However, it doesn’t feature a filament runout sensor, it comes with the 8-bit mainboard that doesn’t feature the silent drivers, and it also doesn’t have auto-bed leveling built-in (can be added later on).
The good news is that it sells for roughly $250, just slightly more than the stock Ender 3, and it’s a much larger printer that has the exact same print quality.
Of course, you could get the “Smart” version of the printer that sells for about $480 and which comes with Auto-Bed leveling already built-in as well as WIFI, is much more silent, comes with a filament runout sensor, and also has a touchscreen instead of the traditional knob.
If you need an affordable printer with a large build volume to get started with, the original CR-10 is definitely the way to go.
| Extruder Type: | Bowden |
| Bed Leveling Sensor Type: | None |
| Filament Runout sensor | Yes |
| Build Volume | 300mm X 300mm X 400mm |
| Bed Type | Tempered Glass |
You can find the Artillery Genius here :Amazon, Banggood, 3D Printers Online.
My Top Recommendation
All of the printers on this list are absolute beasts, and while clearly the best choice would be to go with the Original Prusa I3 M3S+ because of how great of a printer it is, the support you get from Prusa, etc., it’s also a very expensive printer (about $1000). If you have the money and want the best printer you can get below $1000, then that’s the one.
However, for everyone else I’d recommend going with the Ender 3-X, which is essentially the Ender 3 Pro that comes with both the glass and magnetic beds and the 32-bit silent mainboard, and it generally sells for less than the stock Ender 3.
The reason I would go with the Ender 3-x is because of how great the whole Ender 3 community is and you can also download a whole bunch of printable upgrades for free to make the printer better, upgrading components is easy and affordable, installing silent Noctua fans is also pretty straight forward, etc., and all of this for less than $200, usually… I purchased mine for $180 but I’ve also seen it being sold for $300.
I hope this information was useful!
Have a great day!
Check out our recommended products section
We created a recommended products section that will allow you to remove the guesswork and reduce the time spent researching what printer, filament, or upgrades to get, since we know that this can be a very daunting task and which generally leads to a lot of confusion.
We have selected just a handful of 3D printers that we consider to be good for beginners as well as intermediates, and even experts, making the decision easier, and the filaments, as well as the upgrades listed, were all tested by us and carefully selected, so you know that whichever one you choose will work as intended.
3Dプリント
- Raspberry Piロボットの構築:初心者向けの最高のチュートリアル
- StratasysFDMプリンターの新素材
- バトルボットにMarkforged3Dプリンターを使用する
- 2022年の金属ビジネスに最適な金属CNCマシン
- 2022年のShopifyに最適な会計ソフトウェア
- 地形の印刷に最適な 11 の 3D プリンター:FDM および樹脂プリンター (2022 年)
- 11の最高のレジン3Dプリンター! 2022年更新
- ダイレクトドライブエクストルーダーを備えた 10 のベスト 3D プリンター:2022 年更新!
- 屋外での使用に最適な 3D フィラメント!
- Ultiboard – 初心者向けの究極のガイド
- 機械工場向けの最高の 3D プリンター購入ガイド