



Alexa対応Arduinoホームコントローラー:音声でスマートホーム自動化
必要な部品と材料
| 部品 | 数量 |
|---|---|
| Arduino Yun | 1 |
| ControlEverything.com 4チャネルI2Cリレーコントローラー | 1 |
| DHT11温湿度センサー(4ピン) | 1 |
| 抵抗 10kΩ | 2 |
| SparkFun RedBot ブザー | 1 |
| 汎用NPNトランジスタ | 1 |
| LM2596 DC-DC降圧コンバーター | 1 |
| Amazon Alexa Echo Dot | 1 |
| Arduino プロトシールド | 1 |
| USB Webカメラ | 1 |
| 白色ジャンクションボックス 200×155×80mm | 1 |
必要な工具
- はんだごて
使用アプリ・オンラインサービス
- Arduino IDE
- Amazon Alexa Skills Kit
- Amazon Web Services AWS Lambda
- PubNub Publish/Subscribe API
プロジェクト概要
概要
AmazonがAlexaとEcho Dotを発売したことで、自然言語の音声コマンドで制御できるスマートホームの可能性が無限に広がりました。本プロジェクトは、多数のセンサーとデバイスをインターネットに接続し、Amazon Alexaスキルで制御できるArduinoホームコントローラーを構築します。
現在制御可能な機能:
- 4つの照明(部屋、ガレージ、キッチン、リビング)
- 温湿度センサー
- ブザーアラーム
- Webカメラで防犯写真撮影・メール送信
デモ動画では、ブレッドボード上の4つのLEDで各部屋の照明を模擬しています。リモートモジュールで実際の照明を制御したい場合は、姉妹プロジェクト「Arduino Home Controller Remote Modules」を参照してください。
ブロック図
本プロジェクトは4つの主要コンポーネントで構成されます(ブロック図参照)。

- Amazon Echo Dot:音声コマンドを受信し、AWS(Amazon Web Services)へ送信
- AWS(Alexaスキル + Lambda関数):コマンドを解釈。スキル名は「Arduino Home Controller」。後で有効化可能
- MQTTブローカー(PubNubクラウド):制御メッセージを2つのチャネルでやり取り(設定値送信用、センサー値受信用)。PubNubアカウント作成不要(デモ用アカウント使用可)
- ホームコントローラー(Arduino Yun):Ethernetシールド内蔵、Linuxマシン搭載でPython実行可能。リレー制御、温湿度読み取り、ブザー制御、Webカメラ操作を行う
必要なソフトウェアのインストール
2つの選択肢があります:デモ用として筆者の公開スキルを使用するか、自分専用のスキルを作成するか。
オプション1:公開スキルを使用(簡単)
- Alexaアプリでスキルストアを開き、「Arduino」で検索
- 「Arduino Home Controller」スキルを選択し、「有効にする」をクリック
- Amazonアカウントとリンク(メールアドレスをIDとして使用。メール送信には使わない)


オプション2:自分専用のスキルを作成
1. スキルの作成
- Amazon Developer Consoleで無料開発者アカウント登録
- ログイン後、「Alexa」メニュー → 「Alexa Skills Kit」の「Get Started」
- 「Add a New Skill」で新規作成
- 設定:
- Custom Interaction Model
- Language: English (US)
- Name:
TestSkill(ストア検索用名) - Invocation Name:
Test Skill(呼び出し名。「Alexa, ask Test Skill to...」) - グローバルフィールドはすべてNo
- Save


作成後、Application IDが表示されます(後でLambda関数とのリンクに使用)。
amzn1.ask.skill.6e22e052-c32f-433c-8d39-dc94a77a4adb

1.4 インタラクションモデル(インテント、スロット、発話の定義)

Intent Schema(JSON)をコピー&ペースト:
{
  "intents": [
    { "slots": [ { "name": "light", "type": "States" }, { "name": "which", "type": "HabRooms" } ], "intent": "LightIntent" },
    { "slots": [ { "name": "alarm", "type": "States" } ], "intent": "AlarmIntent" },
    { "intent": "TakePhotoIntent" },
    { "intent": "GetTemperatureIntent" },
    { "intent": "GetHumidityIntent" },
    { "intent": "AboutIntent" },
    { "intent": "AMAZON.HelpIntent" },
    { "intent": "AMAZON.CancelIntent" },
    { "intent": "AMAZON.StopIntent" }
  ]
}
カスタムスロットタイプでStatesとHabRoomsを定義:


Sample Utterances(発話例)をコピー&ペースト:
LightIntent Turn {which} light {light}
LightIntent Set {which} light {light}
AlarmIntent Turn alarm {alarm}
TakePhotoIntent Take a Photo
TakePhotoIntent Take Security Photo
GetTemperatureIntent Read Temperature
GetHumidityIntent Read Humidity
AboutIntent Tell me about
AboutIntent About

2. Lambda関数の作成
- AWS Consoleでアカウント作成
- サービス → Lambda → 左メニュー「Functions」→「Create function」
- 設定:
- Author from Scratch
- Name:
TestSkillLambda - Runtime: Node.js 6.10
- Role: Create Custom Role → IAM Role:
Lambda_Basic_Execution、ポリシー名「Create New Role Policy」で以下をペースト:{ "Version": "2012-10-17", "Statement": [ { "Effect": "Allow", "Action": [ "logs:CreateLogGroup", "logs:CreateLogStream", "logs:PutLogEvents" ], "Resource": "arn:aws:logs:*:*:*" }, { "Effect": "Allow", "Action": [ "iot:UpdateThingShadow" ], "Resource": "*" } ] } - 「Add」→「Create Function」ページに戻り、Existing roleで
lambda_basic_execution選択


2.4-2.6 Lambda関数の設定完了
- 左メニュー「Alexa Skills Kit」をトリガーに追加、Configure triggersでEnable、Skill IDにApplication IDを入力
- Function codeセクション:Code entry type「Upload a .zip file」、Runtime「Node.js 6.10」、
data.zipをアップロード index.jsを開き、23行目のApplication IDを自分のものに書き換え- Save後、ページ上部のARN(Amazon Resource Name)をメモ(スキル設定のConfigurationで使用)


3. スキル定義に戻って設定完了
- Configurationセクション:Endpointで「AWS Lambda ARN」選択、DefaultにARNを貼り付け
- Account Linkingセクション:最初の2つのRedirect URLをコピー(セキュリティプロファイル設定用)


4. セキュリティプロファイルの作成
- Developer Consoleで「Apps & Services」→「Login with Amazon」→「Create a New Security Profile」
- Security Profile Name:
TestSkillProfile、Description:Profile used by TestSkill、Consent Privacy Notice URL: 自分のURL - 保存後、Client IDとClient Secretをメモ
- Web SettingsタブでAllowed Origins(
https://layla.amazon.com,https://pitangui.amazon.com)、Allowed Return URLs(先ほどコピーした2つのRedirect URL)を設定


5. スキル作成の仕上げ
- スキルのConfiguration→Account Linking:
- Allow users to create account: Yes
- Authorization URL:
https://www.amazon.com/ap/oa/?redirect_url=REDIRECT_URL - Client ID, Scope:
profile - Authorization Grant Type: Auth Code Grant
- Access Token URI:
https://api.amazon.com/auth/o2/token - Client Secret, Privacy Policy URL
- Global Fields:カテゴリ「Smart Home」、テスト手順、全世界公開、説明文、キーワード、アイコン(108×108, 512×512)
- Privacy & Compliance


6. テストスキルのインストール
- Alexaアプリで「Your Skills」→「Dev Skills」フィルターで
TestSkillを有効化 - アカウントリンクでAmazonログイン、成功すればリンク完了
Alexa, ask Test Skillで動作確認


Arduino Yunの設定
初回使用時はセットアップが必要です。Greg Bauguesのガイド参照(@BenEagen氏に感謝)。
写真撮影・メール送信のため、追加ソフトウェアをインストールし、USBカメラのドライバー動作確認を行います。USB WebカメラをArduino YunのUSBポートに接続してください。
SSH接続とパッケージインストール
ssh root@yourYunName.local
# デフォルトパスワード: arduino

opkg update
opkg install kmod-video-uvc      # UVCドライバー
opkg install python-openssl      # Python SSL
opkg install fswebcam            # 写真撮影ユーティリティ
SDカードがマウントされているか確認:
mount

/dev/sda1 on /mnt/sda1 type vfatがあればOK。
カメラテスト:
cd /mnt/sda1
fswebcam test.png
Opening /dev/video0... Trying source module v4l2... /dev/video0 opened.と表示されればOK。SDカードをPCで読み込み、test.pngが正常に撮影できているか確認。
メール送信用Pythonスクリプトのインストール
PCで
cd /mnt/sda1
python /mnt/sda1/AHC_SendEmail.py /mnt/sda1/ test.png
メールが届けば成功。
デバイス接続とスケッチ書き込み
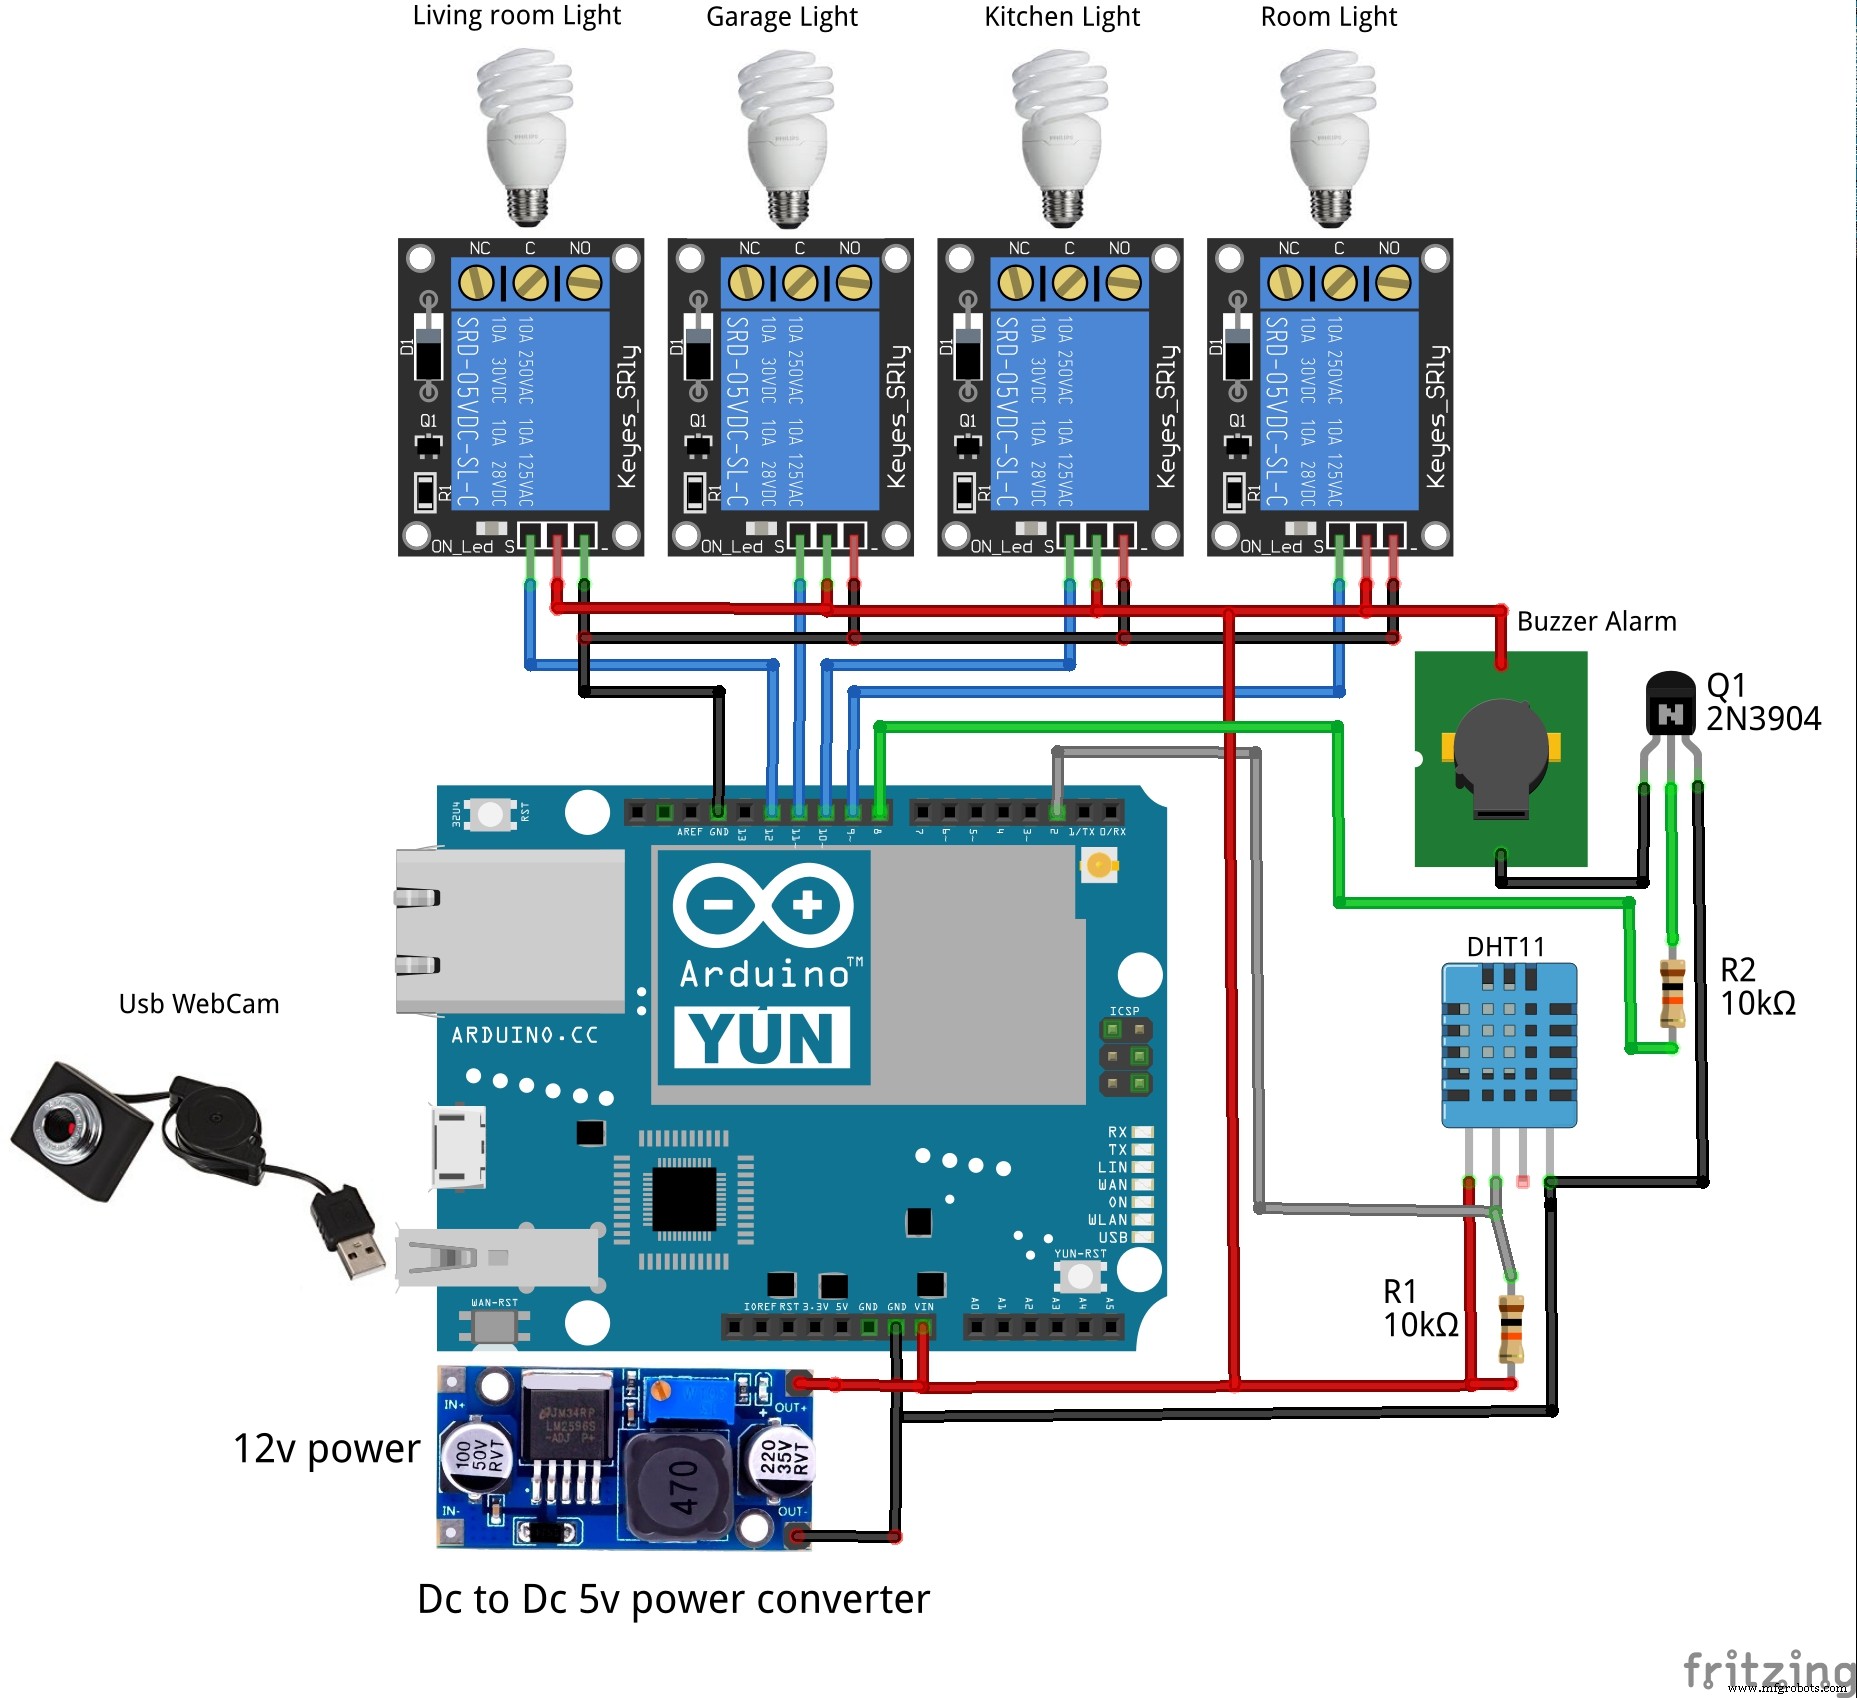
回路図に従って全デバイスを接続(特にDHT11とブザー)。
GitHubからlibraries.zipをダウンロードし、Arduino IDEのlibrariesフォルダに解凍。含まれるライブラリ:
- ArduinoJson(JSON操作)
- DHT_sensor_library(DHTセンサー制御)
- pubsubclient-master(PubNub接続・Pub/Sub)
Arduino IDE 1.6.xでボード「Arduino Yun」選択。ArduinoHomeMQTT.inoを開き、16行目のAmazonメールアドレス、50行目のUUID(ここで生成)を書き換えて書き込み。シリアルモニターでPubNub接続とセンサー初期化を確認。


Alexa Echo Dotでの動作テスト
スキル「Arduino Home Controller」が対応する発話一覧(Alexaアプリのスキル説明欄にも記載)。シリアルモニターでPubNub送受信メッセージを確認可能。
照明制御
"Alexa, ask arduino home to turn room light on"
"Alexa, ask arduino home to turn room light off"
"Alexa, ask arduino home to turn kitchen light on"
"Alexa, ask arduino home to turn kitchen light off"
"Alexa, ask arduino home to turn garage light on"
"Alexa, ask arduino home to turn garage light off"
"Alexa, ask arduino home to turn living room light on"
"Alexa, ask arduino home to turn living room light off"
アラーム制御
"Alexa, ask arduino home to turn alarm on"
"Alexa, ask arduino home to turn alarm off"
温湿度読み取り
"Alexa, ask arduino home to read temperature"
"Alexa, ask arduino home to read humidity"
防犯写真撮影
"Alexa, ask arduino home to take a photo"
ヘルプ・説明
"Alexa, ask arduino home about"
"Alexa, ask arduino home help"

ソフトウェア詳細
全ファイルはGitHubからダウンロード可能:https://github.com/jcruzp/ArduinoHomeController
ArduinoHomeMQTT→ Arduino Yun用.inoファイルとライブラリlambda→ AWS Lambda用Node.js関数(node_modules含む)python→ 写真添付メール送信用Pythonスクリプトschematic→ Fritzing形式回路図
Arduino Home Controller ワークフロー
- Echo Dotが音声コマンドを受信し、Arduino Home Controllerスキルへ
- スキルがLambda関数
index.jsを呼び出し - Lambda関数(Node.js、node_modules使用、AWSホスト)がインテントを解釈
- MQTT JSONメッセージに変換し、PubNubブローカーへ送信。フォーマット:
トピック例:{ "topic": "Topic_xxxx", "command": "on/off", "id": "email address" }Topic_room,Topic_livingroom,Topic_kitchen,Topic_garage,Topic_alarm,Topic_temperature,Topic_humidity,Topic_photo - 送信チャネル:
AHC_IOT_01、受信チャネル:AHC_IOT_02 - Arduino Yunスケッチ
ArduinoHomeMQTT.inoがブローカーと接続、Pub/Subでメッセージ送受信 BridgeライブラリでLinux側と通信、WAN/LAN接続やコマンド実行- メール送信時はPython
AHC_SendEmail.py、写真撮影時はfswebcamをLinux側で実行

ハードウェア詳細
核心はArduino Yun。各デバイス制御用デジタルピン:
Pin 2  : DHT11センサー
Pin 8  : ブザーアラーム(NPNトランジスタ経由)
Pin 9  : 部屋の照明
Pin 10 : キッチン照明
Pin 11 : ガレージ照明
Pin 12 : リビング照明
WebカメラはUSBポート接続。全デバイスは12V DC電源からDC-DCコンバーターで5Vに降圧して給電。Arduino Proto Shieldでシールド化し、センサー、ブザー、電源インターフェースを集約。拡張用スペースも確保。


Arduino Yun、Proto Shield、リレー、電源レギュレーターをプラスチックケースに収納、アラーム・Webカメラ・センサーは外部露出。回路図通りに配線。


長文お読みいただきありがとうございます。ご提案等あればご連絡ください。このプロジェクトは昨年亡くなった父の追憶に捧げます。R.I.P. Dad.
ソースコード
ArduinoHomeMQTT.ino(Arduino Yun用)
// ArduinoHomeMQTT v2.1
// Copyright (C)2018 Jose Cruz. All right reserved
// web: https://sites.google.com/view/raeiot/home
#include
#include
#include
#include
#include

#define MyID "YOUR AMAZON EMAIL LINKED IN ALEXA APP"
#define DHTPIN 2
#define DHTTYPE DHT11
DHT dht(DHTPIN, DHTTYPE);
#define alarm 8
#define room_light 9
#define kitchen_light 10
#define garage_light 11
#define livingroom_light 12

int mqtt_server_port = 1883;
const char* mqtt_server = "mqtt.pndsn.com";
const char* topic = "AHC_IOT_01";
const char* topic2 = "AHC_IOT_02";
const char* clientId = "pub-c-e93def7f-95aa-475a-aa60-cc3cd32ee8a7/sub-c-ec04dbbc-0893-11e8-8e75-cea83f8405bb/YOUR UUID GENERATED";

YunClient ethClient;
PubSubClient client(ethClient);
Process picture;
String filename;
String path = "/mnt/sda1/";

void TakePhoto() {
  filename = "";
  picture.runShellCommand("date +%s");
  while (picture.running());
  while (picture.available() > 0) { char c = picture.read(); filename += c; }
  filename.trim(); filename += ".jpg";
  picture.runShellCommand("/usr/bin/fswebcam -i 0 --jpeg 95 --no-banner --fps 1 -S 1 -r 352x288 --save " + path + filename);
  while (picture.running());
  picture.runShellCommand("python /mnt/sda1/AHC_SendEmail.py " + path + " " + filename);
  while (picture.running());
}

void SendTemperature() {
  char cstr[16];
  float t = dht.readTemperature();
  client.publish(topic2, itoa(t, cstr, 10));
}

void SendHumidity() {
  char cstr[16];
  float h = dht.readHumidity();
  client.publish(topic2, itoa(h, cstr, 10));
}

void callback(char* topic, byte* payload, unsigned int length) {
  Serial.print("Message arrived ["); Serial.print(topic); Serial.print("] ");
  for (int i = 0; i < length; i++) Serial.print((char)payload[i]);
  Serial.println();
  StaticJsonBuffer<200> jsonBuffer;
  JsonObject& root = jsonBuffer.parseObject((char[])payload);
  String alexa_topic = root["topic"];
  String alexa_command = root["command"];
  String alexa_id = root["id"];
  if (alexa_id.equals(MyID)) {
    if (alexa_topic.endsWith("Topic_room")) digitalWrite(room_light, (alexa_command.endsWith("on") ? LOW : HIGH));
    else if (alexa_topic.endsWith("Topic_kitchen")) digitalWrite(kitchen_light, (alexa_command.endsWith("on") ? LOW : HIGH));
    else if (alexa_topic.endsWith("Topic_garage")) digitalWrite(garage_light, (alexa_command.endsWith("on") ? LOW : HIGH));
    else if (alexa_topic.endsWith("Topic_living room")) digitalWrite(livingroom_light, (alexa_command.endsWith("on") ? LOW : HIGH));
    else if (alexa_topic.endsWith("Topic_temperature")) SendTemperature();
    else if (alexa_topic.endsWith("Topic_humidity")) SendHumidity();
    else if (alexa_topic.endsWith("Topic_alarm")) digitalWrite(alarm, (alexa_command.endsWith("on") ? HIGH : LOW));
    else if (alexa_topic.endsWith("Topic_photo")) TakePhoto();
  }
}

void reconnect() {
  while (!client.connected()) {
    Serial.print("Attempting MQTT connection...");
    if (client.connect(clientId)) {
      Serial.println("MQTT broker connected");
      client.subscribe(topic);
    } else {
      Serial.print("Failed, rc = "); Serial.print(client.state());
      Serial.println(" try again in 5 seconds");
      delay(5000);
    }
  }
}

void setup() {
  Bridge.begin(); delay(2000);
  Serial.begin(115200);
  Serial.println("Init Arduino Home Controller v2.1...");
  pinMode(alarm, OUTPUT);
  pinMode(room_light, OUTPUT);
  pinMode(kitchen_light, OUTPUT);
  pinMode(garage_light, OUTPUT);
  pinMode(livingroom_light, OUTPUT);
  digitalWrite(room_light, HIGH);
  digitalWrite(kitchen_light, HIGH);
  digitalWrite(garage_light, HIGH);
  digitalWrite(livingroom_light, HIGH);
  client.setServer(mqtt_server, mqtt_server_port);
  client.setCallback(callback);
  client.connect(clientId);
  Serial.println("Connected to PubNub MQTT broker OK ...");
  client.subscribe(topic);
  Serial.println("Suscribe to topic at MQTT broker Ok ...");
  dht.begin(); delay(4000);
  Serial.println("DHT sensor Ok ...");
}

void loop() {
  if (!client.connected()) reconnect();
  client.loop();
}
AHC_SendEmail.py(Pythonメール送信)
import smtplib, sys, time
from email.MIMEMultipart import MIMEMultipart
from email.MIMEText import MIMEText
from email.MIMEBase import MIMEBase
from email import encoders

fromaddr = "joseacruzp@gmail.com"
toaddr = "joseacruzp@gmail.com"
emailpassword = "YOUR PASSWORD"
subject = "Arduino Home Controller by Alexa Skill"
body = "Photo taken in " + time.strftime('%a, %d %b %Y %H:%M:%S %Z(%z)')
filedir = sys.argv[1]
filename = sys.argv[2]

msg = MIMEMultipart()
msg['From'] = fromaddr
msg['To'] = toaddr
msg['Subject'] = subject
msg.attach(MIMEText(body, 'plain'))

attachment = open(filedir + filename, "rb")
part = MIMEBase('application', 'octet-stream')
part.set_payload(attachment.read())
encoders.encode_base64(part)
part.add_header('Content-Disposition', "attachment; filename= %s" % filename)
msg.attach(part)

server = smtplib.SMTP('smtp.gmail.com', 587)
server.starttls()
server.login(fromaddr, emailpassword)
server.sendmail(fromaddr, toaddr, msg.as_string())
server.quit()
index.js(AWS Lambda関数)
// Alexa SDK for Arduino Home Controller
// Copyright (c) 2014-2015 Amazon.com, Inc. or its affiliates. All Rights Reserved.
// Jose Cruz https://sites.google.com/view/jriot

var PubNub = require("pubnub");
var pubnub = new PubNub({
  ssl: true,
  publish_key: "pub-c-e93def7f-95aa-475a-aa60-cc3cd32ee8a7",
  subscribe_key: "sub-c-ec04dbbc-0893-11e8-8e75-cea83f8405bb",
  uuid: "YOUR UUID"
});

var channel = 'AHC_IOT_01';
var channel2 = 'AHC_IOT_02';
var slotStates = ['on', 'off'];
var APP_ID = 'YOUR APP ID FOR THE SKILL';

var AlexaSkill = require('./AlexaSkill');
var ArduinoHomeSkill = function() { AlexaSkill.call(this, APP_ID); };

var mqttListener, access_token, url;
var https = require("https");

function SendMessage(topicname, commandvalue, speechOutput, iresponse) {
  https.get(url, res => {
    res.setEncoding("utf8");
    let body = "";
    res.on("data", data => { body += data; });
    res.on("end", () => {
      pubnub.publish({
        channel: channel,
        message: { "topic": topicname, "command": commandvalue, "id": JSON.parse(body).email }
      }).then(response => {
        console.log("message Published w/ timetoken", response.timetoken);
        if (speechOutput) iresponse.tell(speechOutput);
      }).catch(error => {
        console.log("publishing failed w/ status: ", error);
        iresponse.ask("Sorry, I didn't catch what you said");
      });
    });
  });
}

ArduinoHomeSkill.prototype = Object.create(AlexaSkill.prototype);
ArduinoHomeSkill.prototype.constructor = ArduinoHomeSkill;

ArduinoHomeSkill.prototype.eventHandlers.onSessionStarted = function(sessionStartedRequest, session) {
  console.log("ArduinoHomeSkill onSessionStarted requestId: " + sessionStartedRequest.requestId + ", sessionId: " + session.sessionId);
  pubnub.removeListener(mqttListener);
  pubnub.unsubscribeAll();
};

ArduinoHomeSkill.prototype.eventHandlers.onLaunch = function(launchRequest, session, response) {
  console.log("ArduinoHomeSkill onLaunch requestId: " + launchRequest.requestId + ", sessionId: " + session.sessionId);
  if (session.user.accessToken == undefined) {
    response.tellWithCardLink('To start using this skill, please use the companion app to authenticate on Amazon.');
    return;
  }
  response.ask("Welcome to Arduino Home Controller. What would you like to do?", "I am ready");
};

ArduinoHomeSkill.prototype.eventHandlers.onSessionEnded = function(sessionEndedRequest, session) {
  console.log("ArduinoHomeSkill onSessionEnded requestId: " + sessionEndedRequest.requestId + ", sessionId: " + session.sessionId);
};

ArduinoHomeSkill.prototype.intentHandlers = {
  "AboutIntent": function(intent, session, response) {
    response.ask("Arduino Home Controller skill lets you control internet connected devices. It controls Lights (room, kitchen, garage, living room), reads temperature, humidity, takes security photo via webcam and sends by email, activates alarm. Uses PubNub for messaging. Check skill page for details. What would you like to do?");
  },
  "LightIntent": function(intent, session, response) {
    var slotHabRooms = ['room', 'kitchen', 'garage', 'living room'];
    var lightSlot = intent.slots.light;
    var lightSlotValue = lightSlot ? lightSlot.value : "";
    var whichSlot = intent.slots.which;
    var whichSlotValue = whichSlot ? whichSlot.value : "";
    if (lightSlotValue && whichSlotValue && slotStates.indexOf(lightSlotValue.toLowerCase()) > -1 && slotHabRooms.indexOf(whichSlotValue.toLowerCase()) > -1) {
      SendMessage('Topic_' + whichSlotValue, lightSlotValue, "The light is now " + lightSlotValue, response);
    } else { response.ask("Sorry, I didn't catch what you said"); }
  },
  "AlarmIntent": function(intent, session, response) {
    var alarmSlot = intent.slots.alarm;
    var alarmSlotValue = alarmSlot ? alarmSlot.value : "";
    if (alarmSlotValue && slotStates.indexOf(alarmSlotValue.toLowerCase()) > -1) {
      SendMessage('Topic_alarm', alarmSlotValue, "The alarm is now " + alarmSlotValue, response);
    } else { response.ask("Sorry, I didn't catch what you said"); }
  },
  "TakePhotoIntent": function(intent, session, response) {
    SendMessage('Topic_photo', 'take', "Taken home photo ", response);
  },
  "GetTemperatureIntent": function(intent, session, response) {
    mqttListener = {
      status: function(statusEvent) {},
      message: function(message) {
        console.log("Receive=", message);
        response.tell("Inside Temperature is " + message.message + " degrees C");
      },
      presence: function(presenceEvent) {}
    };
    pubnub.addListener(mqttListener);
    pubnub.subscribe({ channels: [channel2] });
    SendMessage('Topic_temperature', 'Ok', null, response);
  },
  "GetHumidityIntent": function(intent, session, response) {
    mqttListener = {
      status: function(statusEvent) {},
      message: function(message) {
        console.log("Receive=", message);
        response.tell("Inside Humidity is " + message.message + " %");
      },
      presence: function(presenceEvent) {}
    };
    pubnub.addListener(mqttListener);
    pubnub.subscribe({ channels: [channel2] });
    SendMessage('Topic_humidity', 'Ok', null, response);
  },
  "AMAZON.HelpIntent": function(intent, session, response) {
    response.ask("With Arduino Home Controller skill and Alexa you can control internet connected devices using an Arduino Yun or Arduino with Ethernet Shield. Check skill page for details. What would you like to do?");
  },
  "AMAZON.StopIntent": function(intent, session, response) {
    response.tell("Thanks for using Arduino Home Controller. Bye see you later");
  },
  "AMAZON.CancelIntent": function(intent, session, response) {
    response.tell("Thanks for using Arduino Home Controller. Bye see you later");
  },
  default: function(intent, session, response) { response.ask("Try again"); }
};

exports.handler = function(event, context) {
  try {
    access_token = event['context']['System']['user']['accessToken'];
    url = 'https://api.amazon.com/user/profile?access_token=' + access_token;
  } catch (error) { console.log(error); }
  var ArduinoHomeControl = new ArduinoHomeSkill();
  ArduinoHomeControl.execute(event, context);
};
GitHubリポジトリ
https://github.com/jcruzp/ArduinoHomeController
回路図
メインボード:リレー、温湿度センサー、ブザーアラーム、Webカメラ
製造プロセス
- Web制御DMX照明システム:Arduino Megaマスターコントローラー
- Arduinoデジタルダイス: LCD表示の乱数ジェネレーター自作
- DIY Arduino USBゲームコントローラー - 高性能ゲームパッドを自作
- Pixel Chaser: Arduino Nanoで作るワンタップLEDゲーム
- Arduino Nanoで構築するスマートホーム植物自動水やりシステム
- Arduinoで作る斥力式磁気浮上装置: シンプル回路とDIYガイド
- Arduinoベースの蛍光表示管(VFD)コントローラーキット
- 自律型ホームアシスタントロボット「O'nine」の構築 – ROS、Alexa、ロボットアーム完全ガイド
- Arduino Nanoで作るNeoPixelマトリックス版Pongゲーム
- ESP32-CAMで作るAI顔認識ドアロックシステム:ローカル処理でプライバシー保護
- DIY LEDルーレットゲーム – Arduino Nanoで作る1人用アーケードゲーム