



礼儀正しいドライバーに感謝を伝える - Arduino MKR1000で作る車載メッセージ表示システム
必要な部品と材料
| Arduino MKR1000 | ×1 |
| SparkFun Bluetooth Modem - BlueSMiRF Silver | ×1 |
| Adafruit 4チャネル I2C対応 双方向ロジックレベルコンバーター (BSS138) | ×1 |
| Adafruit フレキシブル DotStar マトリックス 8×32 (256 RGB LED) | ×1 |
| Adafruit 4ピン JST SM プラグ + レセプタクル ケーブルセット | ×1 |
| DC 2.1mm バレルコネクター | ×1 |
| ACアダプター 5V 4A | ×1 |
| メスヘッダー 4ピン (2.54mm) | ×1 |
| ブレッドボード(汎用) | ×1 |
| プロジェクトボックス(全部品+Bluetoothの高さが入るサイズ) | ×1 |
| 1/4″ × 4.5″ × 15″ バルチックバーチ合板 | ×1 |
| 木工用両面テープ 1″ × 50′ | ×1 |
必要な工具と機械
- はんだごて
- グルーガン
- フォースナービット(木工用ドリルビット)
- 電動ドリル
- サンドペーパー(120番手、エッジ処理用)
使用アプリとオンラインサービス
- Arduino IDE
- Virtual Shield for Arduino
- Adafruit DotStarライブラリ
プロジェクト概要
運転中、周囲のドライバーとより意味のあるコミュニケーションを取りたいと常々思っていました。ライトの点滅、手を振る、クラクション、急ブレーキなどは、いずれも粗雑なコミュニケーション手段に過ぎません。
きっかけはジェームズ・ボンド映画のオープニングシーン。リアウィンドウにテキストが表示されるアストンマーティンを見て、「自分の意思をテキストで後続車に伝えられたら」と考えました。


MKR1000のセットアップ
MKR1000はプレリリースボードで公式ドキュメントがなかったため、HacksterのガイドとArduinoフォーラムのプライベートセクションを参考に、Arduino IDE 1.6.9 hourly buildを使用して環境構築しました。
必要なライブラリ:Adafruit DotStar、Adafruit DotStarMatrix、Adafruit GFX、ArduinoJson、Windows Virtual Shields for Arduino
電圧レベル変換の重要性
MKR1000は3.3V動作です。5V許容か不明なため、安全のためAdafruitの4チャネル双方向レベルシフターを使用しました。BluetoothモジュールとDotStarマトリックスは5V動作を好みます。
各コンポーネントの動作確認
- DotStarマトリックス: ヘッダーピンを半田付けし、SPIピン(SDA=11、SCL=12)に接続。「matrixtest」サンプルで動作確認
- Virtual Shield(Bluetooth): GitHubの手順に従い、TX/RXピン(14、13)で接続。スケッチアップロード時のTX/RX切断も不要になっていました
コード解説
主要インクルード
#include <SPI.h>
#include <Adafruit_GFX.h>
#include <Adafruit_DotStarMatrix.h>
#include <Adafruit_DotStar.h>
#include <ArduinoJson.h>
#include <VirtualShield.h>
#include <Text.h>
#include <Graphics.h>
#include <Recognition.h>
#include <Colors.h>
マトリックスとシールドの初期化
Adafruit_DotStarMatrix matrix = Adafruit_DotStarMatrix(
  32, 8, DATAPIN, CLOCKPIN,
  DS_MATRIX_TOP + DS_MATRIX_LEFT + DS_MATRIX_COLUMNS + DS_MATRIX_ZIGZAG,
  DOTSTAR_GBR);

const uint16_t colors[] = {
  matrix.Color(255, 0, 0), matrix.Color(0, 255, 0),
  matrix.Color(0, 0, 255), matrix.Color(255, 0, 255),
  matrix.Color(255, 0, 106), matrix.Color(255, 255, 255)
};

VirtualShield shield;
Graphics screen = Graphics(shield);
Recognition speech = Recognition(shield);
setup()関数
void setup() {
  matrix.begin();
  matrix.setTextWrap(false);
  matrix.setBrightness(40);
  matrix.setTextColor(colors[0]);
  DisplayText("Initializing...", 4, 10);

  shield.setOnRefresh(refresh);
  speech.setOnEvent(onSpeech);
  screen.setOnEvent(screenEvent);
  shield.begin(); // Bluetooth 115200 bpsで開始
  DisplayText("Initializing...finished", 3, 10);
}
メインループ
void loop() {
  shield.checkSensors(); // イベントチェックとコールバック実行
}
画面リフレッシュ時(ボタン配置)
void refresh(ShieldEvent* shieldEvent) {
  screen.clear(ARGB(123,86,204));
  thanksId = screen.addButton(10, 50, ". Thank you .");
  welcomeId = screen.addButton(10, 100, ". Welcome .");
  turnLeftId = screen.addButton(10, 150, ". Left .");
  stoppingId = screen.addButton(175, 50, ". Stopping .");
  startingId = screen.addButton(175, 100, ". Starting .");
  turnRightId = screen.addButton(175, 150, ". Right .");
  backoffId = screen.addButton(10, 225, ". Back Off .");
  calling911Id = screen.addButton(10, 290, ". Calling 911 .");
}
ボタン押下時の処理
void screenEvent(ShieldEvent* shieldEvent) {
  if(screen.isPressed(thanksId)) DisplayText("Thank You", 5, 100);
  if(screen.isPressed(welcomeId)) DisplayText("You're welcome", 2, 100);
  if(screen.isPressed(backoffId)) DisplayText("Please back off", 4, 100);
  if(screen.isPressed(stoppingId)) DisplayText("...stopping...", 0, 100);
  if(screen.isPressed(startingId)) DisplayText("...starting...", 1, 100);
  if(screen.isPressed(turnLeftId)) DisplayText("Turning LEFT", 3, 100);
  if(screen.isPressed(turnRightId)) DisplayText("Turning RIGHT", 3, 100);
  if(screen.isPressed(calling911Id)) DisplayText("Calling 911", 0, 100);
}
テキストスクロール表示関数
void DisplayText(String message, int colorIndex, int currDelay) {
  int x = matrix.width();
  int maxX = -1 * (message.length() * 5 + message.length());
  matrix.setTextColor(colors[colorIndex]);
  while(x > maxX) {
    matrix.fillScreen(0);
    matrix.setCursor(x, 0);
    matrix.print(message);
    --x;
    matrix.show();
    delay(currDelay);
  }
}
エンクロージャの製作
マトリックスより大きめの箱を用意し、バルチックバーチ合板をカット。フォースナービットでコネクター用の穴をあけ、両面テープで固定。24時間重しを置いて確実に接着しました。


電源設計
全LED点灯時は約7.5A必要ですが、スクロール表示なので同時点灯は少なく、5V 4Aアダプターで十分です。車載用にはACインバーター経由で家庭用アダプターを使用しました。
車両への取り付け
吸盤とバンジーコードでリアウィンドウに固定を試みましたが、改良の余地があります。
コード
GitHub: https://github.com/pulcher/mkr1000_challenge
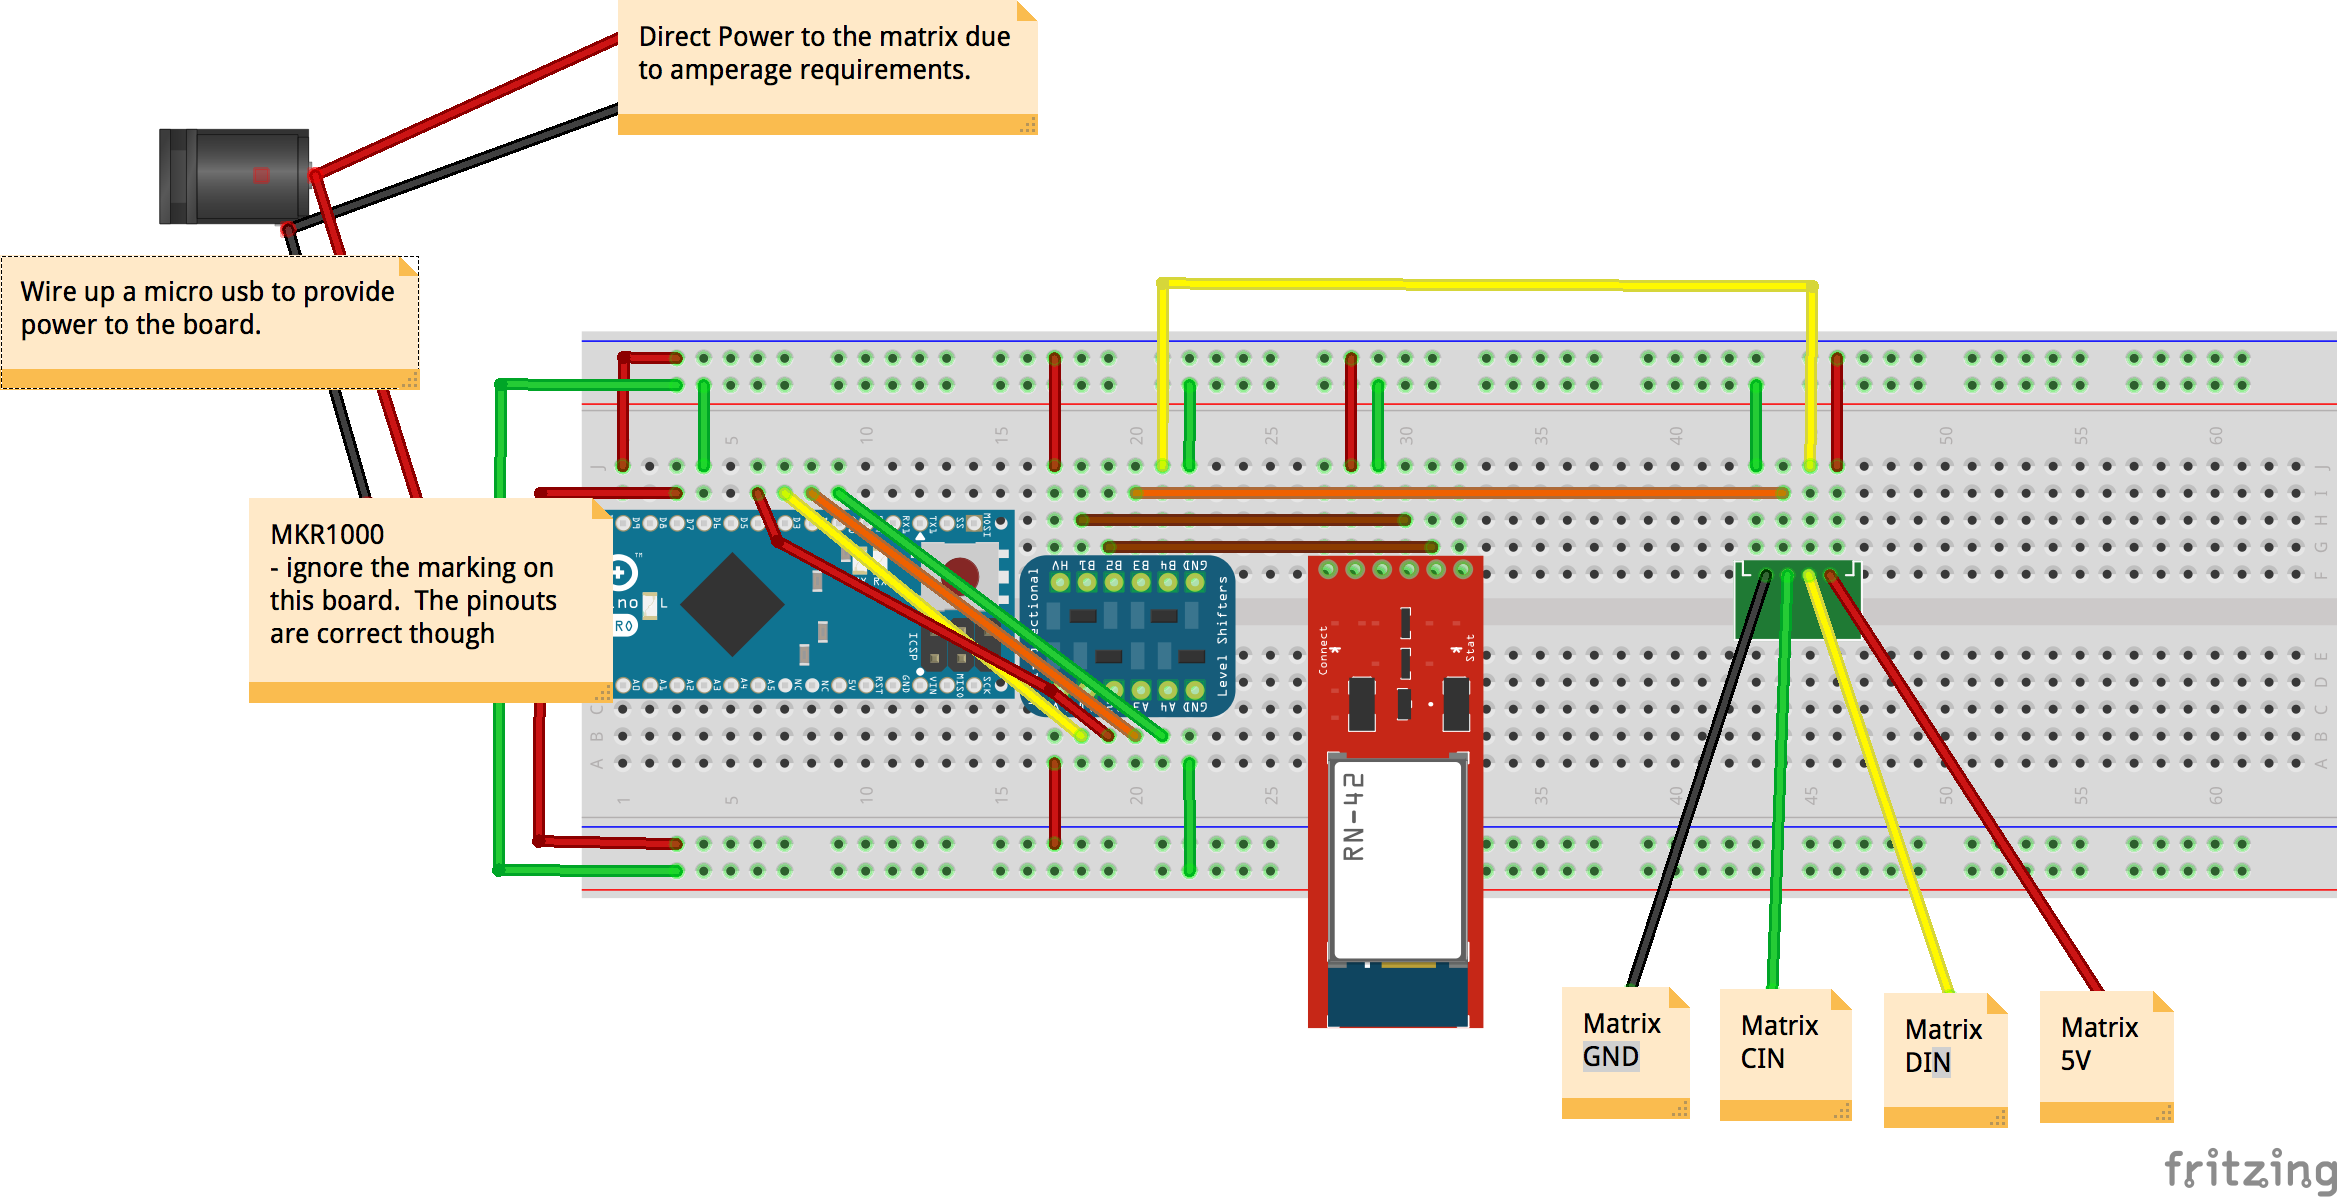
回路図
MKR1000はマイコンのみ(実機未リリース時の回路図)
製造プロセス
- UnifiedWater v1 - 完全なArduino水質センサーキット
- GSM接続対応ポータブル投票システム「Mobile Vote Box」
- Arduino 101とtinyTILE BLEでスマートマッチングサングラスを作る
- Arduino Portenta H7で作る高性能エッジAIカメラ:OpenMV + TensorFlow Lite
- モダンジュークボックス:Raspberry Pi & Arduino LEDミュージックプレーヤー
- DIY Arduino スマートウォッチ — Apple Watch 風腕時計を自作
- Arduino NanoとSi4730で作る全帯域ラジオ(LW/MW/SW/FM)─ 低コスト・ステップバイステップ製作
- Wi-Fi対応IRレプリケーター:家電リモコン信号を学習・再送信して遠隔操作
- PCB表面処理の種類と選び方:HASL、ENIG、OSP、イマージョンSnの特徴と適用
- EDM放電加工の解説:技術、手法、用途
- フランジベアリング完全ガイド:種類、特徴、用途