


PyTest チュートリアル:概要、インストール方法、フレームワーク、アサーション
PyTest とは
PyTest ユーザーが Python プログラミング言語を使用してテスト コードを記述できるテスト フレームワークです。データベース、API、または UI のシンプルでスケーラブルなテスト ケースを作成するのに役立ちます。 PyTest は、主に API のテストを作成するために使用されます。単純な単体テストから複雑な機能テストまで、テストを作成するのに役立ちます。
PyTest を使用する理由
pytest の利点のいくつかは
- シンプルで簡単な構文のため、非常に簡単に始めることができます。
- テストを並行して実行できる
- 特定のテストまたはテストのサブセットを実行できます
- テストを自動的に検出
- テストをスキップ
- オープンソース
この Python PyTest チュートリアルでは、次のことを学びます:
- PyTest とは?
- PyTest を使用する理由
- PyTest のインストール方法
- 最初の基本的な PyTest
- PyTest でのアサーション
- PyTest がテスト ファイルとテスト メソッドを識別する方法
- 特定のファイルと複数のファイルから複数のテストを実行
- PyTest でテスト全体のサブセットを実行する
- Pytest と並行してテストを実行する
- Pytest フィクスチャ
- Pytest パラメータ化テスト
- Pytest Xfail / テストをスキップ
- 結果の XML
- API をテストする Pytest フレームワーク
PyTest のインストール方法
以下は、PyTest のインストール方法に関するプロセスです:
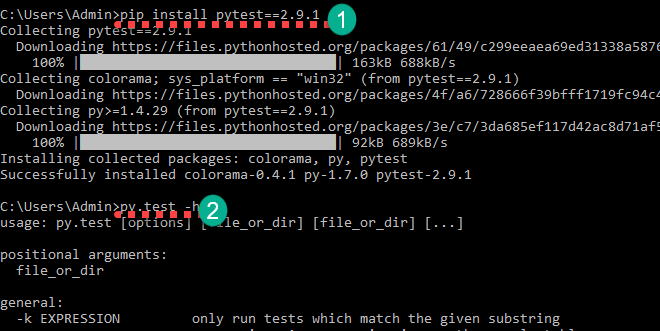
ステップ 1)
で pytest をインストールできますpip install pytest==2.9.1
インストールが完了したら、
で確認できます。py.test -h
ヘルプが表示されます
最初の基本的な PyTest
ここで、基本的な PyTest の例で Pytest の使用方法を学習します。
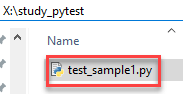
study_pytest フォルダーを作成します。このフォルダ内にテスト ファイルを作成します。
コマンド ラインでそのフォルダに移動してください。
フォルダ内に test_sample1.py という名前のファイルを作成します
以下のコードを追加して保存します
import pytest
def test_file1_method1():
	x=5
	y=6
	assert x+1 == y,"test failed"
	assert x == y,"test failed"
def test_file1_method2():
	x=5
	y=6
	assert x+1 == y,"test failed"
コマンドを使用してテストを実行します
py.test
次のように出力されます
test_sample1.py F.
============================================== FAILURES ========================================
____________________________________________ test_sample1 ______________________________________
    def test_file1_method1():
    	x=5
    	y=6
       	assert x+1 == y,"test failed"
>      	assert x == y,"test failed"
E       AssertionError: test failed
E       assert 5 == 6
test_sample1.py:6: AssertionError
ここでは test_sample1.py F.
Fは失敗と言う
ドット (.) は成功を意味します。
失敗セクションでは、失敗したメソッドと失敗の行を確認できます。ここで x==y は 5==6 を意味し、これは偽です。
この PyTest チュートリアルの次は、PyTest のアサーションについて学びます。
PyTest でのアサーション
Pytest アサーションは、True または False ステータスを返すチェックです。 Python Pytest では、テスト メソッドでアサーションが失敗した場合、そのメソッドの実行はそこで停止します。そのテスト メソッドの残りのコードは実行されず、Pytest アサーションは次のテスト メソッドで続行されます。
Pytest アサートの例:
assert "hello" == "Hai" is an assertion failure.
assert 4==4 is a successful assertion
assert True is a successful assertion
assert False is an assertion failure.
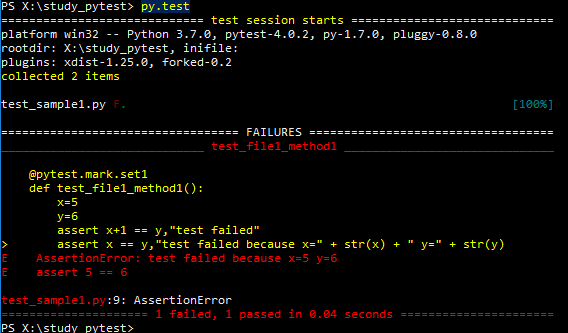
考慮
assert x == y,"test failed because x=" + str(x) + " y=" + str(y)
アサーションの代わりに、このコードを test_file1_method1() に配置します
assert x == y,"test failed"
テストを実行すると、AssertionError:test failed x=5 y=6 として失敗します。
PyTest がテスト ファイルとテスト メソッドを識別する方法
デフォルトでは、pytest は test_ で始まるファイル名のみを識別します または _test で終わる テストファイルとして。ただし、他のファイル名を明示的に指定できます (後で説明します)。 Pytest では、テスト メソッド名を “test” で始める必要があります 」これらのメソッドの実行を明示的に要求しても、他のすべてのメソッド名は無視されます。
有効な pytest ファイル名と無効な pytest ファイル名の例をいくつかご覧ください
test_login.py - valid
login_test.py - valid
testlogin.py -invalid
logintest.py -invalid
注:はい、明示的に pytest に testlogin.py と logintest.py を選択するように依頼できます
有効な pytest テスト メソッドと無効な pytest テスト メソッドの例を参照してください
def test_file1_method1(): - valid
def testfile1_method1(): - valid
def file1_method1(): - invalid
注:file1_method1() を明示的に言及しても、pytest はこのメソッドを実行しません。
特定のファイルと複数のファイルから複数のテストを実行
現在、フォルダー study_pytest 内に、ファイル test_sample1.py があります。 test_sample2.py 、 test_sample3.py など、複数のファイルがあるとします。フォルダーとサブフォルダー内のすべてのファイルからすべてのテストを実行するには、pytest コマンドを実行するだけです。
py.test
これにより、そのフォルダとそのフォルダの下のサブフォルダにある、test_ で始まるすべてのファイル名と _test で終わるファイル名が実行されます。
特定のファイルからのみテストを実行するには、py.test
py.test test_sample1.py
PyTest でテスト全体のサブセットを実行する
テスト スイート全体を実行したくない場合があります。 Pytest を使用すると、特定のテストを実行できます。 2 つの方法でそれを行うことができます
- 部分文字列一致によるテスト名のグループ化
- マーカーによるテストのグループ化
すでに test_sample1.py があります。ファイル test_sample2.py を作成し、以下のコードを追加します
def test_file2_method1():
	x=5
	y=6
	assert x+1 == y,"test failed"
	assert x == y,"test failed because x=" + str(x) + " y=" + str(y)
def test_file2_method2():
	x=5
	y=6
	assert x+1 == y,"test failed"
だから私たちは現在
- test_sample1.py
- test_file1_method1()
- test_file1_method2()
- test_sample2.py
- test_file2_method1()
- test_file2_method2()
オプション 1) 部分文字列一致によるテストの実行
ここで、名前に method1 を含むすべてのテストを実行するために、実行する必要があります
py.test -k method1 -v
-k <expression> is used to represent the substring to match
-v increases the verbosity
したがって、py.test -k method1 -v を実行すると、次の結果が得られます
test_sample2.py::test_file2_method1 FAILED
test_sample1.py::test_file1_method1 FAILED

============================================== FAILURES ==============================================
_________________________________________ test_file2_method1 _________________________________________
    def test_file2_method1():
    	x=5
    	y=6
       	assert x+1 == y,"test failed"
>      	assert x == y,"test failed because x=" + str(x) + " y=" + str(y)
E       AssertionError: test failed because x=5 y=6
E       assert 5 == 6
test_sample2.py:5: AssertionError

_________________________________________ test_file1_method1 _________________________________________
    @pytest.mark.only
    def test_file1_method1():
    	x=5
    	y=6
       	assert x+1 == y,"test failed"
>      	assert x == y,"test failed because x=" + str(x) + " y=" + str(y)
E       AssertionError: test failed because x=5 y=6
E       assert 5 == 6
test_sample1.py:8: AssertionError

================================= 2 tests deselected by '-kmethod1' ==================================
=============================== 2 failed, 2 deselected in 0.02 seconds ===============================
'-kmethod1' で選択解除された 2 つのテスト test_file1_method2 と test_file2_method2 です
次のようなさまざまな組み合わせで実行してみてください:-
py.test -k method -v - will run all the four methods
py.test -k methods -v – will not run any test as there is no test name matches the substring 'methods'
オプション 2) マーカーでテストを実行する
Pytest では、pytest マーカー @pytest.mark を使用して、テスト メソッドのさまざまな属性を設定できます。テスト ファイルでマーカーを使用するには、テスト ファイルに pytest をインポートする必要があります。
ここでは、さまざまなマーカー名をテスト メソッドに適用し、マーカー名に基づいて特定のテストを実行します。
を使用して、各テスト名にマーカーを定義できます。@pytest.mark.<name>.
テスト メソッドでマーカー set1 と set2 を定義しており、マーカー名を使用してテストを実行します。次のコードでテスト ファイルを更新します
test_sample1.py
import pytest
@pytest.mark.set1
def test_file1_method1():
	x=5
	y=6
	assert x+1 == y,"test failed"
	assert x == y,"test failed because x=" + str(x) + " y=" + str(y)

@pytest.mark.set2
def test_file1_method2():
	x=5
	y=6
	assert x+1 == y,"test failed"
test_sample2.py
import pytest
@pytest.mark.set1
def test_file2_method1():
	x=5
	y=6
	assert x+1 == y,"test failed"
	assert x == y,"test failed because x=" + str(x) + " y=" + str(y)

@pytest.mark.set1
def test_file2_method2():
	x=5
	y=6
	assert x+1 == y,"test failed"
でマークされたテストを実行できます
py.test -m <name>
-m <name> mentions the marker name
py.test -m set1 を実行します。これにより、メソッド test_file1_method1、test_file2_method1、test_file2_method2 が実行されます。
py.test -m set2 を実行すると、test_file1_method2 が実行されます。
Pytest と並行してテストを実行する
通常、テスト スイートには複数のテスト ファイルと数百のテスト メソッドが含まれ、実行にかなりの時間がかかります。 Pytest を使用すると、テストを並行して実行できます。
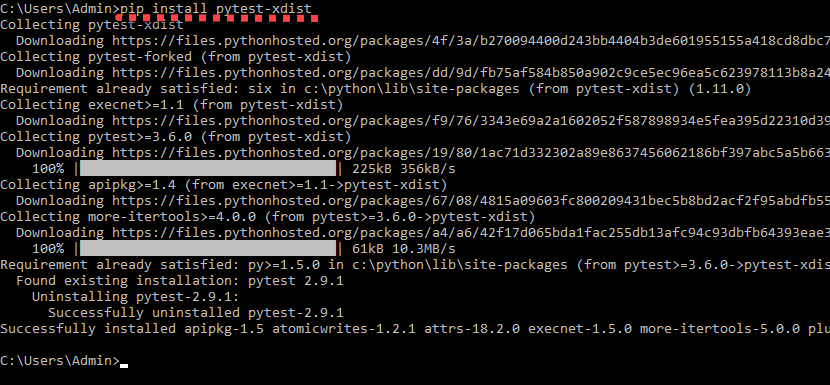
そのためには、最初に pytest-xdist を実行してインストールする必要があります
pip install pytest-xdist
今すぐテストを実行できます
py.test -n 4
-n
Pytest フィクスチャ
フィクスチャは、すべてのテスト メソッドの前に何らかのコードを実行する場合に使用されます。したがって、すべてのテストで同じコードを繰り返す代わりに、フィクスチャを定義します。通常、フィクスチャはデータベース接続の初期化、 base の受け渡しなどに使用されます
メソッドは、
でマークすることにより、Pytest フィクスチャとしてマークされます。@pytest.fixture
テスト メソッドは、フィクスチャを入力パラメーターとして指定することで、Pytest フィクスチャを使用できます。
次のコードで新しいファイル test_basic_fixture.py を作成します
import pytest
@pytest.fixture
def supply_AA_BB_CC():
	aa=25
	bb =35
	cc=45
	return [aa,bb,cc]

def test_comparewithAA(supply_AA_BB_CC):
	zz=35
	assert supply_AA_BB_CC[0]==zz,"aa and zz comparison failed"

def test_comparewithBB(supply_AA_BB_CC):
	zz=35
	assert supply_AA_BB_CC[1]==zz,"bb and zz comparison failed"

def test_comparewithCC(supply_AA_BB_CC):
	zz=35
	assert supply_AA_BB_CC[2]==zz,"cc and zz comparison failed"
こちら
- supply_AA_BB_CC というフィクスチャがあります。このメソッドは 3 つの値のリストを返します。
- それぞれの値と比較する 3 つのテスト方法があります。
各テスト関数には、使用可能なフィクスチャと名前が一致する入力引数があります。次に、Pytest は対応するフィクスチャ メソッドを呼び出し、返された値は入力引数 (ここではリスト [25,35,45]) に格納されます。現在、リスト項目は比較のためにテスト メソッドで使用されています。
テストを実行して結果を確認してください
py.test test_basic_fixture
test_basic_fixture.py::test_comparewithAA FAILED
test_basic_fixture.py::test_comparewithBB PASSED
test_basic_fixture.py::test_comparewithCC FAILED

============================================== FAILURES ==============================================
_________________________________________ test_comparewithAA _________________________________________
supply_AA_BB_CC = [25, 35, 45]
    def test_comparewithAA(supply_AA_BB_CC):
    	zz=35
>   	assert supply_AA_BB_CC[0]==zz,"aa and zz comparison failed"
E    AssertionError: aa and zz comparison failed
E    assert 25 == 35
test_basic_fixture.py:10: AssertionError

_________________________________________ test_comparewithCC _________________________________________
supply_AA_BB_CC = [25, 35, 45]
    def test_comparewithCC(supply_AA_BB_CC):
    	zz=35
>   	assert supply_AA_BB_CC[2]==zz,"cc and zz comparison failed"
E    AssertionError: cc and zz comparison failed
E    assert 45 == 35
test_basic_fixture.py:16: AssertionError
================================= 2 failed, 1 passed in 0.05 seconds =================================
zz=BB=35 であるため、テスト test_comparewithBB は成功し、残りの 2 つのテストは失敗します。
フィクスチャ メソッドには、それが定義されているテスト ファイル内にのみスコープがあります。他のテスト ファイルのフィクスチャにアクセスしようとすると、フィクスチャ ‘supply_AA_BB_CC’ が見つかりません というエラーが表示されます。 他のファイルのテスト メソッド用。
複数のテスト ファイルに対して同じフィクスチャを使用するには、conftest.py というファイルにフィクスチャ メソッドを作成します。
以下の PyTest の例でこれを見てみましょう。次のコードで 3 つのファイル conftest.py、test_basic_fixture.py、test_basic_fixture2.py を作成します
conftest.py
import pytest
@pytest.fixture
def supply_AA_BB_CC():
	aa=25
	bb =35
	cc=45
	return [aa,bb,cc]
test_basic_fixture.py
import pytest
def test_comparewithAA(supply_AA_BB_CC):
	zz=35
	assert supply_AA_BB_CC[0]==zz,"aa and zz comparison failed"

def test_comparewithBB(supply_AA_BB_CC):
	zz=35
	assert supply_AA_BB_CC[1]==zz,"bb and zz comparison failed"

def test_comparewithCC(supply_AA_BB_CC):
	zz=35
	assert supply_AA_BB_CC[2]==zz,"cc and zz comparison failed"
test_basic_fixture2.py
import pytest
def test_comparewithAA_file2(supply_AA_BB_CC):
	zz=25
	assert supply_AA_BB_CC[0]==zz,"aa and zz comparison failed"

def test_comparewithBB_file2(supply_AA_BB_CC):
	zz=25
	assert supply_AA_BB_CC[1]==zz,"bb and zz comparison failed"

def test_comparewithCC_file2(supply_AA_BB_CC):
	zz=25
	assert supply_AA_BB_CC[2]==zz,"cc and zz comparison failed"
pytest は最初にテスト ファイルでフィクスチャを探し、見つからない場合は conftest.py を探します
py.test -k test_comparewith -v でテストを実行すると、以下の結果が得られます
test_basic_fixture.py::test_comparewithAA FAILED
test_basic_fixture.py::test_comparewithBB PASSED
test_basic_fixture.py::test_comparewithCC FAILED
test_basic_fixture2.py::test_comparewithAA_file2 PASSED
test_basic_fixture2.py::test_comparewithBB_file2 FAILED
test_basic_fixture2.py::test_comparewithCC_file2 FAILED
Pytest パラメータ化テスト
テストをパラメーター化する目的は、複数の引数セットに対してテストを実行することです。 @pytest.mark.parametrize でこれを行うことができます。
これは、以下の PyTest の例で確認できます。ここでは、3 つの引数をテスト メソッドに渡します。このテスト メソッドは最初の 2 つの引数を追加し、それを 3 番目の引数と比較します。
以下のコードでテストファイル test_addition.py を作成します
import pytest
@pytest.mark.parametrize("input1, input2, output",[(5,5,10),(3,5,12)])
def test_add(input1, input2, output):
	assert input1+input2 == output,"failed"
ここで、テスト メソッドは、input1、input2、output の 3 つの引数を受け入れます。入力 1 と入力 2 を加算し、出力と比較します。
py.test -k test_add -v でテストを実行して結果を見てみましょう
test_addition.py::test_add[5-5-10] PASSED
test_addition.py::test_add[3-5-12] FAILED
============================================== FAILURES ==============================================
__________________________________________ test_add[3-5-12] __________________________________________
input1 = 3, input2 = 5, output = 12
    @pytest.mark.parametrize("input1, input2, output",[(5,5,10),(3,5,12)])
    def test_add(input1, input2, output):
>   	assert input1+input2 == output,"failed"
E    AssertionError: failed
E    assert (3 + 5) == 12
test_addition.py:5: AssertionError
テストが 2 回実行されたことがわかります。1 回は 5+5 ==10 をチェックし、もう 1 回は 3+5 ==12 をチェックしています。
test_addition.py::test_add[5-5-10] 合格
test_addition.py::test_add[3-5-12] 失敗
Pytest Xfail / テストをスキップ
テストを実行したくない場合や、テスト ケースが特定の時間に関連しない場合があります。このような状況では、テストを Xfail にするか、テストをスキップするかを選択できます
xfailed テストは実行されますが、部分的に失敗または合格したテストとしてはカウントされません。そのテストが失敗した場合、トレースバックは表示されません。
を使用して xfail テストを実行できます@pytest.mark.xfail.
テストをスキップすると、テストは実行されません。
を使用してテストをスキップできます@pytest.mark.skip.
以下のコードで test_addition.py を編集します
import pytest
@pytest.mark.skip
def test_add_1():
	assert 100+200 == 400,"failed"

@pytest.mark.skip
def test_add_2():
	assert 100+200 == 300,"failed"

@pytest.mark.xfail
def test_add_3():
	assert 15+13 == 28,"failed"

@pytest.mark.xfail
def test_add_4():
	assert 15+13 == 100,"failed"

def test_add_5():
	assert 3+2 == 5,"failed"

def test_add_6():
	assert 3+2 == 6,"failed"
こちら
- test_add_1 と test_add_2 はスキップされ、実行されません。
- test_add_3 と test_add_4 は xfailed です。これらのテストは実行され、xfailed (テストが失敗した場合) または xpassed (テストが成功した場合) テストの一部になります。失敗のトレースバックはありません。
- test_add_5 と test_add_6 が実行され、test_add_5 がパスする間、test_add_6 はトレースバックで失敗を報告します
py.test test_addition.py -v でテストを実行して結果を見る
test_addition.py::test_add_1 SKIPPED
test_addition.py::test_add_2 SKIPPED
test_addition.py::test_add_3 XPASS
test_addition.py::test_add_4 xfail
test_addition.py::test_add_5 PASSED
test_addition.py::test_add_6 FAILED

============================================== FAILURES ==============================================
_____________________________________________ test_add_6 _____________________________________________
    def test_add_6():
>   	assert 3+2 == 6,"failed"
E    AssertionError: failed
E    assert (3 + 2) == 6
test_addition.py:24: AssertionError

================ 1 failed, 1 passed, 2 skipped, 1 xfailed, 1 xpassed in 0.07 seconds =================
結果 XML
テスト結果を XML 形式で作成し、継続的インテグレーション サーバーにフィードしてさらに処理することができます。これは
によって行うことができますpy.test test_sample1.py -v –junitxml=”result.xml”
result.xml には、テストの実行結果が記録されます。以下のサンプルの result.xml を見つけてください
<?xml version="1.0" encoding="UTF-8"?>
<testsuite errors="0" failures="1" name="pytest" skips="0" tests="2" time="0.046">
   <testcase classname="test_sample1" file="test_sample1.py" line="3" name="test_file1_method1" time="0.001384973526">
     <failure message="AssertionError:test failed because x=5 y=6 assert 5 ==6">
    @pytest.mark.set1
    def test_file1_method1():
    	x=5
    	y=6
       	assert x+1 == y,"test failed"
>      	assert x == y,"test failed because x=" + str(x) + " y=" + str(y)
E       AssertionError: test failed because x=5 y=6
E       assert 5 == 6
         test_sample1.py:9: AssertionError
    </failure>
   </testcase>
   <testcase classname="test_sample1" file="test_sample1.py" line="10" name="test_file1_method2" time="0.000830173492432" />
</testsuite>
API をテストする Pytest フレームワーク
次に、API をテストするための小さな pytest フレームワークを作成します。ここで使用する API は、https://reqres.in/ から無料のものを使用しています。この Web サイトは、テスト可能な API を提供するためのものです。このウェブサイトはデータを保存しません。
ここで、
のテストをいくつか書きます。- 一部のユーザーのリスト
- ユーザーでログイン
与えられたコードで以下のファイルを作成してください
conftest.py – すべてのテスト メソッドのベース URL を提供するフィクスチャがあります
import pytest
@pytest.fixture
def supply_url():
	return "https://reqres.in/api"
test_list_user.py – 有効なユーザーと無効なユーザーを一覧表示するためのテスト メソッドが含まれています
- test_list_valid_user は有効なユーザー フェッチをテストし、応答を検証します
- test_list_invaliduser は無効なユーザー フェッチをテストし、応答を検証します
import pytest
import requests
import json
@pytest.mark.parametrize("userid, firstname",[(1,"George"),(2,"Janet")])
def test_list_valid_user(supply_url,userid,firstname):
	url = supply_url + "/users/" + str(userid)
	resp = requests.get(url)
	j = json.loads(resp.text)
	assert resp.status_code == 200, resp.text
	assert j['data']['id'] == userid, resp.text
	assert j['data']['first_name'] == firstname, resp.text

def test_list_invaliduser(supply_url):
	url = supply_url + "/users/50"
	resp = requests.get(url)
	assert resp.status_code == 404, resp.text
test_login_user.py – ログイン機能をテストするためのテスト メソッドが含まれています。
- test_login_valid は、電子メールとパスワードを使用して有効なログイン試行をテストします
- test_login_no_password は、パスワードを渡さずに無効なログイン試行をテストします
- test_login_no_email は、メールを渡さずに無効なログイン試行をテストします。
import pytest
import requests
import json
def test_login_valid(supply_url):
	url = supply_url + "/login/"
	data = {'email':'test@test.com','password':'something'}
	resp = requests.post(url, data=data)
	j = json.loads(resp.text)
	assert resp.status_code == 200, resp.text
	assert j['token'] == "QpwL5tke4Pnpja7X", resp.text

def test_login_no_password(supply_url):
	url = supply_url + "/login/"
	data = {'email':'test@test.com'}
	resp = requests.post(url, data=data)
	j = json.loads(resp.text)
	assert resp.status_code == 400, resp.text
	assert j['error'] == "Missing password", resp.text

def test_login_no_email(supply_url):
	url = supply_url + "/login/"
	data = {}
	resp = requests.post(url, data=data)
	j = json.loads(resp.text)
	assert resp.status_code == 400, resp.text
	assert j['error'] == "Missing email or username", resp.text
py.test -v を使用してテストを実行します
結果を次のように参照してください
test_list_user.py::test_list_valid_user[1-George] PASSED
test_list_user.py::test_list_valid_user[2-Janet] PASSED
test_list_user.py::test_list_invaliduser PASSED
test_login_user.py::test_login_valid PASSED
test_login_user.py::test_login_no_password PASSED
test_login_user.py::test_login_no_email PASSED
テストを更新し、さまざまな出力を試してください
まとめ
この PyTest チュートリアルでは、
- pip install pytest=2.9.1 を使用して pytest をインストールします
- 単純な pytest プログラムを作成し、py.test コマンドで実行します。
- アサーション ステートメント assert x==y は、True または False を返します。
- pytest がテスト ファイルとメソッドを識別する方法
- test_ で始まるテスト ファイル または _test で終わる
- test で始まるテスト メソッド
- py.test コマンドは、そのフォルダーとサブフォルダー内のすべてのテスト ファイルを実行します。特定のファイルを実行するには、コマンド py.test
- テスト メソッドのサブセットを実行する
- 部分文字列 matching.py.test -k
-v によるテスト名のグループ化は、名前に を含むすべてのテストを実行します。 - マーカーでテストを実行します。@pytest.mark.
を使用してテストをマークし、pytest -m を使用してテストを実行して、 としてマークされたテストを実行します。 - テストを並行して実行
- pip install pytest-xdist を使用して pytest-xdist をインストールします
- py.test -n NUM (NUM はワーカーの数) を使用してテストを実行します
- @pytest.fixture でメソッドをマークすることにより、すべてのテストの前にコードを実行するフィクスチャ メソッドを作成する
- フィクスチャ メソッドのスコープは、定義されているファイル内にあります。
- conftest.py ファイルで定義することにより、複数のテスト ファイルからフィクスチャ メソッドにアクセスできます。
- テスト メソッドは、Pytest フィクスチャを入力引数として使用してアクセスできます。
- 複数の入力セットに対して実行するテストのパラメータ化。
@pytest.mark.parametrize(“input1, input2, output”,[(5,5,10),(3,5,12)] )
def test_add(input1, input2, output):
assert input1+input2 ==output,”failed”
入力 (5,5,10) および (3) でテストを実行します,5,12) - @pytets.mark.skip と @pytest.mark.xfail を使用してテストをスキップ/xfail する
- py.test test_sample1.py -v –junitxml=”result.xml” を使用して、実行されたテストの詳細をカバーする XML 形式でテスト結果を作成します
- API をテストするサンプル pytest フレームワーク
Python