


Arduinoゲームプロジェクト–Arduino用のゆるい鳥のレプリカ
このArduinoプロジェクトでは、ArduinoとTFTタッチスクリーンを使用して、スマートフォン向けの人気のあるFlappyBirdゲームのレプリカであるクールなArduinoゲームを作成します。次の動画を見るか、下の文章を読むことで、その仕組みを学ぶことができます。
ゲームは非常にシンプルですが、面白くて中毒性があります。タッチスクリーンを使用して鳥を制御し、進行するにつれて速度が上がる動く柱を避けようとします。また、電源を抜いても最高得点を貯めることができます。[/ column]
前のチュートリアル(Arduino TFTチュートリアル)では、ArduinoでTFTタッチスクリーンを使用する方法を詳しく学び、このチュートリアルで説明するゲームの例を残しました。さて、前のチュートリアルと同じように、このArduinoゲームの背後にあるコードを段階的に説明します。
コードは少し長く、理解を深めるために、プログラムのソースコードを各セクションの説明とともにセクションに投稿します。そして、この記事の最後に、完全なソースコードを投稿します。
HenningKarlsenによって作成されたUTFTおよびURTouchライブラリを使用します。これらのライブラリは、彼のWebサイトwww.RinkyDinkElectronics.comからダウンロードできます。また、EEPROMライブラリを使用して最高スコアをEEPROMに保存します。 EEPROMは、ボードの電源がオフの場合でもデータを保存できるメモリです。
ライブラリを含めたら、UTFTオブジェクトとURTouchオブジェクトを作成し、ゲームに必要な変数を定義する必要があります。セットアップセクションでは、表示とタッチを開始し、EEPROMから最高スコアを読み取り、initiateGame()カスタム関数を使用してゲームを開始する必要があります。
したがって、initiateGame()カスタム関数を使用して、ゲームの初期状態を描画します。これを行う方法は次のとおりです。最初に画面をクリアし、次に青い背景を描画し、下部セクションを描画し、テキストを追加し、drawBird()カスタム関数を呼び出して鳥を描画する必要があります。この後、画面をタップするまでゲームが開始されないようにするwhileループが必要です。したがって、この状態のときに右上隅を押すと、最高スコアをゼロにリセットできます。画面上の他の場所を押すと、whileループから抜け出し、コードのメインループに入ります。ゲームを開始します。
メインループセクションには、柱の描画に使用されるxP変数とyP変数があります。最初は、xP変数の値は画面のサイズとして319であり、yP変数の値は最初の柱の高さである100です。反復ごとに、xP変数の値はmovingRate変数の値だけ減少します。movingRate変数の値は最初は3で、ゲームを進めるにつれて増加します。
ゲームの動作原理は次のとおりです。50ピクセル幅のピラーが右から左に移動し、次のピラーごとにランダムな高さが異なります。それらを論理的に動かすには、各反復の後に画面をクリアし、柱を新しい位置に置いてグラフィックを再描画する必要があります。ただし、画面のリフレッシュレートが低く、グラフィックのちらつきが発生するため、これを行うことはできません。すべてのピクセルをアクティブにするには、画面にもう少し時間がかかるため、移動しているものだけを即興で再描画する必要があります。
それでは、drawPilars()カスタム関数がそれをどのように行うかを見てみましょう。 xP変数とyP変数を受け取り、それらとfillRect()関数を使用して柱を描画します。したがって、反復ごとに、新しい場所に柱を描画し、左側と右側から青い長方形を追加して、前に描画した柱をクリアします。このようにして、実際には、移動する柱を再描画するだけの即興演奏を行います。ここでのifステートメントは、「x2」パラメーターの値が画面サイズを超えている場合に何らかの理由でfillRect()関数が機能しなかったため、追加の即興です。また、このカスタム関数の最後に、到達スコアの値を出力する必要があります。
ループセクションに戻ると、鳥のy位置であるyB変数があります。これは、各反復後に増加する落下率に依存し、そのようにして加速度または重力の効果を取得します。また、ここでは衝突をチェックし、ifステートメントを使用して鳥を閉じ込め、鳥が上、地面、または柱に当たった場合にゲームが終了するようにします。
次はdrawBird()カスタム関数で、それがどのように機能するかを見てみましょう。鳥は実際には、HenningKarlsenによって作成されたImageConverter565ツールを使用してビットマップに変換される写真です。ツールを使用して作成された「.c」ファイルは、スケッチの起動時にロードされるように、ディレクトリに含まれている必要があります。また、このようにビットマップを定義する必要があり、drawBitmap()関数を使用して、画面に写真を描画します。鳥のX座標は固定されており、yB変数はY座標です。柱と同様に、鳥の上下に2つの青い長方形を描くことで、鳥の以前の状態をクリアします。
ループに戻ると、柱が画面を通過した後、xP変数が319にリセットされ、yPは柱の高さに対して20から100までの新しいランダム値を取得し、スコアが1つ増加することがわかります。次のifステートメントで、鳥を制御します。画面をタップすると、落下率が負に設定され、鳥がジャンプします。画面を押したままにすると、elseifステートメントでそれが発生しなくなります。最後のifステートメントはゲームの難易度に関するものであり、各細かいポイントの後に柱の移動速度を上げます。
さて、残っているのは、gameOver()カスタム関数がどのように機能するかを確認することです。 1秒の遅延の後、画面がクリアされ、スコアとテキストが印刷されます。スコアが最高スコアよりも高い場合は、EEPROMに書き留められ、すべての変数が開始位置の値にリセットされ、最後にリセットされます。ゲームを再開するためにinitiateGame()カスタム関数を呼び出します。
これですべてです。コードの説明が十分に明確であることを願っています。ご不明な点がございましたら、下のコメント欄でお気軽にお問い合わせください。
これは、Arduinoスケッチ、鳥の画像、鳥のビットマップファイルを含むダウンロードファイルです。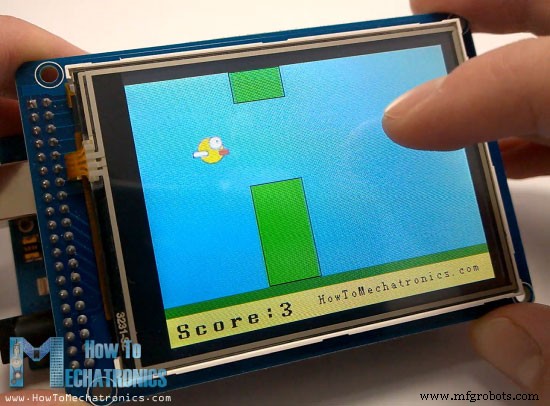
 #include <UTFT.h>
#include <URTouch.h>
#include <EEPROM.h>

//==== Creating Objects
UTFT    myGLCD(SSD1289,38,39,40,41); //Parameters should be adjusted to your Display/Schield model
URTouch  myTouch( 6, 5, 4, 3, 2);

//==== Defining Fonts
extern uint8_t SmallFont[];
extern uint8_t BigFont[];
extern uint8_t SevenSegNumFont[];

extern unsigned int bird01[0x41A]; // Bird Bitmap

int x, y; // Variables for the coordinates where the display has been pressed

// Floppy Bird
int xP = 319;
int yP = 100;
int yB = 50;
int movingRate = 3;
int fallRateInt = 0;
float fallRate = 0;
int score = 0;
int lastSpeedUpScore = 0;
int highestScore;
boolean screenPressed = false;
boolean gameStarted = false;

void setup() {
  // Initiate display
  myGLCD.InitLCD();
  myGLCD.clrScr();
  myTouch.InitTouch();
  myTouch.setPrecision(PREC_MEDIUM);

  highestScore = EEPROM.read(0); // Read the highest score from the EEPROM

  initiateGame(); // Initiate the game
}Code language: Arduino (arduino)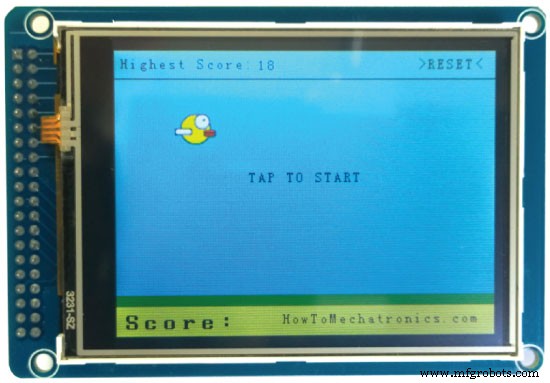
// ===== initiateGame - Custom Function
void initiateGame() {
  myGLCD.clrScr();
  // Blue background
  myGLCD.setColor(114, 198, 206);
  myGLCD.fillRect(0,0,319,239);
  // Ground
  myGLCD.setColor(221,216,148);
  myGLCD.fillRect(0, 215, 319, 239);
  myGLCD.setColor(47,175,68);
  myGLCD.fillRect(0, 205, 319, 214);
  // Text
  myGLCD.setColor(0, 0, 0);
  myGLCD.setBackColor(221, 216, 148);
  myGLCD.setFont(BigFont);
  myGLCD.print("Score:",5,220);
  myGLCD.setFont(SmallFont);
  myGLCD.print("HowToMechatronics.com", 140, 220);
  myGLCD.setColor(0, 0, 0);
  myGLCD.setBackColor(114, 198, 206);
  myGLCD.print("Highest Score: ",5,5);
  myGLCD.printNumI(highestScore, 120, 6);
  myGLCD.print(">RESET<",255,5);
  myGLCD.drawLine(0,23,319,23);
  myGLCD.print("TAP TO START",CENTER,100);

  drawBird(yB); // Draws the bird

  // Wait until we tap the sreen
  while (!gameStarted) {
    if (myTouch.dataAvailable()) {
    myTouch.read();
    x=myTouch.getX();
    y=myTouch.getY();
    // Reset higest score
    if ((x>=250) && (x<=319) &&(y>=0) && (y<=28)) {
    highestScore = 0;
    myGLCD.setColor(114, 198, 206);
    myGLCD.fillRect(120, 0, 150, 22);
    myGLCD.setColor(0, 0, 0);
    myGLCD.printNumI(highestScore, 120, 5);
    }
    if ((x>=0) && (x<=319) &&(y>=30) && (y<=239)) {
    gameStarted = true;
    myGLCD.setColor(114, 198, 206);
    myGLCD.fillRect(0, 0, 319, 32);
    }
  }
  }
  // Clears the text "TAP TO START" before the game start
  myGLCD.setColor(114, 198, 206);
  myGLCD.fillRect(85, 100, 235, 116);

}Code language: Arduino (arduino)// The Main Loop Section
void loop() {
xP=xP-movingRate; // xP - x coordinate of the pilars; range: 319 - (-51)
drawPilars(xP, yP); // Draws the pillars
// yB - y coordinate of the bird which depends on value of the fallingRate variable
yB+=fallRateInt;
fallRate=fallRate+0.4; // Each inetration the fall rate increase so that we can the effect of acceleration/ gravity
fallRateInt= int(fallRate);
// Checks for collision
if(yB>=180 || yB<=0){ // top and bottom
gameOver();
}
if((xP<=85) && (xP>=5) && (yB<=yP-2)){ // upper pillar
gameOver();
}
if((xP<=85) && (xP>=5) && (yB>=yP+60)){ // lower pillar
gameOver();
}
// Draws the bird
drawBird(yB);
// After the pillar has passed through the screen
if (xP<=-51){
xP=319; // Resets xP to 319
yP = rand() % 100+20; // Random number for the pillars height
score++; // Increase score by one
}
//==== Controlling the bird
if (myTouch.dataAvailable()&& !screenPressed) {
fallRate=-6; // Setting the fallRate negative will make the bird jump
screenPressed = true;
}
// Doesn't allow holding the screen / you must tap it
else if ( !myTouch.dataAvailable() && screenPressed){
screenPressed = false;
}
// After each five points, increases the moving rate of the pillars
if ((score - lastSpeedUpScore) == 5) {
lastSpeedUpScore = score;
movingRate++;
}
}Code language: Arduino (arduino)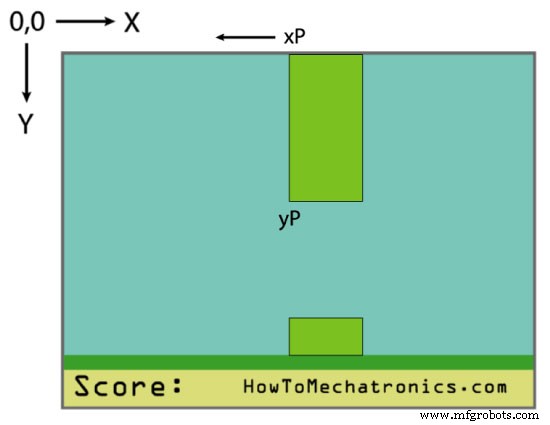
// ===== drawPlillars - Custom Function
void drawPilars(int x, int y) {
    if (x>=270){
      myGLCD.setColor(0, 200, 20);
      myGLCD.fillRect(318, 0, x, y-1);
      myGLCD.setColor(0, 0, 0);
      myGLCD.drawRect(319, 0, x-1, y);

      myGLCD.setColor(0, 200, 20);
      myGLCD.fillRect(318, y+81, x, 203);
      myGLCD.setColor(0, 0, 0);
      myGLCD.drawRect(319, y+80, x-1, 204);
    }
    else if( x<=268) {
      // Draws blue rectangle right of the pillar
      myGLCD.setColor(114, 198, 206);
      myGLCD.fillRect(x+51, 0, x+60, y);
      // Draws the pillar
      myGLCD.setColor(0, 200, 20);
      myGLCD.fillRect(x+49, 1, x+1, y-1);
      // Draws the black frame of the pillar
      myGLCD.setColor(0, 0, 0);
      myGLCD.drawRect(x+50, 0, x, y);
      // Draws the blue rectangle left of the pillar
      myGLCD.setColor(114, 198, 206);
      myGLCD.fillRect(x-1, 0, x-3, y);

      // The bottom pillar
      myGLCD.setColor(114, 198, 206);
      myGLCD.fillRect(x+51, y+80, x+60, 204);
      myGLCD.setColor(0, 200, 20);
      myGLCD.fillRect(x+49, y+81, x+1, 203);
      myGLCD.setColor(0, 0, 0);
      myGLCD.drawRect(x+50, y+80, x, 204);
      myGLCD.setColor(114, 198, 206);
      myGLCD.fillRect(x-1, y+80, x-3, 204);
  }
  // Draws the score
  myGLCD.setColor(0, 0, 0);
  myGLCD.setBackColor(221, 216, 148);
  myGLCD.setFont(BigFont);
  myGLCD.printNumI(score, 100, 220);
}Code language: Arduino (arduino)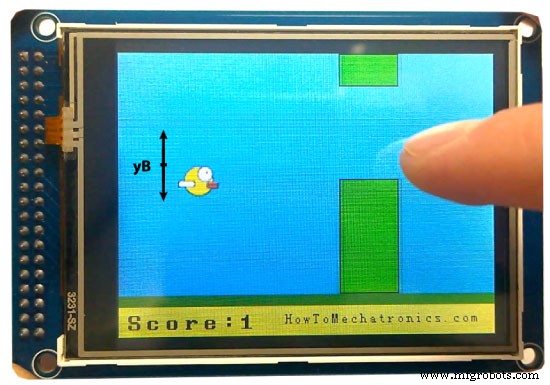
//====== drawBird() - Custom Function
void drawBird(int y) {
  // Draws the bird - bitmap
  myGLCD.drawBitmap (50, y, 35, 30, bird01);
  // Draws blue rectangles above and below the bird in order to clear its previus state
  myGLCD.setColor(114, 198, 206);
  myGLCD.fillRoundRect(50,y,85,y-6);
  myGLCD.fillRoundRect(50,y+30,85,y+36);
}Code language: Arduino (arduino)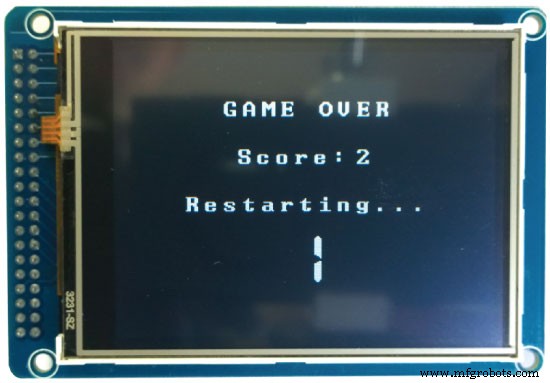
//======== gameOver() - Custom Function
void gameOver() {
  delay(1000); // 1 second
  // Clears the screen and prints the text
  myGLCD.clrScr();
  myGLCD.setColor(255, 255, 255);
  myGLCD.setBackColor(0, 0, 0);
  myGLCD.setFont(BigFont);
  myGLCD.print("GAME OVER", CENTER, 40);
  myGLCD.print("Score:", 100, 80);
  myGLCD.printNumI(score,200, 80);
  myGLCD.print("Restarting...", CENTER, 120);
  myGLCD.setFont(SevenSegNumFont);
  myGLCD.printNumI(2,CENTER, 150);
  delay(1000);
  myGLCD.printNumI(1,CENTER, 150);
  delay(1000);

  // Writes the highest score in the EEPROM
  if (score > highestScore) {
    highestScore = score;
    EEPROM.write(0,highestScore);
  }
  // Resets the variables to start position values
  xP=319;
  yB=50;
  fallRate=0;
  score = 0;
  lastSpeedUpScore = 0;
  movingRate = 3;
  gameStarted = false;
  // Restart game
  initiateGame();
}Code language: Arduino (arduino)/* Arduino Game Proejct
* Program made by Dejan Nedelkovski,
* www.HowToMechatronics.com
*/
/* This program uses the UTFT and URTouch libraries
* made by Henning Karlsen.
* You can find and download them at:
* www.RinkyDinkElectronics.com
*/
#include <UTFT.h>
#include <URTouch.h>
#include <EEPROM.h>
//==== Creating Objects
UTFT myGLCD(SSD1289,38,39,40,41); //Parameters should be adjusted to your Display/Schield model
URTouch myTouch( 6, 5, 4, 3, 2);
//==== Defining Fonts
extern uint8_t SmallFont[];
extern uint8_t BigFont[];
extern uint8_t SevenSegNumFont[];
extern unsigned int bird01[0x41A]; // Bird Bitmap
int x, y; // Variables for the coordinates where the display has been pressed
// Floppy Bird
int xP = 319;
int yP = 100;
int yB = 50;
int movingRate = 3;
int fallRateInt = 0;
float fallRate = 0;
int score = 0;
int lastSpeedUpScore = 0;
int highestScore;
boolean screenPressed = false;
boolean gameStarted = false;
void setup() {
// Initiate display
myGLCD.InitLCD();
myGLCD.clrScr();
myTouch.InitTouch();
myTouch.setPrecision(PREC_MEDIUM);
highestScore = EEPROM.read(0); // Read the highest score from the EEPROM
initiateGame(); // Initiate the game
}
void loop() {
xP=xP-movingRate; // xP - x coordinate of the pilars; range: 319 - (-51)
drawPilars(xP, yP); // Draws the pillars
// yB - y coordinate of the bird which depends on value of the fallingRate variable
yB+=fallRateInt;
fallRate=fallRate+0.4; // Each inetration the fall rate increase so that we can the effect of acceleration/ gravity
fallRateInt= int(fallRate);
// Checks for collision
if(yB>=180 || yB<=0){ // top and bottom
gameOver();
}
if((xP<=85) && (xP>=5) && (yB<=yP-2)){ // upper pillar
gameOver();
}
if((xP<=85) && (xP>=5) && (yB>=yP+60)){ // lower pillar
gameOver();
}
// Draws the bird
drawBird(yB);
// After the pillar has passed through the screen
if (xP<=-51){
xP=319; // Resets xP to 319
yP = rand() % 100+20; // Random number for the pillars height
score++; // Increase score by one
}
//==== Controlling the bird
if (myTouch.dataAvailable()&& !screenPressed) {
fallRate=-6; // Setting the fallRate negative will make the bird jump
screenPressed = true;
}
// Doesn't allow holding the screen / you must tap it
else if ( !myTouch.dataAvailable() && screenPressed){
screenPressed = false;
}
// After each five points, increases the moving rate of the pillars
if ((score - lastSpeedUpScore) == 5) {
lastSpeedUpScore = score;
movingRate++;
}
}
// ===== initiateGame - Custom Function
void initiateGame() {
myGLCD.clrScr();
// Blue background
myGLCD.setColor(114, 198, 206);
myGLCD.fillRect(0,0,319,239);
// Ground
myGLCD.setColor(221,216,148);
myGLCD.fillRect(0, 215, 319, 239);
myGLCD.setColor(47,175,68);
myGLCD.fillRect(0, 205, 319, 214);
// Text
myGLCD.setColor(0, 0, 0);
myGLCD.setBackColor(221, 216, 148);
myGLCD.setFont(BigFont);
myGLCD.print("Score:",5,220);
myGLCD.setFont(SmallFont);
myGLCD.print("HowToMechatronics.com", 140, 220);
myGLCD.setColor(0, 0, 0);
myGLCD.setBackColor(114, 198, 206);
myGLCD.print("Highest Score: ",5,5);
myGLCD.printNumI(highestScore, 120, 6);
myGLCD.print(">RESET<",255,5);
myGLCD.drawLine(0,23,319,23);
myGLCD.print("TAP TO START",CENTER,100);
drawBird(yB); // Draws the bird
// Wait until we tap the sreen
while (!gameStarted) {
if (myTouch.dataAvailable()) {
myTouch.read();
x=myTouch.getX();
y=myTouch.getY();
// Reset higest score
if ((x>=250) && (x<=319) &&(y>=0) && (y<=28)) {
highestScore = 0;
myGLCD.setColor(114, 198, 206);
myGLCD.fillRect(120, 0, 150, 22);
myGLCD.setColor(0, 0, 0);
myGLCD.printNumI(highestScore, 120, 5);
}
if ((x>=0) && (x<=319) &&(y>=30) && (y<=239)) {
gameStarted = true;
myGLCD.setColor(114, 198, 206);
myGLCD.fillRect(0, 0, 319, 32);
}
}
}
// Clears the text "TAP TO START" before the game start
myGLCD.setColor(114, 198, 206);
myGLCD.fillRect(85, 100, 235, 116);
}
// ===== drawPlillars - Custom Function
void drawPilars(int x, int y) {
if (x>=270){
myGLCD.setColor(0, 200, 20);
myGLCD.fillRect(318, 0, x, y-1);
myGLCD.setColor(0, 0, 0);
myGLCD.drawRect(319, 0, x-1, y);
myGLCD.setColor(0, 200, 20);
myGLCD.fillRect(318, y+81, x, 203);
myGLCD.setColor(0, 0, 0);
myGLCD.drawRect(319, y+80, x-1, 204);
}
else if( x<=268) {
// Draws blue rectangle right of the pillar
myGLCD.setColor(114, 198, 206);
myGLCD.fillRect(x+51, 0, x+60, y);
// Draws the pillar
myGLCD.setColor(0, 200, 20);
myGLCD.fillRect(x+49, 1, x+1, y-1);
// Draws the black frame of the pillar
myGLCD.setColor(0, 0, 0);
myGLCD.drawRect(x+50, 0, x, y);
// Draws the blue rectangle left of the pillar
myGLCD.setColor(114, 198, 206);
myGLCD.fillRect(x-1, 0, x-3, y);
// The bottom pillar
myGLCD.setColor(114, 198, 206);
myGLCD.fillRect(x+51, y+80, x+60, 204);
myGLCD.setColor(0, 200, 20);
myGLCD.fillRect(x+49, y+81, x+1, 203);
myGLCD.setColor(0, 0, 0);
myGLCD.drawRect(x+50, y+80, x, 204);
myGLCD.setColor(114, 198, 206);
myGLCD.fillRect(x-1, y+80, x-3, 204);
}
// Draws the score
myGLCD.setColor(0, 0, 0);
myGLCD.setBackColor(221, 216, 148);
myGLCD.setFont(BigFont);
myGLCD.printNumI(score, 100, 220);
}
//====== drawBird() - Custom Function
void drawBird(int y) {
// Draws the bird - bitmap
myGLCD.drawBitmap (50, y, 35, 30, bird01);
// Draws blue rectangles above and below the bird in order to clear its previus state
myGLCD.setColor(114, 198, 206);
myGLCD.fillRoundRect(50,y,85,y-6);
myGLCD.fillRoundRect(50,y+30,85,y+36);
}
//======== gameOver() - Custom Function
void gameOver() {
delay(3000); // 1 second
// Clears the screen and prints the text
myGLCD.clrScr();
myGLCD.setColor(255, 255, 255);
myGLCD.setBackColor(0, 0, 0);
myGLCD.setFont(BigFont);
myGLCD.print("GAME OVER", CENTER, 40);
myGLCD.print("Score:", 100, 80);
myGLCD.printNumI(score,200, 80);
myGLCD.print("Restarting...", CENTER, 120);
myGLCD.setFont(SevenSegNumFont);
myGLCD.printNumI(2,CENTER, 150);
delay(1000);
myGLCD.printNumI(1,CENTER, 150);
delay(1000);
// Writes the highest score in the EEPROM
if (score > highestScore) {
highestScore = score;
EEPROM.write(0,highestScore);
}
// Resets the variables to start position values
xP=319;
yB=50;
fallRate=0;
score = 0;
lastSpeedUpScore = 0;
movingRate = 3;
gameStarted = false;
// Restart game
initiateGame();
}Code language: Arduino (arduino)
製造プロセス