



Arduinoタッチブレークアウトゲーム:2.4インチTFT LCDでクラシックアーケードを再現
必要な部品と材料
| 部品 | 数量 | 備考 |
|---|---|---|
| Arduino UNO | 1 | |
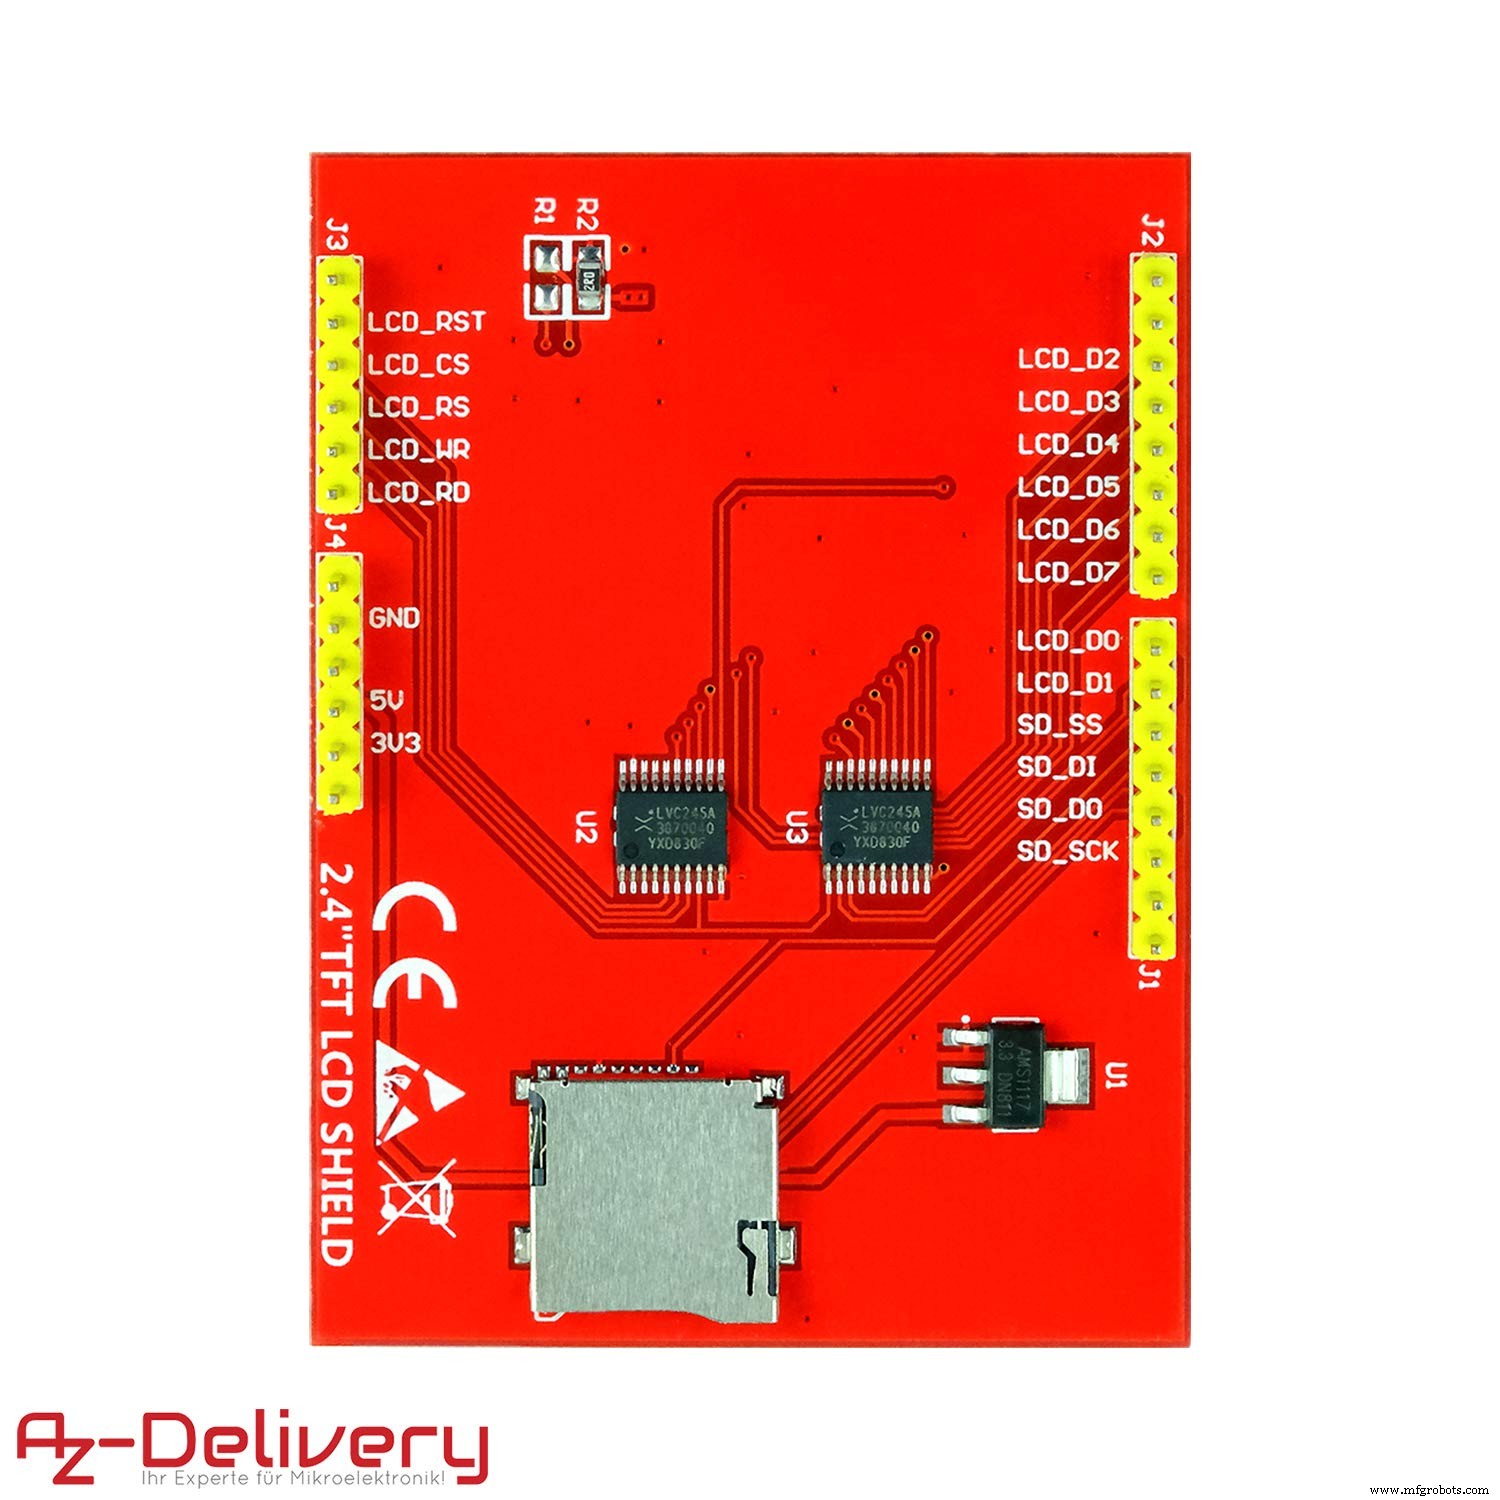
| AZ-Delivery 2.4インチ TFT LCD タッチディスプレイ シールド (ILI9341, 8ビット並列) | 1 | 240x320ピクセル、SDカードスロット内蔵 |
使用するアプリとオンラインサービス
- Arduino IDE
プロジェクト概要
Arduino UNOとTFT LCDシールド (240x320ピクセル、ILI9341ドライバー、8ビット並列通信) で動作する、クラシックなブレークアウトゲームの小型版です。
ゲーム内容
複数のステージがあり、各ステージでレンガの行数・列数・パターンを設定可能 (最大8行、2行ごとに色違い)。タッチパネルでパドルを左右に動かし、ボールを壁やパドルで反射させてレンガを壊していきます。パドルでボールを取り損ねるとミス。行ごとに得点が異なります。
uint8_t pointsForRow[] = {7, 7, 5, 5, 3, 3, 1, 1};各レベルでパドルサイズとボールサイズを設定可能。ボール速度はヒットごとに加速。パドルのどの位置でヒットしたかによって水平速度も変化します。
新しいステージを自由に定義・追加できます。


遊び方
デバイスを両手で持ち、親指で画面をタッチしてパドルを左右に動かします。

新ステージの定義方法
以下の構造体でステージを定義します。
typedef struct game_type {
    int ballsize;
    int playerwidth;
    int playerheight;
    int exponent;
    int top;
    int rows;
    int columns;
    int brickGap;
    int lives;
    int wall[GAMES_NUMBER];
    int initVelx;
    int initVely;
} game_type;
配列に追加します。
game_type games[GAMES_NUMBER] =
// ballsize, playerwidth, playerheight, exponent, top, rows, columns, brickGap, lives, wall[8], initVelx, initVely
{
    { 10, 60, 8, 6, 40 , 8, 8, 3, 3, {0x18, 0x66, 0xFF, 0xDB, 0xFF, 0x7E, 0x24, 0x3C} , 28, -28},
    { 10, 50, 8, 6, 40 , 8, 8, 3, 3, {0xFF, 0x99, 0xFF, 0xE7, 0xBD, 0xDB, 0xE7, 0xFF} , 28, -28},
    // ... 以下同様に追加可能
};
壁パターン
壁(レンガ配置)パターンは8x8ビット配列で定義します。
{0xAA, 0xAA, 0xAA, 0xAA, 0xAA, 0xAA, 0xAA, 0xAA}
これは以下のビットパターンに対応します (鏡像で表示されます)。
1,0,1,0,1,0,1,0
1,0,1,0,1,0,1,0
1,0,1,0,1,0,1,0
1,0,1,0,1,0,1,0
1,0,1,0,1,0,1,0
1,0,1,0,1,0,1,0
1,0,1,0,1,0,1,0
1,0,1,0,1,0,1,0

ハードウェア
AZ-Delivery 2.4インチ TFT LCDシールド (抵抗膜式4線タッチスクリーン、SDカードリーダー内蔵) を使用。詳細は拙記事「Road testing an AZ-Delivery 2.4 TFT LCD Touch Display」を参照。

シールドの取り付け
Arduinoにシールドを挿すだけです。


使用ライブラリ:
#include      // コアグラフィックライブラリ
#include
#include
タッチスクリーンのキャリブレーション
タッチ位置を正確に取得するためキャリブレーションが必要です。MCUFriend_kbv ライブラリの例題 TouchScreen_Calibr_native を使用します。シリアルモニタを開き、画面の指示に従って白くハイライトされた位置マーカーを押し続けます。全ポイント完了でキャリブレーション値が画面とシリアル出力に表示されます。このプロジェクトでは「ポートレート(縦向き)キャリブレーション」の値を使用します。
TouchScreen.h GFX Calibration
Making all control and bus pins INPUT_PULLUP
Typical 30k Analog pullup with corresponding pin
would read low when digital is written LOW
e.g. reads ~25 for 300R X direction
e.g. reads ~30 for 500R Y direction
Testing : (A2, D8) = 26
Testing : (A3, D9) = 28
ID = 0x9341
cx=153 cy=103 cz=534 X, Y, Pressure
cx=150 cy=475 cz=406 X, Y, Pressure
cx=155 cy=868 cz=231 X, Y, Pressure
cx=517 cy=103 cz=561 X, Y, Pressure
cx=535 cy=855 cz=364 X, Y, Pressure
cx=884 cy=88 cz=650 X, Y, Pressure
cx=908 cy=478 cz=557 X, Y, Pressure
cx=902 cy=864 cz=488 X, Y, Pressure
*** COPY-PASTE from Serial Terminal:
const int XP=8,XM=A2,YP=A3,YM=9; //240x320 ID=0x9341
const int TS_LEFT=118,TS_RT=931,TS_TOP=72,TS_BOT=887;
PORTRAIT CALIBRATION 240 x 320
x = map(p.x, LEFT=118, RT=931, 0, 240)
y = map(p.y, TOP=72, BOT=887, 0, 320)
LANDSCAPE CALIBRATION 320 x 240
x = map(p.y, LEFT=72, RT=887, 0, 320)
y = map(p.x, TOP=931, BOT=118, 0, 240)
アニメーション処理
画像を時間経過で移動させるには、静的な速度を用い、各タイムステップで位置に加算します。
pos += vel * dt;浮動小数点演算を避ける工夫
ILI9341の解像度は240x320で、ピクセル参照には9ビット×2必要。16ビット整数を使えば6ビットを小数部に割り当てられます。
nnnn nnnn nndd dddd (上位10ビット整数部、下位6ビット小数部)
この6ビットを「バイナリ指数 (exponent)」と呼び、0.000〜0.63の小数部を表現可能。整数演算のみで浮動小数点演算を回避できます。整数部取得は右シフトで行います。
number >> exponent実際のコードでは以下のように使用。ボール位置更新時に指数分右シフトして整数座標を得ています。
state.ballx += state.velx;
state.bally += state.vely;
checkBallCollisions(game, &state, state.ballx >> game->exponent, state.bally >> game->exponent);
checkBallExit(game, &state, state.ballx >> game->exponent, state.bally >> game->exponent);
デモモード
以下の定義を有効化すると、パドルが自動でボールを追従するデモモードになります (動画参照)。
#define DEMO_MODE楽しんでください!
新しいパターンやレベルを作って共有しましょう!
ソースコード
Arduino Breakout (Arduino)
/* Arduino Touch TFT Breakout
   Classic breakout game
   Parts needed:
   Ardunio UNO
   AZ-Delivery 2.4 TFT LCD Touch Display Arduino Shield or compatible
   This example code is in the public domain.
   Modified 07 11 2020
   By Enrique Albertos */
// #define DEMO_MODE
#include  // Core graphics library
#include
#include
#define BLACK 0x0000
#define BLUE 0x001F
#define RED 0xF800
#define GREEN 0x07E0
#define CYAN 0x07FF
#define MAGENTA 0xF81F
#define YELLOW 0xFFE0
#define WHITE 0xFFFF
#define PRIMARY_COLOR 0x4A11
#define PRIMARY_LIGHT_COLOR 0x7A17
#define PRIMARY_DARK_COLOR 0x4016
#define PRIMARY_TEXT_COLOR 0x7FFF
#define LCD_CS A3
#define LCD_CD A2
#define LCD_WR A1
#define LCD_RD A0
#define LCD_RESET A4
Adafruit_TFTLCD tft(LCD_CS, LCD_CD, LCD_WR, LCD_RD, LCD_RESET);
#define LOWFLASH (defined(__AVR_ATmega328P__) && defined(MCUFRIEND_KBV_H_))
#define MINPRESSURE 40
#define MAXPRESSURE 1000
const int16_t XP = 8, XM = A2, YP = A3, YM = 9; //240x320 ID=0x9341
const int16_t TS_LEFT = 122, TS_RT = 929, TS_TOP = 77, TS_BOT = 884;
const TouchScreen ts = TouchScreen(XP, YP, XM, YM, 300);
#define SCORE_SIZE 30
char scoreFormat[] = "%04d";
typedef struct gameSize_type {
    int16_t x, y, width, height;
} gameSize_type;
gameSize_type gameSize;
uint16_t backgroundColor = BLACK;
int level;
const uint8_t BIT_MASK[] = {0x01, 0x02, 0x04, 0x08, 0x10, 0x20, 0x40, 0x80};
uint8_t pointsForRow[] = {7, 7, 5, 5, 3, 3 , 1, 1};
#define GAMES_NUMBER 16
typedef struct game_type {
    int ballsize;
    int playerwidth;
    int playerheight;
    int exponent;
    int top;
    int rows;
    int columns;
    int brickGap;
    int lives;
    int wall[GAMES_NUMBER];
    int initVelx;
    int initVely;
} game_type;
game_type games[GAMES_NUMBER] =
// ballsize, playerwidth, playerheight, exponent, top, rows, columns, brickGap, lives, wall[8], initVelx, initVely
{
    { 10, 60, 8, 6, 40 , 8, 8, 3, 3, {0x18, 0x66, 0xFF, 0xDB, 0xFF, 0x7E, 0x24, 0x3C} , 28, -28},
    { 10, 50, 8, 6, 40 , 8, 8, 3, 3, {0xFF, 0x99, 0xFF, 0xE7, 0xBD, 0xDB, 0xE7, 0xFF} , 28, -28},
    { 10, 50, 8, 6, 40 , 8, 8, 3, 3, {0xAA, 0x55, 0xAA, 0x55, 0xAA, 0x55, 0xAA, 0x55} , 28, -28},
    { 8, 50, 8, 6, 40 , 8, 8, 3, 3, {0xFF, 0xC3, 0xC3, 0xC3, 0xC3, 0xC3, 0xC3, 0xFF} , 34, -34},
    { 10, 40, 8, 6, 40 , 8, 8, 3, 3, {0xFF, 0xAA, 0xAA, 0xFF, 0xFF, 0xAA, 0xAA, 0xFF} , 28, -28},
    { 10, 40, 8, 6, 40 , 8, 8, 3, 3, {0xAA, 0xAA, 0xAA, 0xAA, 0xAA, 0xAA, 0xAA, 0xAA} , 28, -28},
    { 12, 64, 8, 6, 60 , 4, 2, 3, 4, {0xFF, 0xFF, 0xFF, 0xFF, 0xFF, 0xFF, 0xFF, 0xFF} , 20, -20},
    { 12, 60, 8, 6, 60 , 5, 3, 3, 4, {0xFF, 0xFF, 0xFF, 0xFF, 0xFF, 0xFF, 0xFF, 0xFF} , 22, -22},
    { 10, 56, 8, 6, 30 , 6, 4, 3, 4, {0xFF, 0xFF, 0xFF, 0xFF, 0xFF, 0xFF, 0xFF, 0xFF} , 24, -24},
    { 10, 52, 8, 6, 30 , 7, 5, 3, 4, {0xFF, 0xFF, 0xFF, 0xFF, 0xFF, 0xFF, 0xFF, 0xFF} , 26, -26},
    { 8, 48, 8, 6, 30 , 8, 6, 3, 3, {0xFF, 0xFF, 0xFF, 0xFF, 0xFF, 0xFF, 0xFF, 0xFF} , 28, -28},
    { 8, 44, 8, 6, 30 , 8, 7, 3, 3, {0xFF, 0xFF, 0xFF, 0xFF, 0xFF, 0xFF, 0xFF, 0xFF} , 30, -30},
    { 8, 40, 8, 6, 30 , 8, 8, 3, 3, {0xFF, 0xFF, 0xFF, 0xFF, 0xFF, 0xFF, 0xFF, 0xFF} , 32, -32},
    { 8, 36, 8, 6, 40 , 8, 8, 3, 3, {0xFF, 0xFF, 0xFF, 0xFF, 0xFF, 0xFF, 0xFF, 0xFF} , 34, -34},
    { 8, 36, 8, 6, 40 , 8, 8, 3, 3, {0xAA, 0xAA, 0xAA, 0xAA, 0xAA, 0xAA, 0xAA, 0xAA} , 34, -34}
};
game_type* game;
typedef struct game_state_type {
    uint16_t ballx;
    uint16_t bally;
    uint16_t ballxold;
    uint16_t ballyold;
    int velx;
    int vely;
    int playerx;
    int playerxold;
    int wallState[8];
    int score;
    int remainingLives;
    int top;
    int bottom;
    int walltop;
    int wallbottom ;
    int brickheight;
    int brickwidth;
} game_state_type;
game_state_type state;

void setup() {
    initTft(tft);
    gameSize = {0, 0, tft.width(), tft.height()};
    newGame(&games[0], &state, tft);
}

void loop(void) {
    int selection = readUiSelection(game, &state, -1);
    drawPlayer(game, &state);
    state.playerxold = state.playerx;
    if (abs(state.vely) > ((1 << game->exponent) - 1)) {
        state.vely = ((1 << game->exponent) - 1) * ((state.vely > 0) - (state.vely < 0));
    }
    if (abs(state.velx) > ((1 << game->exponent) - 1)) {
        state.velx = ((1 << game->exponent) - 1) * ((state.velx > 0) - (state.velx < 0));
    }
    state.ballx += state.velx;
    state.bally += state.vely;
    checkBallCollisions(game, &state, state.ballx >> game->exponent, state.bally >> game->exponent);
    checkBallExit(game, &state, state.ballx >> game->exponent, state.bally >> game->exponent);
    drawBall(state.ballx >> game->exponent, state.bally >> game->exponent,
             state.ballxold >> game->exponent, state.ballyold >> game->exponent, game->ballsize);
    state.ballxold = state.ballx;
    state.ballyold = state.bally;
    state.velx = (20 + (state.score >> 3)) * ((state.velx > 0) - (state.velx < 0));
    state.vely = (20 + (state.score >> 3)) * ((state.vely > 0) - (state.vely < 0));
    if (noBricks(game, &state) && level < GAMES_NUMBER) {
        level++;
        newGame(&games[level], &state, tft);
    } else if (state.remainingLives <= 0) {
        gameOverTouchToStart();
        state.score = 0;
        level = 0;
        newGame(game, &state, tft);
    }
}

// 以下、newGame, setupState, updateLives, setupWall, drawBrick, noBricks,
// drawPlayer, drawBall, touchToStart, gameOverTouchToStart, updateScore,
// checkBrickCollision, checkCornerCollision, hitBrick, checkBorderCollision,
// checkBallCollisions, checkBallExit, setBrick, unsetBrick, isBrickIn,
// initTft, clearDialog, drawBoxedString, readUiSelection, waitForTouch
// 等の関数定義が続く (全文はオリジナル参照)
回路図
製造プロセス
- Arduino NanoとMPU-6050で作るリアルタイムジャイロスコープゲーム
- Arduino UNOとOLEDディスプレイでクラシックPongゲームを自作:ステップバイステップチュートリアル
- Arduinoで携帯型静電容量タッチピアノを自作:MPR121シールド活用・ステップバイステップ
- DIY Arduino USBゲームコントローラー - 高性能ゲームパッドを自作
- Arduino NanoとMAX7219で作る24×16 LEDポングゲーム機
- 巨大レゴミニフィグ・アニマトロニクス「オペレーション」ゲームをArduinoで自作
- USB-MIDI機器をBluetooth LEでiOSに無線接続 ─ Arduinoベースの3つのアダプター設計
- Pixel Chaser: Arduino Nanoで作るワンタップLEDゲーム
- Arduino Dueでマスターする音声認識と音声合成
- Arduinoで自動化するChrome恐竜ゲーム – LDRとPythonで障害物を検知してジャンプ
- Arduino UNOで作る静電容量式タッチLEDスイッチ - 簡単DIY