



スマート駐車場カウンター:Arduino、Processing、PHPでリアルタイム車両管理
必要な部品と材料
| Arduino UNO | ×1 |
| PIR人感センサー | ×2(入口・出口用) |
| LED(汎用) | ×1 |
| ジャンパーワイヤー(汎用) | ×1 |
使用するアプリとオンラインサービス
- Arduino IDE
- Samsung ARTIK Cloud for IoT
- Processing
- PHP
このプロジェクトについて
概要
2つのセンサーで駐車場の入出庫車両をカウントし、ProcessingとPHPを経由してクラウドにデータを送信、空き枠数を可視化するシステムです。EthernetシールドやWiFiシールドは不要です!
仕組み
センサーを駐車場の入口と出口に設置します。車が入るとカウントをインクリメント、出るとデクリメントします。LEDは車両が正しくカウントされるたびに点灯します。
Processingの役割
Processingは、Arduinoからシリアルポート経由で送られてくるデータ(車両カウント)を受信し、PHPファイルをloadStrings()メソッドで呼び出してクラウドに転送する役割を果たします。Processing IDEをインストールして使用します。
PHPの役割
PHPスクリプト(post-message.php)がProcessingから受け取ったカウント値をARTIK CloudにPOSTします。ローカルサーバー(WAMP/XAMPP)またはSSL証明書付きのリモートサーバーで動作させます。必要なファイルはArtikCloudProxy.phpとpost-message.phpの2つです。
ARTIK Cloudの設定
- ARTIK Cloudにログインし、Applications → New Applicationで新規アプリ作成
- アプリ詳細を入力
- 作成後、Show Client ID & Secretで認証情報を取得(PHPファイルに設定)
- サイドメニューのPermissionsで「Car Counter」デバイスタイプを追加し、Read/Write権限を付与
実行手順
- Arduinoスケッチをアップロード
- Processingスケッチを実行(WAMPサーバーがONであること)
- PIRセンサーに手をかざして動作確認
- ARTIK Cloudダッシュボードでデータ受信を確認
トラブルシューティング
以下のURLでJSONが返ってくれば正常です:
https://localhost:8000/acdemo/post-message.php?count=10JSONが表示されない場合は、SSL証明書のインストールを見直してください。
今後の展開
このカウントデータを基に、買い物客が駐車場の空き状況を事前に確認できるアプリを作成可能です。満車/空き表示ランプの追加も考えられます。
ソースコード
Arduinoコード
int pirPinIN = 7;
int pirPinOUT = 10;
int led = 13;
static long counter = 0;

void setup() {
  pinMode(pirPinIN, INPUT);
  pinMode(pirPinOUT, INPUT);
  pinMode(led, OUTPUT);
  digitalWrite(led, LOW);
  Serial.begin(9600);
}

void loop() {
  if (digitalRead(pirPinIN) == HIGH) {
    counter++;
    Serial.println(counter);
    digitalWrite(led, HIGH);
    delay(500);
    digitalWrite(led, LOW);
  }
  if (digitalRead(pirPinOUT) == HIGH) {
    counter--;
    Serial.println(counter);
    digitalWrite(led, HIGH);
    delay(500);
    digitalWrite(led, LOW);
  }
}
Processingスケッチ
import processing.serial.*;

Serial myPort;
String val;

void setup() {
  String portName = Serial.list()[0]; // 環境に合わせて変更
  myPort = new Serial(this, portName, 9600);
}

void draw() {
  if (myPort.available() > 0) {
    val = myPort.readStringUntil('\n');
    int count = parseInt(val);
    if (count >= 0) {
      loadStrings("https://localhost:8000/acdemo/post-message.php?count=" + val);
    }
  }
  println(val);
}
post-message.php
<?php
$count = filter_input(INPUT_GET, 'count', FILTER_SANITIZE_NUMBER_INT);
require('ArtikCloudProxy.php');
$proxy = new ArtikCloudProxy();
$proxy->setAccessToken("YOUR_ACCESS_TOKEN");
$data = '{"count":' . $count . '}';
$payload = array("data" => $data, "sdid" => "YOUR_DEVICE_ID", "type" => "message");
$payload = json_encode($payload, JSON_HEX_QUOT | JSON_HEX_TAG);
$response = $proxy->sendMessage($payload);
header('Content-Type: application/json');
echo json_encode($response);
ArtikCloudProxy.php
<?php
class ArtikCloudProxy {
  const CLIENT_ID = "YOUR_CLIENT_ID";
  const DEVICE_ID = "YOUR_DEVICE_ID";
  const API_URL = "https://api.artik.cloud/v1.1";
  const API_USERS_SELF = "/users/self";
  const API_MESSAGES_POST = "/messages";

  public $token = null;
  public $user = null;

  public function setAccessToken($someToken) {
    $this->token = $someToken;
    $this->user = $this->getUsersSelf();
  }

  public function getCall($url) {
    $ch = curl_init();
    curl_setopt($ch, CURLOPT_URL, $url);
    curl_setopt($ch, CURLOPT_HTTPGET, true);
    curl_setopt($ch, CURLOPT_RETURNTRANSFER, true);
    curl_setopt($ch, CURLOPT_HEADER, false);
    curl_setopt($ch, CURLOPT_HTTPHEADER, array('Content-Type: application/json', 'Authorization: bearer ' . $this->token));
    $json = curl_exec($ch);
    $status = curl_getinfo($ch, CURLINFO_HTTP_CODE);
    curl_close($ch);
    if ($status == 200) return json_decode($json);
    else { var_dump($json); return $json; }
  }

  public function postCall($url, $payload) {
    $ch = curl_init();
    curl_setopt($ch, CURLOPT_URL, $url);
    curl_setopt($ch, CURLOPT_POST, true);
    curl_setopt($ch, CURLOPT_POSTFIELDS, (String)$payload);
    curl_setopt($ch, CURLOPT_RETURNTRANSFER, true);
    curl_setopt($ch, CURLOPT_HEADER, false);
    curl_setopt($ch, CURLOPT_HTTPHEADER, array('Content-Type: application/json', 'Authorization: bearer ' . $this->token));
    $json = curl_exec($ch);
    $status = curl_getinfo($ch, CURLINFO_HTTP_CODE);
    curl_close($ch);
    if ($status == 200) return json_decode($json);
    else { var_dump($json); return $json; }
  }

  public function getUsersSelf() {
    return $this->getCall(self::API_URL . self::API_USERS_SELF);
  }

  public function sendMessage($payload) {
    return $this->postCall(self::API_URL . self::API_MESSAGES_POST, $payload);
  }
}
回路図
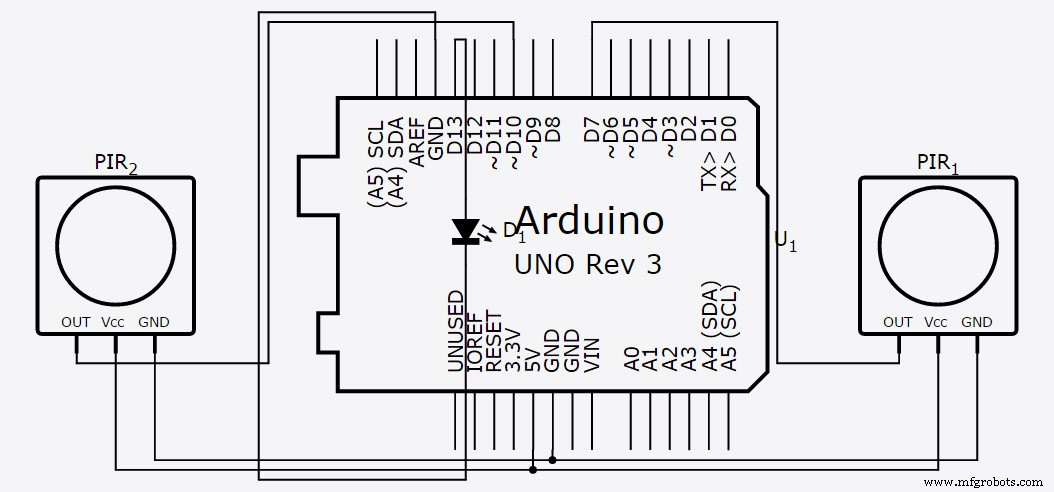
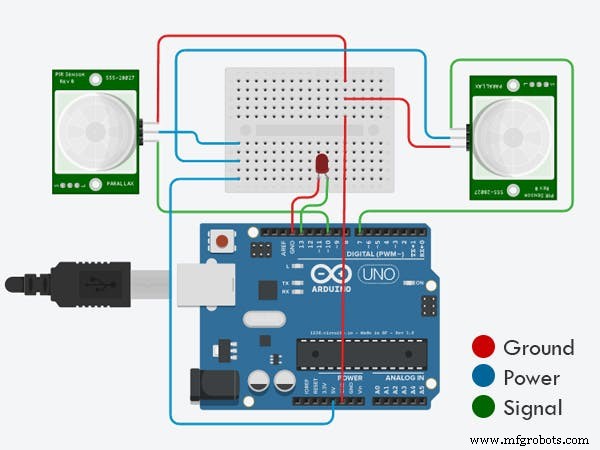
製造プロセス
- Arduino MegaでPWM制御:プッシュボタン付きLEDフェード制御チュートリアル
- Arduinoで超音波レベーション(浮遊)装置を自作:ステップバイステップガイド
- ESP8266・Arduino・超音波センサーで作るスマートIoTジャー:リアルタイム中身監視
- Arduinoでアイアンマンを自作:部品・センサー・手順ガイド
- ArduinoとBluetoothで作るスマート紛失防止タグ「Find Me」
- Arduinoで地球の質量を測定:ステップバイステップDIYガイド
- DIY Arduino加湿器コントローラー:リレーを用いた安全な高電圧制御
- Arduino超音波センサーとProcessingで作るリアルタイム距離測定ソナー
- MAX30100脈波センサーをArduinoで活用:ステップバイステップガイド
- バレンタインデーの贈り物:DIY 交際日数カウンター
- ArduinoとProcessingで作るリアルタイムデジタルコンパス