



Arduino UNOで作るニンジャドルLCDゲーム
部品と用品
| 部品 | 数量 | 備考 |
|---|---|---|
| Arduino UNO | 1 | |
| Adafruit 標準LCD 16x2 白文字/青背景 | 1 | |
| ブレッドボード(汎用) | 2 | スペース確保のため2枚使用。1枚でも可 |
| 可変抵抗 10kΩ(単回転) | 1 | LCDコントラスト調整用 |
| LED(汎用) | 2 | ジャンプ/射撃インジケーター用 |
| 抵抗 1kΩ | 4 | LED電流制限用 |
| SparkFun プッシュボタンスイッチ 12mm | 2 | ジャンプボタン、射撃ボタン |
| RobotGeek ブザー | 1 | 効果音用 |
| ジャンパーワイヤー(汎用) | 1 |
必要な工具と機械
- はんだごて(汎用) – LCDのはんだ付け用
このプロジェクトについて
これはシンプルなLCDゲームです。インスピレーションはGoogle Chromeの恐竜ゲームですが、いくつか独自の要素を加えました。ドル戦士($)は常に移動し、ジャンプして障害物(#)を避けたり、スター(*)を取ってポイントを稼いだりします。障害物をジャンプで越えると1ポイント、スターを取ると5ポイント獲得。射撃(~)で前方の障害物を破壊することもできます。LEDがジャンプや射撃の状態を表示します。10、20、30ポイントで移動速度が上がり、50ポイントでクリア。障害物に当たるとゲームオーバー。これらの閾値はコードで簡単に変更可能です。ジャンプ/射撃時の効果音、勝敗時のメロディーもパッシブブザーで再生します。初めてのプロジェクトです。感想やレビューをお待ちしています。
動画
(動画は元記事を参照)
配線
LCDモジュールの裏面には16ピンのメスヘッダーがあります。写真のようにブレッドボードに差し込みます。全ての電源・制御信号はこのヘッダーを通じます。
ピン配置(左から右):
- GND – 電源グラウンド
- VCC – 電源プラス
- V0 – コントラスト調整
- RS – レジスタ選択
- R/W – 読み書き選択
- E – イネーブル信号
- D0-D3 – データビット0-3(今回未使用)
- D4-D7 – データビット4-7
- A – バックライトLEDアノード
- K – バックライトLEDカソード
Arduinoの5Vをブレッドボードの赤い列(上部)に、GNDを青い列(上部)にジャンパーワイヤーで接続します。
- VSS → GND
- VDD → 5V
- V0 → 可変抵抗の出力ピン
- RS → Arduinoピン12
- RW → GND
- E → Arduinoピン11
- D4 → Arduinoピン5
- D5 → Arduinoピン4
- D6 → Arduinoピン3
- D7 → Arduinoピン2
- A → 5V
- K → GND
可変抵抗の残り2ピンを5VとGNDに接続します。
3ピンのピエゾブザーの場合:Sピン→Arduinoピン7、-ピン→GND、残りピン→5V。2ピンの場合:1ピン→GND、もう1ピン→Arduinoピン7。
タクトスイッチは回路図通りに配線。ジャンプボタン→Arduinoピン1、射撃ボタン→Arduinoピン6。LEDはボタン経由で制御(Arduinoから直接制御しない)。アノード→ボタンのArduino側ピン、カソード→GND。
コード
dollar_warrior Arduino
#include <LiquidCrystal.h>
const int rs = 12, en = 11, d4 = 5, d5 = 4, d6 = 3, d7 = 2;
const int buttonPin1 = 1;
const int buttonPin2 = 6;
const int buzzer = 7;
unsigned long pts = 0;
bool buttonState1 = 0;
bool buttonState2 = 0;
int randomNums[6];
int randomNum = 0;
int randomNums1[3];
int randomNum1 = 0;
unsigned int myDelay = 500;
bool temp = 0;
int tempI[16];
bool temp1 = 0;
int tempI1[3];
int button2IsPressed = 0;

LiquidCrystal lcd(rs, en, d4, d5, d6, d7);

void setup() {
  lcd.begin(16, 2);
  pinMode(buttonPin1, INPUT);
  pinMode(buttonPin2, INPUT);
  pinMode(buzzer, OUTPUT);
  lcd.setCursor(4, 0);
  lcd.print("THE GAME");
  lcd.setCursor(2, 1);
  lcd.print("STARTS IN ");
  lcd.print("5");
  delay(1000);
  lcd.setCursor(12, 1);
  lcd.print("4");
  delay(1000);
  lcd.setCursor(12, 1);
  lcd.print("3");
  delay(1000);
  lcd.setCursor(12, 1);
  lcd.print("2");
  delay(1000);
  lcd.setCursor(12, 1);
  lcd.print("1");
  delay(1000);
  lcd.clear();
}

void loop() {
here:
  randomNum = random(5);
  for (int i = 0; i < randomNum; ++i) {
    randomNums[i] = random(16);
  }
  randomNum1 = random(3);
  for (int i = 0; i < randomNum1; ++i) {
    randomNums1[i] = random(16);
  }
  temp = 0;
  for (int j = 0; j < 3; ++j) {
    tempI1[j] = 0;
  }
  button2IsPressed = 0;

  for (int i = 0; i < 16; ++i) {
    // ポイント表示
    if (pts > 9 && pts < 20) {
      lcd.setCursor(14, 0);
      myDelay = 400;
    } else if (pts > 19 && pts < 30) {
      lcd.setCursor(14, 0);
      myDelay = 300;
    } else if (pts > 29 && pts < 50) {
      myDelay = 200;
      lcd.setCursor(14, 0);
    } else if (pts >= 50) {
      pts = 0;
      myDelay = 500;
      lcd.clear();
      lcd.setCursor(5, 0);
      lcd.print("VICTORY");
      tone(buzzer, 262); delay(200);
      tone(buzzer, 330); delay(200);
      tone(buzzer, 392); delay(100);
      tone(buzzer, 330); delay(100);
      tone(buzzer, 392); delay(100);
      tone(buzzer, 523); delay(200);
      noTone(buzzer);
      delay(3000);
      lcd.clear();
      goto here;
    } else {
      lcd.setCursor(15, 0);
    }
    lcd.print(pts);

    buttonState1 = digitalRead(buttonPin1);
    buttonState2 = digitalRead(buttonPin2);

    // 障害物表示
    if (!temp) {
      for (int j = 0; j < randomNum; ++j) {
        lcd.setCursor(randomNums[j], 1);
        lcd.print("#");
      }
    } else {
      for (int j = 0; j < randomNum; ++j) {
        if (tempI[0] > randomNums[j]) {
          lcd.setCursor(randomNums[j], 1);
          lcd.print("#");
        }
      }
    }

    // スター表示
    if (!temp1) {
      for (int j = 0; j < randomNum1; ++j) {
        lcd.setCursor(randomNums1[j], 0);
        lcd.print("*");
      }
    } else {
      for (int j = 0; j < randomNum1; ++j) {
        if (randomNums1[j] != tempI1[j]) {
          lcd.setCursor(randomNums1[j], 0);
          lcd.print("*");
        }
      }
    }

    // ジャンプ処理
    if (buttonState1 == HIGH) {
      lcd.setCursor(i, 0);
      tone(buzzer, 131); delay(200); noTone(buzzer);
    } else {
      lcd.setCursor(i, 1);
    }
    lcd.print("$");

    // 射撃処理
    if (buttonState2 == HIGH) {
      tone(buzzer, 175); delay(100); noTone(buzzer);
      temp = 1;
      if (buttonState1 == LOW) {
        tempI[button2IsPressed] = i;
      }
      ++button2IsPressed;
      for (int k = i + 1; k < 16; ++k) {
        if (buttonState1 == LOW) lcd.setCursor(k, 1);
        else lcd.setCursor(k, 0);
        lcd.print("~");
        delay(5);
        if (buttonState1 == LOW) lcd.setCursor(k - 1, 1);
        else lcd.setCursor(k - 1, 0);
        lcd.print(" ");
        delay(5);
      }
    }
    delay(myDelay);
    lcd.clear();

    // スター取得判定
    for (int j = 0; j < randomNum1; ++j) {
      if (i == randomNums1[j] && buttonState1 == HIGH) {
        temp1 = 1;
        tempI1[j] = i;
        pts += 5;
      }
    }

    // 障害物衝突判定
    for (int j = 0; j < randomNum; ++j) {
      if (i == randomNums[j] && buttonState1 == LOW && temp == 0) {
        pts = 0;
        myDelay = 500;
        lcd.clear();
        lcd.setCursor(6, 0);
        lcd.print("GAME");
        lcd.setCursor(6, 1);
        lcd.print("OVER");
        tone(buzzer, 349); delay(200);
        tone(buzzer, 277); delay(200);
        tone(buzzer, 220); delay(100);
        tone(buzzer, 277); delay(100);
        tone(buzzer, 220); delay(200);
        noTone(buzzer);
        delay(3000);
        lcd.clear();
        goto here;
      } else if (i == randomNums[j] && buttonState1 == HIGH) {
        ++pts;
      }
    }
  }
}
回路図
game_aUIjA6VZxX.fzz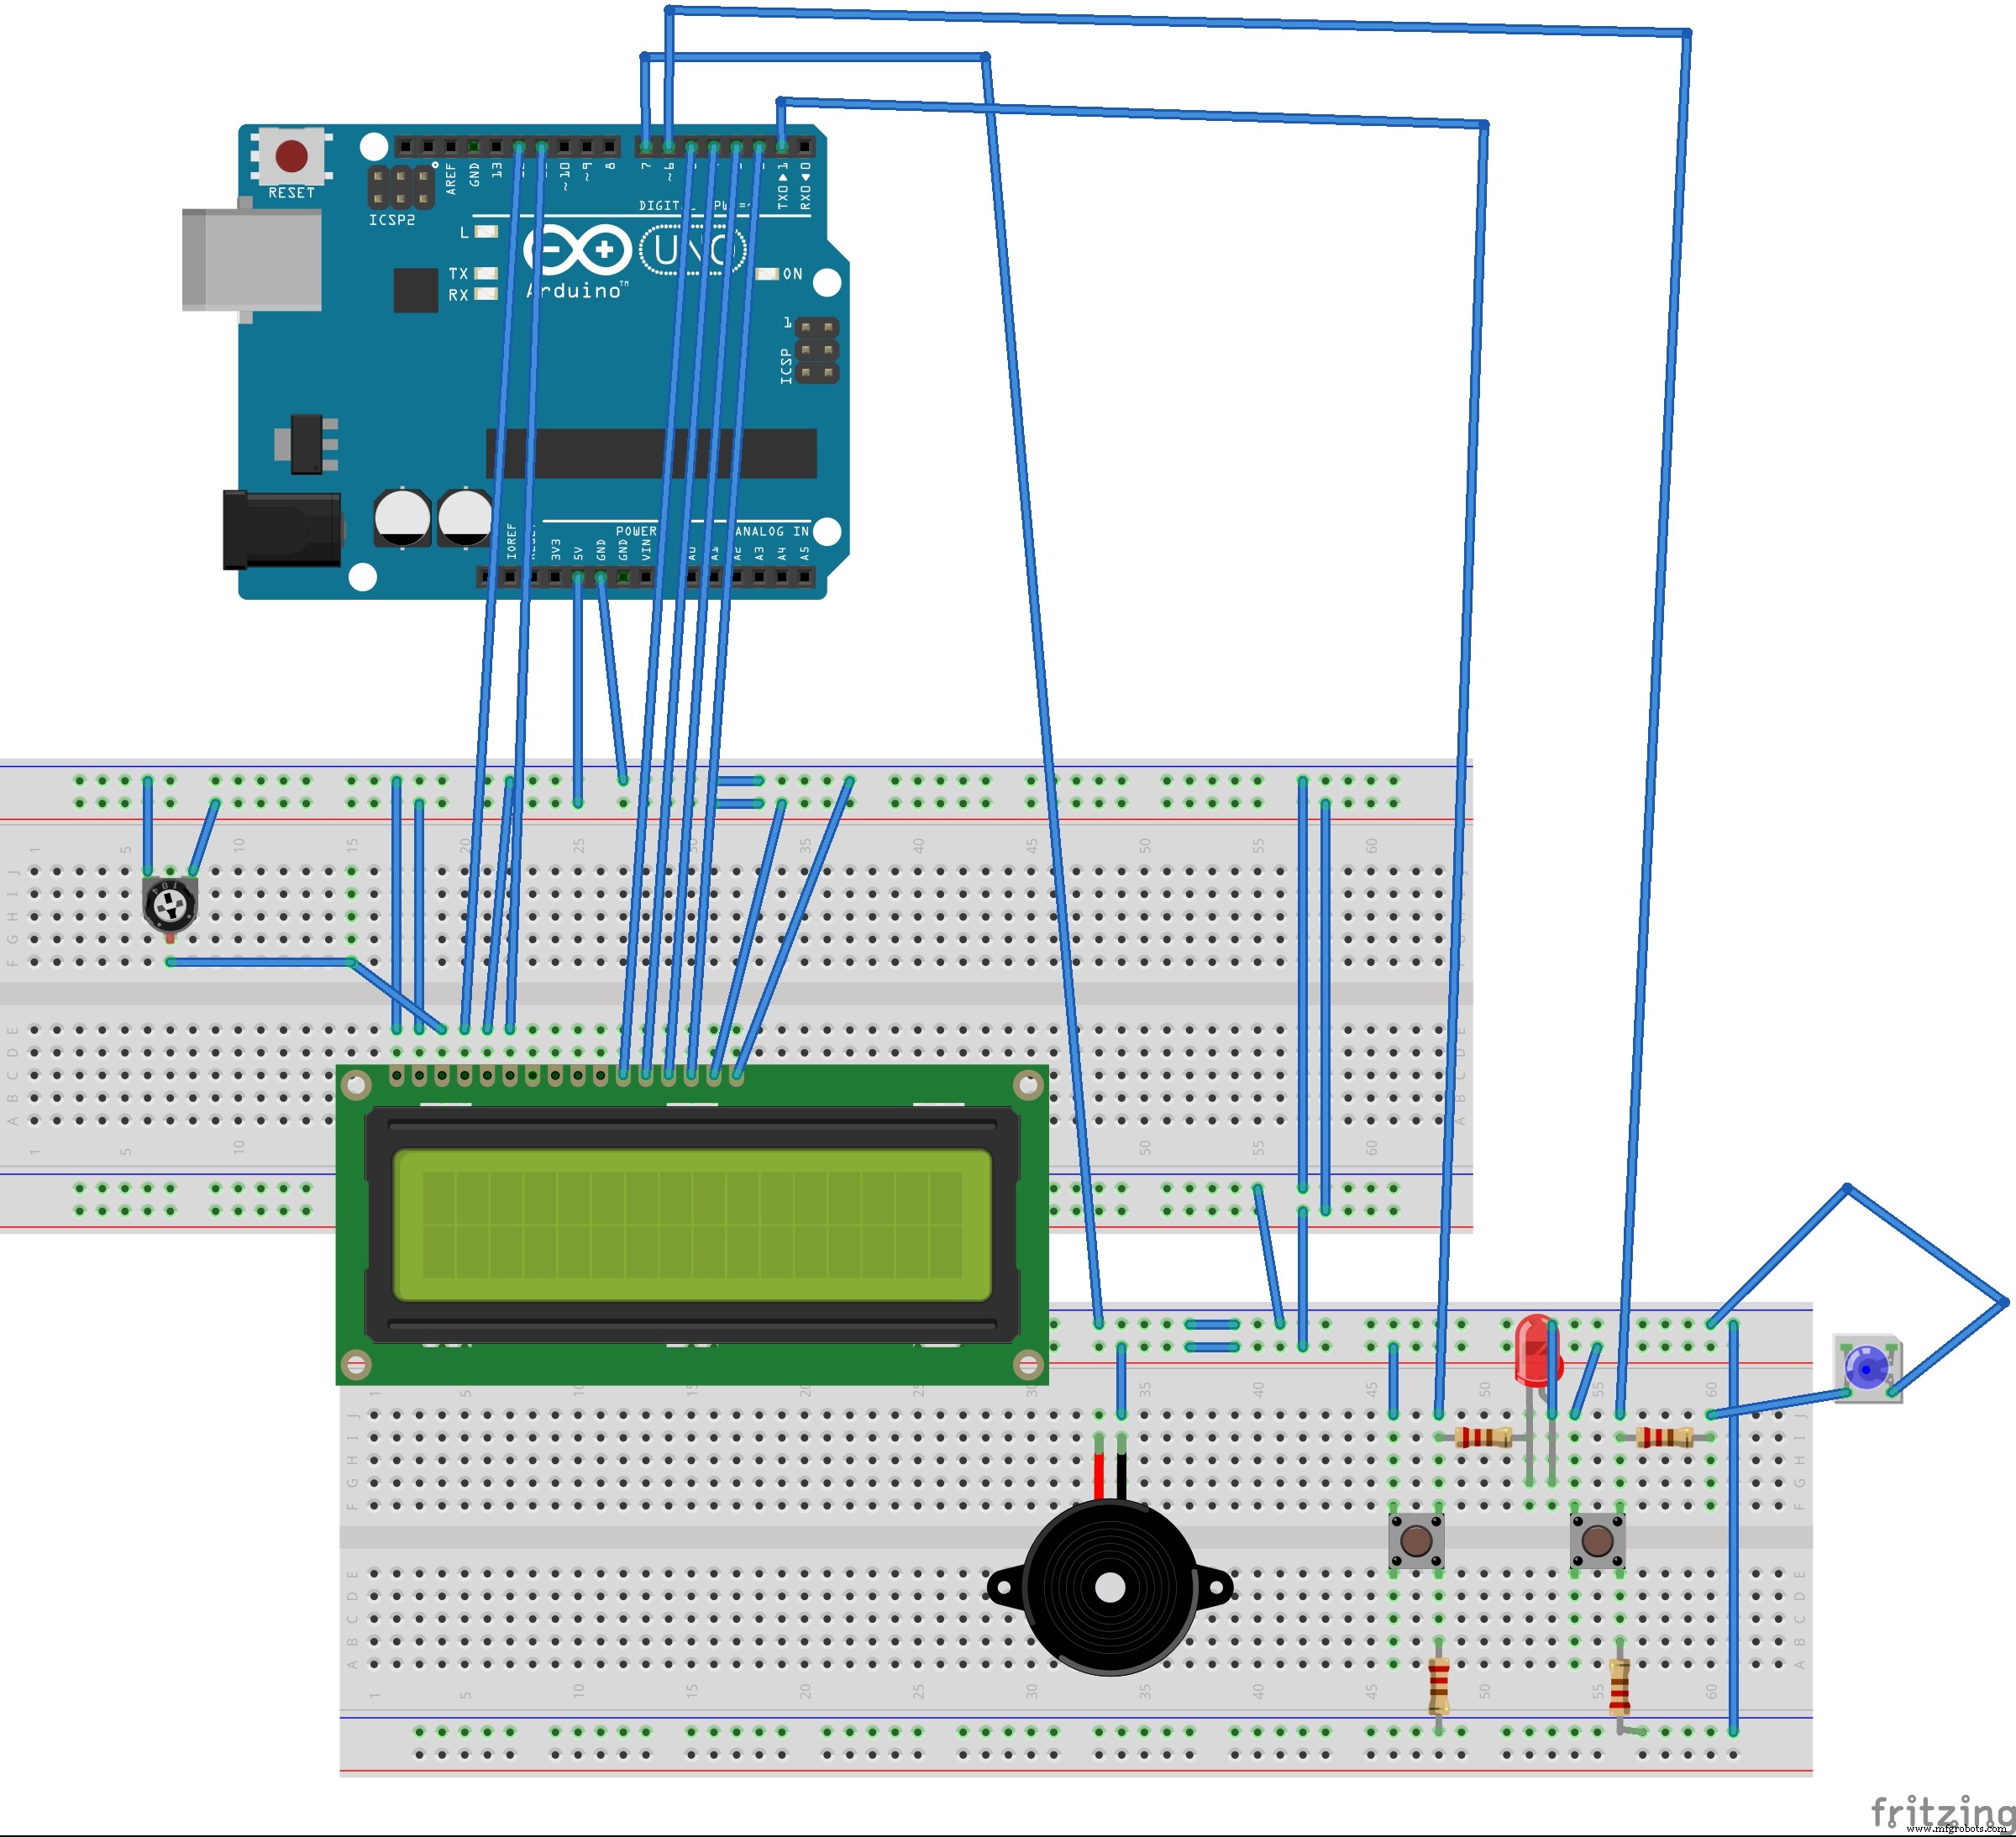
製造プロセス
- チェス:古代起源から現代製造まで——専門家の概観
- ピンボール:歴史、設計、製造——クラシックアーケードゲームの全貌
- アメリカンフットボールの進化と職人技:古代競技から現代NFL基準まで
- Arduino NanoとMPU-6050で作るリアルタイムジャイロスコープゲーム
- Arduino Nanoで37LEDルーレットゲームを自作:ヨーロピアンスタイル完全再現
- 3D RGB アルドゥクロック:Bluetooth対応LED時計(RTC内蔵)
- 川の健康を見守る:Arduinoベース水質監視システム「MyRiver」
- Arduinoとジョイスティックでインタラクティブゲーム – LEDフィードバック付き
- ArduinoとBluetoothで作るスマート紛失防止タグ「Find Me」
- Arduino Nanoで自作オシロスコープ(10Hz〜50kHz)128×64 LCD搭載
- Arduinoで作る自律走行ミニローバー