MeArmロボット用のジョイスティックコントローラー-座標の記録
コンポーネントと消耗品
>  | | × | 1 | |
| | | × | 2 | |
 | | × | 2 | |
| | | × | 1 | |
 | | × | 1 | |
| | | × | 4 | |
アプリとオンラインサービス
>  | | |
このプロジェクトについて
座標の記録を備えたロボットアーム(MeArm®)用のArduinoUnoジョイスティックコントローラー。ボタンクリックで1回または繰り返し記録された座標を繰り返すことができます。追加のボードなしでArduinoUnoベースボードを使用します。 USB接続(2A)または6V / 2A電源が必要です。 4つのサーボSG90を使用してテスト済み。
ジョイスティック1のボタンを押して、座標の記録を開始します。ジョイスティック1のボタンを押して、座標の記録を終了します。
ジョイスティック2のボタンを押して、記録された座標の再生を開始します。ジョイスティック2のボタンを押して、記録された座標の再生を停止します。ジョイスティック2のボタンを押し続けると、記録された座標の再生がサイクルで自動的に開始されます。
メモ:追加の抵抗とLEDダイオードを必要としないこのソフトウェアのより単純なバージョンも作成しました:MeArm Robot-座標の記録(最小化バージョン)
MeArmジョイスティックボードをお持ちの場合は、次のバージョンを使用できます。MeArm1.6.1ロボットジョイスティックボードの動きの記録(IR)
コード
- 座標を記録するMeArm®ロボット用のArduionoジョイスティックコントローラー。 (バージョン1.3.1)
座標を記録するMeArm®ロボット用のArduionoジョイスティックコントローラー。 (バージョン1.3.1) Arduino
USBポートを介してArduionoUNOベースボードをプログラミングするには、ArduinoIDEを使用します。 / * meArmアナログジョイスティックバージョン1.3.1-UtilStudio.com 2018年12月2つのアナログジョイスティックと4つのサーボを使用します。バージョン1.3では、座標の記録が改善されました。いくつかのバグが削除されました。最初のジョイスティックは、グリッパーを前後左右に動かし、ボタンの開始/停止位置を示します。 2番目のジョイスティックはグリッパーを上下に動かし、開閉し、ボタンは記録された位置の再生を開始/停止します。ボタンを2秒間押して、自動再生します。ピン:Arduino Stick1 Stick2 Base Shoulder Elbow Gripper Record / GND GND GND Brown Brown Brown Brown Auto play 5V VCC VCC Red Red Red Red LED A0 HOR A1 VER PD2 BUTT A2 HOR A3 VER PD3 BUTT 11 Yellow 10 Yellow 9 Yellow 6 Yellow PD4 X * /#include bool repeatePlaying =false; / *記録されたサイクルを繰り返し実行しています* / int delayBetweenCycles =2000; / *サイクル間の遅延* / int basePin =11; / *ベースサーボ* / int ShoulderPin =10; / *ショルダーサーボ* / int elbowPin =9; / *エルボーサーボ* / int GriperPin =6; / *グリッパーサーボ* / int xdirPin =0; / *ベース-joystick1 * / int ydirPin =1; / *肩-joystick1 * / int zdirPin =3; / *エルボー-joystick2 * / int gdirPin =2; / *グリッパー-joystick2 * /// int pinRecord =A4; / *ボタンレコード-下位互換性* /// int pinPlay =A5; / *ボタンの再生-下位互換性* / int pinRecord =PD2; / *ボタンレコード-推奨(A4は非推奨であり、追加のジョイスティックに使用されます)* / int pinPlay =PD3; / *ボタンの再生-推奨(A5は非推奨で、追加のジョイスティックに使用されます)* / int pinLedRecord =PD4; / * LED-記録(点灯)または自動再生モード(点滅)を示します* / bool useInternalPullUpResistors =false; const int buffSize =512; / *記録バッファーのサイズ* / int startBase =90; int startShoulder =90; int startElbow =90; int startGripper =0; int posBase =90; int posShoulder =90; int posElbow =90; int posGripper =0; int lastBase =90; int lastShoulder =90; int lastElbow =90; int lastGripper =90; int minBase =0; int maxBase =150; int minShoulder =0; int maxShoulder =150; int minElbow =0; int maxElbow =150; int minGripper =0; int maxGripper =150; const int countServo =4; int buff [buffSize]; int buffAdd [countServo]; int recPos =0; int playPos =0; int buttonRecord =HIGH; int buttonPlay =HIGH; int buttonRecordLast =LOW; int buttonPlayLast =LOW; bool record =false; bool play =false; bool debug =false; String command ="Manual"; int printPos =0; int buttonPlayDelay =20; int buttonPlayCount =0; bool ledLight =false; ServoservoBase;サーボservoShoulder;サーボservoElbow;サーボservoGripper; void setup(){Serial.begin(9600); if(useInternalPullUpResistors){pinMode(pinRecord、INPUT_PULLUP); pinMode(pinPlay、INPUT_PULLUP); } else {pinMode(pinRecord、INPUT); pinMode(pinPlay、INPUT); } pinMode(xdirPin、INPUT); pinMode(ydirPin、INPUT); pinMode(zdirPin、INPUT); pinMode(gdirPin、INPUT); pinMode(pinLedRecord、OUTPUT); ServoBase.attach(basePin); ServoShoulder.attach(shoulderPin); ServoElbow.attach(elbowPin); ServoGripper.attach(gripperPin); StartPosition(); digitalWrite(pinLedRecord、HIGH); delay(1000); digitalWrite(pinLedRecord、LOW);} void loop(){buttonRecord =digitalRead(pinRecord); buttonPlay =digitalRead(pinPlay); // Serial.print(buttonRecord); // Serial.print( "\ t"); // Serial.println(buttonPlay); //テスト目的でif(buttonPlay ==LOW){buttonPlayCount ++; if(buttonPlayCount> =buttonPlayDelay){repeatePlaying =true; }} else buttonPlayCount =0; if(buttonPlay!=buttonPlayLast){if(record){record =false; } if(buttonPlay ==LOW){play =!play; repeatePlaying =false; if(play){StartPosition(); }}} if(buttonRecord!=buttonRecordLast){if(buttonRecord ==LOW){record =!record; if(record){play =false; repeatePlaying =false; recPos =0; } else {if(debug)PrintBuffer(); }}} buttonPlayLast =buttonPlay; buttonRecordLast =buttonRecord; float dx =map(analogRead(xdirPin)、0、1023、-5.0、5.0); float dy =map(analogRead(ydirPin)、0、1023、5.0、-5.0); float dz =map(analogRead(zdirPin)、0、1023、5.0、-5.0); float dg =map(analogRead(gdirPin)、0、1023、5.0、-5.0); if(abs(dx)<1.5)dx =0; if(abs(dy)<1.5)dy =0; if(abs(dz)<1.5)dz =0; if(abs(dg)<1.5)dg =0; posBase + =dx; posShoulder + =dy; posElbow + =dz; posGripper + =dg; if(play){if(playPos> =recPos){playPos =0; if(repeatePlaying){delay(delayBetweenCycles); StartPosition(); } else {play =false; }} bool endOfData =false; while(!endOfData){if(playPos> =buffSize-1)break; if(playPos> =recPos)break; int data =buff [playPos]; int角度=データ&0xFFF; intservoNumber =データ&0x3000; endOfData =data&0x4000; switch(servoNumber){case 0x0000:posBase =angle;壊す;ケース0x1000:posShoulder =角度;壊す;ケース0x2000:posElbow =角度;壊す;ケース0x3000:posGripper =角度; dg =posGripper-lastGripper;壊す; } playPos ++; }} if(posBase> maxBase)posBase =maxBase; if(posShoulder> maxShoulder)posShoulder =maxShoulder; if(posElbow> maxElbow)posElbow =maxElbow; if(posGripper> maxGripper)posGripper =maxGripper; if(posBase 0){posGripper =maxGripper; waitGripper =true; } servoGripper.write(posGripper); if(play &&waitGripper){delay(1000); } if((lastBase!=posBase)|(lastShoulder!=posShoulder)|(lastElbow!=posElbow)|(lastGripper!=posGripper)){if(record){if(recPos
回路図
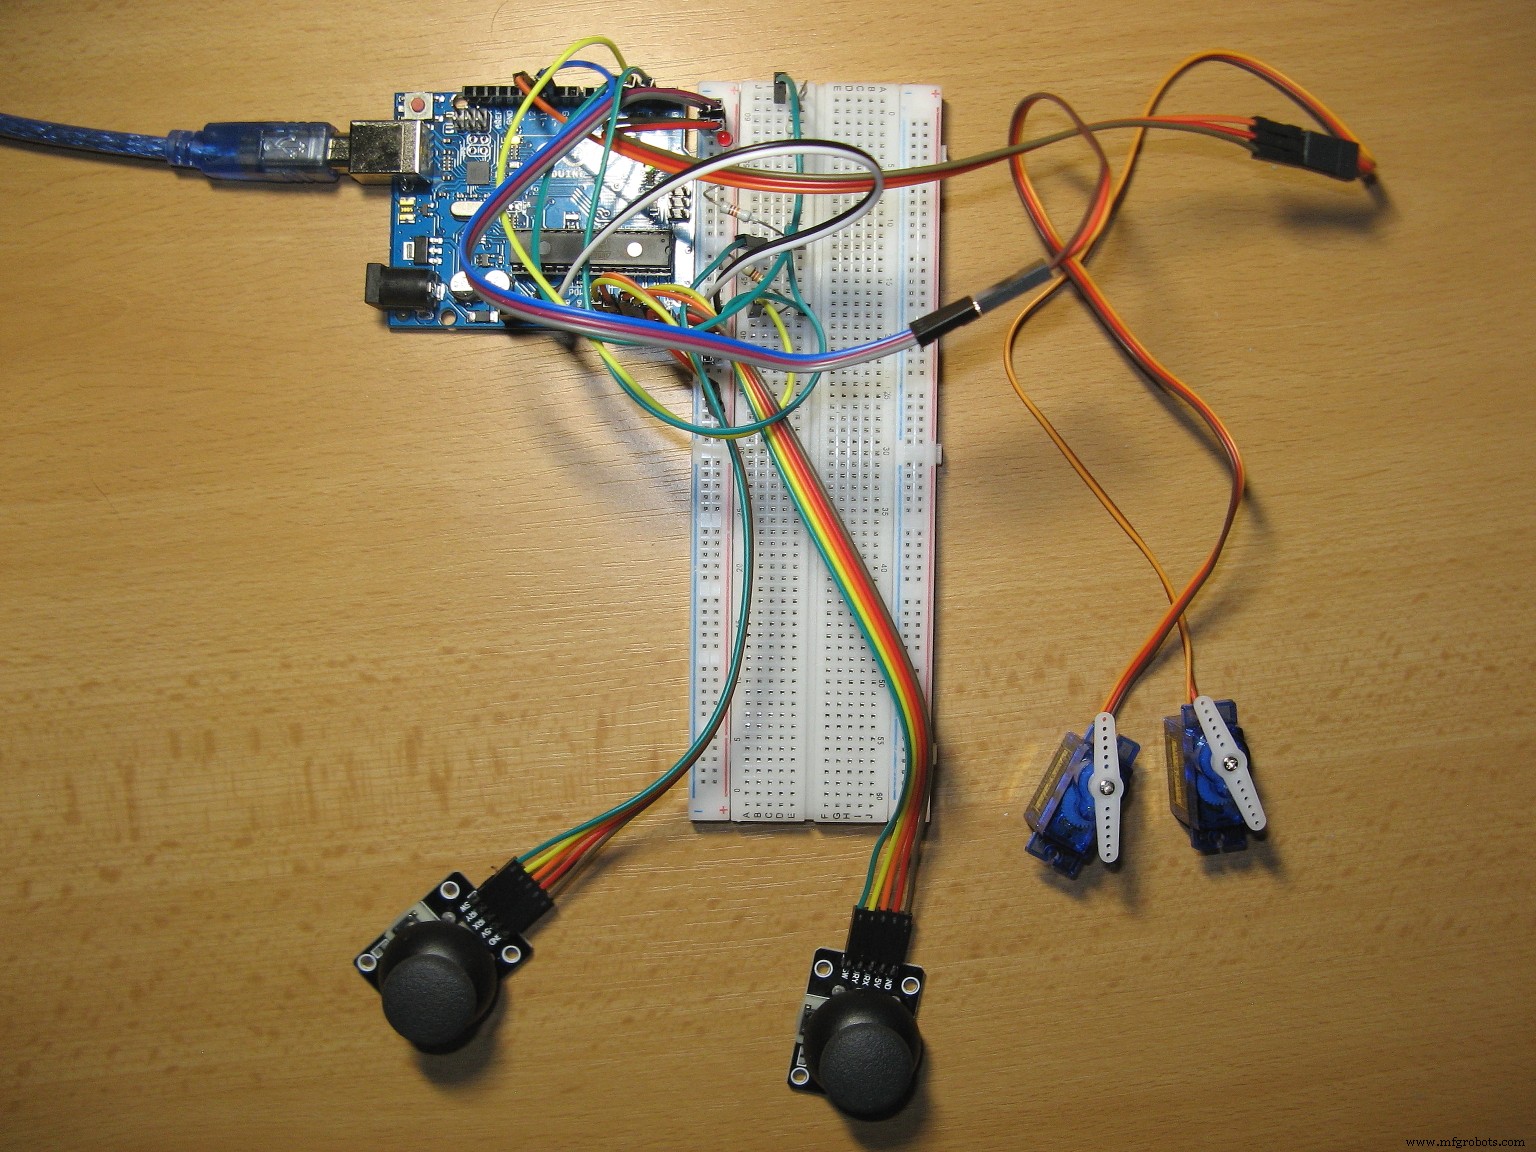
座標の記録を備えたMeArm®ロボット用のジョイスティックコントローラー-概略図 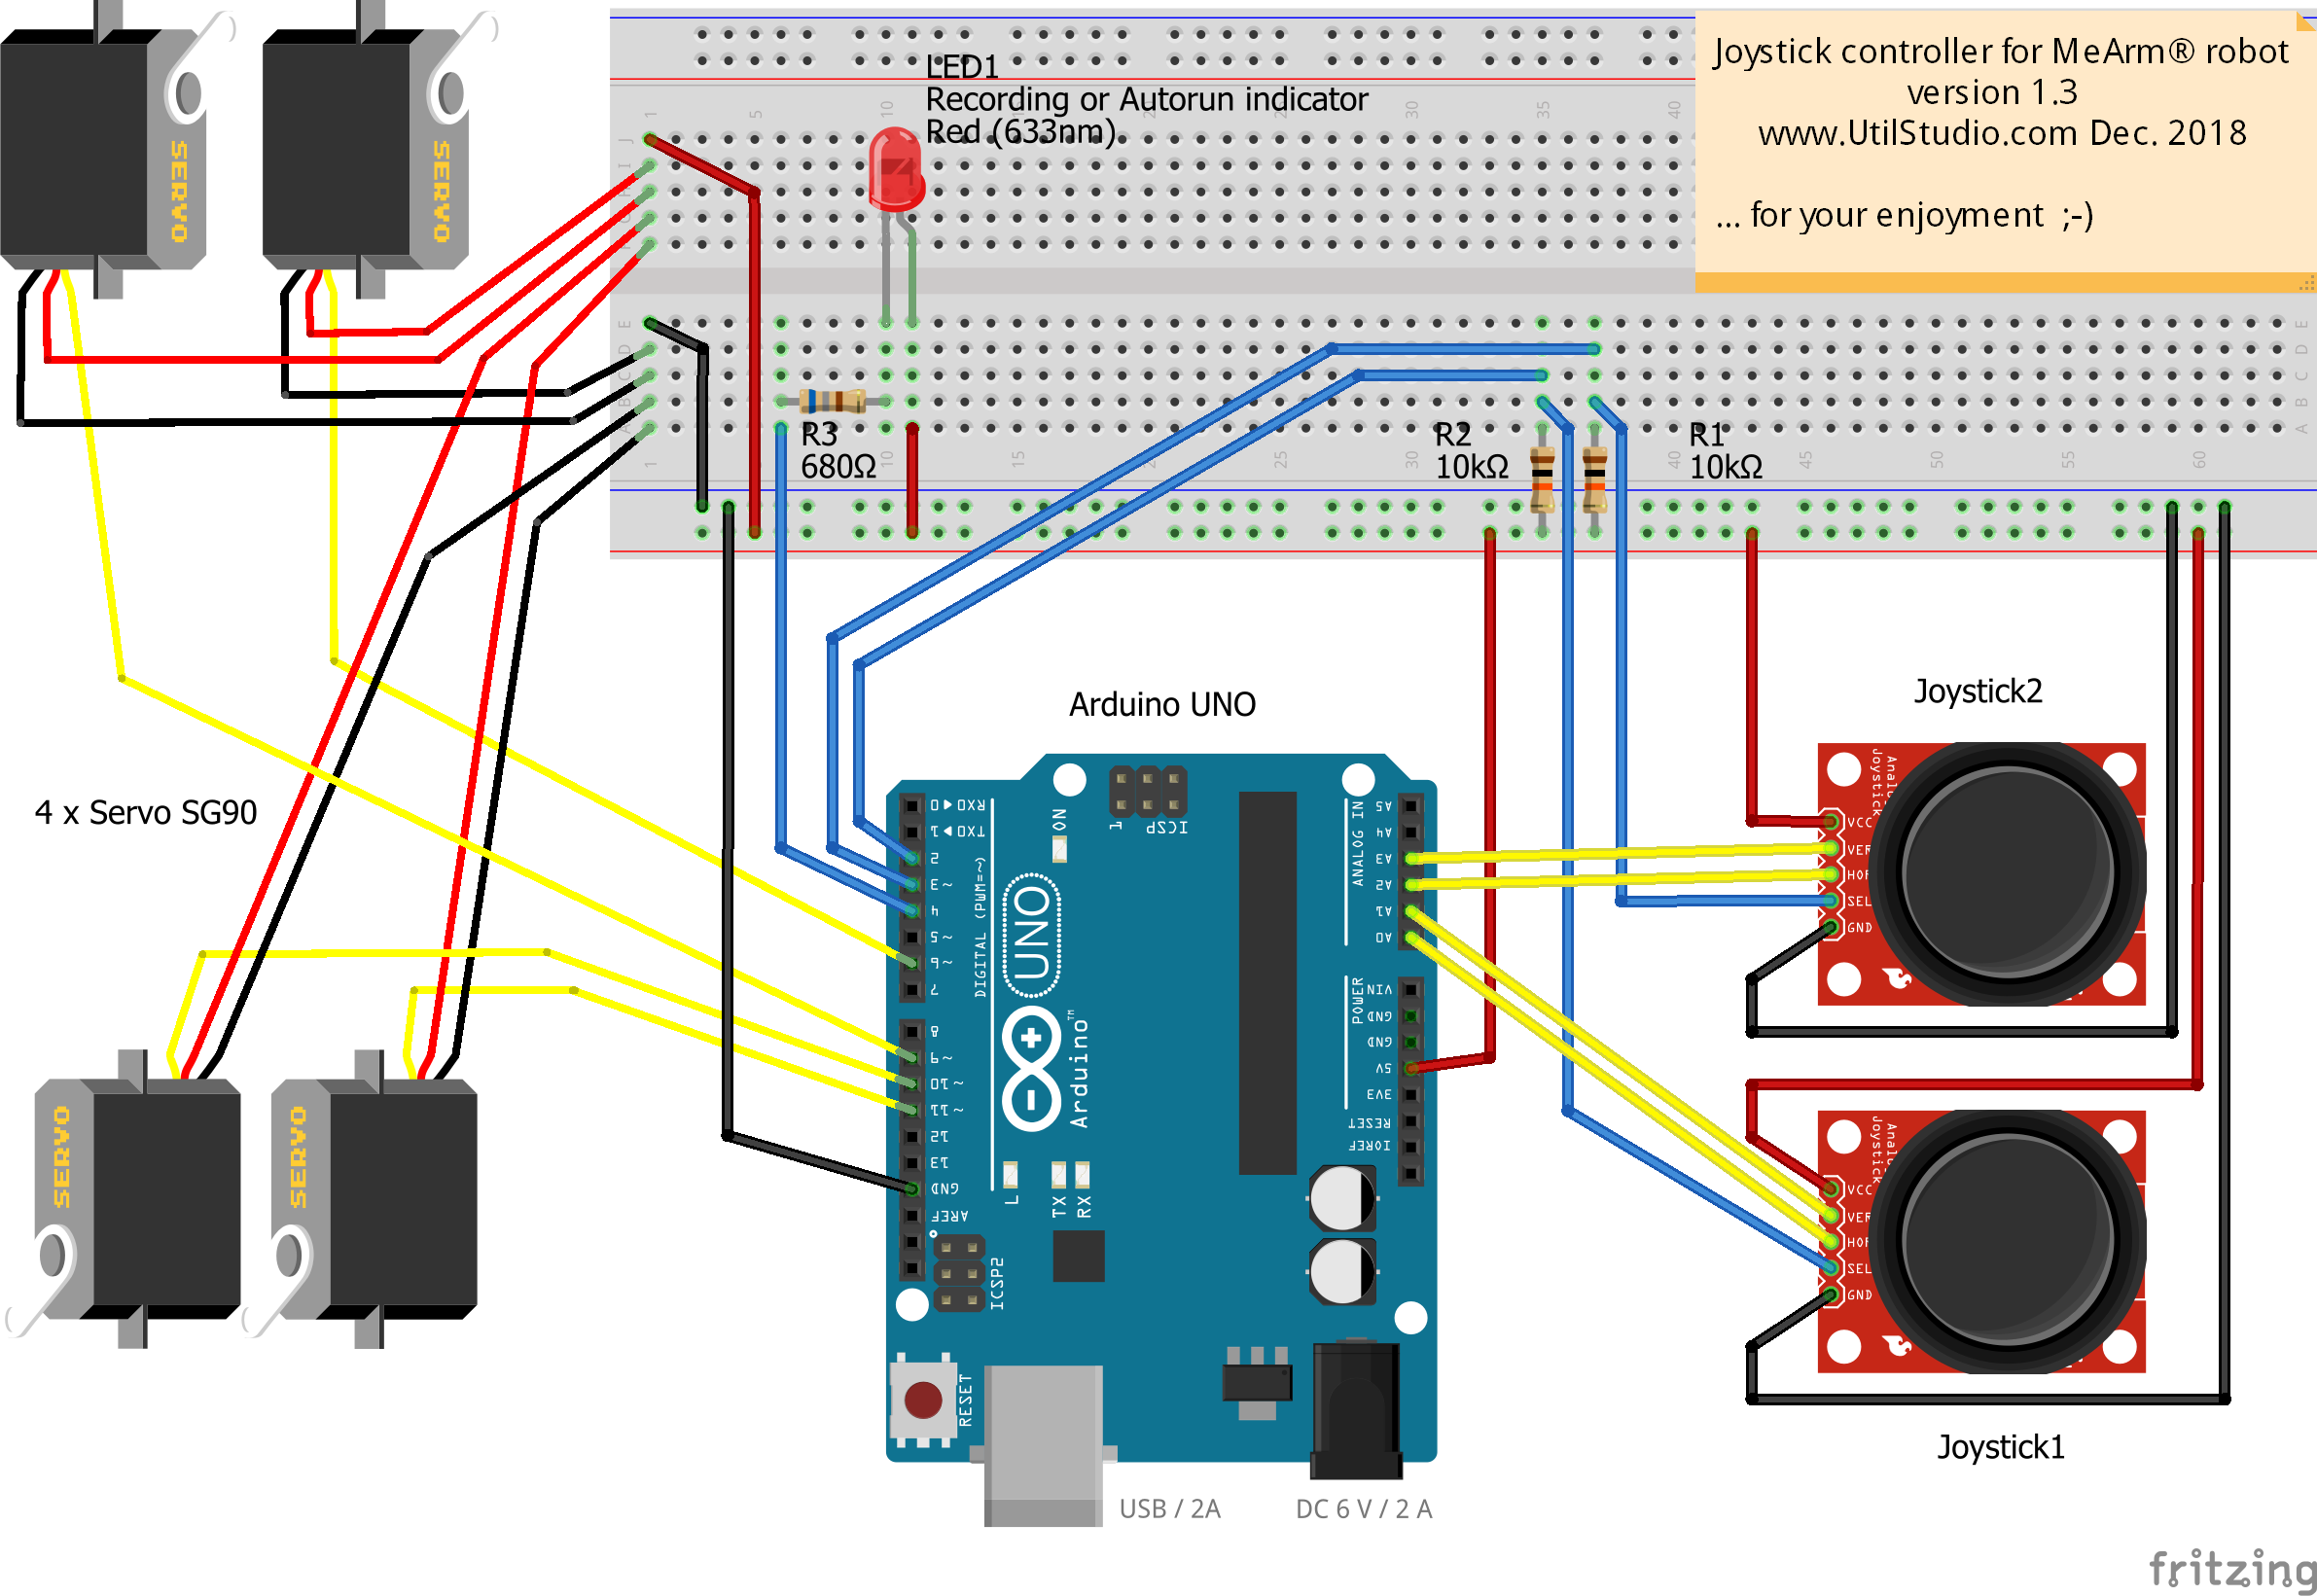 2つのサーボのみが接続されたテストボード。 4つのサーボモーターを接続するには、概略図を参照してください。