



862D+はんだごて用DIY温度コントローラー:精度と信頼性を両立
必要な部品と材料
| 部品 | 数量 | 備考 |
|---|---|---|
| Arduino Nano R3 | 1 | |
| フライバックダイオード (一般整流用) | 1 | |
| IRF540N NチャネルMOSFET | 1 | ヒーター駆動用 |
| 5V リニアレギュレータ | 1 | Arduino電源用 |
| 330Ω 抵抗 | 1 | ゲート駆動用 |
| ピンヘッダー (オス) | 2 | |
| 0.96インチ OLEDディスプレイ (I2C) | 1 | 温度・出力表示用 |
必要な工具と機器
- はんだごて
- 8mmドリルビット & ドリル (ケース加工用)
プロジェクト概要
更新 (2019/10/21): コードを大幅更新。詳細は後述。
私の862D+はんだごてが壊れたため、新品を買う代わりに別の中古機を入手して修理しました。最も困ったのは、ネット上に修理情報が皆無だったことです。ヒーターを交換しても「S-E (センサーエラー)」が出続け、基板側が故障していることが判明しました。

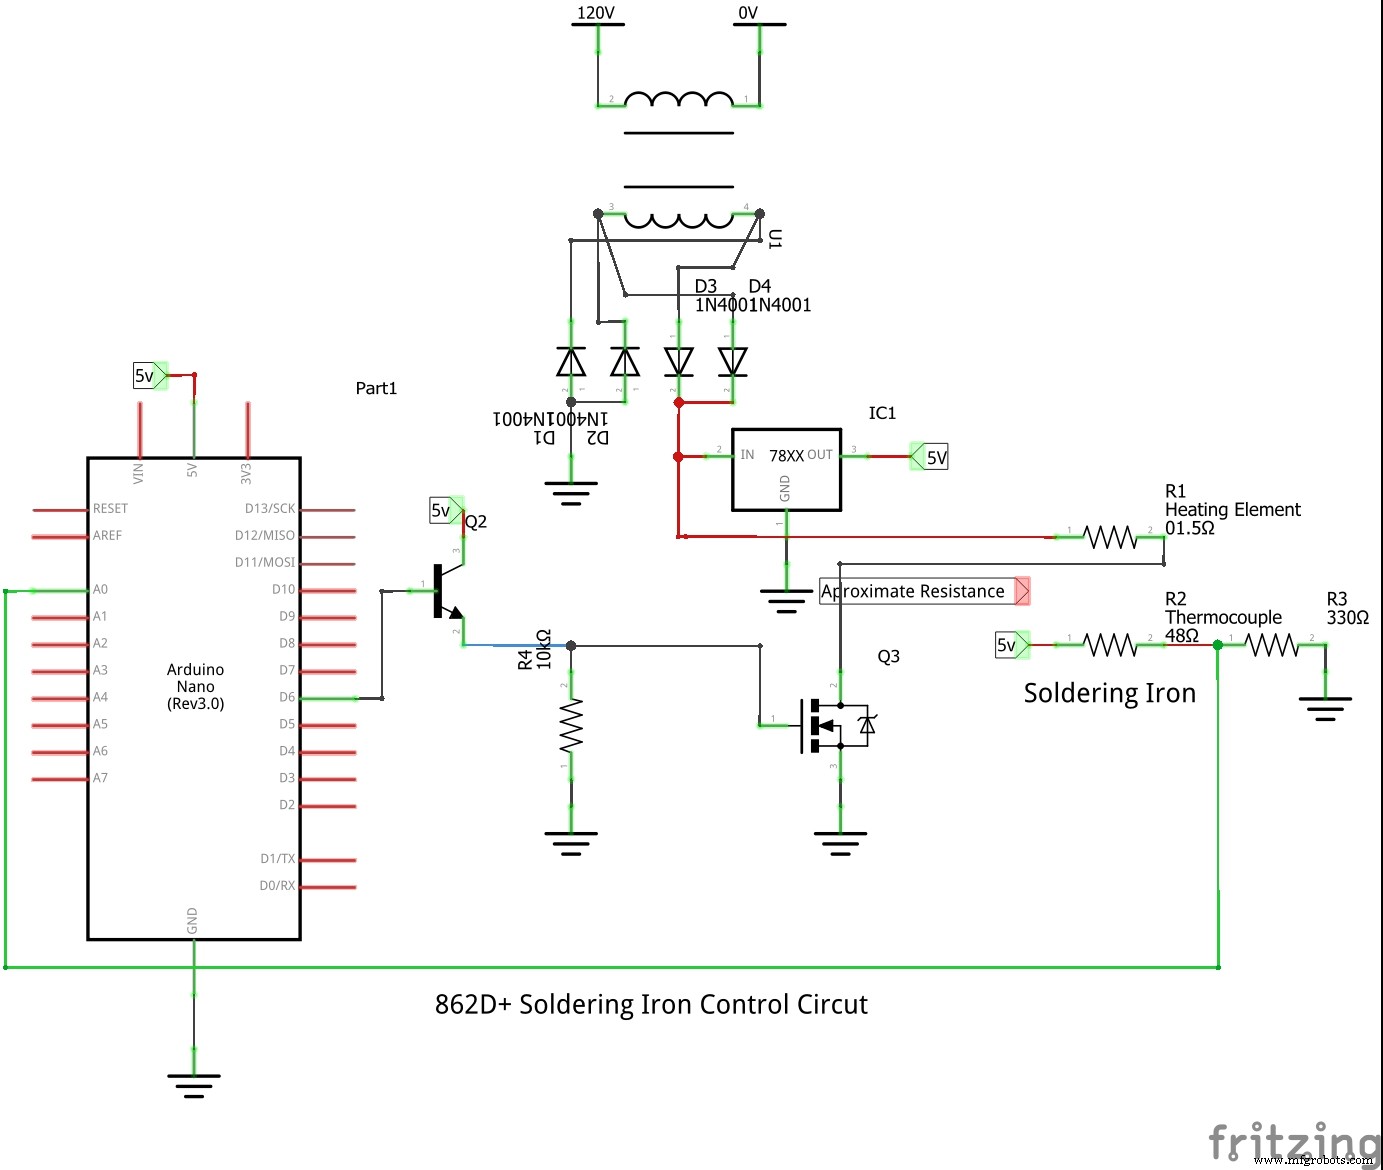
そこで自作コントローラー回路を設計し、内部に組み込むことにしました。セカンドトランスが必要でしたが、安価な機種なので内部に十分なスペースがありました。


見た目は良くありませんが、完璧に動作します。おまけとして、元の電源スイッチを取り外し、5VとArduinoの間に新しいスイッチを追加しました。
製作のヒント
- 全パーツは現在入手可能。LCSC はバルク電子部品サイトで、部品単価が極めて安い(例: MOSFETがAmazonで$6のところLCSCなら32セント)。送料は高めですが、まとめ買いすればお得。抵抗類も50本で0.84セント程度。
- 長距離データ線は必ずシールドすること (アースしたアルミ箔等)。I2CのOLED配線などが該当。
- コード内の設定: アナログ値
1023 = 常温,0 = 高温。settempを好みの値に変更 (通常600前後)。 - コントローラーはヒーターの接続/断線を検知可能。ヒーター未接続時はアナログ入力をゼロ扱い。以前は熱くなっていたのに今はダメ、という場合: ヒーターを外し「プラグインしてください」表示まで待ち、再接続すれば復旧します (私が遭遇した問題)。
以上が基本です。高級はんだごてもありますが、これは安価でDIY可能な代替案です。
ソースコード
Control Code (C/C++) - 基本版
提供回路専用。Arduino IDEにペーストして書き込み。
int output = 0;
int temp = 0;
int settemp = 630;
String inputString = "";
boolean rap = false;
boolean stringComplete = false;
int t = 0;

void setup() {
    Serial.begin(9600);
    inputString.reserve(200);
    pinMode(6, OUTPUT);
    digitalWrite(6, LOW);
}

void loop() {
    serialEvent();
    if (stringComplete) {
        Serial.println(inputString);
        t = inputString.toInt(); // settemp = t // シリアル入力で設定温度変更可能
        inputString = "";
        stringComplete = false;
    }
    rapid();
    pid();
}

void rapid() {
    // 立ち上がり高速加熱
    if (rap == false) {
        digitalWrite(6, HIGH);
        do {
            temp = analogRead(0);
            Serial.print("rapid");
            Serial.println(temp);
        } while (temp - settemp > 10);
        digitalWrite(6, LOW);
        rap = true;
    }
}

void pid() {
    // PID制御 (簡易版)
    temp = analogRead(0);
    output = temp - settemp;
    if (output < 0) output = 0;
    if (output > 255) output = 255;
    Serial.print("pid");
    Serial.print(temp); Serial.print(", "); Serial.println(output);
    analogWrite(6, output);
}

void serialEvent() {
    // シリアル通信で設定温度更新
    while (Serial.available()) {
        char inChar = (char)Serial.read();
        inputString += inChar;
        if (inChar == '\n') {
            stringComplete = true;
        }
    }
}
The Code (C/C++) - OLED表示対応版
専用回路図でのみ動作。エディタにペーストして書き込み。
#include
#include
#include
#define OLED_ADDR 0x3C
Adafruit_SSD1306 display(-1);

int settemp = 590;
int output = 0;
int temp = 0;
String inputString = "";
boolean rap = false;
boolean stringComplete = false;
int t = 0;
int mappedpower = 0;
byte powermultiply = 0;
long counter = 0;
int temp2 = 0;
byte outputoffset = 0;
byte scaleread = 0;

void setup() {
    Serial.begin(9600);
    pinMode(12, OUTPUT);
    digitalWrite(12, LOW);
    display.begin(SSD1306_SWITCHCAPVCC, OLED_ADDR);
    display.clearDisplay();
    display.display();
    rapid();
}

void loop() {
    pid();
    display.clearDisplay();
    updatebar();
    updatetext();
    display.display();
}

void rapid() {
    if (rap == false) {
        digitalWrite(12, HIGH);
        output = 255;
        do {
            temp = analogRead(0);
            Serial.print("rapid");
            Serial.println(temp);
            display.clearDisplay();
            updatebar();
            updatetext();
            display.display();
        } while (temp - settemp > 1);
        digitalWrite(12, LOW);
        rap = true;
    }
}

void pid() {
    temp = analogRead(0);
    // 温度平均化 (ノイズ対策)
    temp2 = temp;
    delay(50);
    temp = analogRead(0);
    temp = (temp + temp2) / 2;
    zeroscale(); // ヒーター未接続検知
    temp = temp + outputoffset;
    output = temp - settemp;
    output = output + powermultiply;
    output = output * 4;
    if (output < 0) output = 0;
    if (output > 255) output = 255;
    counter = counter + 1;
    if (counter > 10) {
        counter = 0;
        if (temp > settemp + 3) powermultiply++;
        if (temp < settemp - 3 && powermultiply > 0) powermultiply--;
    }
    Serial.print(powermultiply); Serial.print(", "); Serial.print(temp); Serial.print(", "); Serial.println(output);
    analogWrite(12, output);
}

void updatebar() {
    // OLED上のパワーバー更新
    mappedpower = map(output, 0, 255, 0, 127) - 10;
    display.fillRect(0, 0, mappedpower, 8, WHITE);
    display.fillRoundRect(mappedpower - 5, 0, 20, 8, 3, WHITE);
}

void updatetext() {
    // OLEDテキスト更新
    display.setCursor(0, 9);
    display.setTextColor(WHITE);
    display.setTextSize(1);
    display.print("Set Temp: "); display.print(settemp);
    display.setCursor(0, 20);
    display.print("Temp: "); display.print(temp);
}

void zeroscale() {
    // ヒーター未接続時のオフセット補正
    if (output < 200) {
        display.clearDisplay();
        display.setCursor(0, 9);
        display.setTextColor(WHITE);
        display.setTextSize(1);
        display.print("No soldering iron, or defective");
        display.setCursor(0, 15);
        display.print("iron.");
        display.setCursor(0, 20);
        display.print("Testing in 5 seconds.");
        display.display();
        delay(5000);
        if (output < 200) {
            outputoffset = temp;
        }
        display.clearDisplay();
        display.setCursor(0, 9);
        display.print("Output offset set.");
        display.setCursor(0, 20);
        display.print("Please plug in the iron.");
        display.display();
        do {
            scaleread = analogRead(0);
        } while (scaleread < 200);
    }
}
Code Updated 10/21/2019 (C/C++) - 改良版
回路図専用。IDEにペーストして書き込み。zeroscale() の判定条件を output から temp ベースに変更し、待機時間を調整。
#include
#include
#include
#define OLED_ADDR 0x3C
Adafruit_SSD1306 display(-1);

int settemp = 590;
int output = 0;
int temp = 0;
String inputString = "";
boolean rap = false;
boolean stringComplete = false;
int t = 0;
int mappedpower = 0;
byte powermultiply = 0;
long counter = 0;
int temp2 = 0;
byte outputoffset = 0;
byte scaleread = 0;

void setup() {
    Serial.begin(9600);
    pinMode(12, OUTPUT);
    digitalWrite(12, LOW);
    display.begin(SSD1306_SWITCHCAPVCC, OLED_ADDR);
    display.clearDisplay();
    display.display();
    rapid();
}

void loop() {
    pid();
    display.clearDisplay();
    updatebar();
    updatetext();
    display.display();
}

void rapid() {
    if (rap == false) {
        digitalWrite(12, HIGH);
        output = 255;
        do {
            temp = analogRead(0);
            Serial.print("rapid");
            Serial.println(temp);
            display.clearDisplay();
            updatebar();
            updatetext();
            display.display();
        } while (temp - settemp > 1);
        digitalWrite(12, LOW);
        rap = true;
    }
}

void pid() {
    temp = analogRead(0);
    temp2 = temp;
    delay(50);
    temp = analogRead(0);
    temp = (temp + temp2) / 2;
    zeroscale();
    temp = temp + outputoffset;
    output = temp - settemp;
    output = output + powermultiply;
    output = output * 4;
    if (output < 0) output = 0;
    if (output > 255) output = 255;
    counter = counter + 1;
    if (counter > 10) {
        counter = 0;
        if (temp > settemp + 3) powermultiply++;
        if (temp < settemp - 3 && powermultiply > 0) powermultiply--;
    }
    Serial.print(powermultiply); Serial.print(", "); Serial.print(temp); Serial.print(", "); Serial.println(output);
    analogWrite(12, output);
}

void updatebar() {
    mappedpower = map(output, 0, 255, 0, 127) - 10;
    display.fillRect(0, 0, mappedpower, 8, WHITE);
    display.fillRoundRect(mappedpower - 5, 0, 20, 8, 3, WHITE);
}

void updatetext() {
    display.setCursor(0, 9);
    display.setTextColor(WHITE);
    display.setTextSize(1);
    display.print("Set Temp: "); display.print(settemp);
    display.setCursor(0, 20);
    display.print("Temp: "); display.print(temp);
}

void zeroscale() {
    if (temp < 200) {
        display.clearDisplay();
        display.setCursor(0, 20);
        display.setTextColor(WHITE);
        display.setTextSize(1);
        display.print("No soldering iron.");
        display.display();
        delay(10000);
        display.setCursor(0, 0);
        display.print("Testing in 5 seconds.");
        display.display();
        delay(5000);
        if (temp < 200) {
            outputoffset = temp;
        }
        display.clearDisplay();
        display.setCursor(0, 20);
        display.print("Output offset set.");
        display.setCursor(0, 0);
        display.print("Connect the iron.");
        display.display();
        do {
            scaleread = analogRead(0);
        } while (scaleread < 200);
    }
}
回路図
製造プロセス
- スマートホーム連携向けマルチポジション温度センサーシステム
- Arduino Nanoで37LEDルーレットゲームを自作:ヨーロピアンスタイル完全再現
- MotionSense: ArduinoとESP8266で作るスマート侵入検知システム
- 3Dプリンター火災予防:スマートセンサーセーフティシステム
- オルガンコンソールのMIDI化:部品選定とセットアップガイド
- Arduinoで作る斥力式磁気浮上装置: シンプル回路とDIYガイド
- 高度なリモートコントロールグリッパーロボット: 精密ハンドリング向け
- 高度なマイクロコントローラー実験:ESP32、Arduino、PIC、センサーモジュール
- DIY POVグローブ - Arduino Megaで作るLED球体ディスプレイ
- Arduino UNOで作る太陽追尾式ソーラー発電システム – デュアルアックス完全ガイド
- CoroFenceサーマルディテクター:Grid-EYE & PIRセンサー搭載IoT体温監視