


水位警報システム
コンポーネントと消耗品
>  |
| × | 1 | |||
 |
| × | 1 | |||
 |
| × | 1 | |||
 |
| × | 1 | |||
 |
| × | 1 |
アプリとオンラインサービス
>  |
| |||
 |
| |||
|
このプロジェクトについて
はじめに
あなたがバンガロールに数年住んでいるなら、あなたは洪水に見知らぬ人ではありません。毎年モンスーンの時期に、アパートの地下駐車場が水でいっぱいになり、自転車のエンジンを始動することすらできなくなります。さらに悪いことに、水が乾いたら、水害のために修理のために自転車を整備士に連れて行かなければなりません。今年は何も取りません。そこで、駐車場が浸水した場合に警告する水位監視システムを構築することにしました。
同じシステムを稼働させる方法は次のとおりです。
必要なライブラリをインストールする
BoltIoTによるBoltIoT-Arduino-HelperライブラリとErickSimoesによる超音波ライブラリをダウンロードするには、ここをクリックしてください。
これらのライブラリをインストールするには、Arduino IDEに移動し、[スケッチ]ドロップダウンメニューで[ライブラリを含める]> [Add.ZIPライブラリ]を選択します。
次に、ライブラリがダウンロードされたフォルダに移動して、ライブラリを選択します。
Arduinoコードをアップロードする
1. ArduinoIDEを開きます。
<図>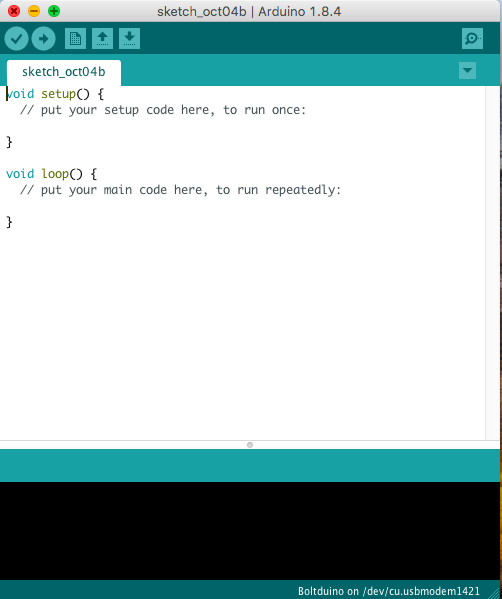
2.ブログの最後にあるArduinoコードをコピーし、スケッチ内のすべてのコードをコピーしたコードに置き換えます。
<図>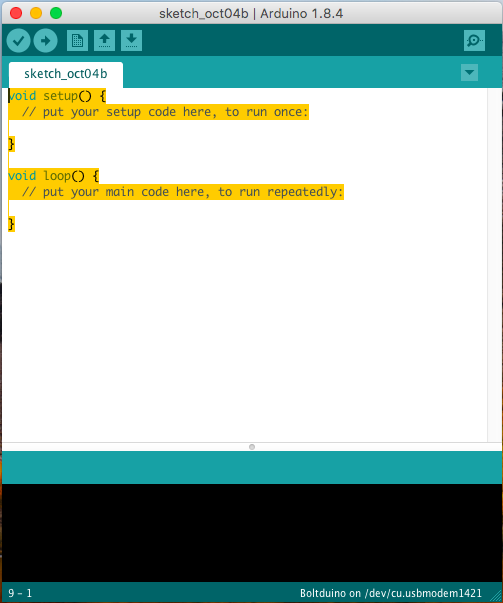 <図>
<図> 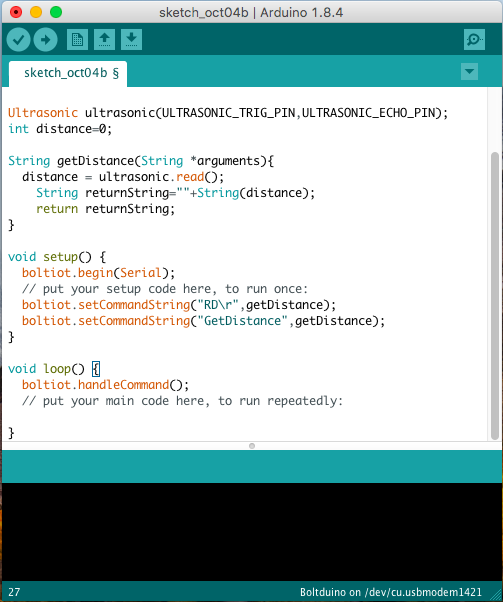
3.未亡人とubuntuでは「ctrl + s」を押し、Macでは「cmd + s」を押して、Arduinoスケッチを保存します。
<図>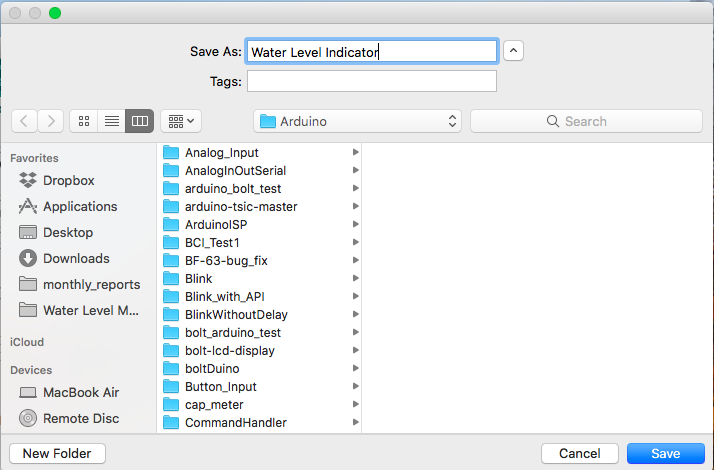
4.コードを保存した後、ツールメニューに移動し、ボードセクションでArduino / GenuinoUnoを選択します。
<図>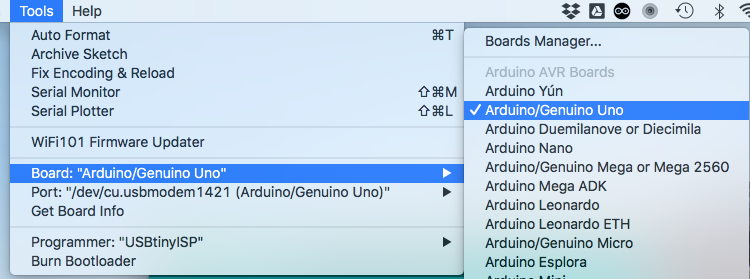
5.USBケーブルを使用してArduinoまたはBoltduinoをPCに接続します。
6.ツールメニューのポートサブメニューで、最後にArduino / Genuinounoがあるポートを選択します。
<図>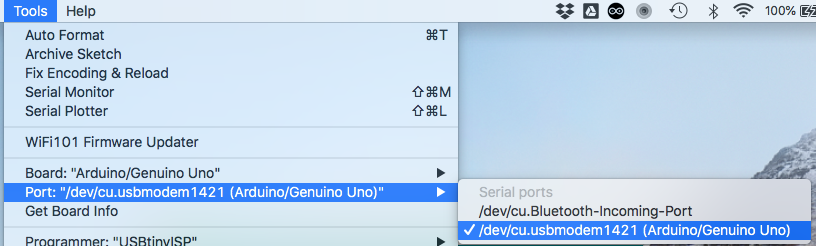
7.アップロードをクリックします。
<図>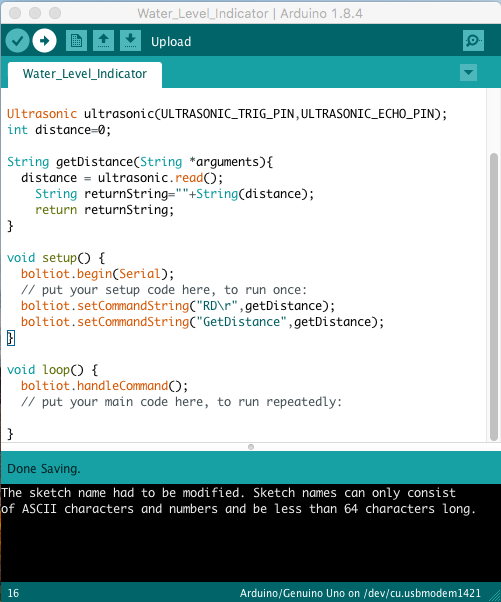
コードはArduinoまたはBoltduinoにアップロードされます。
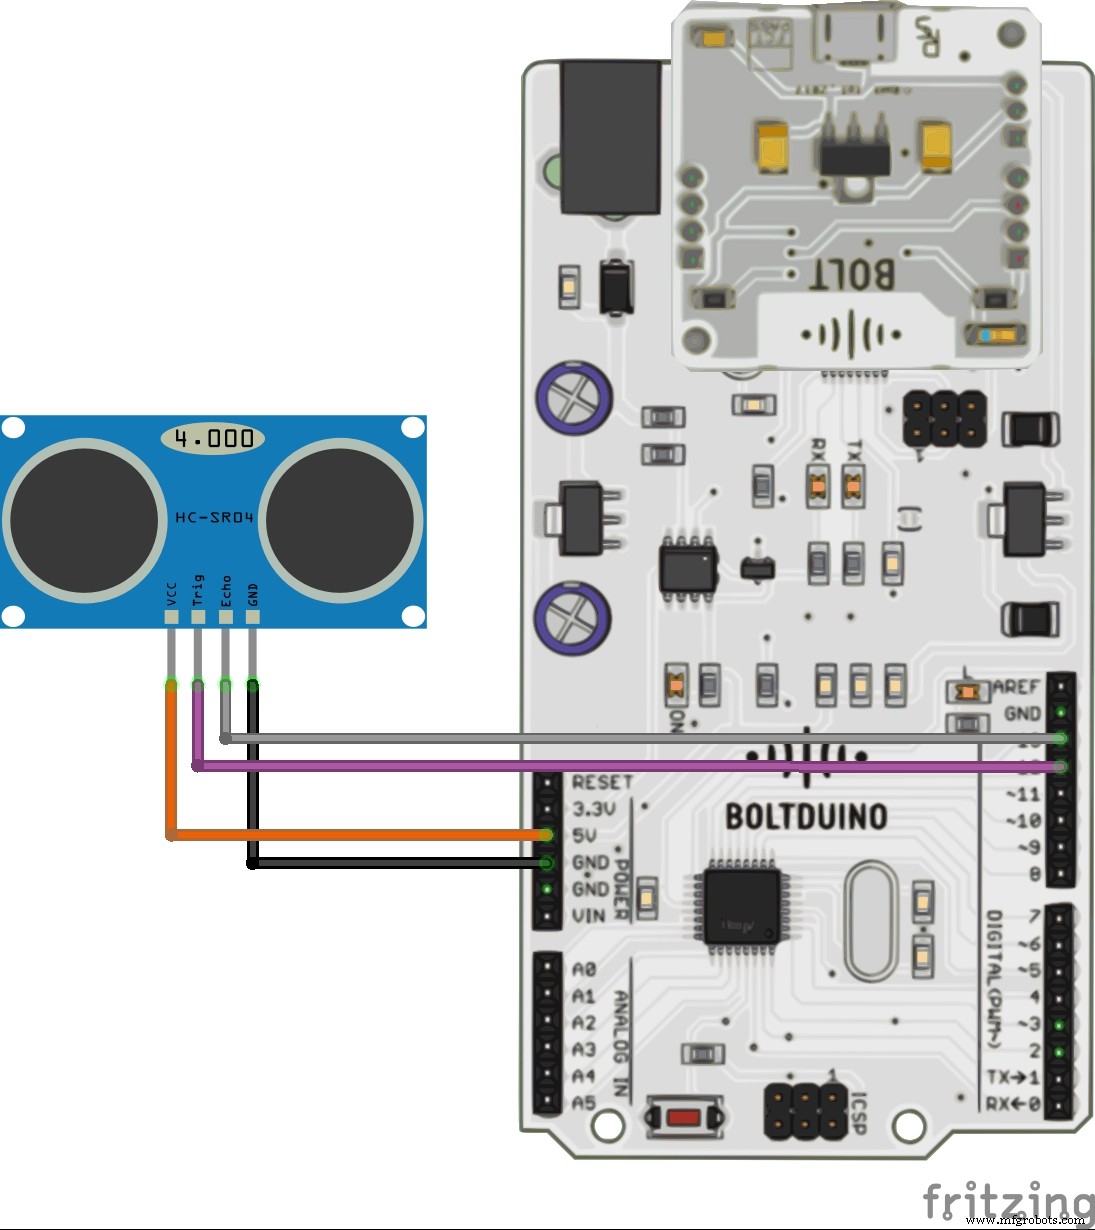
ハードウェアのセットアップ
以下のフリッツの図に従って接続します。
注: '>'をクリックすると、Arduinoの代わりにBoltduinoを使用するためのフリッツの図が表示されます。
<図>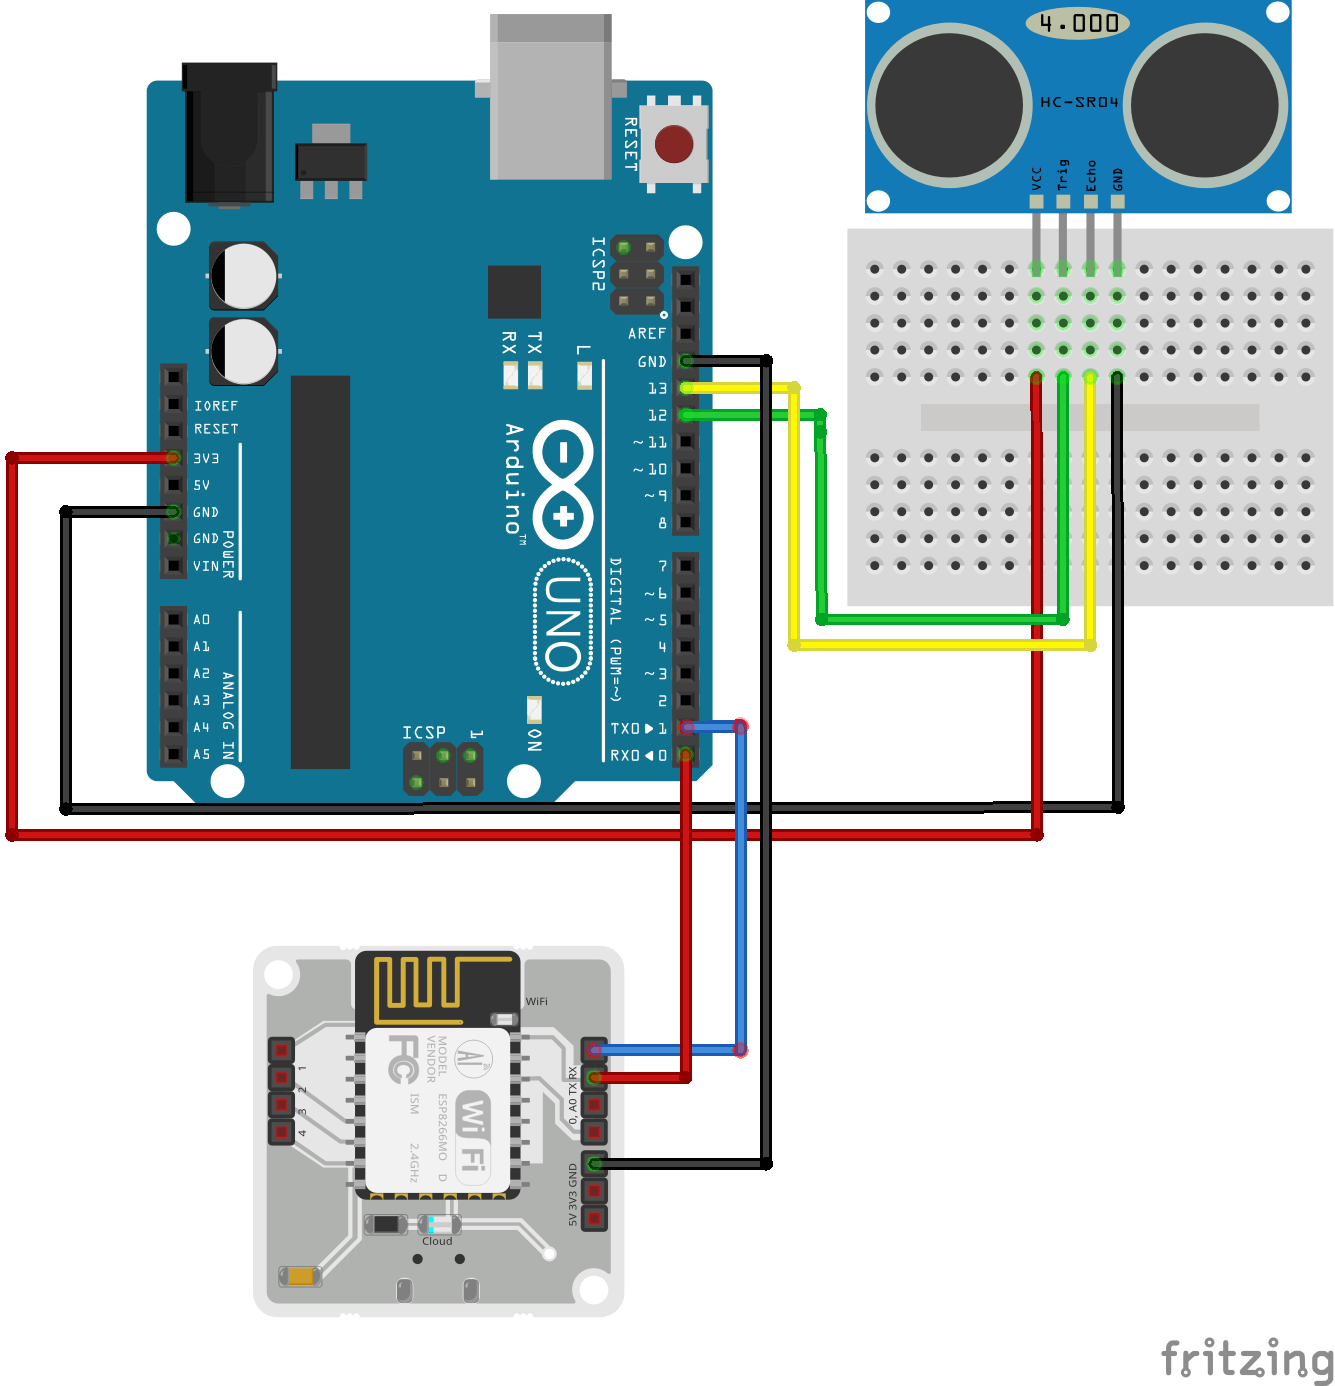 <図>
<図> 
Arduinoの代わりにBoltduinoを使用している場合は、Bolt WiFiモジュールがBoltduinoに直接適合するため、接続回数を減らす必要があります。
センサーが床に下を向くようにシステムを取り付けます。床は時間の経過とともに水が停滞します。
<図>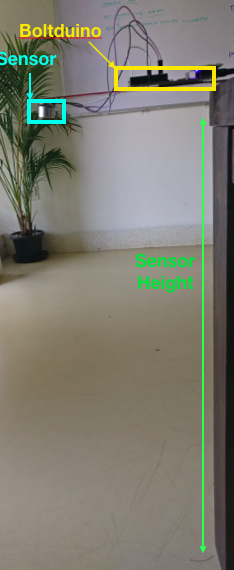 <図>
<図> 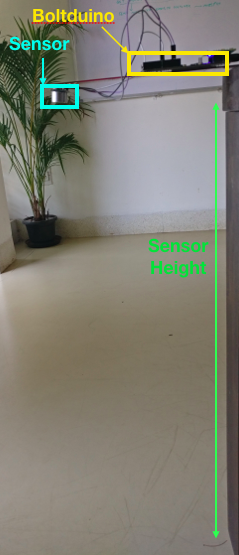
検出しきい値は常にセンサーの高さよりも小さくなることに注意してください。
9vまたは12vDCアダプターを使用してシステムの電源を入れます。
注: まだセットアップしていない場合は、ボルトをまだセットアップしていない場合は、次の手順に従ってください:ボルトのセットアップ 。
電子メールアラートを送信するためのIntegromatシナリオの設定
まだ作成していない場合は、Integromatでアカウントを作成し、ここをクリックしてサインアップページに移動します。すでにIntegormatアカウントをお持ちの場合は、Integromatにサインインしてください。
次の手順を使用して、私が作成した「水位検出」シナリオのクローンを作成します。
1.このプロジェクトのコードセクションに添付されている水位検出シナリオの青写真をダウンロードします。ファイル名「WaterLevelDetection.json」でファイルを保存することを忘れないでください。
2.右上隅にある青い[新しいシナリオを作成]ボタンをクリックしてシナリオを作成し、[続行]をクリックします。
<図>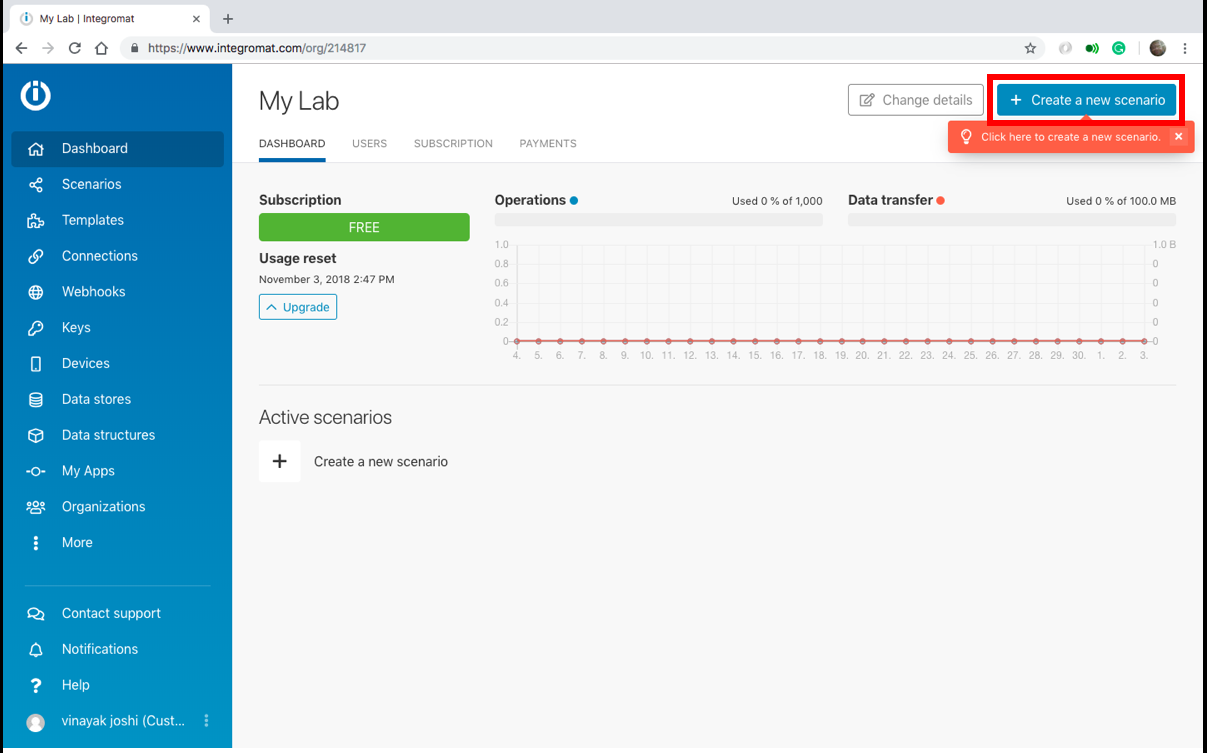 <図>
<図> 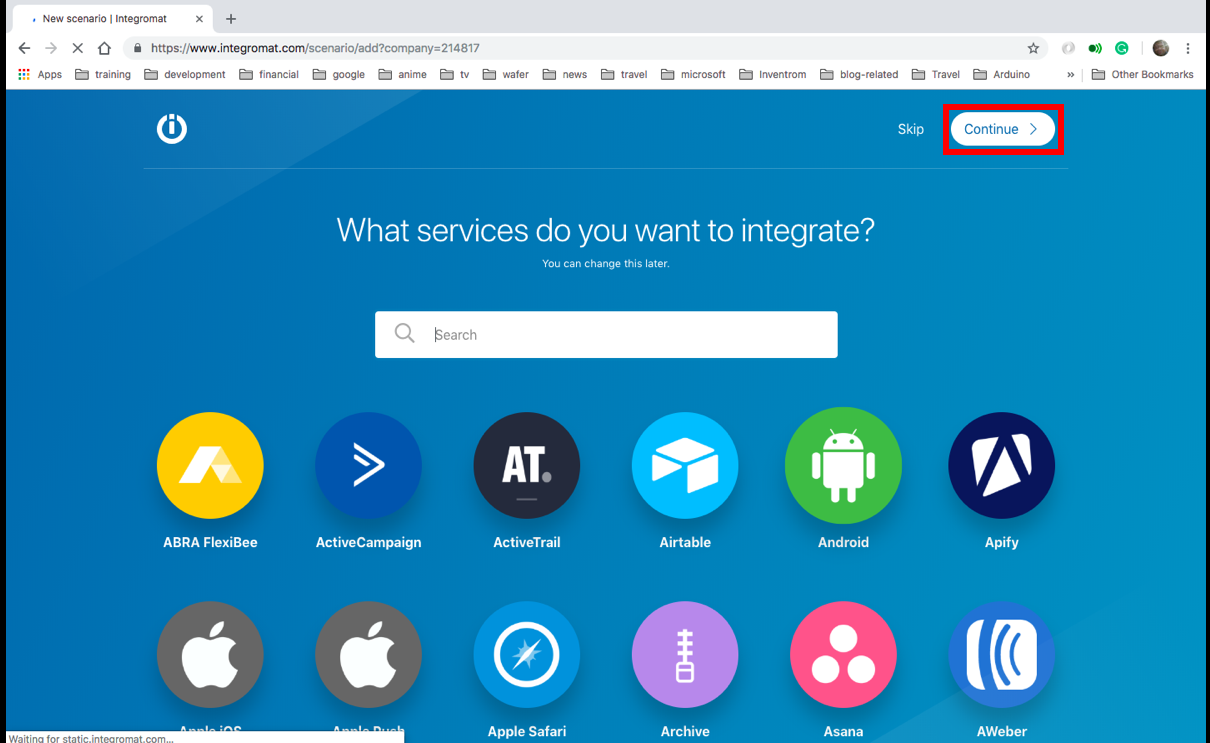
3.画面の下部にある[その他]ボタンをクリックします。
<図>
4. [ブループリントのインポート]を選択し、[ファイルの選択]をクリックします。
<図> <図>
<図> 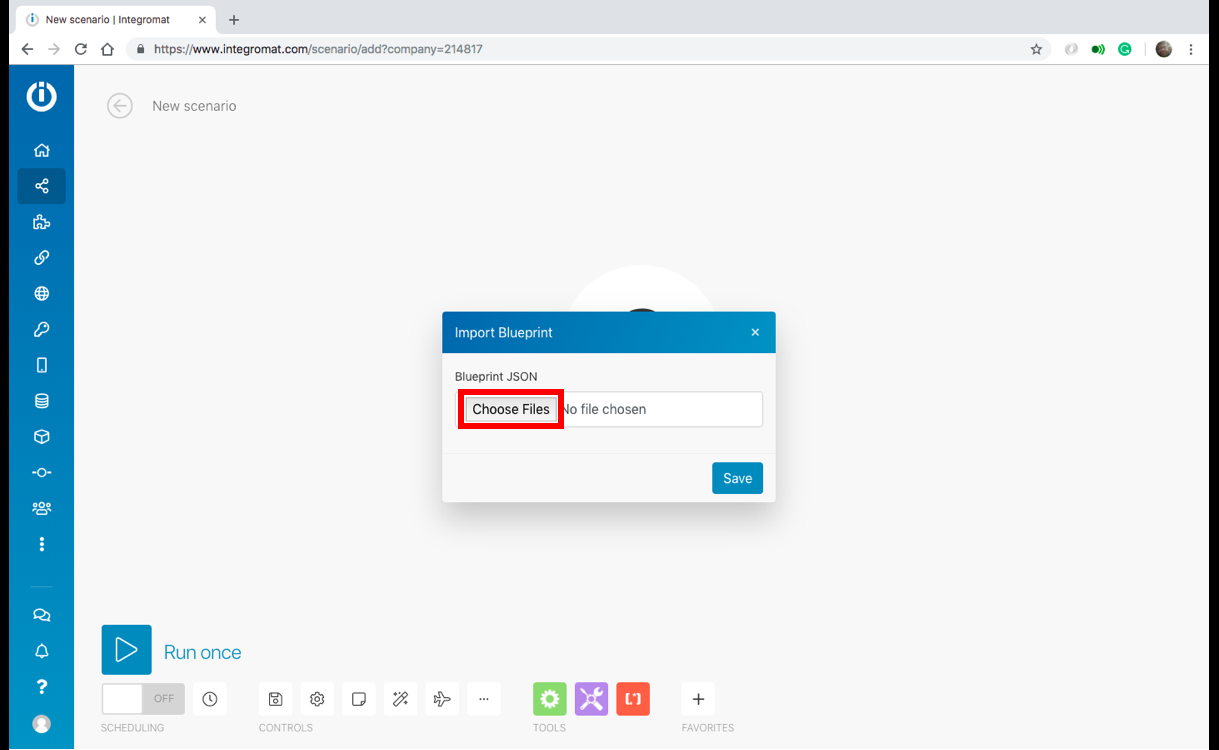
5.「WaterLevelDetection.json」ファイルをダウンロードするフォルダーに移動し、ファイルを選択して「開く」をクリックします。完了したら、[保存]をクリックします。水位検出シナリオが読み込まれます。
<図>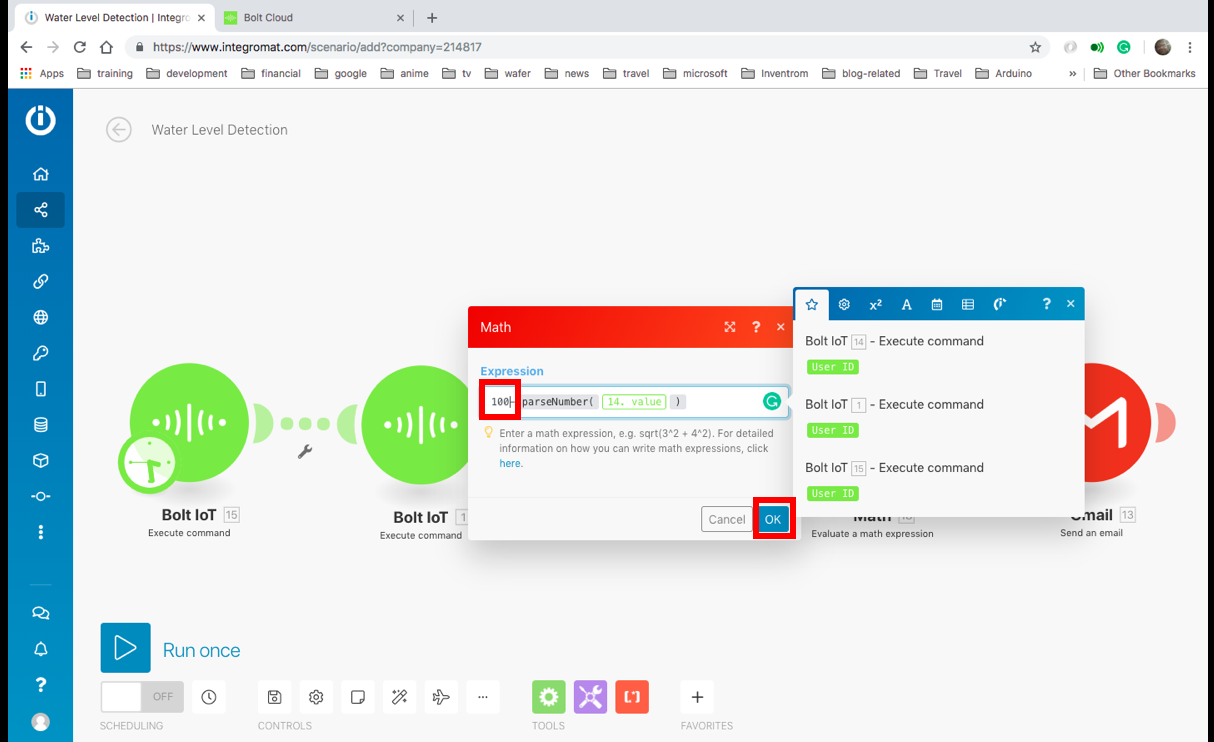 <図>
<図> 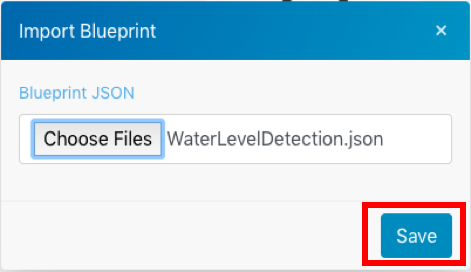 <図>
<図> 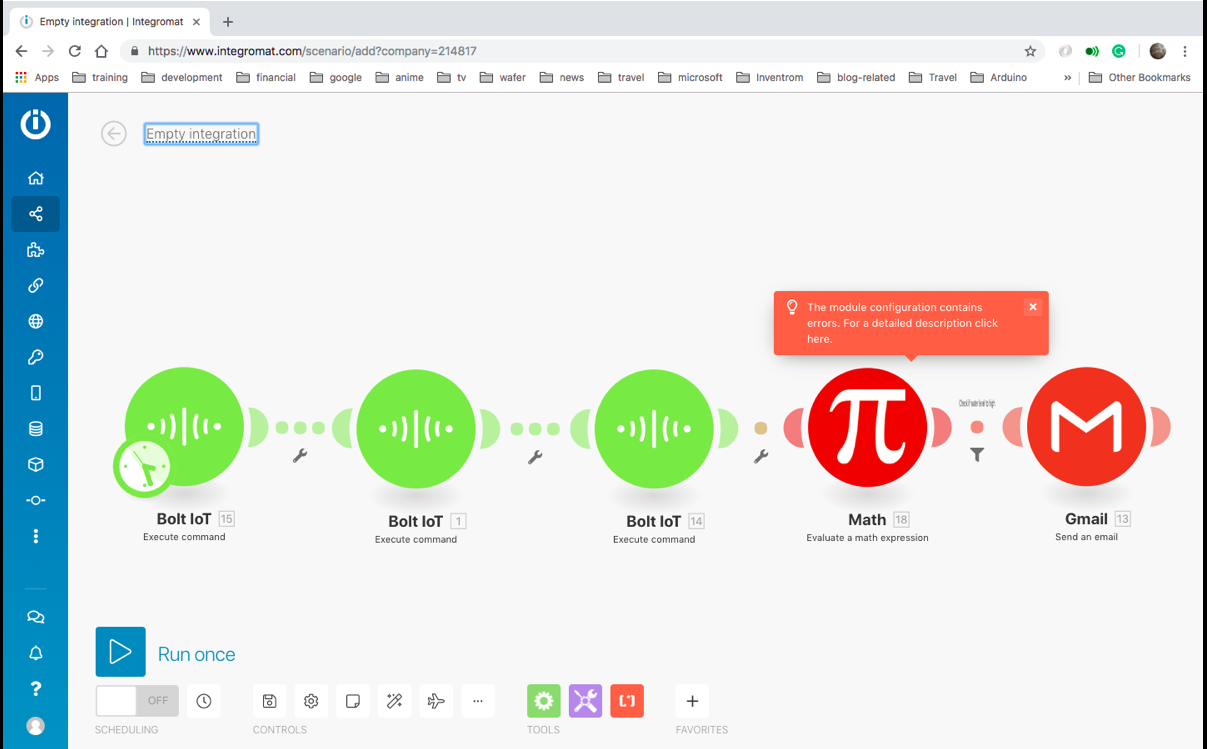
6.シナリオの名前をクリックして、水位検出に変更します。
<図>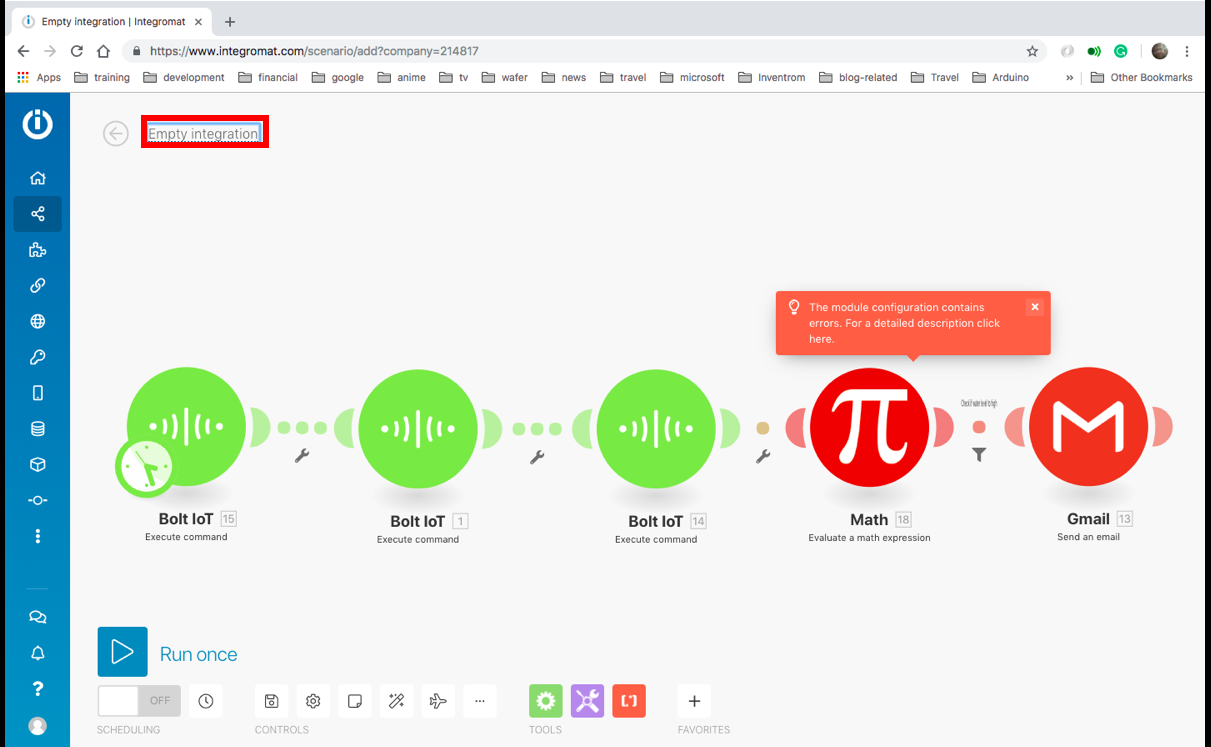
次の手順を使用して、水位検出シナリオを構成します。
1.ここをクリックしてBoltCloudAPIキーを取得します。以下の画像は、APIキーを有効にしてコピーする方法を示しています。
<図>
2. Integromatシナリオに戻り、最初のBoltIoTバブルをクリックしてから、[追加]ボタンをクリックします。
<図>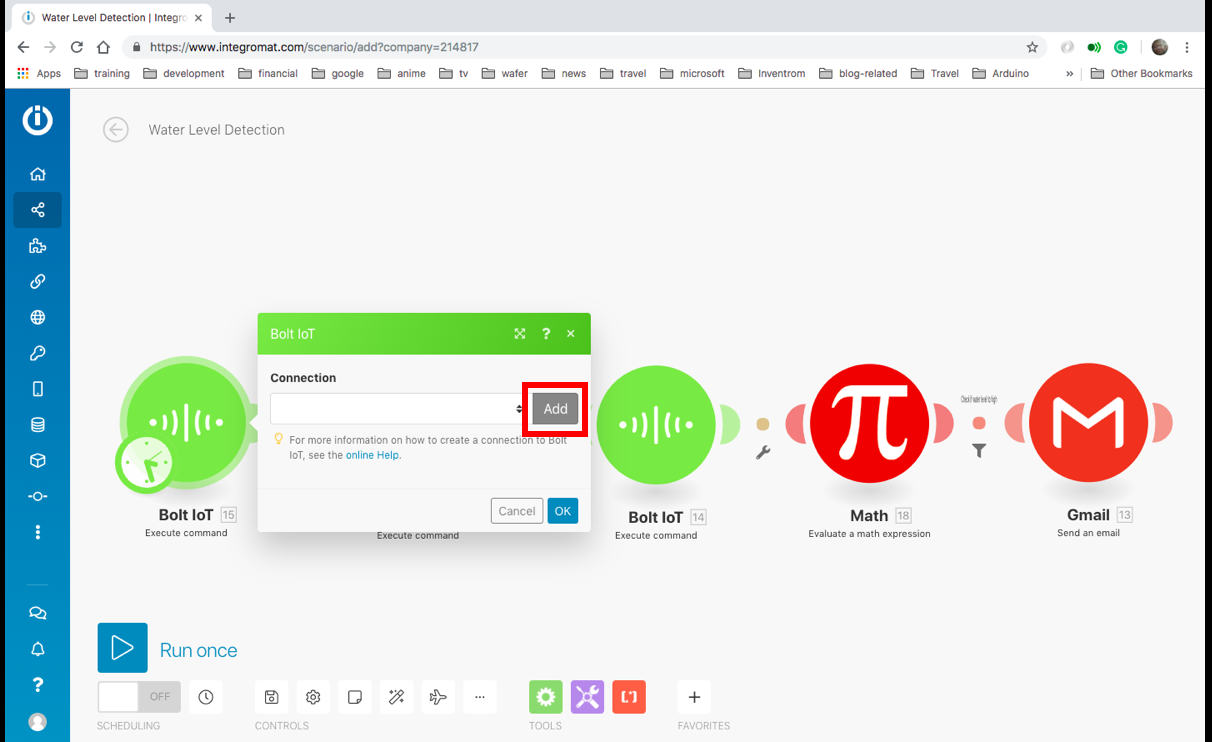
3.前にコピーしたAPIキーを貼り付けて、[続行]ボタンをクリックします。
<図>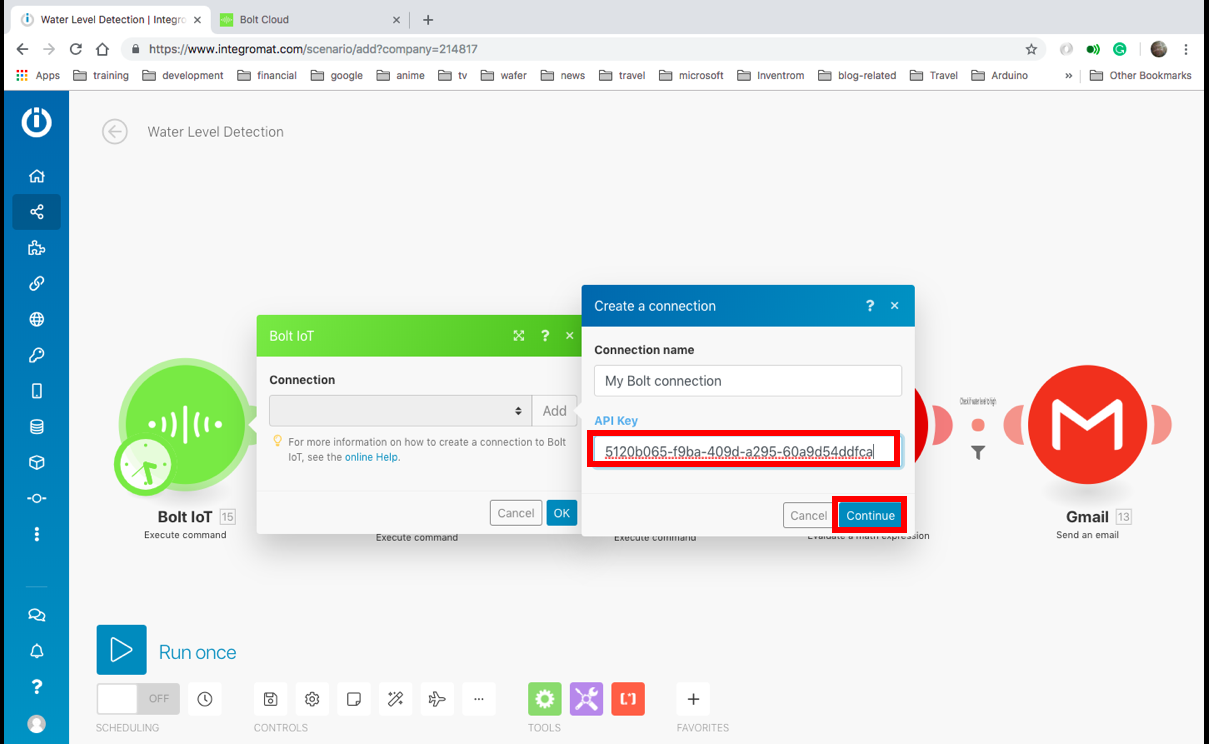
3.デバイスのデバイス名を追加します。ここをクリックすると、BoltWiFiモジュールのデバイス名を確認できます。次に、[OK]をクリックします。
<図>
4. 2番目と3番目のBoltIoTバブルの場合、ドロップダウンメニューをクリックして、[My BoltConnection]を選択できます。それぞれに正しいデバイス名を追加することを忘れないでください。
<図>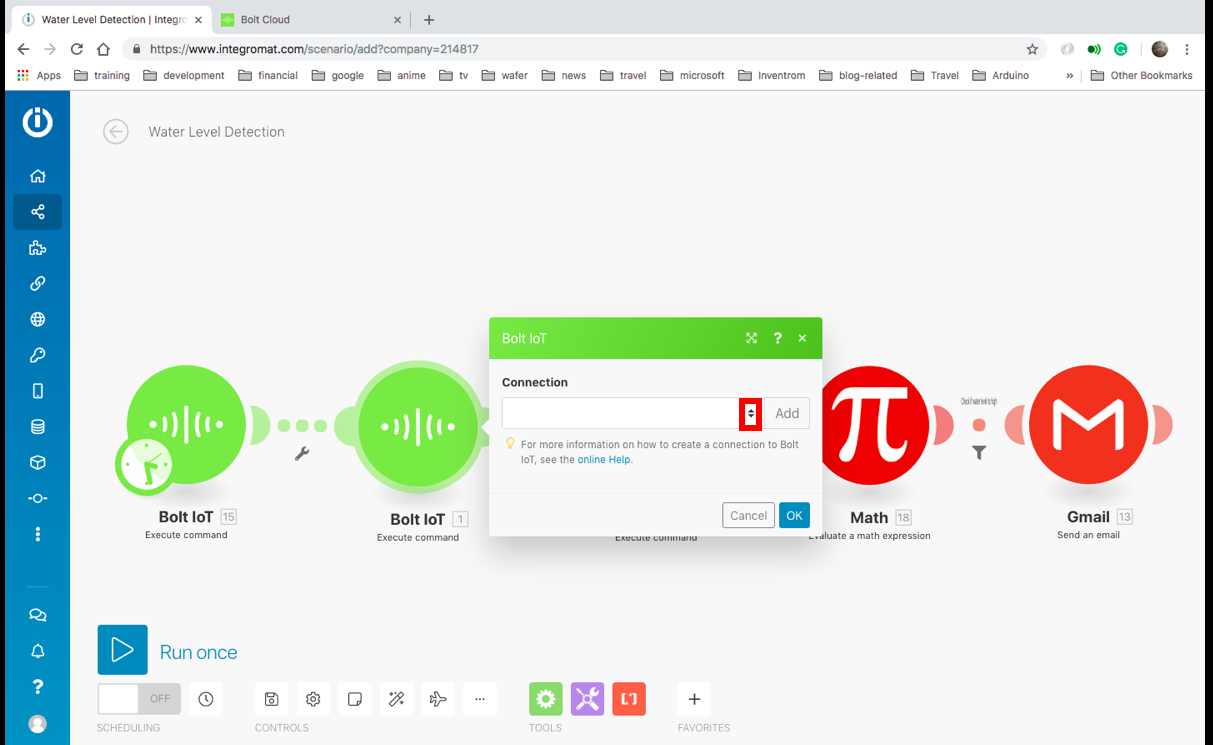 <図>
<図> 
5.計算バブルをクリックし、値100をセンサーを保持した高さ(cm)に変更します。次に、[OK]をクリックします。
<図> 6.数学とGmailのバブルの間にある赤い点をクリックし、60をアラートする水の高さに置き換えて、[OK]をクリックします。
<図>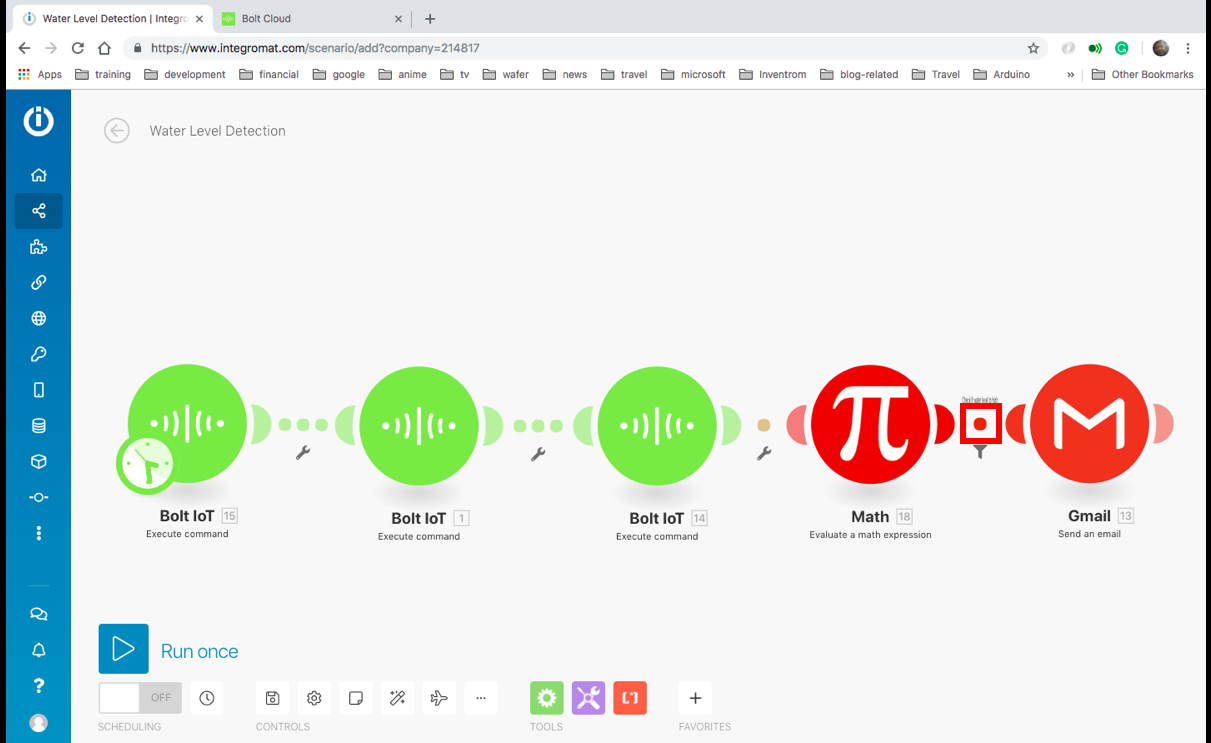 <図>
<図> 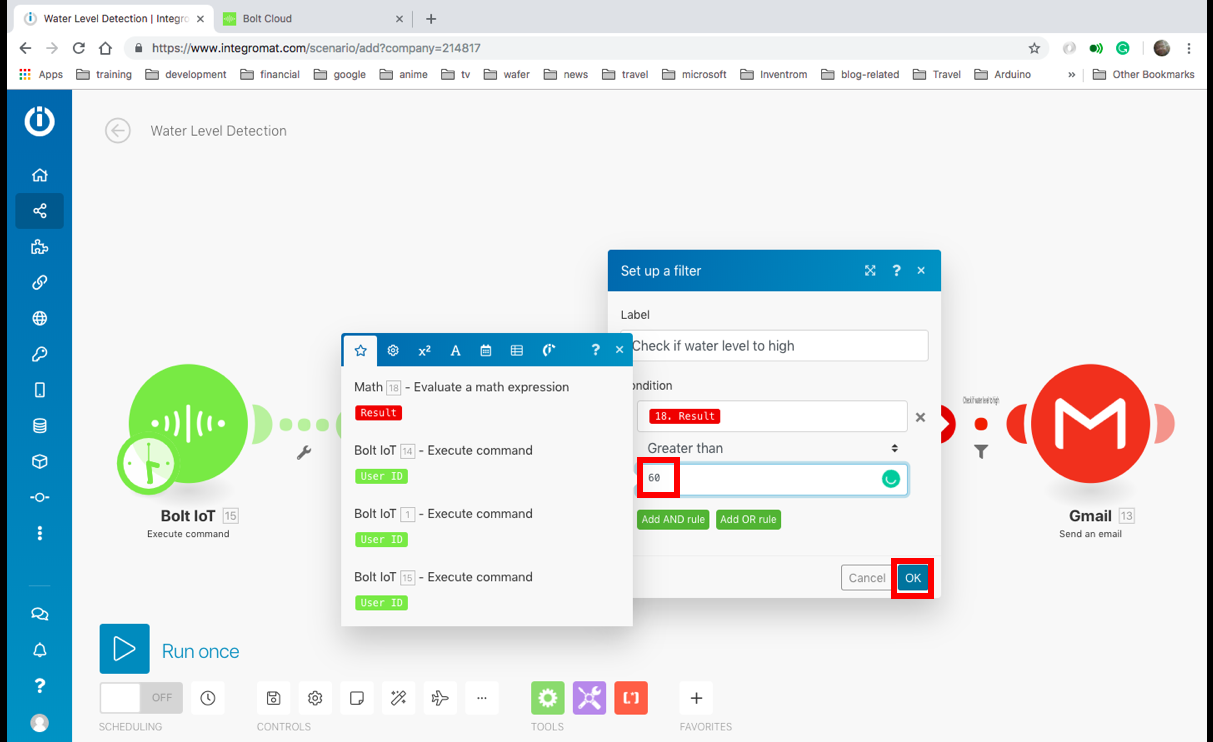
6. Gmailのバブルをクリックし、編集ボタンをクリックします。
<図>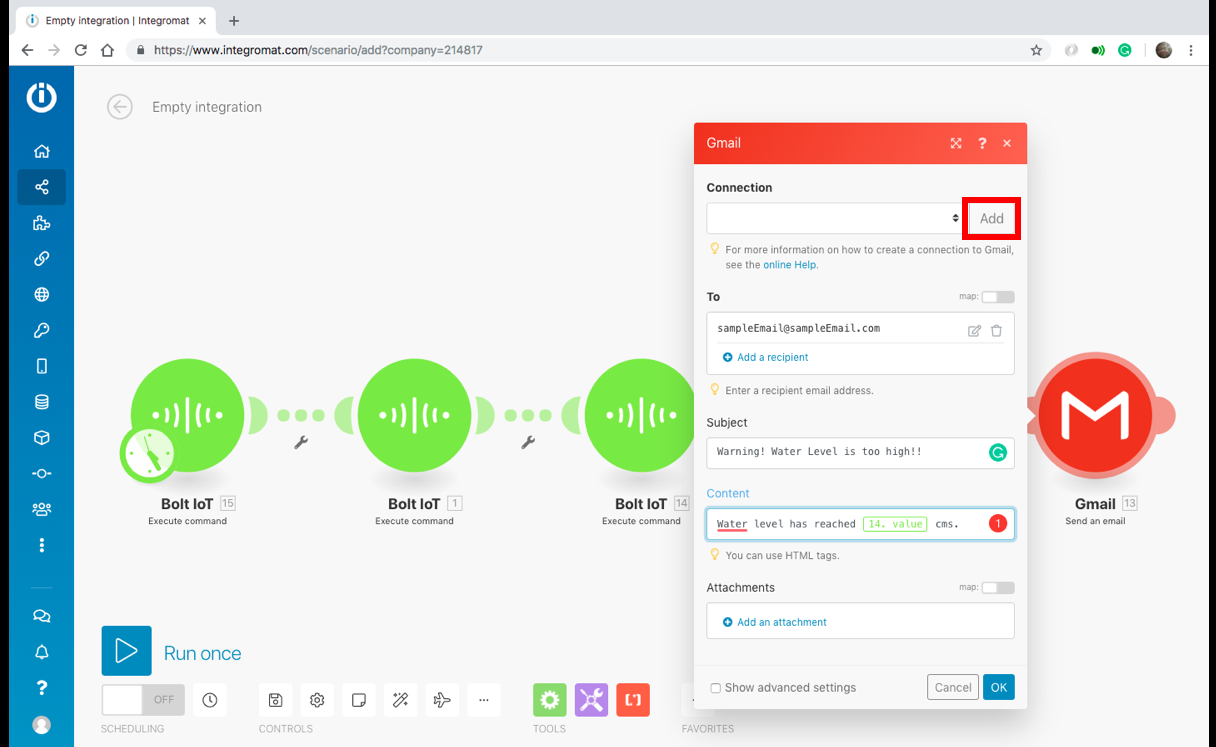 <図>
<図> 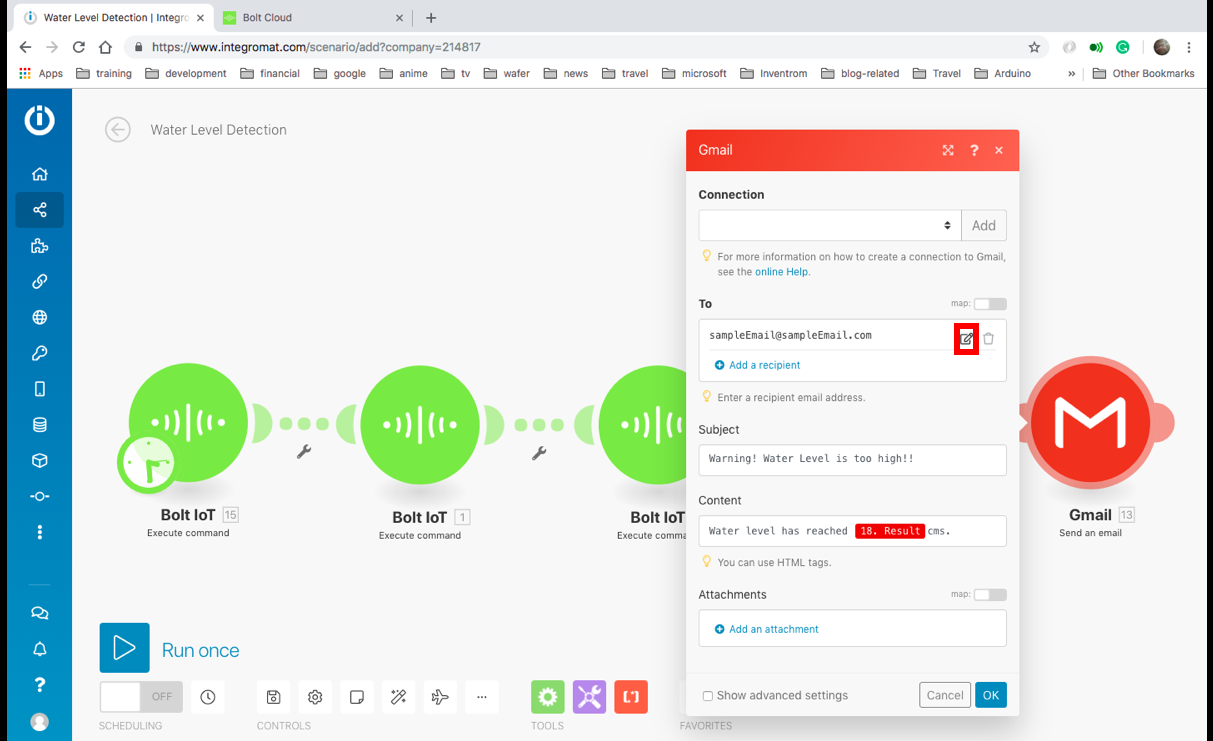
7.メールIDを追加し、[OK]をクリックします。
<図>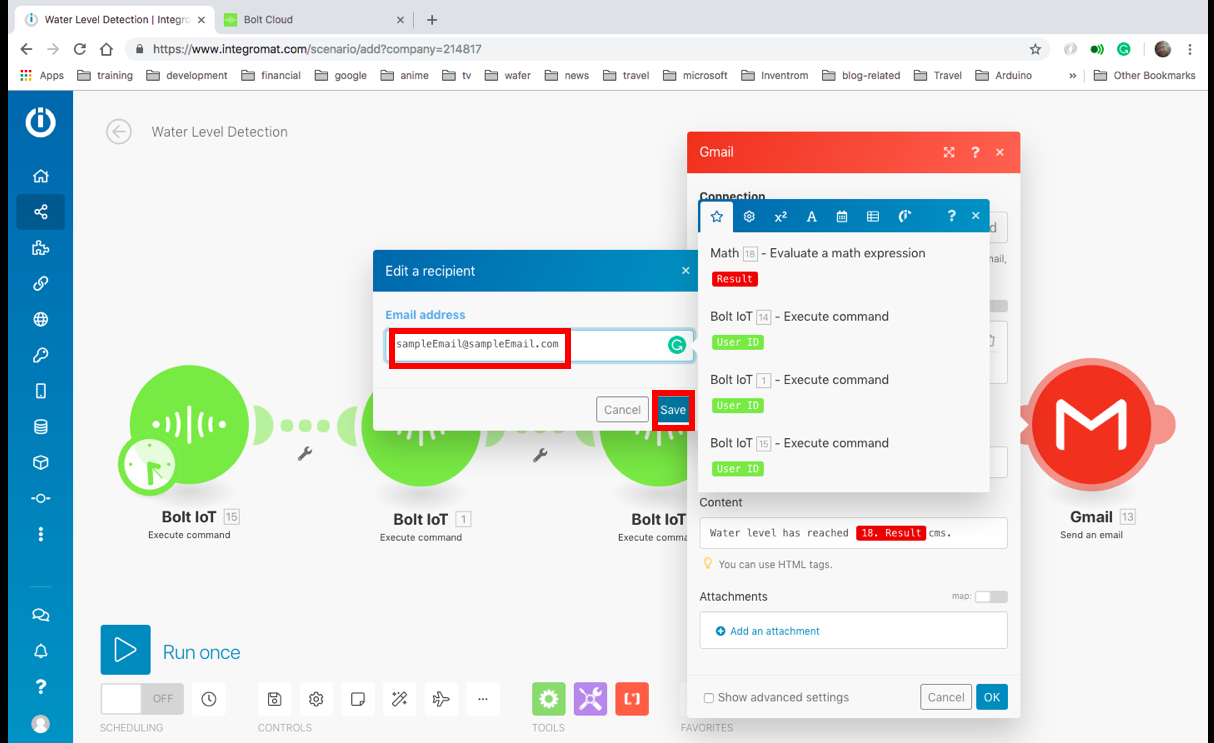
8. [追加]ボタンをクリックしてから[続行]ボタンをクリックし、IntegromatがGmailアカウントにアクセスできるようにします。
<図>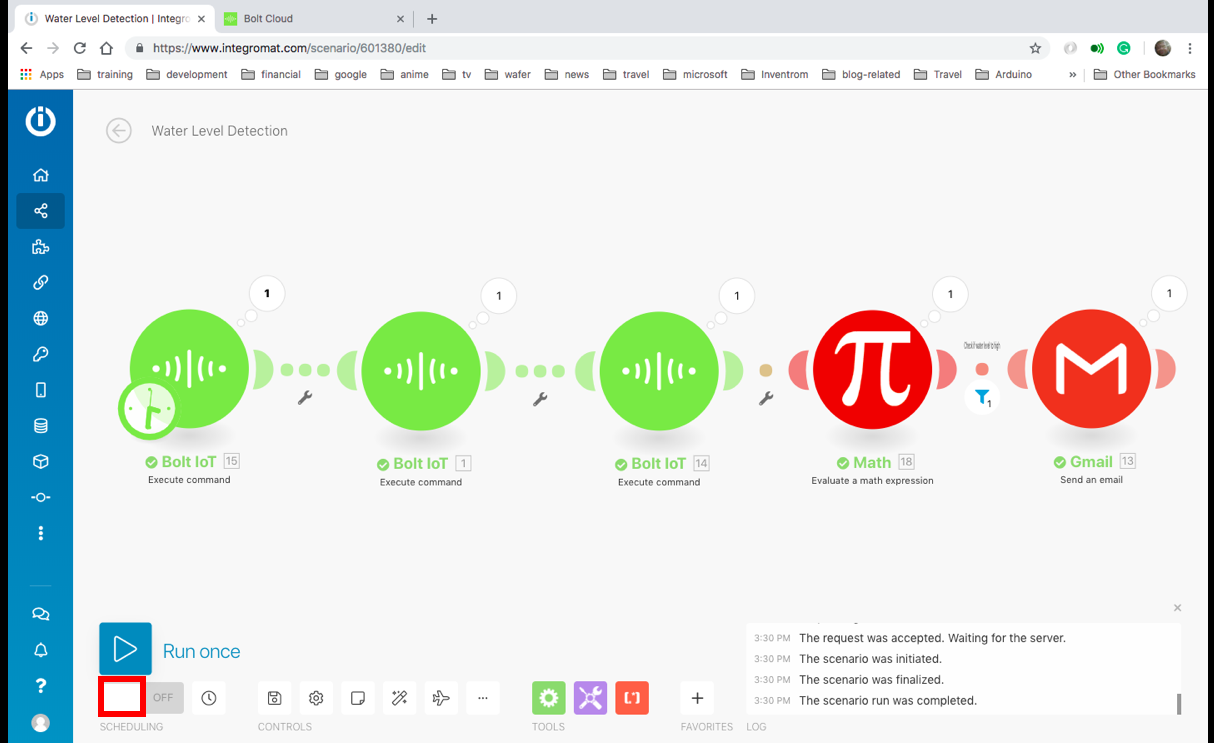 <図>
<図> 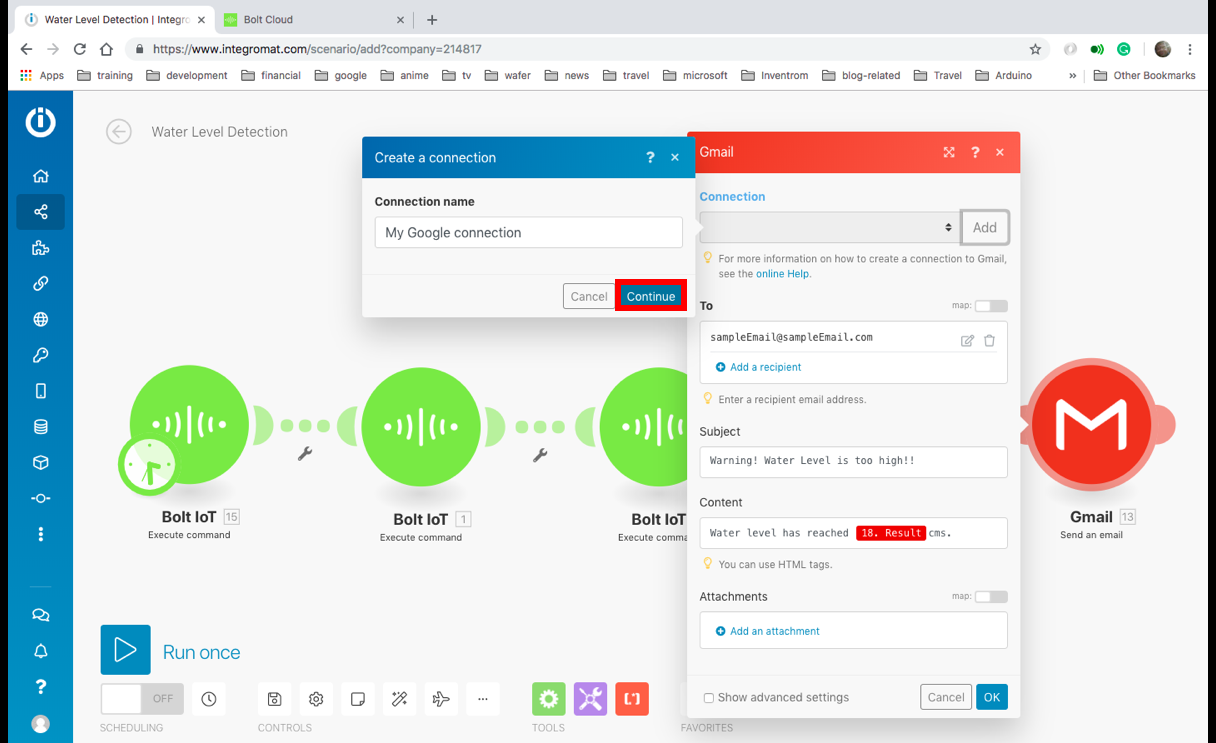
9. [受信者を追加]ボタンをクリックして受信者を追加し、[OK]をクリックします。
<図>
10.回路の電源が入っていて、センサーの前に障害物がないことを確認し、[実行]ボタンをクリックします。シナリオは実行され、思考バブルの「1」で示されるフィルターの前で待機します。センサーの前に手を置いてシナリオを実行すると、シナリオはGmailのバブルまで実行され、メールが届きます。
<図>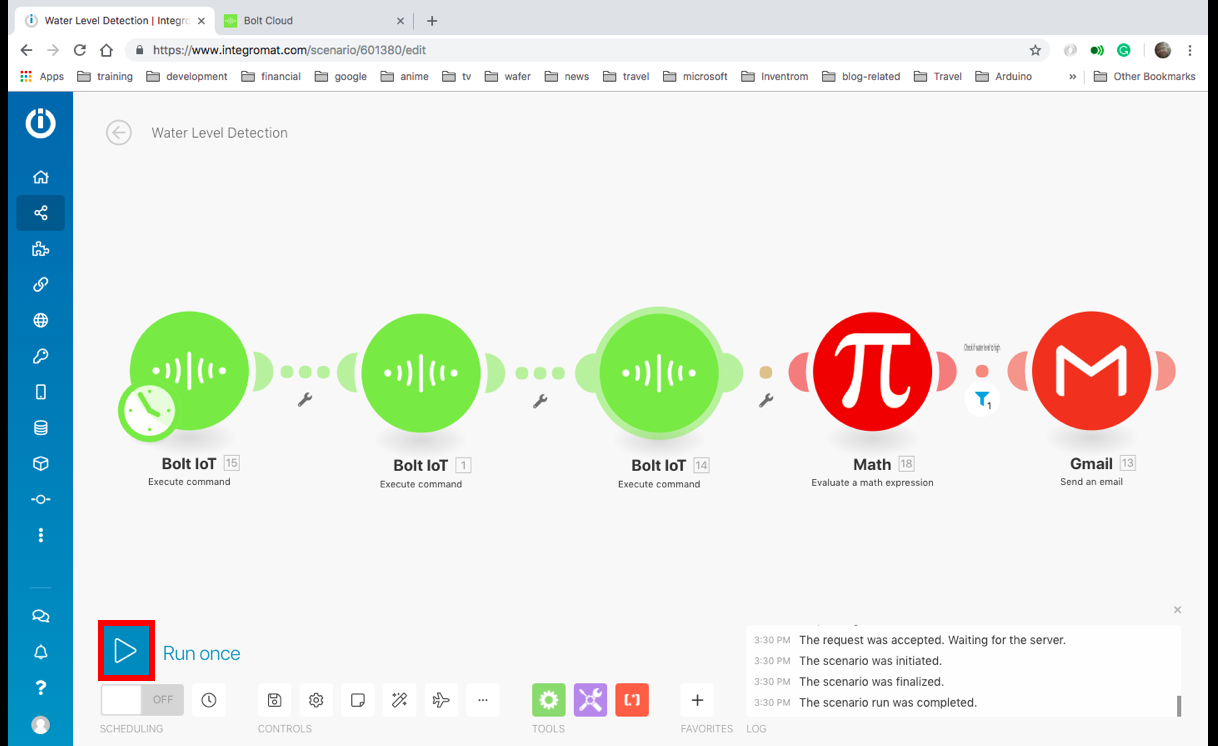 <図>
<図>  <図>
<図> 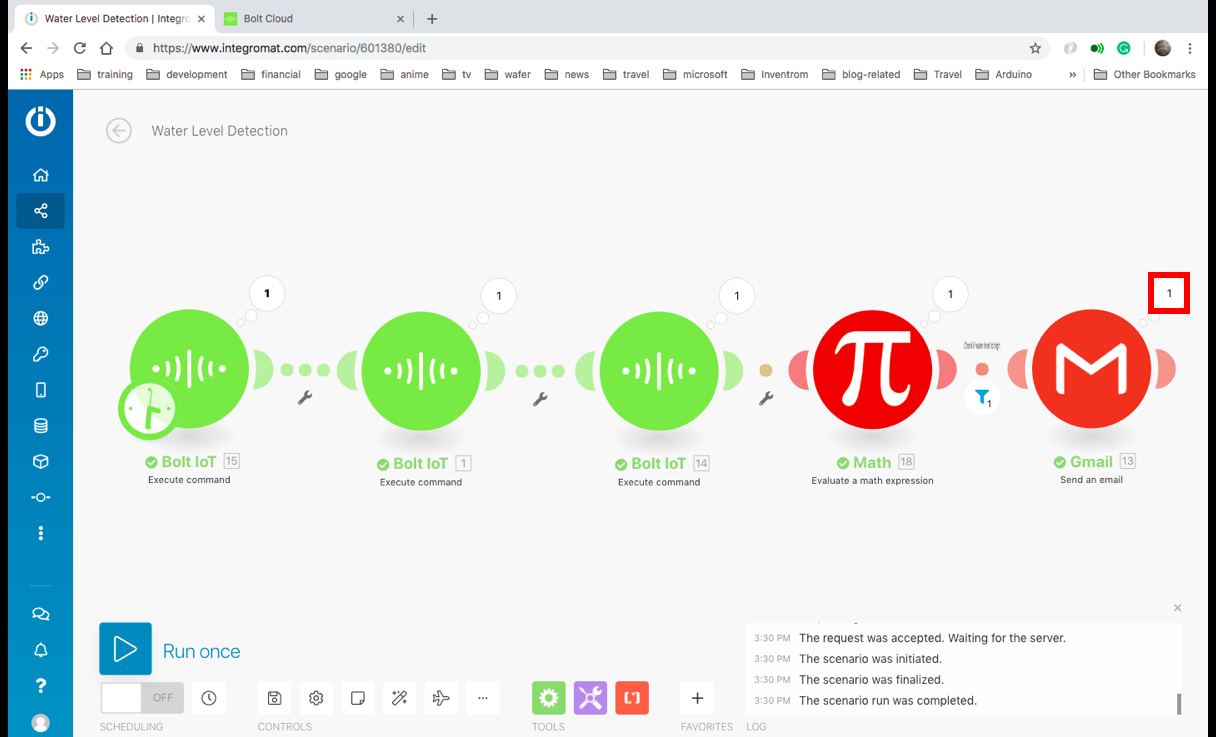 <図>
<図> 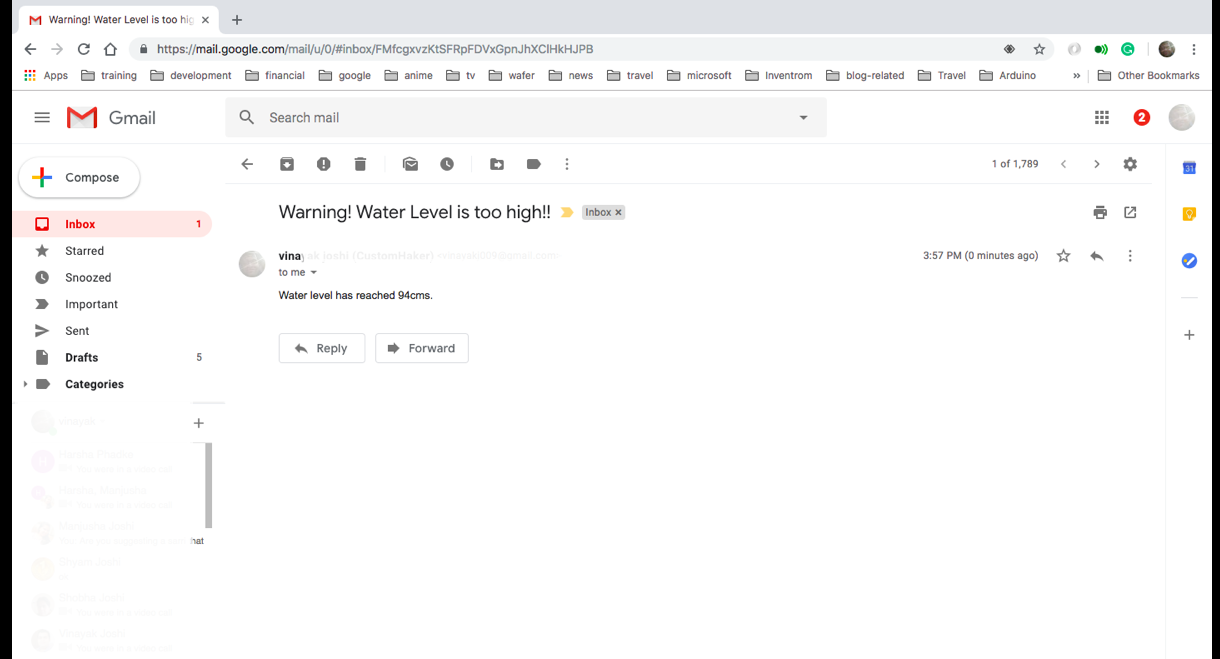
11.「オフ」というテキストの横にあるボタンをクリックして、シナリオをオンにします。これで、シナリオは15分ごとに自動的に実行されます。水位がアラートに設定した高さを超えた場合は、アラートを受信してアラートを受け取ります。
<図> <図> 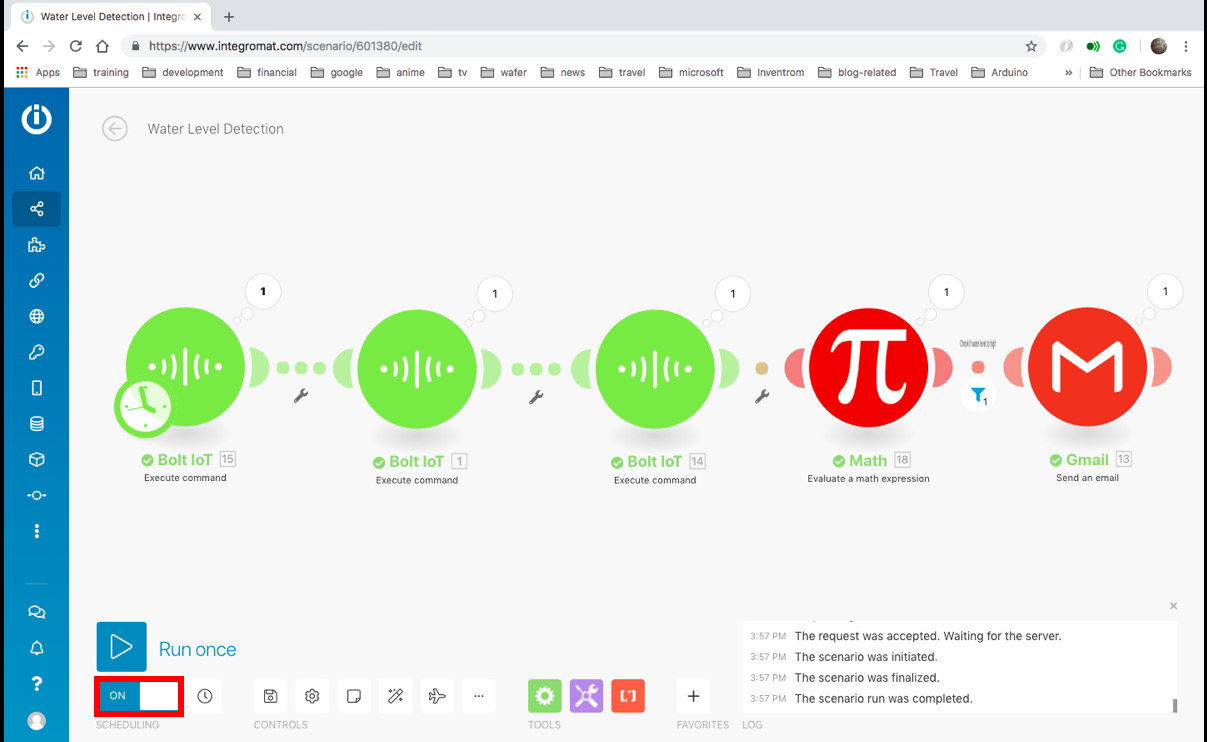
システムの取り付け
これが完了したら、センサーが床を指すようにシステムをマウントし、システムの電源を入れて、BoltがWiFi経由でインターネットに継続的にアクセスできるようにするだけです。
アプリケーション
このシステムは、次のアプリケーションで使用できます。
- 駐車場が浸水していることを検出します。
- 水タンクがいっぱいまたは空になったときにアラートを受け取る。
- 海の近くに家がある場合は、満潮を検出します。
Boltに基づくその他のプロジェクト
Boltで別のプロジェクトを構築したいですか?ここにいくつかの提案があります:
1.ボルト入門:温度監視システム
2.ホームオートメーション
コード
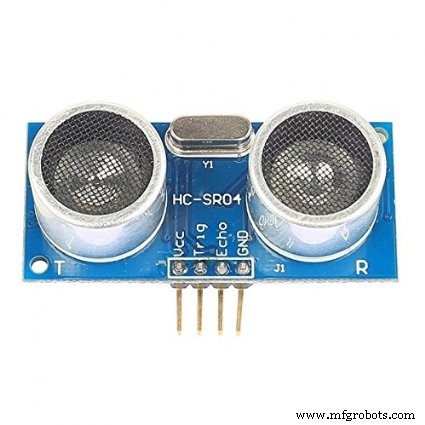
- 超音波HC-SR04を使用した水位検出システム
- WaterLevelDetection
超音波HC-SR04を使用した水位検出システム C / C ++
#include#include #define ULTRASONIC_TRIG_PIN 12#define ULTRASONIC_ECHO_PIN 13超音波超音波(ULTRASONIC_TRIG_PIN、ULTRASONIC_ECHO_PIN); int distance =0; String getDistance(String * arguments){distance =超音波.read();文字列returnString ="" + String(distance); return returnString;} void setup(){boltiot.begin(Serial); //セットアップコードをここに配置して、1回実行します:boltiot.setCommandString( "RD \ r"、getDistance); Boltiot.setCommandString( "GetDistance"、getDistance);} void loop(){boltiot.handleCommand(); //メインコードをここに配置して、繰り返し実行します:}
WaterLevelDetection JSON
これは、Integromatシナリオの青写真を含むjsonファイルです。 {"name": "Water Level Detection"、 "flow":[{"id":15、 "module": "app#bolt-iot: executeCommand "、" version ":1、" parameters ":{" __IMTCONN__ ":445281}、" mapper ":{" command ":" serialBegin "、" parameters ":{" baud ":" 9600 "、" deviceName " : ""}}、 "metadata":{"designer":{"x":8、 "y":-3}、 "restore":{"command":{"label": "シリアル通信の初期化"} 、 "__ IMTCONN __":{"label": "My Bolt connection"}}、 "parameters":[{"name": "__I MTCONN __ "、" type ":" account "、" label ":" Connection "、" required ":true}]、" expect ":[{" name ":" command "、" type ":" select "、" label ":" Command "、" required ":true、" validate ":{" enum ":[" digitalWrite "、" digitalRead "、" analogRead "、" analogWrite "、" serialBegin "、" serialWrite "、" serialRead " 、 "バージョン"、 "再起動"、 "isAlive"]}}、 {"name": "parameters"、 "spec":[{"name": "deviceName"、 "type": "text"、 "label": "Device name"、 "required":true}、{"name ":" baud "、" type ":" number "、" label ":" Baud "、" required ":true}]、" type ":" collection "、" label ":" Parameters "}]}}、 {"id":1、 "module": "app#bolt-iot:executeCommand"、 "version":1、 "parameters":{"__ IMTCONN __":445281}、 "mapper":{"コマンド ":" serialWrite "、"パラメータ ":{"データ ":" GetDistance "、"デバイス名 ":" "}}、"メタデータ ":{"デザイナー ":{" x ":300、" y ":0 }、 "restore":{"command":{"label": "シリアルデータ出力の送信"}、 "__IMTCONN __":{"label": "My Bolt connection"}}、 "parameters":[{"name" : "__ IMTCONN__"、 "type": "account"、 "label": "Connection"、 "required":true}]、 "expect":[{"name": "command"、 "type": "select" 、 "label": "コマンド"、 "required":true、 "validate":{"enum":["digitalWrite"、 "digitalRead"、 "analogRead"、 "analogWrite"、 "serialBegin"、 "serialWrite"、 "serialRead"、 "version"、 "restart "、" isAlive "]}}、{" name ":" parameters "、" spec ":[{" name ":" deviceName "、" type ":" text "、" label ":" Device name "、"必須」:true}、 {"name": "data"、 "type": "text"、 "label": "Data"、 "required":true}]、 "type": "collection"、 "label": "Parameters"}] }}、{"id":14、 "module": "app#bolt-iot:executeCommand"、 "version":1、 "parameters":{"__ IMTCONN __":445281}、 "mapper":{"command" : "serialRead"、 "parameters":{"till": "10"、 "deviceName": ""}}、 "metadata":{"designer":{"x":600、 "y":0}、 "復元":{"コマンド":{ "label": "受信シリアルデータの読み取り"}、 "__IMTCONN __":{"label": "My Bolt connection"}}、 "parameters":[{"name": "__IMTCONN__"、 "type": "account" 、 "label": "接続"、 "必須":true}]、 "期待":[{"名前": "コマンド"、 "タイプ": "選択"、 "ラベル": "コマンド"、 "必須" :true、 "validate":{"enum":["digitalWrite"、 "digitalRead"、 "analogRead"、 "analogWrite"、 "serialBegin"、 "serialWrite"、 "serialRead"、 "version"、 "restart"、 "isAlive"]}}、{"name": "parameters"、 "spec":[{"name": "deviceName"、 "type": "text"、 "label": "デバイス名"、 "required":true}、{"name": "till"、 "type": "number"、 "label": "Till"、 "required":true 、 "validate":{"max":127、 "min":0 }}]、 "type": "collection"、 "label": "Parameters"}]}}、{"id":18、 "module": "math:EvaluateExpression"、 "version":1、 "parameters" :{}、 "mapper":{"expression": "100-{{parseNumber(14.value)}}"}、 "metadata":{"designer":{"x":869、 "y":- 2}、 "expect":[{"name": "expression"、 "type": "text"、 "label": "Expression"、 "required":true}]}}、{"id":13、 "モジュール": "google-email:ActionSendEmail"、 "バージョン":1、 "パラメータ" :{"アカウント":445282}、 "フィルター":{"名前": "水位が高いかどうかを確認"、 "条件":[[{"a": "{{18.result}}"、 "b ":" 60 "、" o ":" number:greater "}]]}、" mapper ":{" cc ":[]、" to ":[]、" bcc ":[]、" html ": "水位が{{18.result}} cmsに達しました。"、 "件名": "警告!水位が高すぎます!! "、"添付ファイル ":[]}、"メタデータ ":{"デザイナー ":{" x ":1145、" y ":-3}、"復元 ":{" cc ": {"mode": "choose"、 "items":[]}、 "to":{"mode": "choose"、 "items":["undefined"]}、 "bcc":{"mode": "choose"、 "items":[]}、 "account":{"label": ""}、 "attachments":{"mode": "choose"、 "items":[]}}、 "parameters" :[{"名前": "アカウント"、 "type": "account"、 "label": "Connection"、 "required":true}]、 "expect":[{"name": "to"、 "spec":{"name": ""、 "type": "email"、 "label": "Email address"、 "required":true}、 "type": "array"、 "label": "To"、 "labels":{"add": "受信者の追加 "、"編集 ":"受信者の編集 "}、"必須 ":true}、{"名前 ":"件名 "、"タイプ ":"テキスト "、"ラベル ":"件名 "}、{"name": "html"、 "type": "text"、 "label": "Content"}、{"name": "attachments"、 "spec":[{"name": "fileName"、 "type ":" filename "、" label ":" File name "、" required ":true、" semantic ":" file:name "}、{" name ":" data "、" type ":" buffer "、" label ":" Data "、" required ":true、" semantic ":" file:data "}、{" name ":" cid "、" type ":" text "、 "label": "Content-ID"}]、 "type": "array"、 "label": "Attachments"、 "labels":{"add": "添付ファイルの追加"、 "edit": "編集添付ファイル "}}、{" name ":" cc "、" spec ":{" type ":" email "、" label ":" Email address "}、" type ":" array "、" label ":"コピー受信者 "、"ラベル ":{"追加 ":"コピー受信者の追加 "、"編集 ":"コピー受信者の編集 "}}、{"名前 ":" bcc "、"仕様 ":{"タイプ " : "Eメール"、" label ":"メールアドレス "}、" type ":" array "、" label ":"ブラインドコピー受信者 "、" labels ":{" add ":"ブラインドコピー受信者を追加 "、" edit " : "ブラインドコピー受信者を編集"}}]}}]、 "metadata":{"version":1、 "scenario":{"roundtrips":1、 "maxErrors":3、 "autoCommit":false、 "シーケンシャル ":false、"機密 ":false、"データロス ":false、" dlq ":false}、"デザイナー ":{"孤児 ":[]}、"ゾーン ":" eu1.integromat.com "}} 回路図

製造プロセス