



Arduinoと1Sheeldで作るAmazon Echo風スマートスピーカー
必要な部品と材料
| 部品 | 数量 |
|---|---|
| Arduino 101 | 1 |
| 1Sheeld | 1 |
| スティックランプ | 1 |
| RGB LEDストリップ | 1 |
| リレーボード | 1 |
| Apple iPhone | 1 |
| ブレッドボード(汎用) | 1 |
| USB-A to Bケーブル | 1 |
| ジャンパーワイヤー(汎用) | 30本 |
| 汎用NPNトランジスタ | 3 |
必要な工具と機器
- ドリル
- PVCパイプ
使用アプリとオンラインサービス
- Arduino IDE
プロジェクト概要
数ヶ月前、友人宅でAmazon Echoを見て衝撃を受けました。音楽再生、家電操作、ニュース・天気・日時の読み上げなど、すべて音声コマンドだけで操作できるのです。
その瞬間、メイカー魂が「自分で作れないか?」と叫びました。そこからArduinoベースのAmazon Echoを作るためのコンポーネント探しが始まり、素晴らしい「1Sheeld」に出会いました。
1SheeldはArduino用プラットフォームで、スマートフォンのセンサーと機能を利用してArduinoプロジェクトで使えるようにするものです。ハードウェアシールドとしてArduinoボードの上に載せ、BluetoothでAndroidアプリと通信し、スマートフォンとデータをやり取りします。1Sheeld公式の入門チュートリアルでステップバイステップで学べます。
このプロジェクトでは1Sheeldの40以上のシールドから5つを使用しました。

使用シールド
- 音声認識シールド - システム全体を音声コマンドで制御。
VoiceRecognition.start();たった1行で有効化。 - 音楽プレイヤーシールド - スマホの音楽プレイヤーにアクセスし、曲をスムーズに再生。
MusicPlayer.play();のみ。 - テキスト読み上げシールド - 人間的な応答を実現。
TextToSpeech.say("time in cairo is");で簡単に応答可能。 - 時計シールド - リアルタイムで時刻を取得。
Clock.queryDateAndTime();でスマホの現在時刻を取得。 - インターネットシールド - 最も強力なシールドの一つ。OpenWeatherMap APIで天気情報を取得。
HttpRequest request1("/* APIアドレス */");で呼び出し。


Step 1: 部品を揃える
- Arduino 101:$30.99
- 1Sheeld+ボード:$54.94
- iPhone:$155.5
- PVCパイプ:$2
- LEDストリップ:$5
- 12V電源:$7
- リレーボード:$3
- ジャンパー/ワイヤー:$3
- NPNトランジスタ3個:$1
Step 2: パイプに穴を開ける(音を出すため)
Step 3: PVCパイプを黒スプレーで塗装
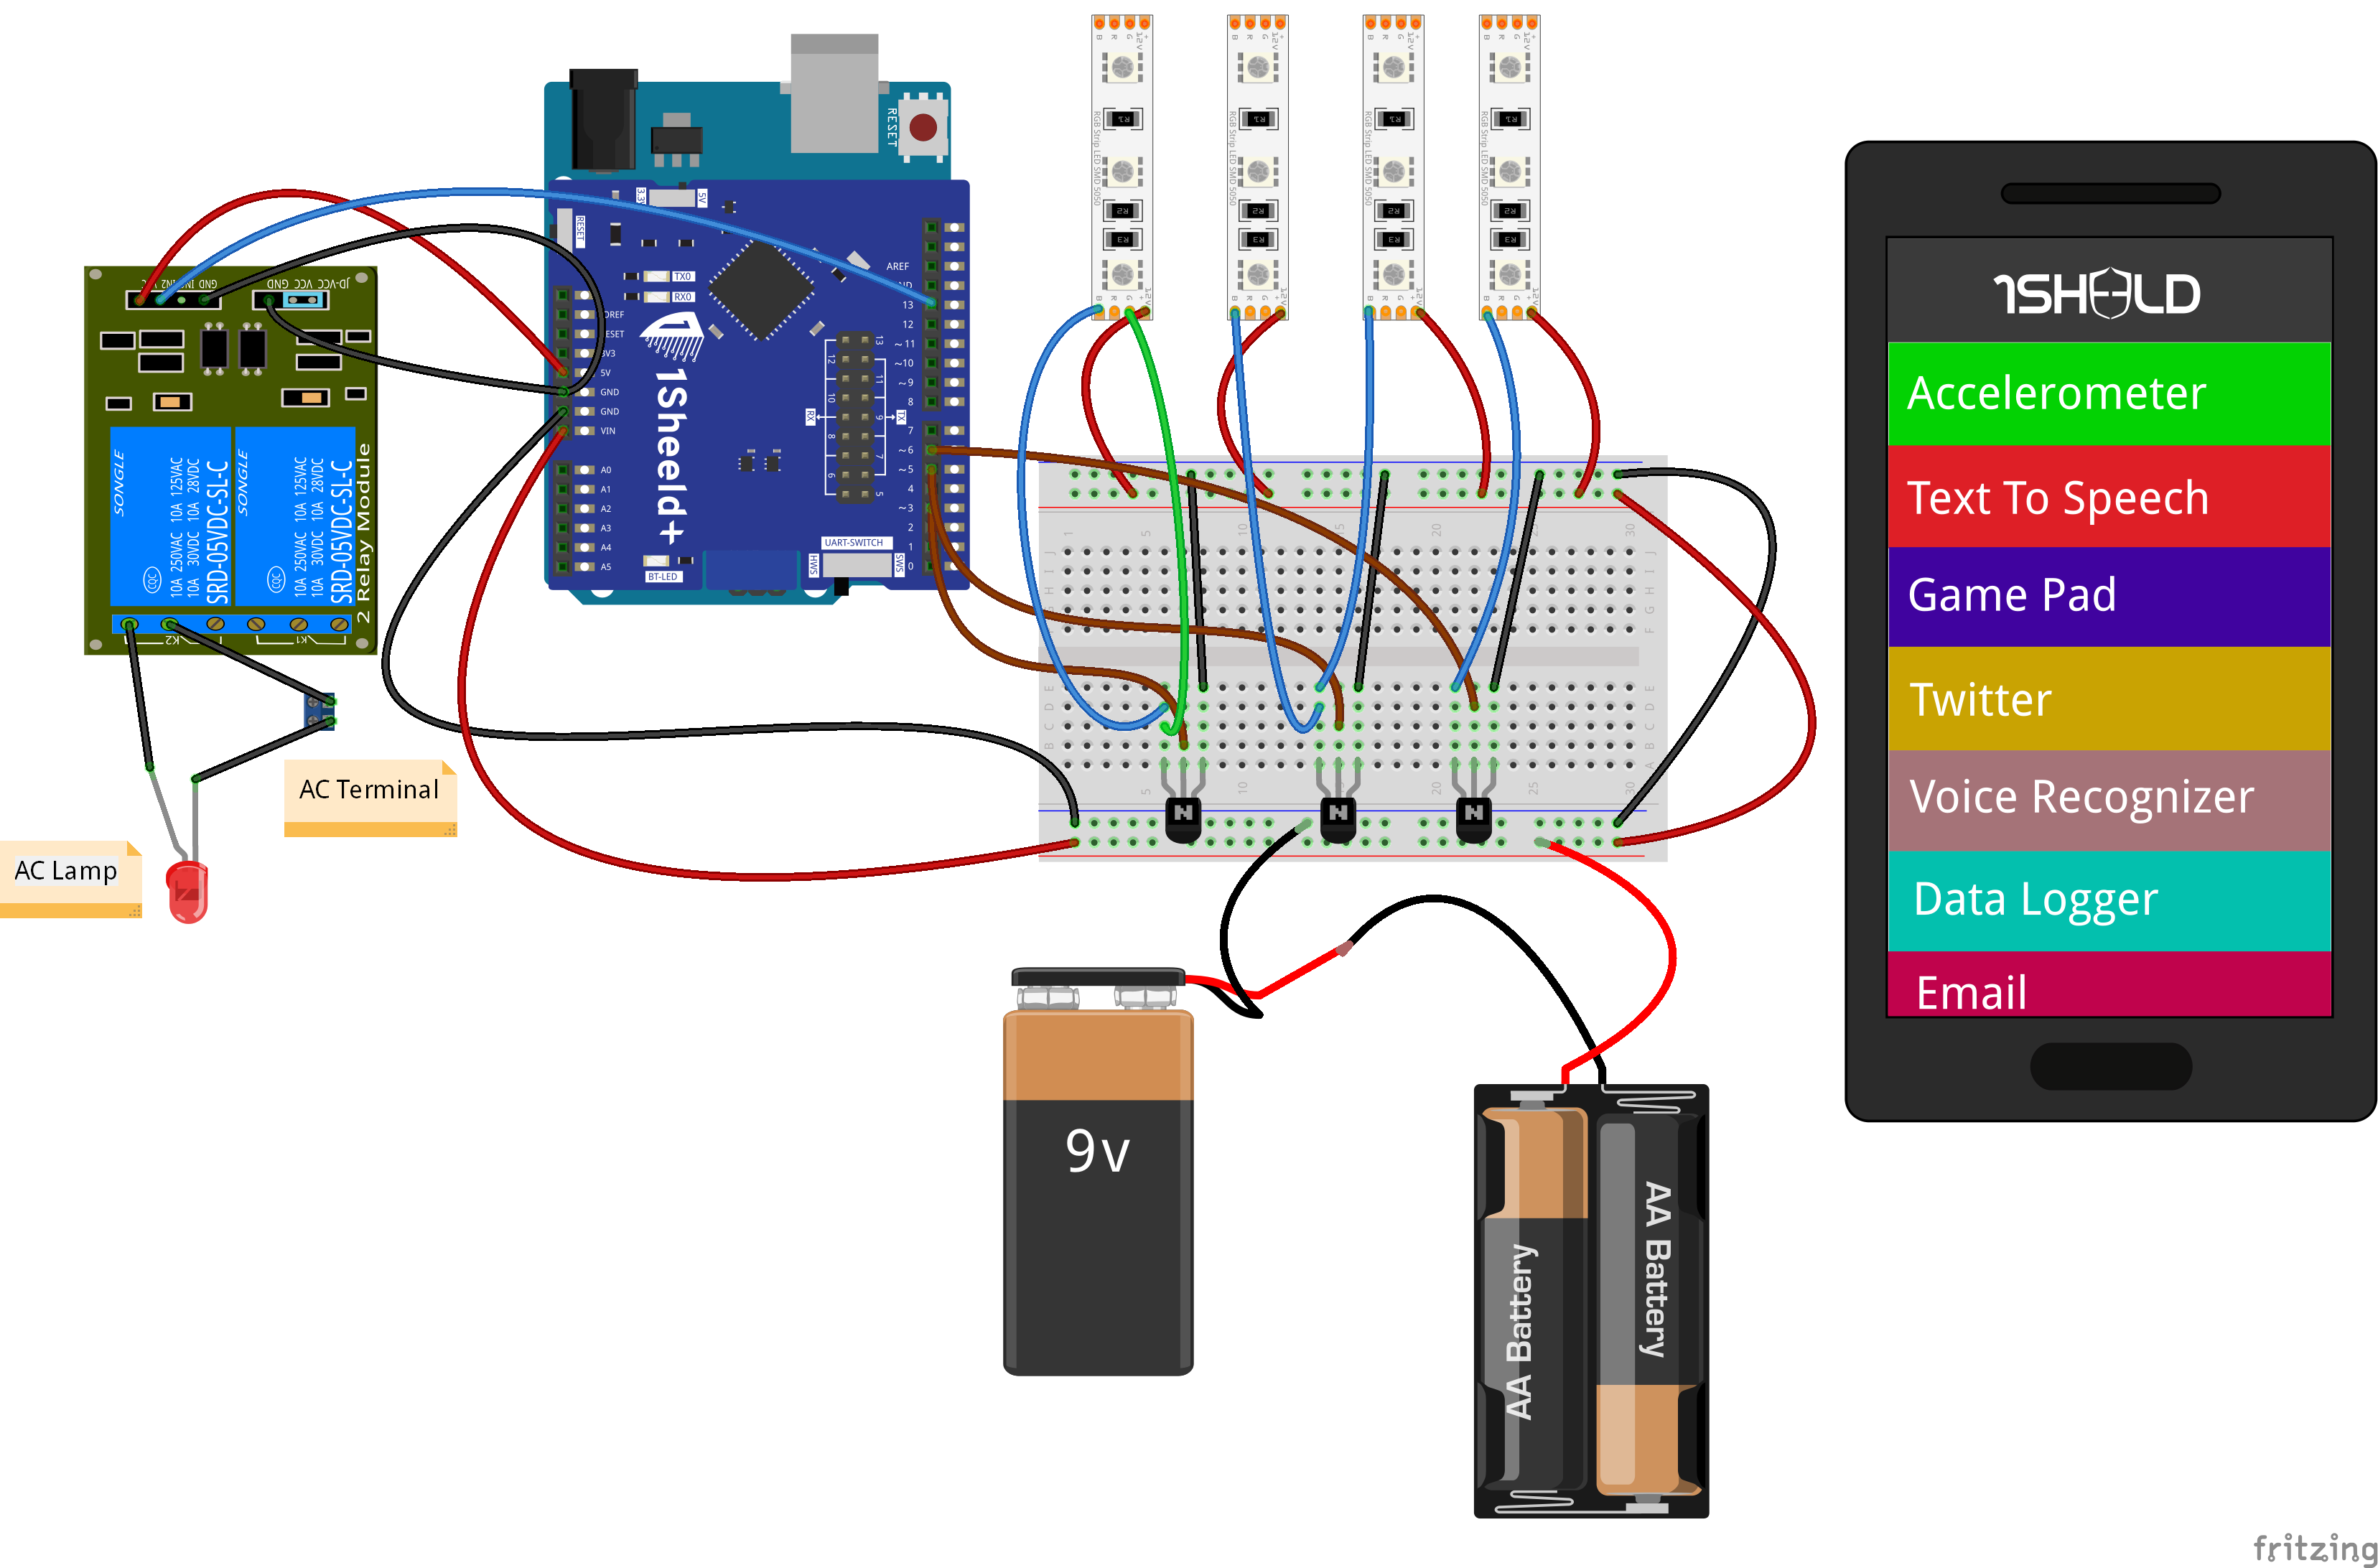
Step 4: 配線する
- LEDストリップをトランジスタと電源に接続
- ランプをリレーボードとAC端子に接続
- リレーボードとLEDストリップをArduino 101に接続(コード参照)
- iPhoneとともにPVCパイプ内にすべて収納
Step 5: 1Sheeldライブラリのセットアップ
Arduino IDEの「スケッチ」→「ライブラリをインクルード」→「ライブラリを管理」→「OneSheeld」で検索→インストール。またはこちらからダウンロードし、.zipファイルとして追加。
Step 6: 1Sheeldアプリのインストール
WebサイトまたはApp Store/Google Playから1Sheeldモバイルアプリをダウンロード。
Step 7: シールドにアクセス
1Sheeld入門チュートリアルに従い、最後に以下のシールドを選択:
- Voice Recognition
- Text to Speech
- Clock
- Internet
- Music Player
「Multiple Shield」ボタンを押す。
コード
- Amazon echo code
Amazon echo code Arduino
/* OPTIONAL: ライブラリコンパイルサイズ削減とメモリ使用量制限のため、
   使用するシールドのみを定義可能 */
#define CUSTOM_SETTINGS
#define INCLUDE_INTERNET_SHIELD
#define INCLUDE_VOICE_RECOGNIZER_SHIELD
#define INCLUDE_TEXT_TO_SPEECH_SHIELD
#define INCLUDE_MUSIC_PLAYER_SHIELD
#define INCLUDE_CLOCK_SHIELD

#include <OneSheeld.h>

unsigned long previousMillis = 0;
bool state = 0;

// カイロ、エジプトの天気を取得するAPI
HttpRequest request1("https://api.openweathermap.org/data/2.5/weather?q=Cairo,EG&appid=43d95b4cf5d0573e2dfe5186c160017a");

#define strip1 3
#define strip2 6
#define strip3 5
int lamp = 13;
int hour, minute;
char b[4], c[4];
String strh, strm, noon;

const char mainCommand[] = "alexa";
const char weatherCommand[] = "how is the weather today";
const char playCommand[] = "play music";
const char clockCommand[] = "what time is it";
const char stopCommand[] = "stop";
const char lightonCommand[] = "turn on the lights";
const char lightoffCommand[] = "turn off the lights";

void setup() {
  OneSheeld.begin();
  pinMode(strip1, OUTPUT);
  pinMode(strip2, OUTPUT);
  pinMode(strip3, OUTPUT);
  pinMode(lamp, OUTPUT);
  request1.setOnSuccess(&onSuccess1);
  request1.getResponse().setOnJsonReply(&onJsonReply1);
  VoiceRecognition.setOnNewCommand(&myFunction);
}

void loop() {
  unsigned long currentMillis = millis();
  if (currentMillis - previousMillis >= 5000) {
    previousMillis = currentMillis;
    Clock.queryDateAndTime();
    VoiceRecognition.start();
  }
  hour = Clock.getHours();
  minute = Clock.getMinutes();
  if (hour > 12) { hour -= 12; noon = "P M"; }
  else { noon = "A M"; }
  strh = String(hour); strm = String(minute);
  strh.toCharArray(b, 4); strm.toCharArray(c, 4);
}

void myFunction(char *commandSpoken) {
  if (!strcmp(mainCommand, VoiceRecognition.getLastCommand())) {
    alexon(); MusicPlayer.setVolume(5); state = 1;
  }
  if (!strcmp(playCommand, VoiceRecognition.getLastCommand()) && state == 1) {
    alexoff(); MusicPlayer.play(); delay(10000); MusicPlayer.stop(); state = 0;
  }
  else if (!strcmp(weatherCommand, VoiceRecognition.getLastCommand()) && state == 1) {
    alexoff(); Internet.performGet(request1); OneSheeld.delay(5000); state = 0;
  }
  if (!strcmp(clockCommand, VoiceRecognition.getLastCommand()) && state == 1) {
    alexoff();
    TextToSpeech.say("time in cairo is"); delay(1300);
    TextToSpeech.say(b); delay(600);
    TextToSpeech.say(c); delay(800);
    TextToSpeech.say(noon); delay(500);
    state = 0;
  }
  if (!strcmp(lightonCommand, VoiceRecognition.getLastCommand()) && state == 1) {
    alexoff(); digitalWrite(lamp, HIGH);
    TextToSpeech.say("the lights turned on"); delay(6000); state = 0;
  }
  else if (!strcmp(lightoffCommand, VoiceRecognition.getLastCommand()) && state == 1) {
    alexoff(); digitalWrite(lamp, LOW);
    TextToSpeech.say("the lights turned off"); delay(3000); state = 0;
  }
}

void onSuccess1(HttpResponse &response1) {
  response1["weather"][0]["main"].query(); delay(200);
}

void onJsonReply1(JsonKeyChain &hell, char *output) {
  if (hell == request1.getResponse()["weather"][0]["main"]) {
    TextToSpeech.say("the weather today in cairo is"); delay(2000);
    TextToSpeech.say(output);
  }
}

void alexon() {
  digitalWrite(strip1, HIGH); delay(200);
  digitalWrite(strip2, HIGH); delay(200);
  digitalWrite(strip3, HIGH);
}

void alexoff() {
  digitalWrite(strip1, LOW);
  digitalWrite(strip2, LOW);
  digitalWrite(strip3, LOW);
}
回路図
製造プロセス
- Firebase経由で2台のArduino間を温湿度データで連携するIoTチュートリアル
- Arduinoデジタルダイス: LCD表示の乱数ジェネレーター自作
- Arduinoと1Sheeldで作る万能Androidリモコン──IR制御で家電を一括操作
- DIY Arduino USBゲームコントローラー - 高性能ゲームパッドを自作
- Arduino超音波センサーとProcessingで作るリアルタイム距離測定ソナー
- Pixel Chaser: Arduino Nanoで作るワンタップLEDゲーム
- Bolt IoTとArduino UNOでLED輝度をシームレス制御
- スマートなArduino制御ロボットアームの製作:簡単DIYチュートリアル
- 自律走行ビール運搬タンク:Walabot+Arduino+Raspberry Pi+Alexa統合
- Arduino NanoとRDA5807Mで作るコンパクトFMラジオ
- Arduino Nanoで作るNeoPixelマトリックス版Pongゲーム