DIY自動販売機–Arduinoベースのメカトロニクスプロジェクト
このプロジェクトでは、ArduinoベースのDIY自動販売機の作り方を学びます。 MDFボードの切断と組み立てから、すべての電子部品の接続とArduinoコードの記述まで、それを構築するプロセス全体を紹介します。
次のビデオを見るか、以下のチュートリアルを読むことができます。
自動販売機は、4つの連続回転サーボモーターで制御される4つの排出ユニット、ステッピングモーターで制御されるキャリアシステム、LCD、アイテムを選択するための4つのボタン、およびコイン検出器を備えています。
あなたは今、アイテムキャリアがこの自動販売機にはあまり役に立たないと思っているかもしれません、そしてそうです、あなたはおそらく正しいです。しかし、ここでの私の考えは、このプロジェクトをより面白くするか、もう少し複雑にして、より多くの新しいことを学ぶことができるようにすることでした。このプロジェクトのアイデアは、最終年度のプロジェクトとして1つを構築することを検討している電子工学やメカトロニクスの学生、およびArduino愛好家にとって素晴らしいものになると思います。
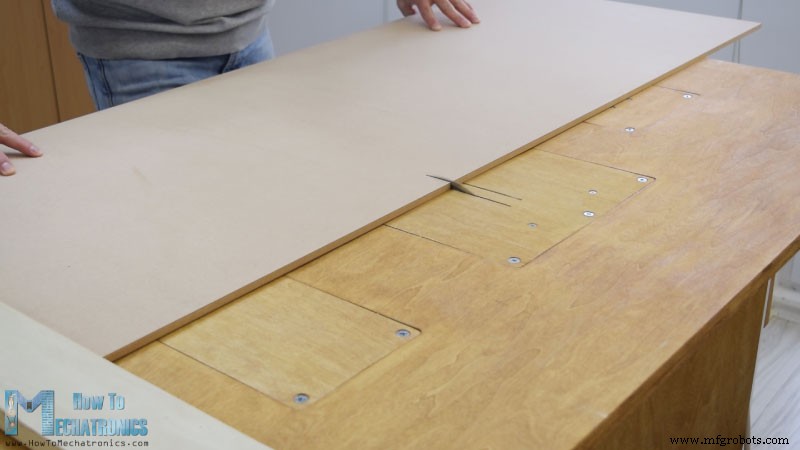
まず、8mmティックのMDFボードを適切なサイズにカットしました。
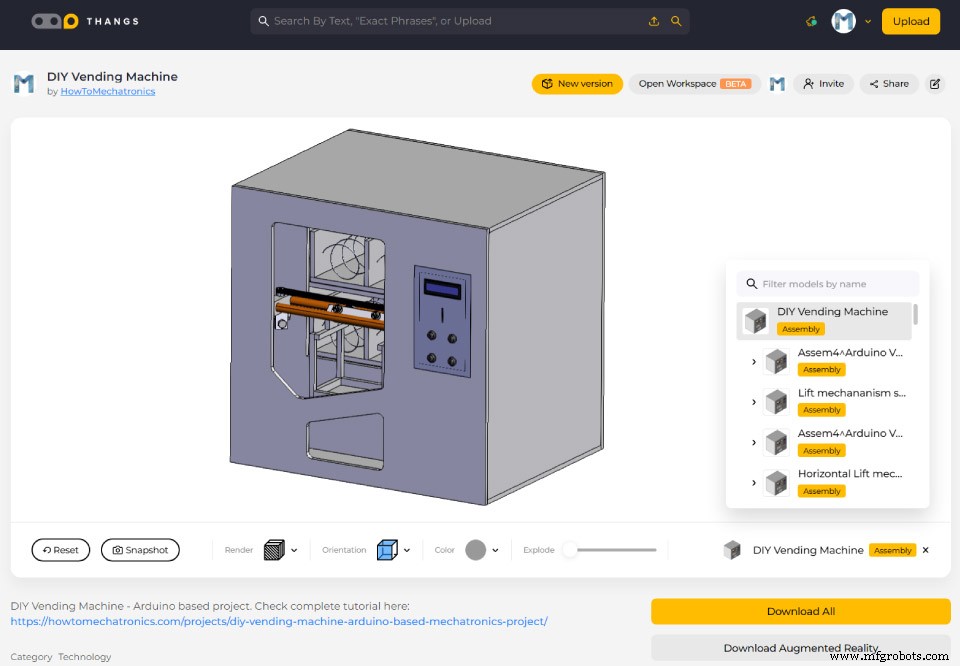
以前、すべての測定値を取得したマシンの3Dモデルを作成しました。
この3Dモデルを見つけてダウンロードしたり、Thangsのブラウザで調べたりすることができます。
MDFの切断には、丸鋸を使用しました。実はこれは、私のパートナーであるマリヤが作った丸鋸、ルーター、ジグソーを備えた自家製の作業台で、彼女のYouTubeチャンネルCreativityHeroにDIYビデオがあります。
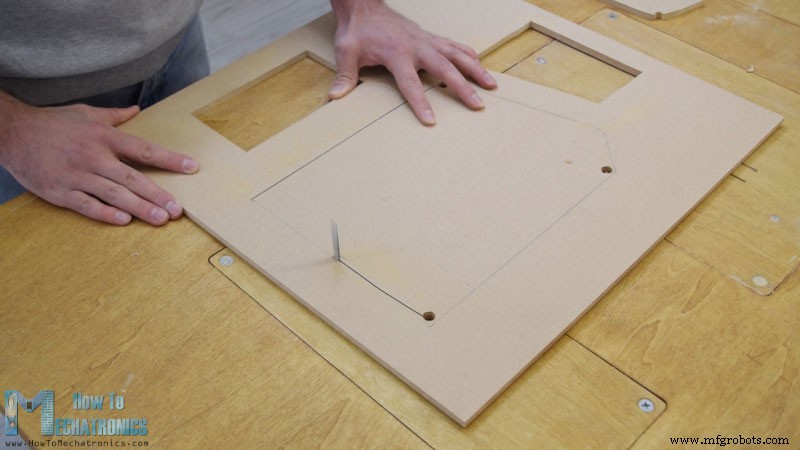
丸鋸を使用してすべてのパネルを切断した後、逆ジグソーを使用して一部のパネルに開口部を作成し続けました。
実際には、丸鋸がない場合は、前の手順でジグソーを使用することもできます。また、ジグソーを使用して、いくつかのカットがある小さなパーツをカットしました。ただし、これらは危険なマシンであるため、使用する際には十分に注意する必要があることに注意してください。
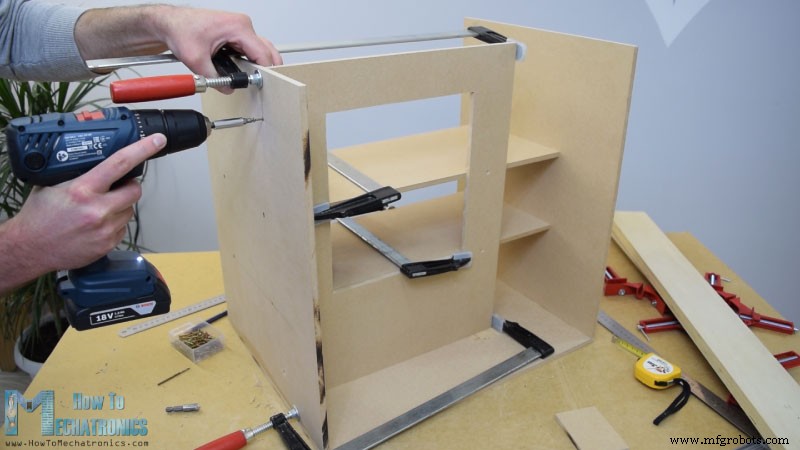
すべてのMDFパーツの準備ができたら、木工用ボンドとネジを使用してそれらを組み立て始めました。パネルを固定するために、私は90度の角度のクランプを使用しました。コードレスドリルを使用して、最初に下穴を開け、次にカウンターシンクを作り、3mmのネジを所定の位置にねじ込みました。すべてのパネルを組み立てるのに同じ方法を使用し、一部のパネルにはFクランプも使用しました。
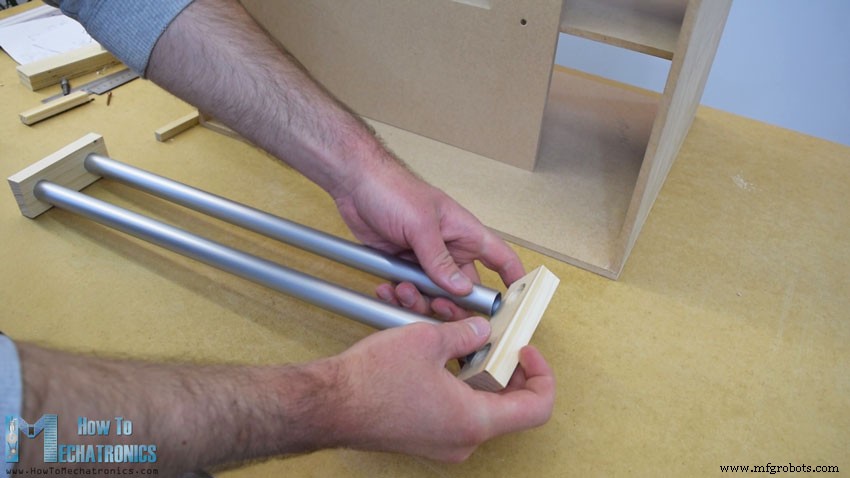
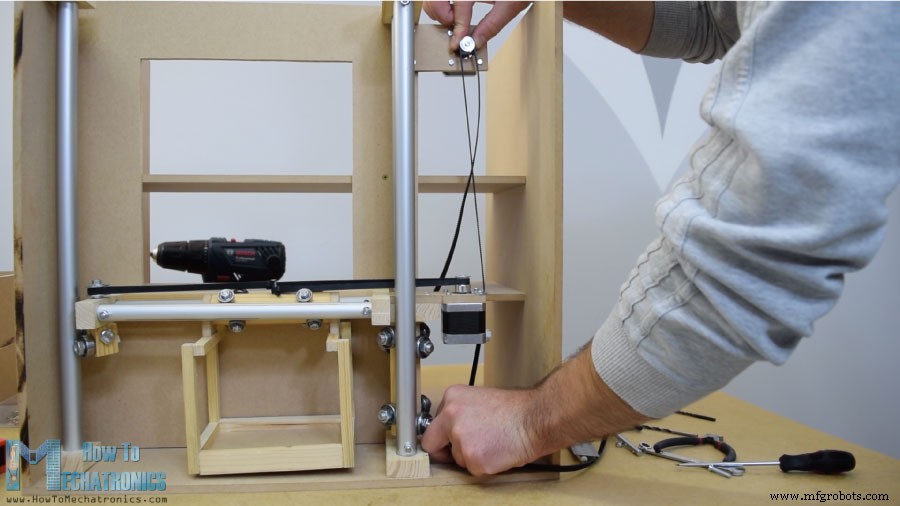
組み立てのこの時点で、レールシステムの作成を続けます。その目的のために、私は金属製の手のこぎりを使用してそれらをサイズにカットしたアルミニウム管を使用しています。水平レールのチューブの直径は16mmで、垂直レールの直径は20mmです。頑丈な18mmの木の板に、Forstnerビットを使用してチューブ用のスロットを作成し、チューブを取り付けました。
水平レールは2本の27cmの長さのチューブで構成され、垂直レールは3本の45cmの長さのチューブで構成されています。
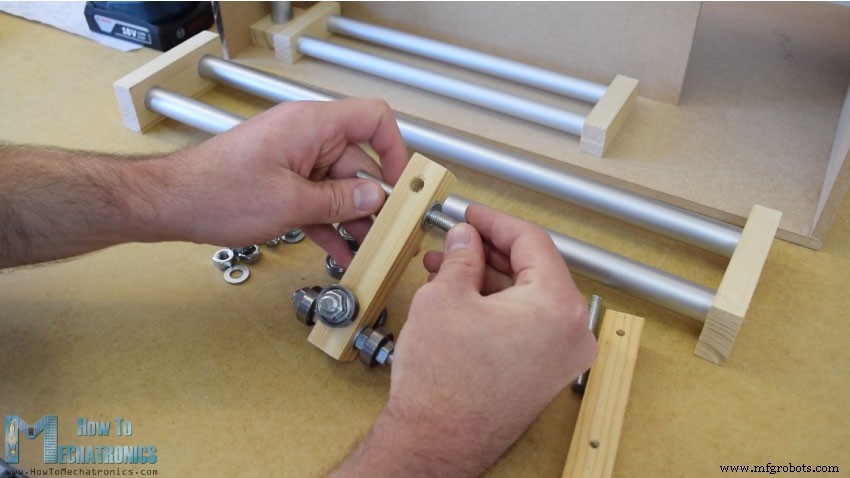
次はスライダーです。これが私がそれらを作った方法です。 21 x 21 cmの木板を使用し、その上に8mmの穴を開けました。
次に、これらの穴に8 mmのネジ山付きロッドを挿入し、ワッシャーとナットを使用して22mmのベアリングを固定しました。水平スライダーについては、同じ方法を使用しましたが、外径が16mmの小さいベアリングを使用しました。
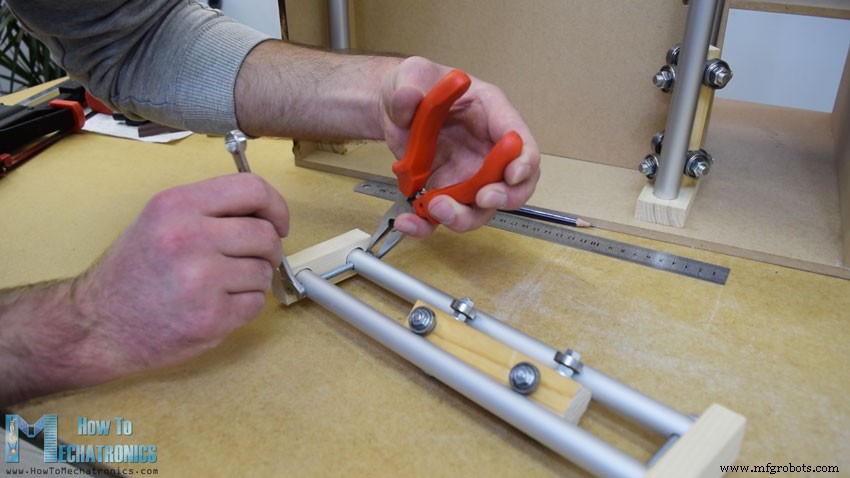
スライダーをチューブレールの間に挿入した後、少し緩んでいることに気づきました。この問題を解決するために、2本のレール間の距離を短くする必要がありました。そこで、最初にチューブスロットを拡張し、次にチューブに垂直なスロットを作成し、最後にねじ山を使用して2つのチューブレールを互いに近づけて固定しました。この後、スライダーは緩んでおらず、正しく機能しました。
ただし、この時点で、他の要素を追加するためにレールを分解する必要がありました。まず、レールの左側に水平タイミングベルト用のプーリーを取り付ける5mmのボルトと、左側の垂直レール上をスライドする2つのベアリングを追加しました。
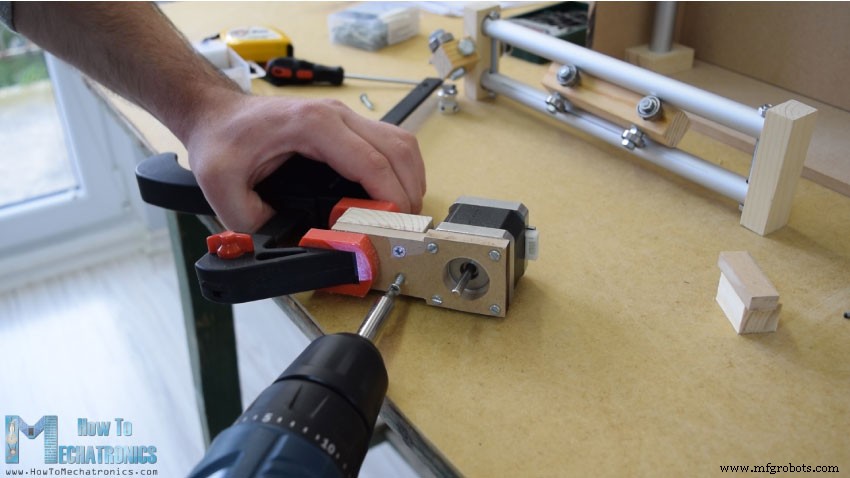
レールの反対側には、水平移動用のステッピングモーターを取り付ける必要がありました。まず、モーターを8 mm MDFボードに固定し、次にそれを支える木片を追加し、スロット部分も固定しました。最後に、木工用ボンドと2本のネジを使用して、このアセンブリ全体を垂直スライダーに取り付けました。
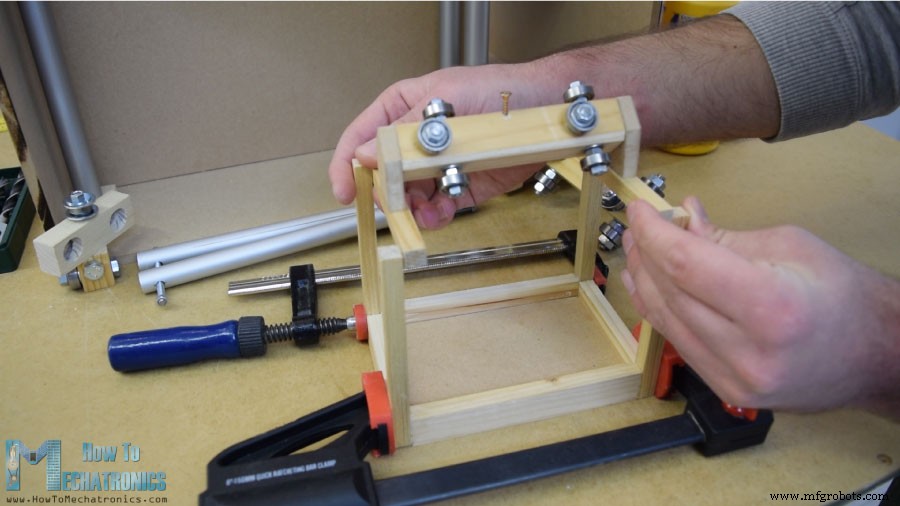
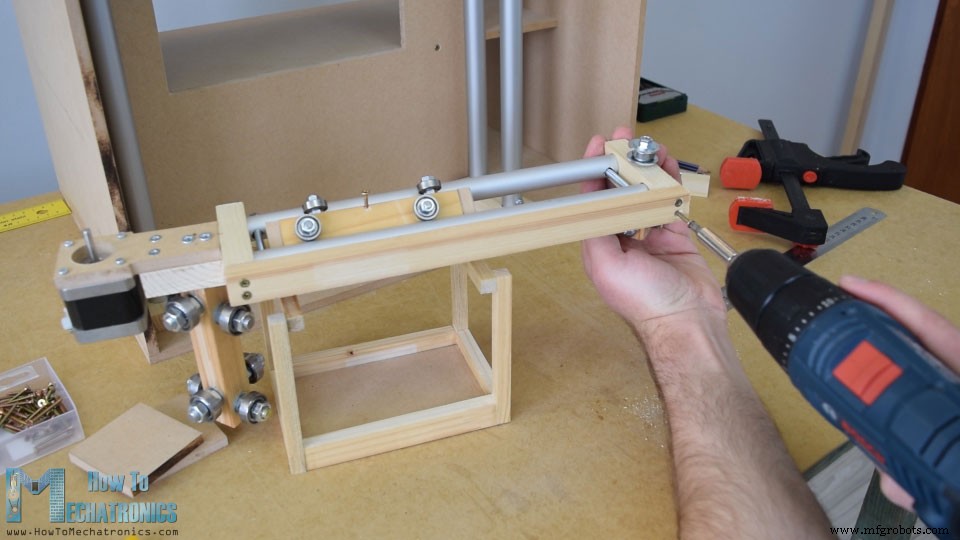
次に、水平スライダーにコンテナーを追加し続けました。その目的のために、私は木工用ボンドを使用してそれらをつなぎ合わせるいくつかの小さな木片を使用しました。これが終わったら、レールシステムを組み立てる準備ができました。レールスロットにエポキシを使用し、レールの側面に木板を追加して、レールシステム全体を剛性にしました。
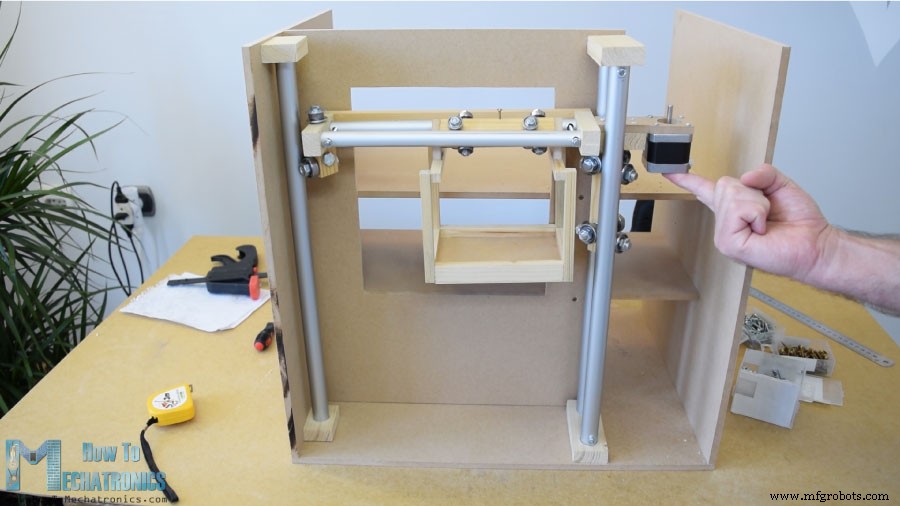
次のステップでは、アセンブリを垂直レールの間に挿入し、それらも所定の位置に固定しました。スライダーとレールシステムの最終結果は、うまく機能していることがわかりました。
水平タイミングベルトの取り付けを続けました。必要な長さを測り、サイズに合わせてカットし、結束バンドでスライダーに固定しました。縦型スライダーは、MDFとボルトを使って機械上部にステッピングモーターを取り付けました。下部にプーリーを取り付け、同様の方法でタイミングベルトを取り付けました。
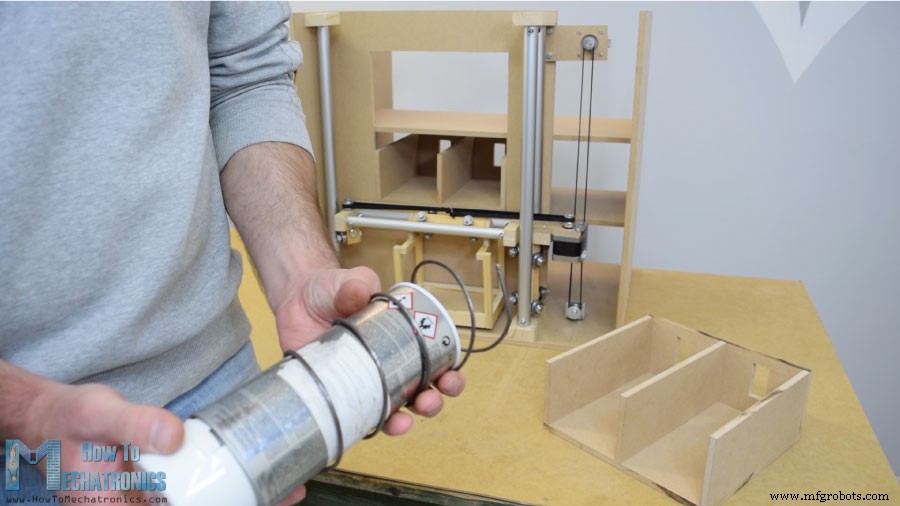
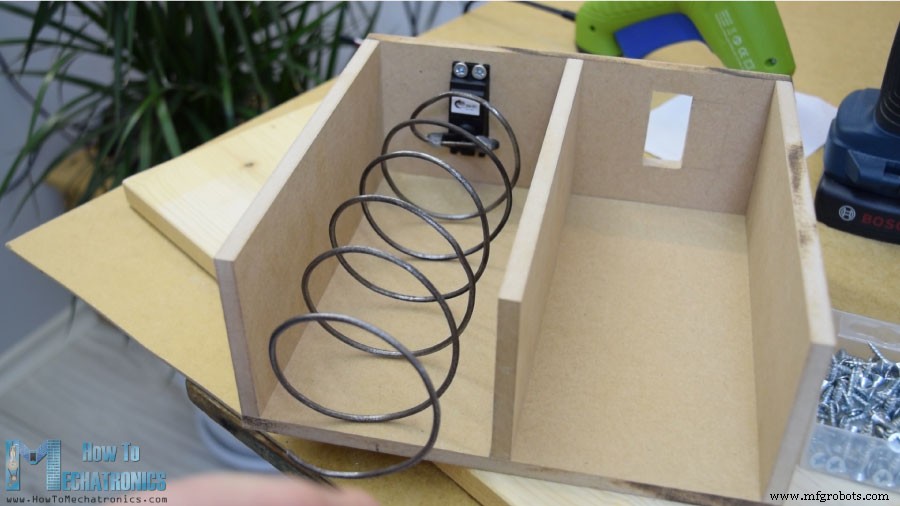
次に、アイテム排出ユニットに移りました。直径7cmのスプレーペイント缶に3mmのダニ金属線を巻き付けてらせんコイルを作りました。
その後、グルーガンを使用して、連続回転サーボモーターに固定しました。
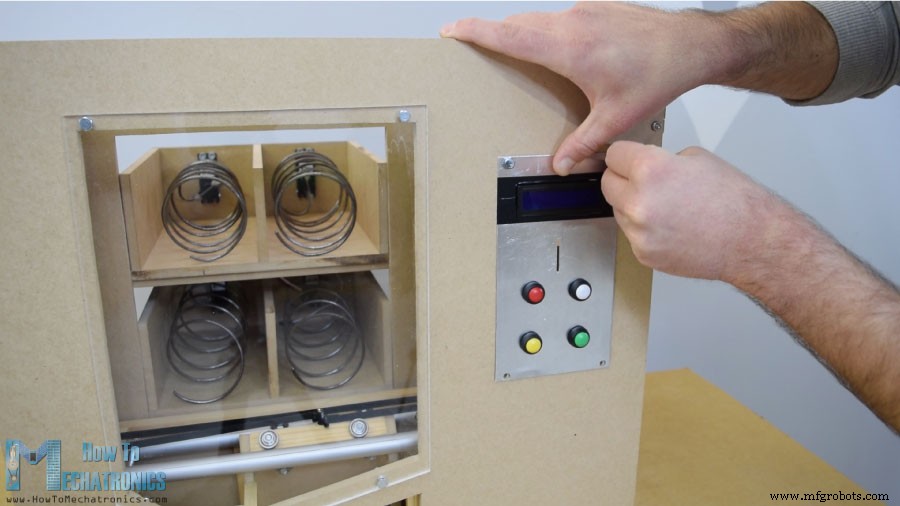
次は、シンプルなヒンジで自動販売機に取り付けたフロントドアパネルで、ロックには磁気ドアキャッチャーを使用しました。次に、5mmの目盛りのアクリルを使用して大きな前面の開口部を覆い、右側の小さな開口部には非常に錫のアルミニウムプレートを使用しました。ここでは、ボタン用に4つの穴を開け、コインとLCDディスプレイ用の開口部を作りました。私はそれらを作るためにドリルと弓のこを使いました。電子部品をアルミ板に取り付けたら、5mmボルトでフロントドアパネルに取り付けました。
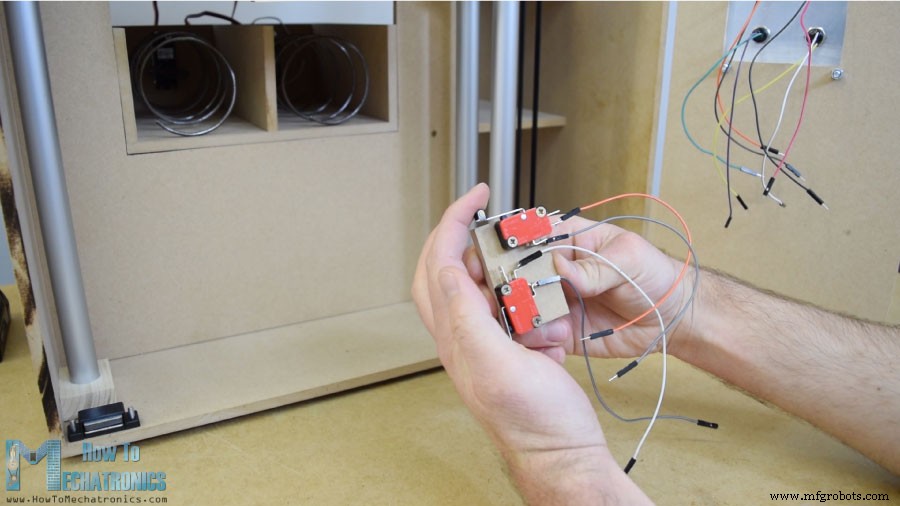
キャリアを開始位置に配置するために、2つのマイクロスイッチを取り付け、コイン用に、コインがマシンの底にスライドするようにガイドするガイドを接着しました。
コイン検出器は単純な赤外線近接センサーであるため、コインがその近くを通過すると、センサーは正のフィードバックを提供します。
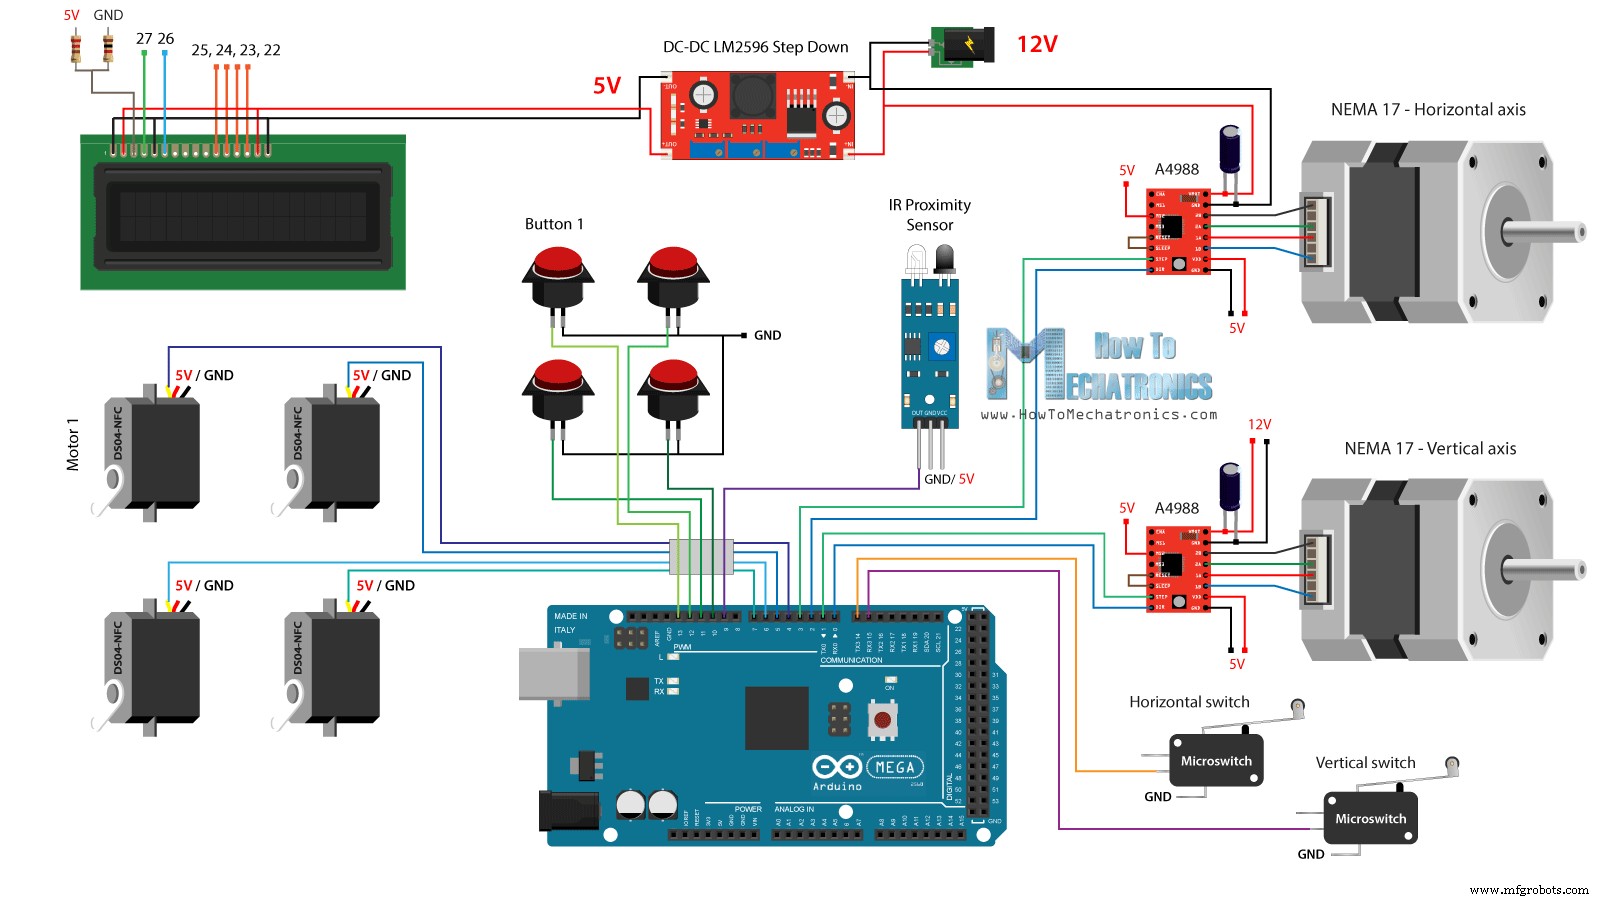
次は、すべての電子部品をArduinoボードに接続する楽しい部分です。このDIY自動販売機プロジェクトの完全な回路図は次のとおりです。
したがって、少なくとも2アンペアの12V電源が必要です。 2つのステッピングモーター用の12Vと、後でフロントドアに取り付けるLEDストリップライトが必要です。ただし、他のすべてのコンポーネントには5Vが必要なので、バックコンバーターを使用して12Vを5Vに降圧しました。 DS04-NFC連続回転サーボモーターは5Vで駆動され、ArduinoボードからのPWM信号を介して制御されますが、ステッピングモーターはA4988ドライバーを介して制御されます。 4つのボタンと2つのマイクロスイッチはGroundとArduinoデジタルピンに接続されているため、Arduinoボードの内部プルアップ抵抗を使用すると、それらが押されたときに簡単に検出できます。
このArduinoチュートリアルに必要なコンポーネントは、以下のリンクから入手できます。
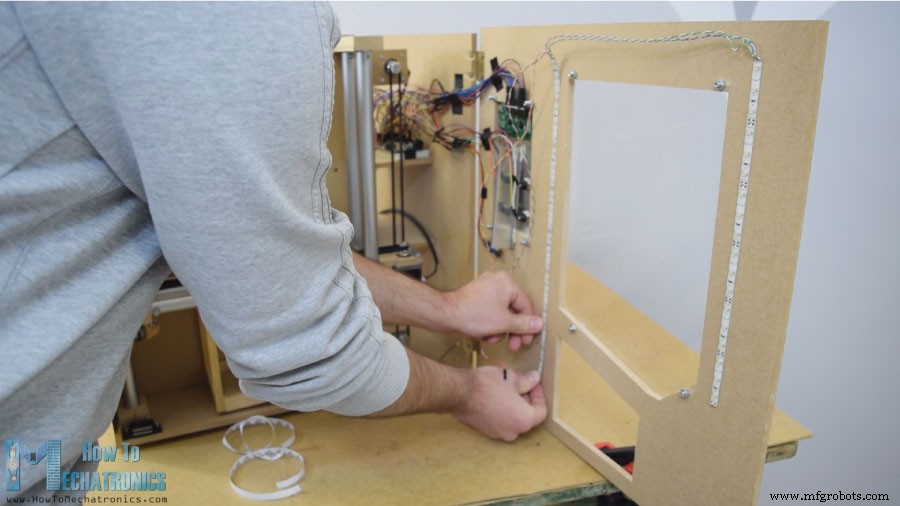
いくつかのジャンプワイヤーを使用して電子部品を接続しました。それだけのワイヤーで少し面倒になりましたが、すべてが正常に機能しました。最後に、自動販売機の内部を照らすために、ドアパネルに2つのLEDライトストリップを取り付けました。
残っているのはArduinoをプログラムすることです。これが、このプロジェクト用に作成したコードです。この下にコードの説明があります。
まず、ServoライブラリとLiquidCrystalライブラリを含め、LCDピン、4つのサーボモーター、ステッピングモーターのピン、コイン検出器、4つのボタンと2つのマイクロスイッチを定義する必要があります。
セットアップセクションでは、上記の各ピンのピンモードを設定します。ボタンとマイクロスイッチピンについては、内部プルアップ抵抗をアクティブにしたことに注意してください。これは、これらのピンの論理レベルが常にHIGHになり、それらを押すと論理レベルがLOWに低下することを意味します。
メインループに入る前に、2つのマイクロスイッチで定義された開始位置にキャリアを設定します。したがって、whileループを使用して、キャリアを開始位置に移動し続け、2つのマイクロスイッチを押すと、モーターが停止して目的の開始位置に移動します。
メインプログラムでは、LCDに「コインを挿入してください」というメッセージを印刷することから始めます。次に、whileループでスタックします。コインを挿入し、近接センサーの近くを通過すると、コイン検出器ピンの論理状態がLOWに低下します。その場合、breakステートメントを使用してwhileループから抜け出します。
次に、「アイテムを選択してください」というメッセージを出力すると、別のwhileループでスタックします。
このwhileループは、4つのボタンのいずれかが押されるのを待ちます。それが完了すると、ループから抜け出し、「配信中」というメッセージを出力します。
押されたボタンに応じて、switchステートメントのケースの1つを実行します。最初のボタンを押した場合、キャリアはカスタムメイドの「moveUp()」関数を使用して上に移動し始めます。
この関数を見ると、ステッピングモーターを特定の方向に移動するように設定し、引数として入力したステップ数を作成していることがわかります。
ここで、A4988ステッパードライバーを1/4ステップの解像度で動作するように設定し、いくつかの試飲で、キャリアが上の位置に到達するために4900ステップが必要であると結論付けました。同様の方法で、キャリアをロケーション番号1に到達するまで左に移動します。
その直後に、連続回転モーターを950ミリ秒回転させて、らせんコイルが完全に循環するようにします。
ここで、これらの値は時々変化する可能性があり、モーター自体に依存することに注意してください。 moveRight()およびmoveDown()カスタム関数を使用して、キャリアを開始位置に戻します。同様に、4つのアイテムを排出できます。
最後に、「アイテムが配達されました」というメッセージを出力します。
とてもシンプルです。このビデオを楽しんで、何か新しいことを学んだことを願っています。以下のコメントセクションで質問をして、Arduinoプロジェクトコレクションを確認してください。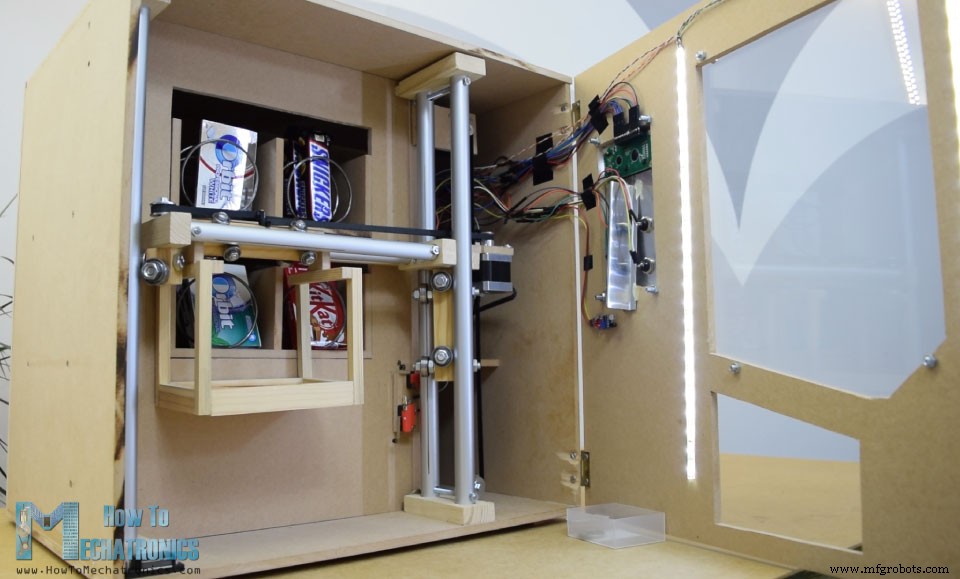
Arduinoコード
/*     DIY Vending Machine - Arduino based Mechatronics Project

    by Dejan Nedelkovski, www.HowToMechatronics.com

*/

#include <LiquidCrystal.h> // includes the LiquidCrystal Library
#include <Servo.h>

LiquidCrystal lcd(27, 26, 25, 24, 23, 22); // Creates an LC object. Parameters: (rs, enable, d4, d5, d6, d7)
Servo servo1, servo2, servo3, servo4;   // DS04-NFC motors

// Stepper motors pins
#define dirPinVertical 0
#define stepPinVertical 1
#define dirPinHorizontal 2
#define stepPinHorizontal 3

#define coinDetector 9

#define button1 13
#define button2 12
#define button3 11
#define button4 10

#define microSwitchV 15
#define microSwitchH 14

int buttonPressed;

void setup() {
  lcd.begin(16, 2); // Initializes the interface to the LCD screen, and specifies the dimensions (width and height) of the display

  servo1.attach(4);
  servo2.attach(5);
  servo3.attach(6);
  servo4.attach(7);

  pinMode(dirPinVertical, OUTPUT);
  pinMode(stepPinVertical, OUTPUT);
  pinMode(dirPinHorizontal, OUTPUT);
  pinMode(stepPinHorizontal, OUTPUT);

  pinMode(coinDetector, INPUT);

  // Activating the digital pins pull up resistors
  pinMode(button1, INPUT_PULLUP);
  pinMode(button2, INPUT_PULLUP);
  pinMode(button3, INPUT_PULLUP);
  pinMode(button4, INPUT_PULLUP);

  pinMode(microSwitchV, INPUT_PULLUP);
  pinMode(microSwitchH, INPUT_PULLUP);

  // Vertical starting position
  digitalWrite(dirPinVertical, HIGH); // Set the stepper to move in a particular direction
  while (true) {
    if (digitalRead(microSwitchV) == LOW) { // If the micro switch is pressed, move the platfor a little bit up and exit the while loop
      moveUp(70);
      break;
    }
    // Move the carrier up until the micro switch is pressed
    digitalWrite(stepPinVertical, HIGH);
    delayMicroseconds(300);
    digitalWrite(stepPinVertical, LOW);
    delayMicroseconds(300);
  }
  // Horizontal starting position
  digitalWrite(dirPinHorizontal, LOW);
  while (true) {
    if (digitalRead(microSwitchH) == LOW) {
      moveLeft(350);
      break;
    }
    digitalWrite(stepPinHorizontal, HIGH);
    delayMicroseconds(300);
    digitalWrite(stepPinHorizontal, LOW);
    delayMicroseconds(300);
  }
}
void loop() {
  // Print "Insert a coin!" on the LCD
  lcd.clear();
  lcd.setCursor(0, 0);
  lcd.print("Insert a coin!");

  // Wait until a coin is detected
  while (true) {
    if (digitalRead(coinDetector) == LOW) { // If a coin is detected, exit the from the while loop
      break;
    }
  }

  delay(10);
  lcd.clear();
  lcd.setCursor(0, 0);
  lcd.print("Select your item");
  lcd.setCursor(0, 1);
  lcd.print(" 1, 2, 3 or 4?");

  // Wait until a button is pressed
  while (true) {
    if (digitalRead(button1) == LOW) {
      buttonPressed = 1;
      break;
    }
    if (digitalRead(button2) == LOW) {
      buttonPressed = 2;
      break;
    }
    if (digitalRead(button3) == LOW) {
      buttonPressed = 3;
      break;
    }
    if (digitalRead(button4) == LOW) {
      buttonPressed = 4;
      break;
    }
  }

  // Print "Delivering..."
  lcd.clear();
  lcd.setCursor(0, 0);
  lcd.print("Delivering...");

  // Depending on the pressed button, move the carrier to that position and discharge the selected item
  switch (buttonPressed) {
    case 1:
      // Move the container to location 1
      moveUp(4900); // Move up 4900 steps (Note: the stepper motor is set in Quarter set resolution)
      delay(200);
      moveLeft(1700); // Move left 1700 steps
      delay(300);
      // Rotate the helical coil, discharge the selected item
      servo1.writeMicroseconds(2000); // rotate
      delay(950);
      servo1.writeMicroseconds(1500);  // stop
      delay(500);
      // Move the container back to starting position
      moveRight(1700);
      delay(200);
      moveDown(4900);
      break;

     case 2:
      // Move the container to location 2
      moveUp(4900);
      delay(200);
      // Rotate the helix, push the selected item
      servo2.writeMicroseconds(2000); // rotate
      delay(950);
      servo2.writeMicroseconds(1500);  // stop
      delay(500);
      moveDown(4900);
      break;

      case 3:
      // Move the container to location 3
      moveUp(2200);
      delay(200);
      moveLeft(1700);
      delay(300);
      // Rotate the helix, push the selected item
      servo3.writeMicroseconds(2000); // rotate
      delay(950);
      servo3.writeMicroseconds(1500);  // stop
      delay(500);
      // Move the container back to starting position
      moveRight(1700);
      delay(200);
      moveDown(2200);
      break;

      case 4:
      // Move the container to location 4
      moveUp(2200); // Move verticaly 4800 steps
      delay(200);
      // Rotate the helix, push the selected item
      servo4.writeMicroseconds(2000); // rotate
      delay(950);
      servo4.writeMicroseconds(1500);  // stop
      delay(500);
      moveDown(2200);
      break;
  }

  lcd.clear(); // Clears the display
  lcd.setCursor(0, 0);
  lcd.print("Item delivered!"); // Prints on the LCD
  delay(2000);
}

// == Custom functions ==

void moveUp (int steps) {
  digitalWrite(dirPinVertical, LOW);
  for (int x = 0; x < steps; x++) {
    digitalWrite(stepPinVertical, HIGH);
    delayMicroseconds(300);
    digitalWrite(stepPinVertical, LOW);
    delayMicroseconds(300);
  }
}
void moveDown (int steps) {
  digitalWrite(dirPinVertical, HIGH);
  for (int x = 0; x < steps; x++) {
    digitalWrite(stepPinVertical, HIGH);
    delayMicroseconds(300);
    digitalWrite(stepPinVertical, LOW);
    delayMicroseconds(300);
  }
}
void moveLeft (int steps) {
  digitalWrite(dirPinHorizontal, HIGH);
  for (int x = 0; x < steps; x++) {
    digitalWrite(stepPinHorizontal, HIGH);
    delayMicroseconds(300);
    digitalWrite(stepPinHorizontal, LOW);
    delayMicroseconds(300);
  }
}
void moveRight (int steps) {
  digitalWrite(dirPinHorizontal, LOW);
  for (int x = 0; x < steps; x++) {
    digitalWrite(stepPinHorizontal, HIGH);
    delayMicroseconds(300);
    digitalWrite(stepPinHorizontal, LOW);
    delayMicroseconds(300);
  }
}Code language: Arduino (arduino)// Vertical starting position
digitalWrite(dirPinVertical, HIGH); // Set the stepper to move in a particular direction
while (true) {
if (digitalRead(microSwitchV) == LOW) { // If the micro switch is pressed, move the platfor a little bit up and exit the while loop
moveUp(70);
break;
}
// Move the carrier up until the micro switch is pressed
digitalWrite(stepPinVertical, HIGH);
delayMicroseconds(300);
digitalWrite(stepPinVertical, LOW);
delayMicroseconds(300);
}
// Horizontal starting position
digitalWrite(dirPinHorizontal, LOW);
while (true) {
if (digitalRead(microSwitchH) == LOW) {
moveLeft(350);
break;
}
digitalWrite(stepPinHorizontal, HIGH);
delayMicroseconds(300);
digitalWrite(stepPinHorizontal, LOW);
delayMicroseconds(300);
}Code language: Arduino (arduino)// Wait until a coin is detected
while (true) {
if (digitalRead(coinDetector) == LOW) { // If a coin is detected, exit the from the while loop
break;
}
}Code language: Arduino (arduino)// Wait until a button is pressed
while (true) {
if (digitalRead(button1) == LOW) {
buttonPressed = 1;
break;
}
if (digitalRead(button2) == LOW) {
buttonPressed = 2;
break;
}
if (digitalRead(button3) == LOW) {
buttonPressed = 3;
break;
}
if (digitalRead(button4) == LOW) {
buttonPressed = 4;
break;
}
}Code language: Arduino (arduino)switch (buttonPressed) {
case 1:
// Move the container to location 1
moveUp(4900); // Move up 4900 steps (Note: the stepper motor is set in Quarter set resolution)
delay(200);
moveLeft(1700); // Move left 1700 steps
delay(300);
// Rotate the helical coil, discharge the selected item
servo1.writeMicroseconds(2000); // rotate
delay(950);
servo1.writeMicroseconds(1500); // stop
delay(500);
// Move the container back to starting position
moveRight(1700);
delay(200);
moveDown(4900);
break;
}Code language: Arduino (arduino)void moveUp (int steps) {
digitalWrite(dirPinVertical, LOW);
for (int x = 0; x < steps; x++) {
digitalWrite(stepPinVertical, HIGH);
delayMicroseconds(300);
digitalWrite(stepPinVertical, LOW);
delayMicroseconds(300);
}
}Code language: Arduino (arduino)// Rotate the helical coil, discharge the selected item
servo1.writeMicroseconds(2000); // rotate
delay(950);
servo1.writeMicroseconds(1500); // stopCode language: Arduino (arduino)
製造プロセス


