


Arduinoタッチスクリーンミュージックプレーヤーと目覚まし時計プロジェクト
このプロジェクトでは、ArduinoタッチスクリーンMP3ミュージックプレーヤーと目覚まし時計を作成する方法を紹介します。次のビデオを見るか、以下のチュートリアルを読むことができます。
ホーム画面には、大きな時計、日付、温度の情報に加えて、ミュージックプレーヤーと目覚まし時計の2つのボタンがあります。
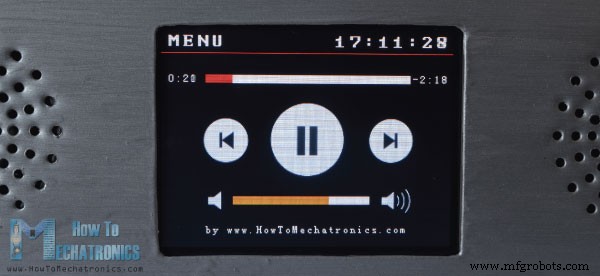
ミュージックプレーヤーに入ると、画面中央の大きな「再生」ボタンを押して音楽の再生を開始できます。そのすぐ横には、前の曲または次の曲を再生するためのボタンがさらに2つあります。
これらのボタンの上には曲のプログレスバーがあり、画面の下部には音量バーと音量を増減するための2つのボタンがあります。右上隅には時計があり、左側にはホーム画面に戻るための「メニュー」ボタンがあります。
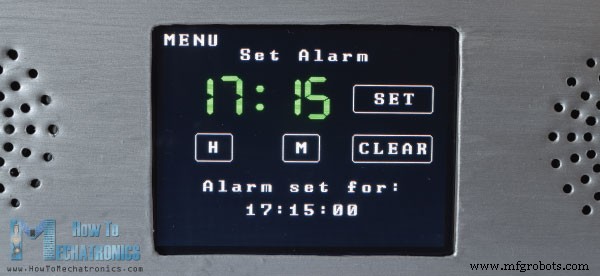
一方、目覚まし時計を入力すると、2つのボタンで時間と分を設定してアラームを設定できます。
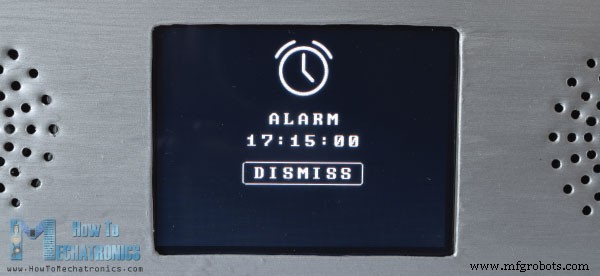
アラームが鳴ると、大音量で曲の再生が始まり、「閉じる」ボタンを押すまで再生が続きます。
それでは、このデバイスがどのように機能するかを見てみましょう。 Arduino Megaボードと、画面をArduinoボードに接続するための適切なシールドを備えた3.2インチTFTタッチスクリーンを使用しています。音楽の再生にはBY8001MP3プレーヤーモジュールを使用し、目覚まし時計にはDS3231リアルタイムクロックモジュールを使用します。
このArduinoプロジェクトに必要なコンポーネントは、以下のリンクから入手できます。
このプロジェクトの回路図は次のとおりです。
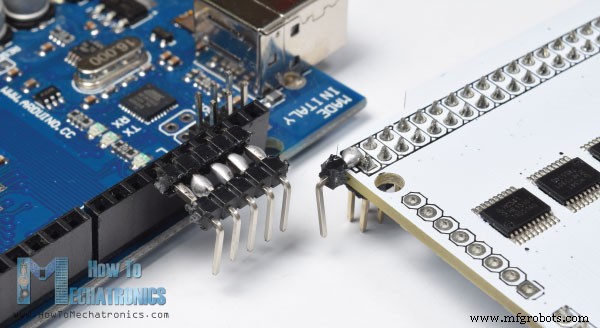
ここで、TFTシールドがArduinoボードのフリーピンをブロックしていることに注意してください。そのため、シールドとArduinoの間に挿入できるカスタムメイドのピンヘッダーを作成する必要があります。
また、シールドはすでにすべてのArduino VCCピンを使用しているため、Arduinoに電力を供給するために、シールドの5Vピンに追加のピンヘッダーをはんだ付けする必要があることに注意してください。
すべてを接続したら、Arduinoのプログラミングに進むことができます。ただし、続行する前に、TFTタッチスクリーンとDS3231リアルタイムクロックモジュールに関する以前の詳細なチュートリアルを確認することをお勧めします。また、MP3プレーヤーモジュールについては、この記事で簡単に説明します。
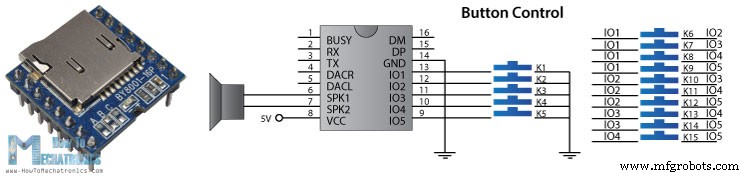
BY8001-16Pは、MicroSDカードで動作し、MP3およびWAVオーディオ形式ファイルをサポートするMP3モジュールです。このモジュールには3Wパワーアンプが内蔵されており、1つの3Wスピーカーを直接駆動できます。
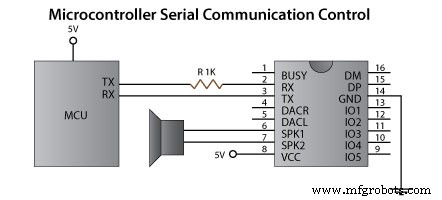
MP3プレーヤーモジュールは、5つの入力ピンを使用するか、シリアル通信を介してマイクロコントローラーを使用してボタン制御できます。
ここで、モジュールのシリアルポートピンは3.3Vで動作するため、モジュールのRXピンを1K抵抗を介してArduinoTXピンに接続する必要があることに注意してください。また、制御モードの選択に使用される3つのポートA、B、およびCにも注意してください。マイクロコントローラを使用してモジュールを制御するには、これらのパッドの3つの抵抗を削除する必要があります。ピン番号6と7は、低電力スピーカーを直接接続するために使用できます。外部アンプを使用する場合は、ピン番号4と5を使用できます。
Arduinoの部分に関しては、GitHubからダウンロードできるBY8001ライブラリを使用するのが最も簡単な方法です。そのデモ例のいくつかを開くと、それがどのように機能するかを見ることができます。したがって、セットアップセクションでモジュールを初期化した後、モジュールを制御するためにカスタムメイドの関数を使用できます。
これで、このArduinoタッチスクリーンMP3スクリーンミュージックプレーヤーと目覚まし時計のコードを確認する準備が整いました。コードが少し長いので、理解を深めるために、プログラムのソースコードを各セクションの説明とともにセクションに投稿します。そして、この記事の最後に、完全なソースコードを投稿します。
したがって、最初に、TFTタッチスクリーン用のライブラリ、BY8001-16P MP3プレーヤー、DS3231リアルタイムクロックモジュール、およびシリアル通信用のライブラリを含める必要があります。次に、適切なオブジェクトを作成し、プログラムに必要ないくつかの変数を定義する必要があります。
ここで、ビットマップの定義に注意してください。プログラムのボタンのいくつかは、実際には、TFTライブラリに付属のImageConverter565ツールを使用してビットマップに変換される画像です。
したがって、これらの「.c」ファイルは、スケッチの起動時にロードされるように、コードファイルのディレクトリに含める必要があります。ここで、これらの画像と「.c」ファイルをダウンロードできます。
オブジェクトを初期化した後のセットアップセクションでは、ホーム画面のすべてのグラフィックを描画するdrawHomeScreen()カスタム関数を呼び出します。また、ここでは、playStatus、currentTemp、Dateなどのいくつかの変数の初期値、ボリュームの初期値などを設定します。
次はループセクションです。 currentPage変数を0に設定したため、最初のifステートメントはtrueです。これは、ホーム画面にいることを示します。ここで、次のifステートメントを使用して、時計に変更があるかどうかを確認します。これは毎秒発生します。数字以外の文字をサポートしないTFTライブラリの7セグメントフォントを使用しているため、DS3231から時計を読み取るためにgetTimeStr()関数に付属している文字列から数字のみを抽出する必要があります。 RTCモジュール。
したがって、substring()関数を使用して、時間、分、秒を別々の変数に取得し、秒、分、または時間で変更が発生するたびにそれらを出力します。
次に、myTouch.dataAvailable()関数を使用して、画面に触れたかどうかを確認し、音楽プレーヤーかアラームボタンかを確認します。したがって、それがミュージックプレーヤーのボタンである場合は、最初にdrawFrame()カスタム関数を呼び出します。この関数は、ボタンが押されたことを示す赤い円をボタンの周りに描画します。また、このカスタム関数には、ボタンを離すまでプログラムをスタックして保持するwhileループがあります。その直後に、currentPage変数を1に設定し、画面をクリアして、ミュージックプレーヤー画面のすべてのグラフィックを描画するdrawMusicPlayerScreen()カスタム関数を呼び出します。同様に、アラームボタンを押すと、currentPage変数を2に設定し、画面をクリアします。
次に、ミュージックプレーヤー画面で何が起こるか見てみましょう。ここでは、画面に触れたかどうかを常に確認しています。 [再生]ボタンをタッチし、現在のplayStatus変数が0の場合、mp3.playTrackFromFolder()関数を呼び出して、MicroSDカードの最初の曲の再生を開始します。同時に、Pauseボタンを描画するdrawPauseButton()カスタム関数を呼び出し、playStatus変数を2に設定します。次の2つのifステートメントを使用して、playStatues変数に応じて、曲の再生と一時停止を切り替えます。
同様に、押されたボタンごとに、前または次のトラックの再生、音量の増減、およびホーム画面に戻るための「メニュー」ボタンを呼び出すための適切な関数を呼び出します。
次のifステートメントは、トラックのプログレスバーを更新するために使用されます。
したがって、音楽が再生されている場合は、trackPlayTime()カスタム関数を呼び出します。この関数は、mp3.getElapsedTrackPlaybackTime()などのミュージックプレーヤーライブラリ関数の一部を使用して、経過時間と残り時間、およびトラックのプログレスバーのグラフィックを計算して出力します。 printClock()カスタム関数を使用して、時計を右上隅に印刷します。
次は目覚まし時計の画面です。ここでは、最初にすべてのグラフィック、時計、テキスト、およびボタンを描画し、変数alarmNotSetをtrueに設定して、次のwhileループに入ることができるようにします。ここでは、HとMの2つのボタンを使用してアラームを設定し、[設定]ボタンをクリックすると、アラームの値がalarmString変数に保存されます。
ここで、getTimeString()関数から取得する文字列と同じ形式になるように、この文字列を調整する必要があることに注意してください。このようにして、それらを比較し、時計が同じ値または時間に達したときにアラームをアクティブにすることができます。
クリアボタンを押すとalarmStringがクリアされ、メニューボタンを押すとwhileループから抜け出し、ホーム画面に戻ります。
アラームを作動させるために、アラームが設定されているかどうかを確認し、アラームが時計と一致する場合、MicroSDカードの最初の曲がより大きな音量で再生を開始します。また、「閉じる」ボタンを使用してすべてのグラフィックを描画し、alarmOn変数をtrueに設定します。これにより、次のwhileループに移動し、[閉じる]ボタンを押すまで曲を再生し続けることができます。
これがコードの仕組みであり、記事の下部に完全なソースコードがあります。
Solidworksを使用してデザインを作成しました。これが、外観です。
このモデルをダウンロードして、ここで測定を行うことができます:
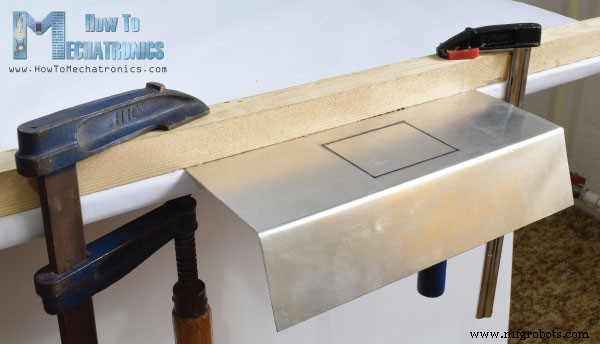
このプロジェクトでは、マルチツールを使用してサイズにカットしたアルミニウム板金を使用することにしました。次に、机の端で、いくつかのクランプとラスの助けを借りて、板金を曲げました。
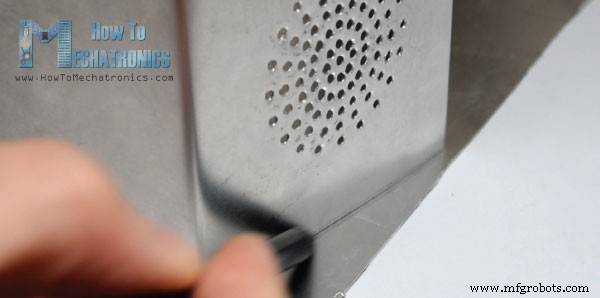
スピーカーは、円形の模様をプリントして貼り付け、ドリルですべての穴を開けました。
その後、側面を適切な形にカットし、グルーガンを使用して前に曲げた板金に固定しました。
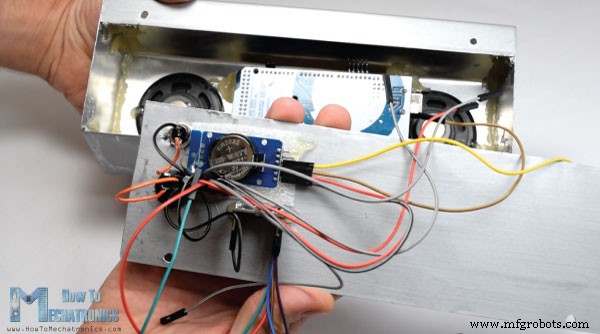
最後に板金ボックスを塗装し、電子部品を取り付ける準備ができました。ここでも、グルーガンを使用してすべてのコンポーネントを固定し、すべてを接続し、2本のボルトを使用してデバイスの背面を固定しました。
以上です。下のコメントセクションでお気軽に質問してください。
デバイスの完全なソースコードは次のとおりです。
Feel free to ask any question in the comments section below and don’t forget to check out my collection of Arduino Projects.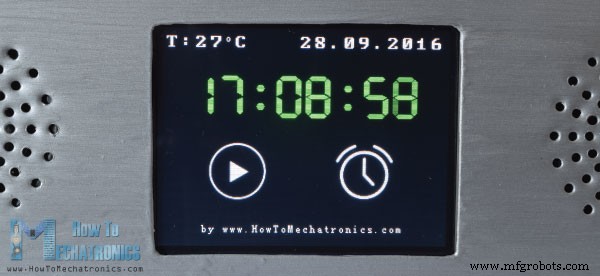


BY8001-16PMP3プレーヤーモジュール
#include <UTFT.h>
#include <URTouch.h>
#include <SoftwareSerial.h>
#include <BY8001.h>
#include <DS3231.h>

//==== Creating Objects
UTFT     myGLCD(SSD1289, 38, 39, 40, 41); //Parameters should be adjusted to your Display/Schield model
URTouch  myTouch( 6, 5, 4, 3, 2);


SoftwareSerial mp3Serial(11, 10);  // RX, TX
BY8001 mp3;  // creating an instance of class BY8001 and call it 'mp3'

DS3231  rtc(SDA, SCL);

//==== Defining Fonts
extern uint8_t SmallFont[];
extern uint8_t BigFont[];
extern uint8_t SevenSegNumFont[];

extern unsigned int MusicPlayerButton[0x1040];
extern unsigned int AlarmButton[0x1040];
extern unsigned int ButtonPlay[0x1AE9];
extern unsigned int ButtonPause[0x1AE9];
extern unsigned int PreviousButton[0x9C4];
extern unsigned int NextButton[0x9C4];
extern unsigned int VolumeDown[0x170];
extern unsigned int VolumeUp[0x3B8];

int x, y; // Variables for the coordinates where the display has been pressed
char currentPage, playStatus;
int iV = 15;
int trackNum = 1;
int b = 16;
int aHours = 0;
int aMinutes = 0;
boolean alarmNotSet = true;
String alarmString = "";
float currentTemperature, temperature;
static word totalTime, elapsedTime, playback, minutes, seconds, lastSeconds, minutesR, secondsR;
String currentClock, currentHours, currentMinutes, currentSeconds, currentDate;
String timeString, hoursString, minutesString, secondsString, hoursS, minutesS, secondsS, dateS;Code language: Arduino (arduino)
void setup() {
  // Initiate display
  myGLCD.InitLCD();
  myGLCD.clrScr();
  myTouch.InitTouch();
  myTouch.setPrecision(PREC_MEDIUM);

  // Initialize the rtc object
  rtc.begin();

  // Music
  Serial.begin(9600);  // set serial monitor baud rate to Arduino IDE
  mp3Serial.begin(9600);  // BY8001 set to 9600 baud (required)
  mp3.setup(mp3Serial); // tell BY8001 library which serial port to use.
  delay(800);  // allow time for BY8001 cold boot; may adjust depending on flash storage size

  drawHomeScreen();  // Draws the Home Screen
  currentPage = '0'; // Indicates that we are at Home Screen
  playStatus = '0';

  mp3.setVolume(15);
  delay(100);
  currentTemperature = rtc.getTemp();
  currentDate = rtc.getDateStr();
  currentClock = rtc.getTimeStr();
  timeString = rtc.getTimeStr();
  currentHours = timeString.substring(0, 2);
  currentMinutes = timeString.substring(3, 5);
  currentSeconds = timeString.substring(6, 8);
}Code language: Arduino (arduino)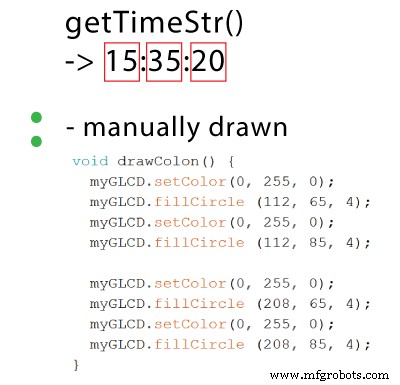
日付と温度については、同様です。 、以前の状態と比較して変化があるかどうかを確認します。void loop() {
// Homes Screen
if (currentPage == '0') {
// Checks for change of the clock
if ( currentClock != rtc.getTimeStr()) {
timeString = rtc.getTimeStr();
hoursS = timeString.substring(0, 2);
minutesS = timeString.substring(3, 5);
secondsS = timeString.substring(6, 8);
myGLCD.setFont(SevenSegNumFont);
myGLCD.setColor(0, 255, 0);
myGLCD.print(secondsS, 224, 50);
if ( currentMinutes != minutesS ) {
myGLCD.print(minutesS, 128, 50);
currentMinutes = minutesS;
}
if ( currentHours != hoursS ) {
myGLCD.print(hoursS, 32, 50);
currentHours = hoursS;
}
// Checks for change of the date
dateS = rtc.getDateStr();
delay(10);
if ( currentDate != dateS){
myGLCD.setColor(255, 255, 255); // Sets color to white
myGLCD.setFont(BigFont); // Sets font to big
myGLCD.print(rtc.getDateStr(), 153, 7);
}
// Checks for change of the temperature
temperature = rtc.getTemp();
delay(10);
if ( currentTemperature != temperature ){
myGLCD.setColor(255, 255, 255); // Sets color to white
myGLCD.setFont(BigFont); // Sets font to big
myGLCD.printNumI(temperature, 39, 7);
currentTemperature = temperature;
}
delay(10);
currentClock = rtc.getTimeStr();
}Code language: Arduino (arduino)// Checks whether the screen has been touched
if (myTouch.dataAvailable()) {
myTouch.read();
x = myTouch.getX(); // X coordinate where the screen has been pressed
y = myTouch.getY(); // Y coordinates where the screen has been pressed
// If we press the Music Player Button
if ((x >= 55) && (x <= 120) && (y >= 125) && (y <= 190)) {
drawFrame(87, 157, 33);
currentPage = '1';
myGLCD.clrScr();
delay(100);
drawMusicPlayerScreen();
delay(100);
}
// If we press the Alarm Button
if ((x >= 195) && (x <= 260) && (y >= 125) && (y <= 190)) {
drawFrame(227, 160, 29);
currentPage = '2';
myGLCD.clrScr();
}
}Code language: Arduino (arduino)// Music Player Screen
if (currentPage == '1') {
if (myTouch.dataAvailable()) {
myTouch.read();
x = myTouch.getX(); // X coordinate where the screen has been pressed
y = myTouch.getY(); // Y coordinates where the screen has been pressed
// If we press the Play Button
if ((x >= 116) && (x <= 204) && (y >= 77) && (y <= 165)) {
if (playStatus == '0') {
drawFrame(159, 121, 42);
drawPauseButton();
mp3.playTrackFromFolder(00, 001);
delay(100);
playStatus = '2';
return;
}
if (playStatus == '1') {
drawFrame(159, 121, 42);
drawPauseButton();
mp3.play();
delay(100);
playStatus = '2';
return;
}
if (playStatus == '2') {
drawFrame(159, 121, 42);
drawPlayButton();
mp3.pause();
delay(100);
playStatus = '1';
return;
}
}Code language: Arduino (arduino)// If we press the Previous Button
if ((x >= 45) && (x <= 95) && (y >= 97) && (y <= 147)) {
drawFrame(70, 121, 26);
mp3.previousTrack();
delay(100);
drawTrackBar();
}
// If we press the Next Button
if ((x >= 227) && (x <= 277) && (y >= 97) && (y <= 147)) {
drawFrame(252, 122, 26);
mp3.nextTrack();
delay(100);
drawTrackBar();
}
// If we press the VolumeDown Button
if ((x >= 35) && (x <= 75) && (y >= 165) && (y <= 209)) {
drawUnderline(45, 205, 65, 205);
if (iV >= 0 & iV <= 30) {
iV--;
drawVolume(iV);
}
mp3.decreaseVolume();
delay(100);
}
// If we press the VolumeUp Button
if ((x >= 230) && (x <= 280) && (y >= 165) && (y <= 209)) {
drawUnderline(235, 205, 275, 205);
if (iV >= 0 & iV <= 30) {
iV++;
drawVolume(iV);
}
mp3.increaseVolume();
delay(100);
}
// If we press the MENU Button
if ((x >= 0) && (x <= 75) && (y >= 0) && (y <= 30)) {
myGLCD.clrScr();
drawHomeScreen(); // Draws the Home Screen
currentPage = '0';
return;
}Code language: Arduino (arduino)// Updates the track bar
if (playStatus == '1' || playStatus == '2') {
trackPlayTime();
} // Updates the track bar
void trackPlayTime() {
totalTime = mp3.getTotalTrackPlaybackTime();
delay(10);
elapsedTime = mp3.getElapsedTrackPlaybackTime();
delay(10);
minutes = (int)elapsedTime / 60;
seconds = (((float)elapsedTime / 60) - minutes) * 60;
playback = totalTime - elapsedTime;
minutesR = (int)playback / 60;
secondsR = (((float)playback / 60) - minutesR) * 60;
myGLCD.setFont(SmallFont);
myGLCD.setColor(255, 255, 255);
myGLCD.printNumI(minutes, 8, 48);
myGLCD.print(":", 16, 48);
myGLCD.printNumI((int)seconds, 24, 48, 2, '0');
myGLCD.print("-", 276, 48);
myGLCD.printNumI(minutesR, 284, 48);
myGLCD.print(":", 292, 48);
myGLCD.printNumI((int)secondsR, 300, 48, 2, '0');
int trackBarX = map(elapsedTime, 0, totalTime, 0, 224);
myGLCD.setColor(255, 0, 0);
myGLCD.fillRect (48, 50, 48 + trackBarX, 50 + 8);
if (totalTime == elapsedTime) {
mp3.nextTrack();
delay(30);
myGLCD.setColor(255, 255, 255);
myGLCD.fillRect (48, 50, 48 + 224, 50 + 8);
}
}Code language: Arduino (arduino)// Alarm Clock Screen
if (currentPage == '2') {
myGLCD.setFont(BigFont);
myGLCD.setColor(255, 255, 255);
myGLCD.print("MENU", 5, 5);
myGLCD.print("Set Alarm", CENTER, 20);
// Draws a colon between the hours and the minutes
myGLCD.setColor(0, 255, 0);
myGLCD.fillCircle (112, 65, 4);
myGLCD.setColor(0, 255, 0);
myGLCD.fillCircle (112, 85, 4);
myGLCD.setFont(SevenSegNumFont);
myGLCD.setColor(0, 255, 0);
myGLCD.printNumI(aHours, 32, 50, 2, '0');
myGLCD.printNumI(aMinutes, 128, 50, 2, '0');
myGLCD.setColor(255, 255, 255);
myGLCD.drawRoundRect (42, 115, 82, 145);
myGLCD.drawRoundRect (138, 115, 178, 145);
myGLCD.setFont(BigFont);
myGLCD.print("H", 54, 122);
myGLCD.print("M", 150, 122);
myGLCD.drawRoundRect (215, 60, 303, 90);
myGLCD.print("SET", 236, 67);
myGLCD.drawRoundRect (215, 115, 303, 145);
myGLCD.print("CLEAR", 220, 122);
alarmNotSet = true;
while (alarmNotSet){
if (myTouch.dataAvailable()) {
myTouch.read();
x = myTouch.getX(); // X coordinate where the screen has been pressed
y = myTouch.getY(); // Y coordinates where the screen has been pressed
//Set hours button
if ((x >= 42) && (x <= 82) && (y >= 115) && (y <= 145)) {
drawRectFrame(42, 115, 82, 145);
aHours++;
if(aHours >=24){
aHours = 0;
}
myGLCD.setFont(SevenSegNumFont);
myGLCD.setColor(0, 255, 0);
myGLCD.printNumI(aHours, 32, 50, 2, '0');
}
// Set minutes buttons
if ((x >= 138) && (x <= 178) && (y >= 115) && (y <= 145)) {
drawRectFrame(138, 115, 178, 145);
aMinutes++;
if(aMinutes >=60){
aMinutes = 0;
}
myGLCD.setFont(SevenSegNumFont);
myGLCD.setColor(0, 255, 0);
myGLCD.printNumI(aMinutes, 128, 50, 2, '0');
}
// Set alarm button
if ((x >= 215) && (x <= 303) && (y >= 60) && (y <= 80)) {
drawRectFrame(215, 60, 303, 90);
if (aHours < 10 && aMinutes < 10){
alarmString = "0"+(String)aHours + ":" + "0"+ (String)aMinutes + ":" + "00";
}
else if (aHours < 10 && aMinutes > 9){
alarmString = "0"+(String)aHours + ":" + (String)aMinutes + ":" + "00";
}
else if (aHours > 9 && aMinutes < 10){
alarmString = (String)aHours + ":" + "0"+ (String)aMinutes + ":" + "00";
}
else {
alarmString = (String)aHours + ":" + (String)aMinutes + ":" + "00";
}
myGLCD.setFont(BigFont);
myGLCD.print("Alarm set for:", CENTER, 165);
myGLCD.print(alarmString, CENTER, 191);
}
// Clear alarm button
if ((x >= 215) && (x <= 303) && (y >= 115) && (y <= 145)) {
drawRectFrame(215, 115, 303, 145);
alarmString="";
myGLCD.setColor(0, 0, 0);
myGLCD.fillRect(45, 165, 275, 210);
}
// If we press the MENU Button
if ((x >= 0) && (x <= 75) && (y >= 0) && (y <= 30)) {
alarmNotSet = false;
currentPage = '0';
myGLCD.clrScr();
drawHomeScreen(); // Draws the Home Screen
}
}
}
}Code language: Arduino (arduino)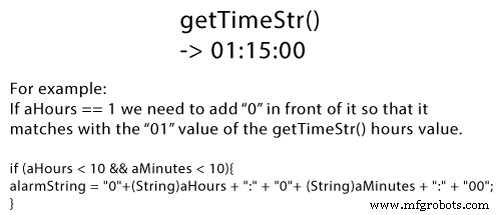
// Alarm activation
if (alarmNotSet == false) {
if (alarmString == rtc.getTimeStr()){
myGLCD.clrScr();
mp3.setVolume(25);
mp3.playTrackByIndexNumber(1);
delay(100);
myGLCD.setFont(BigFont);
myGLCD.setColor(255, 255, 255);
myGLCD.print("ALARM", CENTER, 90);
myGLCD.drawBitmap (127, 10, 65, 64, AlarmButton);
myGLCD.print(alarmString, CENTER, 114);
myGLCD.drawRoundRect (94, 146, 226, 170);
myGLCD.print("DISMISS", CENTER, 150);
boolean alarmOn = true;
while (alarmOn){
if (myTouch.dataAvailable()) {
myTouch.read();
x = myTouch.getX(); // X coordinate where the screen has been pressed
y = myTouch.getY(); // Y coordinates where the screen has been pressed
// Stop alarm button
if ((x >= 94) && (x <= 226) && (y >= 146) && (y <= 170)) {
drawRectFrame(94, 146, 226, 170);
alarmOn = false;
alarmString="";
myGLCD.clrScr();
mp3.stopPlayback();
delay(100);
currentPage = '0';
playStatus = '0';
mp3.setVolume(15);
drawHomeScreen();
}
}
}
}
}Code language: Arduino (arduino)

/*
* Arduino Touch Screen MP3 Music Player and Alarm Clock
*
* Crated by Dejan Nedelkovski,
* www.HowToMechatronics.com
*
* UFTF, URTouch and DS3231 libraries made by Henning Karlsen which can be found and downloaded from his website, www.rinkydinkelectronics.com.
* BY8001 MP3 Player Library made by borland of Arduino forum, Released in public domain. Dowload link: https://github.com/r0ndL/BY8001
*/
#include <UTFT.h>
#include <URTouch.h>
#include <SoftwareSerial.h>
#include <BY8001.h>
#include <DS3231.h>
//==== Creating Objects
UTFT myGLCD(SSD1289, 38, 39, 40, 41); //Parameters should be adjusted to your Display/Schield model
URTouch myTouch( 6, 5, 4, 3, 2);
SoftwareSerial mp3Serial(11, 10); // RX, TX
BY8001 mp3; // creating an instance of class BY8001 and call it 'mp3'
DS3231 rtc(SDA, SCL);
//==== Defining Fonts
extern uint8_t SmallFont[];
extern uint8_t BigFont[];
extern uint8_t SevenSegNumFont[];
extern unsigned int MusicPlayerButton[0x1040];
extern unsigned int AlarmButton[0x1040];
extern unsigned int ButtonPlay[0x1AE9];
extern unsigned int ButtonPause[0x1AE9];
extern unsigned int PreviousButton[0x9C4];
extern unsigned int NextButton[0x9C4];
extern unsigned int VolumeDown[0x170];
extern unsigned int VolumeUp[0x3B8];
int x, y; // Variables for the coordinates where the display has been pressed
char currentPage, playStatus;
int iV = 15;
int trackNum = 1;
int b = 16;
int aHours = 0;
int aMinutes = 0;
boolean alarmNotSet = true;
String alarmString = "";
float currentTemperature, temperature;
static word totalTime, elapsedTime, playback, minutes, seconds, lastSeconds, minutesR, secondsR;
String currentClock, currentHours, currentMinutes, currentSeconds, currentDate;
String timeString, hoursString, minutesString, secondsString, hoursS, minutesS, secondsS, dateS;
void setup() {
// Initiate display
myGLCD.InitLCD();
myGLCD.clrScr();
myTouch.InitTouch();
myTouch.setPrecision(PREC_MEDIUM);
// Initialize the rtc object
rtc.begin();
// Music
Serial.begin(9600); // set serial monitor baud rate to Arduino IDE
mp3Serial.begin(9600); // BY8001 set to 9600 baud (required)
mp3.setup(mp3Serial); // tell BY8001 library which serial port to use.
delay(800); // allow time for BY8001 cold boot; may adjust depending on flash storage size
drawHomeScreen(); // Draws the Home Screen
currentPage = '0'; // Indicates that we are at Home Screen
playStatus = '0';
mp3.setVolume(15);
delay(100);
currentTemperature = rtc.getTemp();
currentDate = rtc.getDateStr();
currentClock = rtc.getTimeStr();
timeString = rtc.getTimeStr();
currentHours = timeString.substring(0, 2);
currentMinutes = timeString.substring(3, 5);
currentSeconds = timeString.substring(6, 8);
}
void loop() {
// Homes Screen
if (currentPage == '0') {
// Checks for change of the clock
if ( currentClock != rtc.getTimeStr()) {
timeString = rtc.getTimeStr();
hoursS = timeString.substring(0, 2);
minutesS = timeString.substring(3, 5);
secondsS = timeString.substring(6, 8);
myGLCD.setFont(SevenSegNumFont);
myGLCD.setColor(0, 255, 0);
myGLCD.print(secondsS, 224, 50);
if ( currentMinutes != minutesS ) {
myGLCD.print(minutesS, 128, 50);
currentMinutes = minutesS;
}
if ( currentHours != hoursS ) {
myGLCD.print(hoursS, 32, 50);
currentHours = hoursS;
}
// Checks for change of the date
dateS = rtc.getDateStr();
delay(10);
if ( currentDate != dateS){
myGLCD.setColor(255, 255, 255); // Sets color to white
myGLCD.setFont(BigFont); // Sets font to big
myGLCD.print(rtc.getDateStr(), 153, 7);
}
// Checks for change of the temperature
temperature = rtc.getTemp();
delay(10);
if ( currentTemperature != temperature ){
myGLCD.setColor(255, 255, 255); // Sets color to white
myGLCD.setFont(BigFont); // Sets font to big
myGLCD.printNumI(temperature, 39, 7);
currentTemperature = temperature;
}
delay(10);
currentClock = rtc.getTimeStr();
}
// Checks whether the screen has been touched
if (myTouch.dataAvailable()) {
myTouch.read();
x = myTouch.getX(); // X coordinate where the screen has been pressed
y = myTouch.getY(); // Y coordinates where the screen has been pressed
// If we press the Music Player Button
if ((x >= 55) && (x <= 120) && (y >= 125) && (y <= 190)) {
drawFrame(87, 157, 33);
currentPage = '1';
myGLCD.clrScr();
delay(100);
drawMusicPlayerScreen();
delay(100);
}
// If we press the Alarm Button
if ((x >= 195) && (x <= 260) && (y >= 125) && (y <= 190)) {
drawFrame(227, 160, 29);
currentPage = '2';
myGLCD.clrScr();
}
}
}
// Music Player Screen
if (currentPage == '1') {
if (myTouch.dataAvailable()) {
myTouch.read();
x = myTouch.getX(); // X coordinate where the screen has been pressed
y = myTouch.getY(); // Y coordinates where the screen has been pressed
// If we press the Play Button
if ((x >= 116) && (x <= 204) && (y >= 77) && (y <= 165)) {
if (playStatus == '0') {
drawFrame(159, 121, 42);
drawPauseButton();
mp3.playTrackFromFolder(00, 001);
delay(100);
playStatus = '2';
return;
}
if (playStatus == '1') {
drawFrame(159, 121, 42);
drawPauseButton();
mp3.play();
delay(100);
playStatus = '2';
return;
}
if (playStatus == '2') {
drawFrame(159, 121, 42);
drawPlayButton();
mp3.pause();
delay(100);
playStatus = '1';
return;
}
}
// If we press the Previous Button
if ((x >= 45) && (x <= 95) && (y >= 97) && (y <= 147)) {
drawFrame(70, 121, 26);
mp3.previousTrack();
delay(100);
drawTrackBar();
}
// If we press the Next Button
if ((x >= 227) && (x <= 277) && (y >= 97) && (y <= 147)) {
drawFrame(252, 122, 26);
mp3.nextTrack();
delay(100);
drawTrackBar();
}
// If we press the VolumeDown Button
if ((x >= 35) && (x <= 75) && (y >= 165) && (y <= 209)) {
drawUnderline(45, 205, 65, 205);
if (iV >= 0 & iV <= 30) {
iV--;
drawVolume(iV);
}
mp3.decreaseVolume();
delay(100);
}
// If we press the VolumeUp Button
if ((x >= 230) && (x <= 280) && (y >= 165) && (y <= 209)) {
drawUnderline(235, 205, 275, 205);
if (iV >= 0 & iV <= 30) {
iV++;
drawVolume(iV);
}
mp3.increaseVolume();
delay(100);
}
// If we press the MENU Button
if ((x >= 0) && (x <= 75) && (y >= 0) && (y <= 30)) {
myGLCD.clrScr();
drawHomeScreen(); // Draws the Home Screen
currentPage = '0';
return;
}
}
// Updates the track bar
    if (playStatus == '1' || playStatus == '2') {
      trackPlayTime();
    }
// Printing the clock in the upper right corner
myGLCD.setFont(BigFont);
myGLCD.setColor(255, 255, 255);
printClock(187, 5);
}
// Alarm Clock Screen
if (currentPage == '2') {
myGLCD.setFont(BigFont);
myGLCD.setColor(255, 255, 255);
myGLCD.print("MENU", 5, 5);
myGLCD.print("Set Alarm", CENTER, 20);
// Draws a colon between the hours and the minutes
myGLCD.setColor(0, 255, 0);
myGLCD.fillCircle (112, 65, 4);
myGLCD.setColor(0, 255, 0);
myGLCD.fillCircle (112, 85, 4);
myGLCD.setFont(SevenSegNumFont);
myGLCD.setColor(0, 255, 0);
myGLCD.printNumI(aHours, 32, 50, 2, '0');
myGLCD.printNumI(aMinutes, 128, 50, 2, '0');
myGLCD.setColor(255, 255, 255);
myGLCD.drawRoundRect (42, 115, 82, 145);
myGLCD.drawRoundRect (138, 115, 178, 145);
myGLCD.setFont(BigFont);
myGLCD.print("H", 54, 122);
myGLCD.print("M", 150, 122);
myGLCD.drawRoundRect (215, 60, 303, 90);
myGLCD.print("SET", 236, 67);
myGLCD.drawRoundRect (215, 115, 303, 145);
myGLCD.print("CLEAR", 220, 122);
alarmNotSet = true;
while (alarmNotSet){
if (myTouch.dataAvailable()) {
myTouch.read();
x = myTouch.getX(); // X coordinate where the screen has been pressed
y = myTouch.getY(); // Y coordinates where the screen has been pressed
//Set hours button
if ((x >= 42) && (x <= 82) && (y >= 115) && (y <= 145)) {
drawRectFrame(42, 115, 82, 145);
aHours++;
if(aHours >=24){
aHours = 0;
}
myGLCD.setFont(SevenSegNumFont);
myGLCD.setColor(0, 255, 0);
myGLCD.printNumI(aHours, 32, 50, 2, '0');
}
// Set minutes buttons
if ((x >= 138) && (x <= 178) && (y >= 115) && (y <= 145)) {
drawRectFrame(138, 115, 178, 145);
aMinutes++;
if(aMinutes >=60){
aMinutes = 0;
}
myGLCD.setFont(SevenSegNumFont);
myGLCD.setColor(0, 255, 0);
myGLCD.printNumI(aMinutes, 128, 50, 2, '0');
}
// Set alarm button
if ((x >= 215) && (x <= 303) && (y >= 60) && (y <= 80)) {
drawRectFrame(215, 60, 303, 90);
if (aHours < 10 && aMinutes < 10){
alarmString = "0"+(String)aHours + ":" + "0"+ (String)aMinutes + ":" + "00";
}
else if (aHours < 10 && aMinutes > 9){
alarmString = "0"+(String)aHours + ":" + (String)aMinutes + ":" + "00";
}
else if (aHours > 9 && aMinutes < 10){
alarmString = (String)aHours + ":" + "0"+ (String)aMinutes + ":" + "00";
}
else {
alarmString = (String)aHours + ":" + (String)aMinutes + ":" + "00";
}
myGLCD.setFont(BigFont);
myGLCD.print("Alarm set for:", CENTER, 165);
myGLCD.print(alarmString, CENTER, 191);
}
// Clear alarm button
if ((x >= 215) && (x <= 303) && (y >= 115) && (y <= 145)) {
drawRectFrame(215, 115, 303, 145);
alarmString="";
myGLCD.setColor(0, 0, 0);
myGLCD.fillRect(45, 165, 275, 210);
}
// If we press the MENU Button
if ((x >= 0) && (x <= 75) && (y >= 0) && (y <= 30)) {
alarmNotSet = false;
currentPage = '0';
myGLCD.clrScr();
drawHomeScreen(); // Draws the Home Screen
}
}
}
}
// Alarm activation
if (alarmNotSet == false) {
if (alarmString == rtc.getTimeStr()){
myGLCD.clrScr();
mp3.setVolume(25);
mp3.playTrackByIndexNumber(1);
delay(100);
myGLCD.setFont(BigFont);
myGLCD.setColor(255, 255, 255);
myGLCD.print("ALARM", CENTER, 90);
myGLCD.drawBitmap (127, 10, 65, 64, AlarmButton);
myGLCD.print(alarmString, CENTER, 114);
myGLCD.drawRoundRect (94, 146, 226, 170);
myGLCD.print("DISMISS", CENTER, 150);
boolean alarmOn = true;
while (alarmOn){
if (myTouch.dataAvailable()) {
myTouch.read();
x = myTouch.getX(); // X coordinate where the screen has been pressed
y = myTouch.getY(); // Y coordinates where the screen has been pressed
// Stop alarm button
if ((x >= 94) && (x <= 226) && (y >= 146) && (y <= 170)) {
drawRectFrame(94, 146, 226, 170);
alarmOn = false;
alarmString="";
myGLCD.clrScr();
mp3.stopPlayback();
delay(100);
currentPage = '0';
playStatus = '0';
mp3.setVolume(15);
drawHomeScreen();
}
}
}
}
}
}
void drawHomeScreen() {
myGLCD.setBackColor(0, 0, 0); // Sets the background color of the area where the text will be printed to black
myGLCD.setColor(255, 255, 255); // Sets color to white
myGLCD.setFont(BigFont); // Sets font to big
myGLCD.print(rtc.getDateStr(), 153, 7);
myGLCD.print("T:", 7, 7);
myGLCD.printNumI(rtc.getTemp(), 39, 7);
myGLCD.print("C", 82, 7);
myGLCD.setFont(SmallFont);
myGLCD.print("o", 74, 5);
if (alarmString == "" ) {
myGLCD.setColor(255, 255, 255);
myGLCD.print("by www.HowToMechatronics.com", CENTER, 215);
}
else {
myGLCD.setColor(255, 255, 255);
myGLCD.print("Alarm set for: ", 68, 215);
myGLCD.print(alarmString, 188, 215);
}
drawMusicPlayerButton();
drawAlarmButton();
drawHomeClock();
}
void drawMusicPlayerScreen() {
// Title
myGLCD.setBackColor(0, 0, 0); // Sets the background color of the area where the text will be printed to black
myGLCD.setColor(255, 255, 255); // Sets color to white
myGLCD.setFont(BigFont); // Sets font to big
myGLCD.print("MENU", 5, 5); // Prints the string on the screen
myGLCD.setColor(255, 0, 0); // Sets color to red
myGLCD.drawLine(0, 26, 319, 26); // Draws the red line
myGLCD.setColor(255, 255, 255); // Sets color to white
myGLCD.setFont(SmallFont); // Sets font to big
myGLCD.print("by www.HowToMechatronics.com", CENTER, 215); // Prints the string on the screen
// Volume Bar
myGLCD.setColor(255, 255, 255);
myGLCD.fillRect (78, 184, 78 + 150, 184 + 8);
myGLCD.setColor(240, 196, 30);
myGLCD.fillRect (78, 184, 78 + 75, 184 + 8);
// Track Bar
myGLCD.setColor(255, 255, 255);
myGLCD.fillRect (48, 50, 48 + 224, 50 + 8);
myGLCD.setFont(SmallFont);
myGLCD.setColor(255, 255, 255);
myGLCD.print("0:00", 8, 48);
myGLCD.print("-0:00", 276, 48);
drawPlayButton();
if (playStatus == '2') {
drawPauseButton();
}
drawPreviousButton();
drawNextButton();
drawVolumeDown();
drawVolumeUp();
}
void drawMusicPlayerButton() {
myGLCD.drawBitmap (55, 125, 65, 64, MusicPlayerButton);
}
void drawAlarmButton() {
myGLCD.drawBitmap (195, 125, 65, 64, AlarmButton);
}
void drawPlayButton() {
myGLCD.drawBitmap (118, 79, 83, 83, ButtonPlay);
}
void drawPauseButton() {
myGLCD.drawBitmap (118, 79, 83, 83, ButtonPause);
}
void drawNextButton() {
myGLCD.drawBitmap (227, 97, 50, 50, NextButton);
}
void drawPreviousButton() {
myGLCD.drawBitmap (45, 97, 50, 50, PreviousButton);
}
void drawVolumeDown() {
myGLCD.drawBitmap (50, 177, 16, 23, VolumeDown);
}
void drawVolumeUp() {
myGLCD.drawBitmap (241, 175, 34, 28, VolumeUp);
}
// check for if Mp3 Player is stopped
bool checkFor_mp3IsStopped() {
if (mp3Serial.available() > 0) {
if (mp3.getPlaybackStatus() == 0) {
return true;
}
}
else return false;
}
// Highlights the button when pressed
void drawFrame(int x, int y, int r) {
myGLCD.setColor(255, 0, 0);
myGLCD.drawCircle (x, y, r);
while (myTouch.dataAvailable())
myTouch.read();
myGLCD.setColor(0, 0, 0);
myGLCD.drawCircle (x, y, r);
}
void drawRectFrame(int x1, int y1, int x2, int y2) {
myGLCD.setColor(255, 0, 0);
myGLCD.drawRoundRect (x1, y1, x2, y2);
while (myTouch.dataAvailable())
myTouch.read();
myGLCD.setColor(255, 255, 255);
myGLCD.drawRoundRect (x1, y1, x2, y2);
}
void drawUnderline(int x1, int y1, int x2, int y2) {
myGLCD.setColor(255, 0, 0);
myGLCD.drawLine (x1, y1, x2, y2);
while (myTouch.dataAvailable())
myTouch.read();
myGLCD.setColor(0, 0, 0);
myGLCD.drawLine (x1, y1, x2, y2);
}
// Sound bar
void drawVolume(int x) {
myGLCD.setColor(255, 255, 255);
myGLCD.fillRect (78 + 5 * x, 184, 78 + 150, 184 + 8);
myGLCD.setColor(240, 196, 30);
myGLCD.fillRect (78, 184, 78 + 5 * x, 184 + 8);
}
// Clears the track bar
void drawTrackBar() {
myGLCD.setColor(255, 255, 255);
myGLCD.fillRect (48, 50, 48 + 224, 50 + 8);
}
// Updates the track bar
void trackPlayTime() {
totalTime = mp3.getTotalTrackPlaybackTime();
delay(10);
elapsedTime = mp3.getElapsedTrackPlaybackTime();
delay(10);
minutes = (int)elapsedTime / 60;
seconds = (((float)elapsedTime / 60) - minutes) * 60;
playback = totalTime - elapsedTime;
minutesR = (int)playback / 60;
secondsR = (((float)playback / 60) - minutesR) * 60;
myGLCD.setFont(SmallFont);
myGLCD.setColor(255, 255, 255);
myGLCD.printNumI(minutes, 8, 48);
myGLCD.print(":", 16, 48);
myGLCD.printNumI((int)seconds, 24, 48, 2, '0');
myGLCD.print("-", 276, 48);
myGLCD.printNumI(minutesR, 284, 48);
myGLCD.print(":", 292, 48);
myGLCD.printNumI((int)secondsR, 300, 48, 2, '0');
int trackBarX = map(elapsedTime, 0, totalTime, 0, 224);
myGLCD.setColor(255, 0, 0);
myGLCD.fillRect (48, 50, 48 + trackBarX, 50 + 8);
if (totalTime == elapsedTime) {
mp3.nextTrack();
delay(30);
myGLCD.setColor(255, 255, 255);
myGLCD.fillRect (48, 50, 48 + 224, 50 + 8);
}
}
void printClock(int x, int y) {
if ( currentClock != rtc.getTimeStr()) {
myGLCD.print(rtc.getTimeStr(), x, y);
currentClock = rtc.getTimeStr();
}
}
void drawColon() {
myGLCD.setColor(0, 255, 0);
myGLCD.fillCircle (112, 65, 4);
myGLCD.setColor(0, 255, 0);
myGLCD.fillCircle (112, 85, 4);
myGLCD.setColor(0, 255, 0);
myGLCD.fillCircle (208, 65, 4);
myGLCD.setColor(0, 255, 0);
myGLCD.fillCircle (208, 85, 4);
}
void drawHomeClock() {
timeString = rtc.getTimeStr();
currentHours = timeString.substring(0, 2);
currentMinutes = timeString.substring(3, 5);
currentSeconds = timeString.substring(6, 8);
myGLCD.setFont(SevenSegNumFont);
myGLCD.setColor(0, 255, 0);
myGLCD.print(currentSeconds, 224, 50);
myGLCD.print(currentMinutes, 128, 50);
myGLCD.print(currentHours, 32, 50);
drawColon();
}Code language: Arduino (arduino)
製造プロセス