


燃え尽きたレジンを使用した 3D プリント パーツのマイクロフュージョン
マイクロフュージョンまたはロストワックス キャスティング 最もジュエリー業界で広く使用されている製造方法の 1 つです。 知られている最古の鋳造プロセスです。
鋳造では、伝統的にワックスでモデル化されたプロトタイプから作られた金型を使用して、金属のレプリカを取得できます。 この場合、燃え尽きた樹脂を使用した 3D プリント部品がワックス モデルの代わりに使用されます。
ジュエリーは、金、プラチナ、銀、真鍮など、さまざまな金属から作ることができます 、鋳造プロセスを使用します。以下は、燃え尽きた樹脂を使用して 3D プリントされたピースからジュエリーを製造するためのマイクロフュージョン プロセスです。
1- パーツの 3D プリント
CAD ソフトウェアを使用して作成された設計に基づいて、 希望するモデルは 3D プリントする必要があります。現在、さまざまなメーカーから多数の焼成可能な樹脂が入手可能です。どの材料を使用するかは、使用する 3D プリンターとパーツに必要な特性によって異なります。
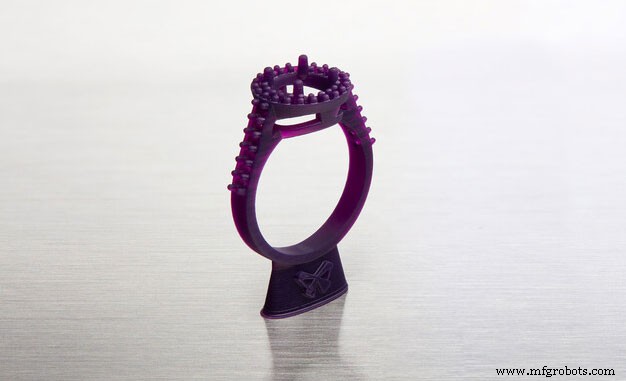
画像 1:FormLabs バーンアウト レジンを使用した 3D プリント リング。出典:FormLabs.
ジュエリー業界で最も人気のある 3D プリンターの 1 つは、有名メーカー FormLabs の Form3 です。この 3D プリンタは高度な技術的知識を必要としないため、問題なく使用できます . Form3 3D プリンタは、メーカーが開発した素材のみをサポートすることで、その使用を制限しています。 これは、セットアップが不要であり、構成パラメーターと変更可能な値が最小限に抑えられ、材料の種類といくつかの基本的なパラメーターのみが選択されるため、利点となる可能性があります。これにより、誤差が最小限に抑えられます。
次の表は、最も一般的な可燃性樹脂の一部と、それらの3D プリンターとの互換性を示しています。
| レジン | メーカー | テクノロジー | 互換性 |
|---|---|---|---|
| キャスタブル ワックス | フォームラボ | SLA | フォーム 2、フォーム 3、フォーム 3L、フォーム 3+ |
| キャスタブルワックス 40 | フォームラボ | SLA | フォーム 2、フォーム 3、フォーム 3L、フォーム 3+ |
| zWax アンバー | ユニズ | 液晶 | スラッシュ、スラッシュ 2、スラッシュ 2 プラス、スラッシュ 2 プロ |
| zWax パープル | ユニズ | 液晶 | スラッシュ、スラッシュ 2、スラッシュ 2 プラス、スラッシュ 2 プロ |
| ブルーキャスト オリジナル | ゾルトラックス | 液晶 | UniZ, WANHAO, zortrax, ANYCUBIC, ASIGA, B9 Creator, FLASH FORGE Moon Ray, Prusa. |
| Bluecast X5 | Zortrax | LCD | UniZ, WANHAO, zortrax, ANYCUBIC, ASIGA, B9 Creator, FLASH FORGE Moon Ray, Prusa. |
| Bluecast X10 | Zortrax | LCD | UniZ, WANHAO, zortrax, ANYCUBIC, ASIGA, B9 Creator, FLASH FORGE Moon Ray, Prusa. |
| Dental Cast | Harz Labs | LCD | Formlabs, PEOPOLY, UniZ, WANHAO, zortrax, ANYCUBIC, ASIGA, B9 Creator, FLASH FORGE Moon Ray, Prusa. |
Table 1:Burn-out resins and compatibility. Source:Filament2print.
Each material has different properties and requires different parameters. However, they all have a common characteristic:they have been developed to replace wax parts in the microfusion process, with a composition that achieves castings free of residues that could affect the final result of the parts.
Once the parts have been printed, they must be cured if the material requires it. This depends on the composition of the resin and the manufacturer's advice should always be followed to achieve an optimum result.
2- Wax tree
Once the parts are cured (in cases where this step is required), the removal of the backing can be carried out, always with great care. Sandpaper (400 grit or higher) or even a rotary tool with a polishing attachment can be used to achieve total removal of the support and a perfect finish.
To create the wax tree, a wax base is taken and attached to a rubber cover of the sprue. Small cylindrical wax rods are welded to the wax base using a heat tool. The 3D printed parts are welded to the other end of the bars.
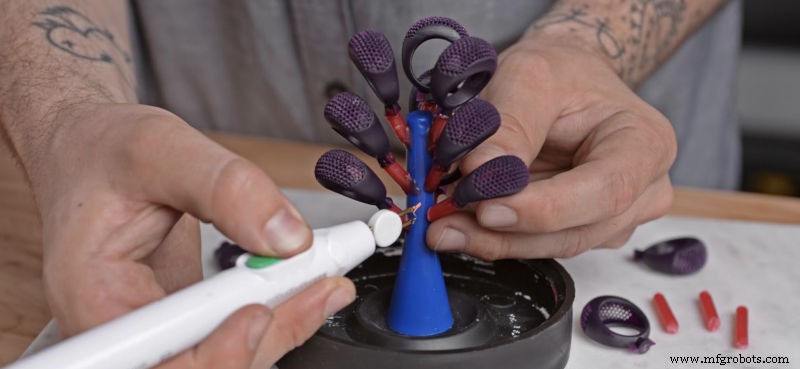
Image 2:Casting wax tree. Source:FormLabs.
This process is similar to that carried out in microfusion when casting traditionally carved wax pieces.
3- Mould preparation
The wax tree with the 3D printed parts in burn-out resin is to be placed inside a refractory steel cylinder, which is to be fitted into the rubber cylinder cover. In case the refractory steel cylinder has holes, these should be covered by wrapping the cylinder in adhesive tape.
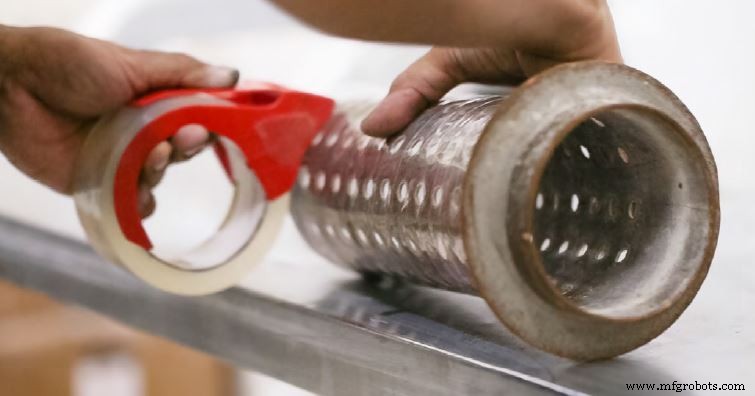
Image 3:Refractory steel cylinder shell.出典:Formlabs.
The casting must then be poured slowly, always from the side of the cylinder to avoid damaging the tree with the parts 3D printed with calcineable resin.
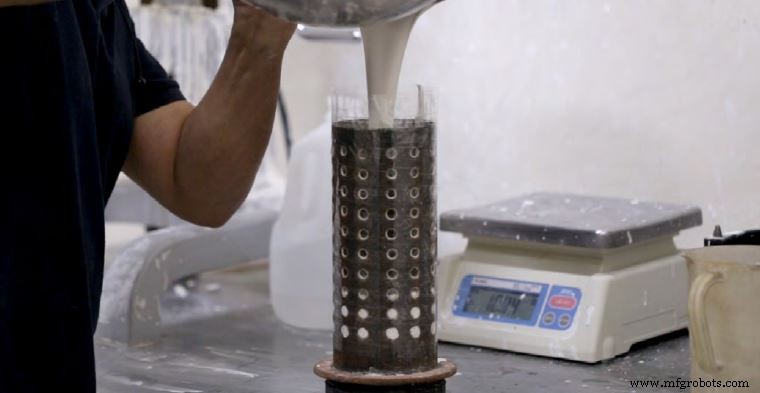
Image 4:Pouring of the casting into a refractory steel cylinder.出典:Formlabs.
When pouring the casting, it is possible that small air pockets may remain which can affect the quality of the final parts. For this reason, it is very important to carry out the degassing process in a vacuum chamber.
4- Burnout
The cylinder is placed in the oven following the time and temperature instructions recommended by the manufacturer. During this time, the wax will burn out without leaving residues, leaving the mould ready.
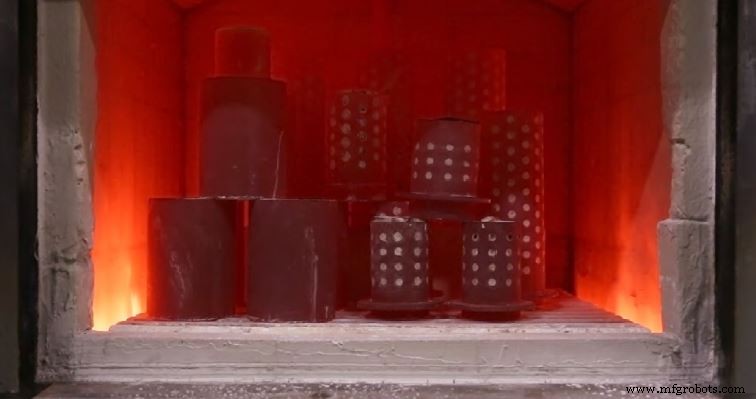
Image 5:Burnout process.出典:Formlabs.
The desired metal must then be poured into the mould to produce the final parts.
5- Washing and polishing
After casting, the mould is carefully removed from the furnace and immersed in water using tongs. During this process, the casting will melt, leaving the metal parts visible. Once washed, the metal parts are separated from the tree, polished and polished until the desired finish is achieved.
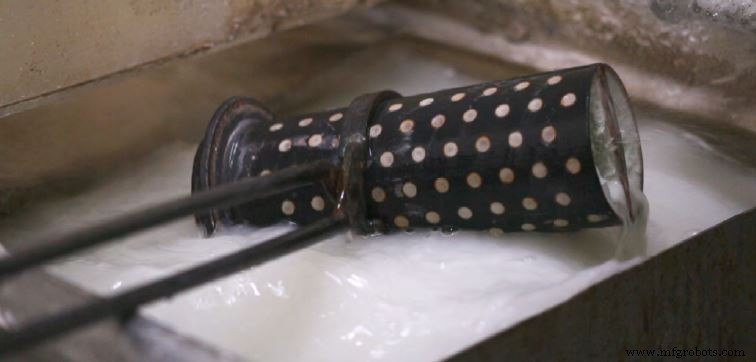
Image 6:Washing process.出典:Formlabs.
Once washed, the metal parts are separated from the tree, polished and polished to the desired finish.
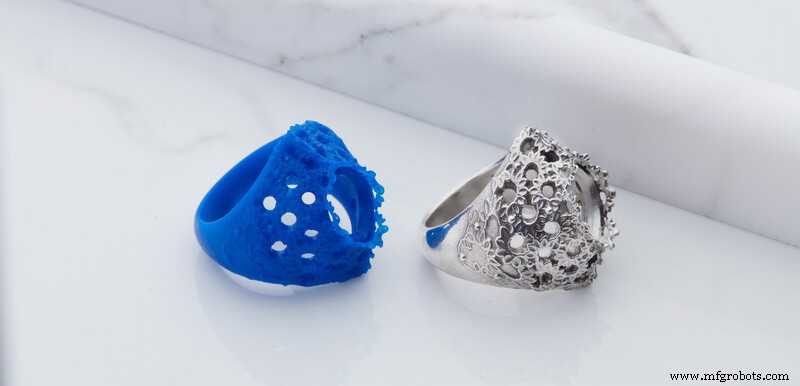
Image 7:3D printed ring with burn-out resin and silver ring after the microfusion process.出典:Formlabs.
The use of castable resins in the jewellery sector offers numerous advantages . Among others, it allows you to 3D print as many models as you want, quickly and with extreme precision . This results in a significant reduction in costs and production times.
3Dプリント