


Arduinoレンジ測定器およびデジタル水準器プロジェクト
このチュートリアルでは、Arduinoレンジ測定器とデジタル水準器の作り方を学びます。次のビデオを見るか、以下のチュートリアルを読むことができます。
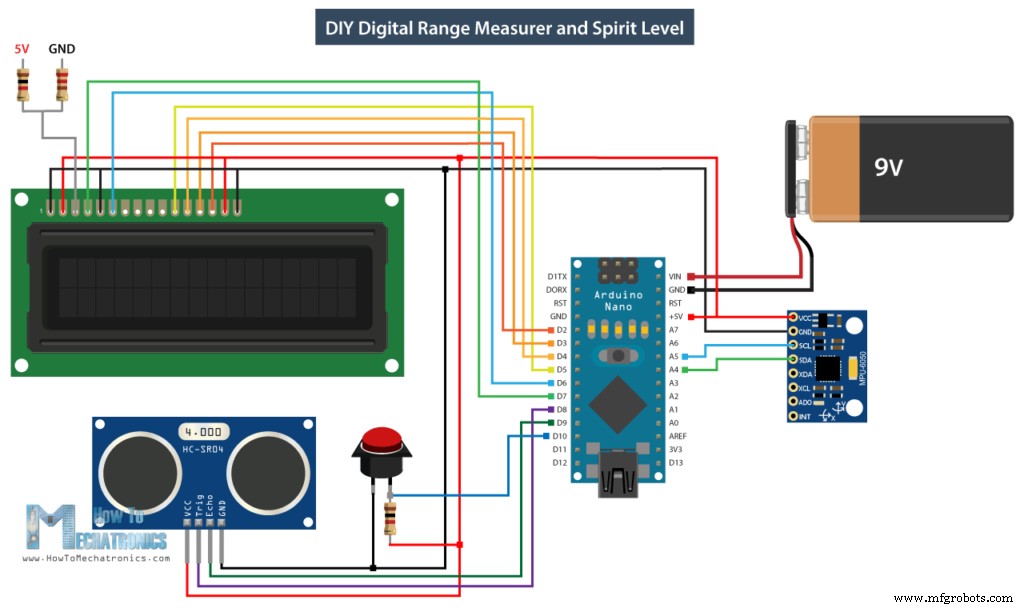
このデバイスは、最も近い物体までの距離を測定するための超音波センサー、地面に対する角度を測定するための加速度計、結果を表示するためのLCDディスプレイ、およびすべてのコンポーネントが接続されているカスタム設計のPCBを備えています。
ボタンひとつで操作できます。デバイスに電力を供給したら、測定単位を選択する必要があります。
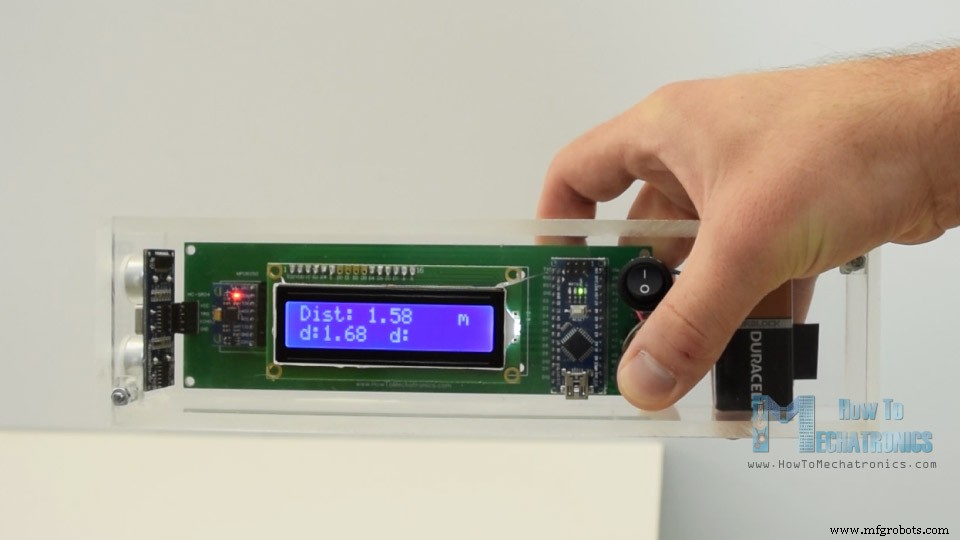
ボタンを押すことでユニットを切り替えることができ、ボタンをしばらく押し続けると最初のプログラムに入ります。ここで距離を測定でき、最後の2つの測定値を保存することもできます。
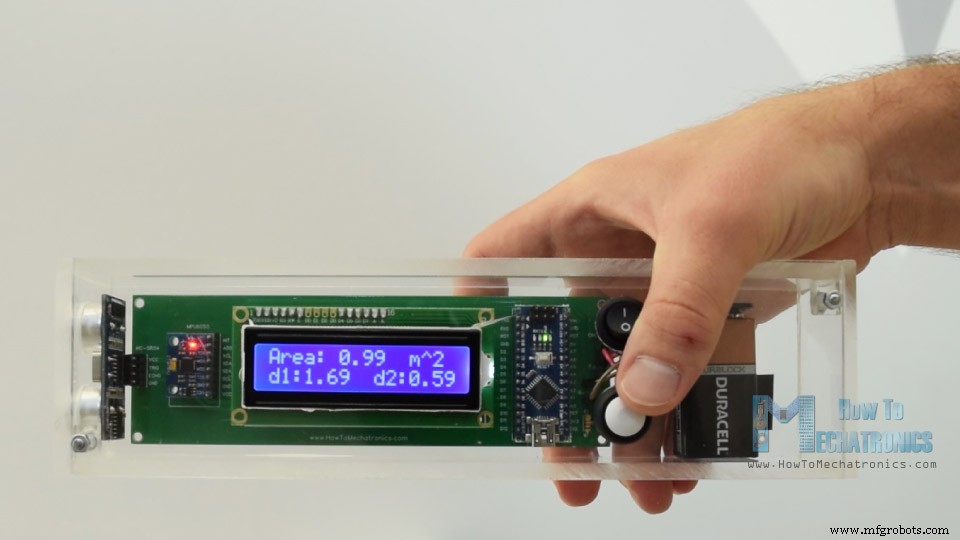
2番目のプログラムに入るには、ボタンをしばらく押し続ける必要があります。このプログラムでは、2つの垂直距離測定を行うことで正方形の面積を測定できます。
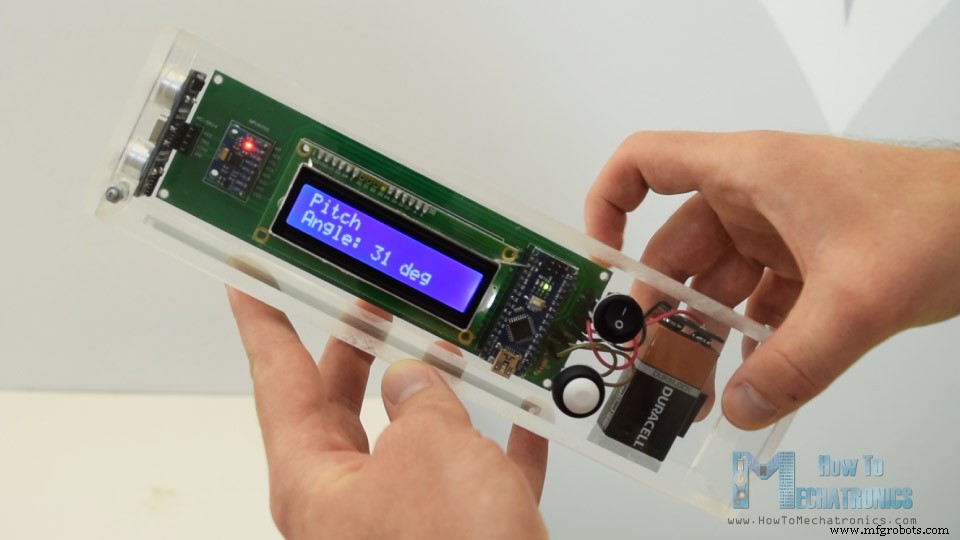
次のプログラムはデジタル水準器で、ここで地面に対する角度を測定できます。
ボタンを使用して、2つの軸を切り替えるか、ピッチまたはロールのいずれかを測定できます。
これがこのArduinoプロジェクトの回路図です。
これらの各モジュールがどのように機能するかについての詳細なチュートリアルはすでにあります。超音波センサーのチュートリアル、LCDのチュートリアル、MEMS加速度計のチュートリアルのリンクで確認できます。
このプロジェクトに必要なコンポーネントは、以下のリンクから入手できます。
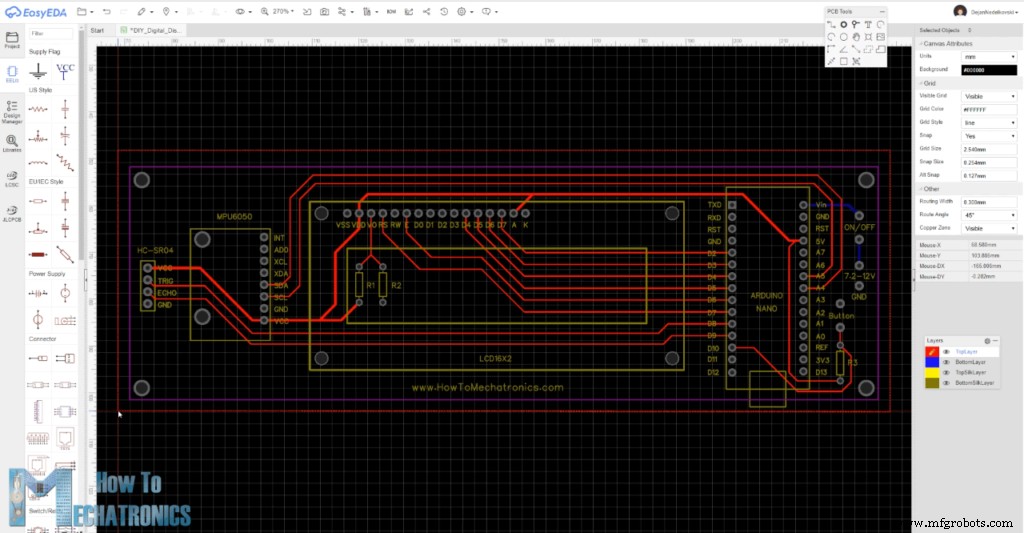
回路図によると、カスタムPCBを設計する必要があり、EasyEDAの無料オンライン回路設計ソフトウェアを使用して設計しました。
ここで設計が完了したら、PCBの製造に使用されるガーバーファイルを簡単にエクスポートできます。このプロジェクトのEasyEDAプロジェクトファイルはここで確認できます。
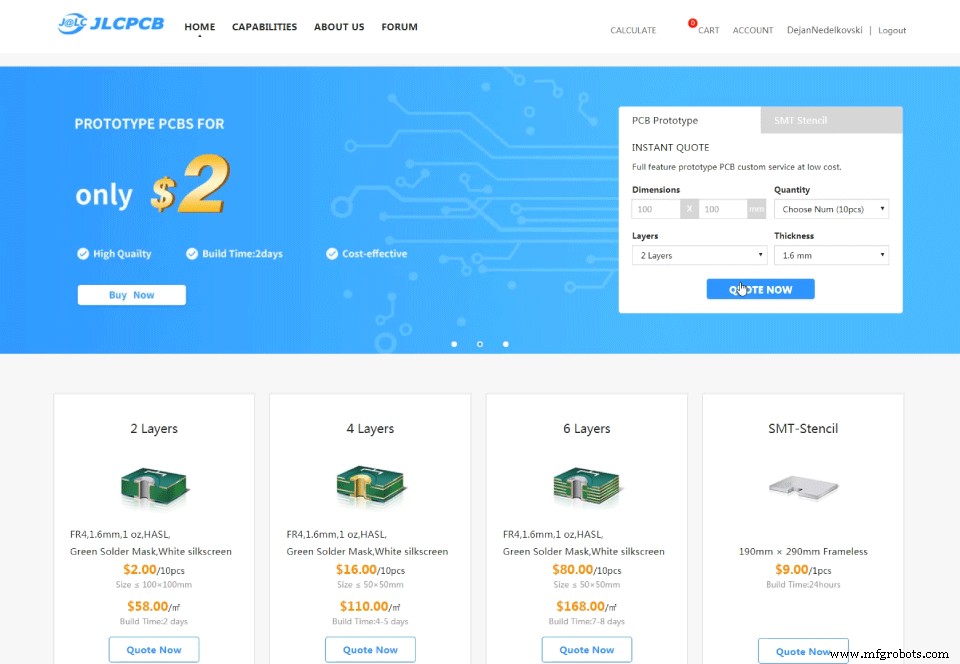
次に、実際にこのプロジェクトのスポンサーであるJLCPCBにPCBを注文できます。
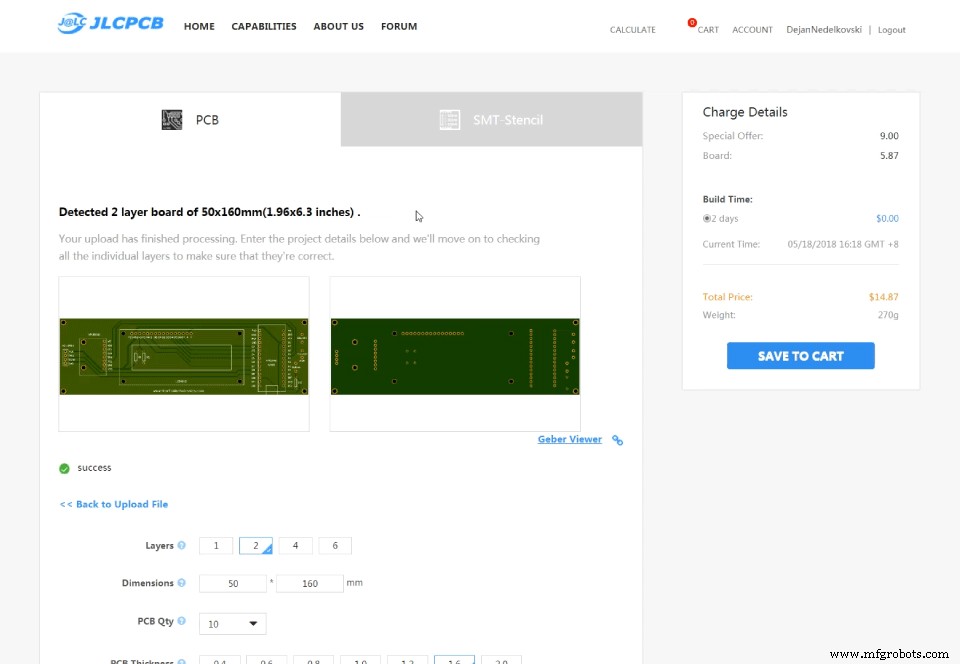
ここでは、ガーバーファイルをドラッグアンドドロップするだけです。アップロードしたら、GerberビューアでPCBを確認できます。すべてが順調であれば、先に進み、PCBに必要なプロパティを選択してから、PCBをリーズナブルな価格で注文できます。 JLCPCBからの最初の注文の場合、わずか2ドルで最大10個のPCBを入手できることに注意してください。
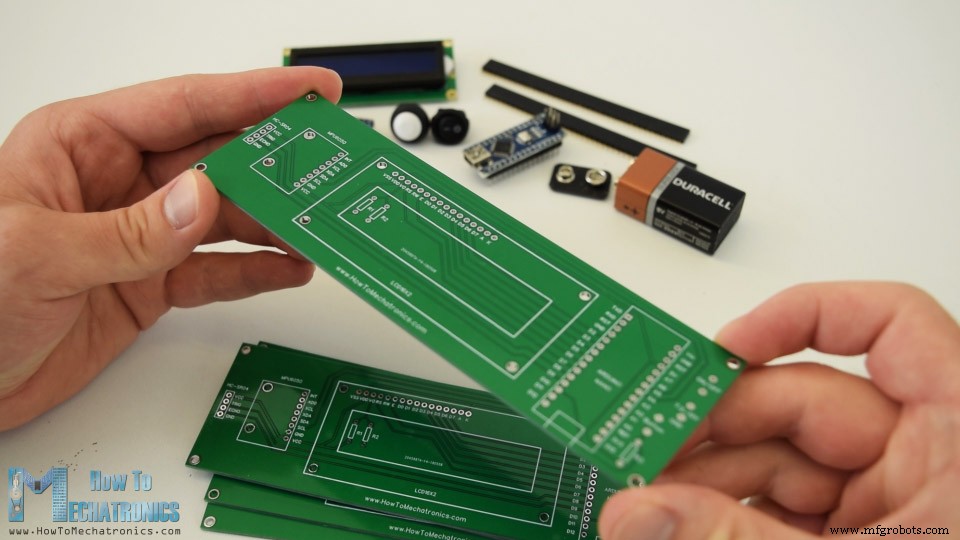
それにもかかわらず、数日後、PCBが到着しました。 PCBの品質は素晴らしく、すべてが設計とまったく同じです。
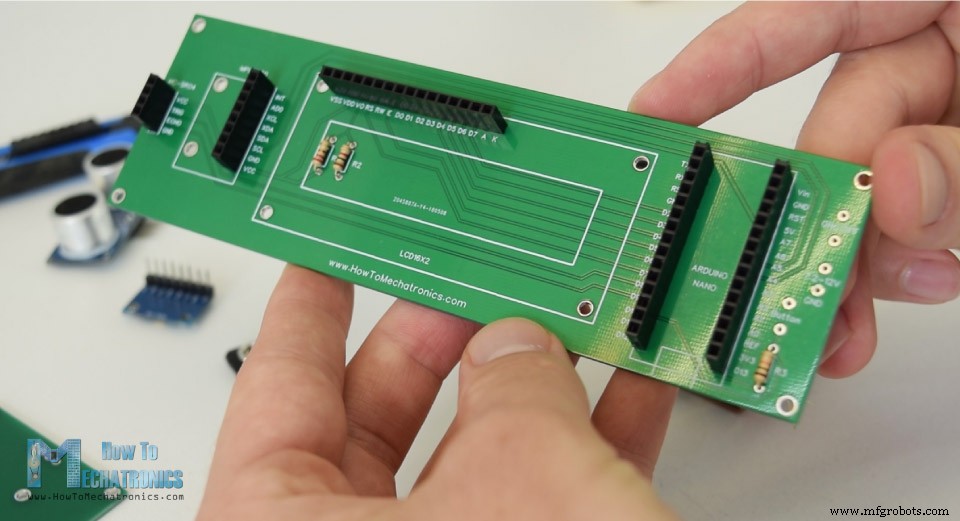
これで、このプロジェクトの電子機器の組み立てを開始できます。 PCBにピンヘッダーをはんだ付けすることから始めました。このようにして、必要に応じてコンポーネントを簡単に接続および切断できます。
次に、3つの抵抗器を挿入してはんだ付けしました。そのうちの2つは、LCDのコントラスト用の分圧器用です。 1k抵抗はR1に配置し、220オームはR2に配置する必要があります。 3つ目はボタンのプルアップ抵抗です。
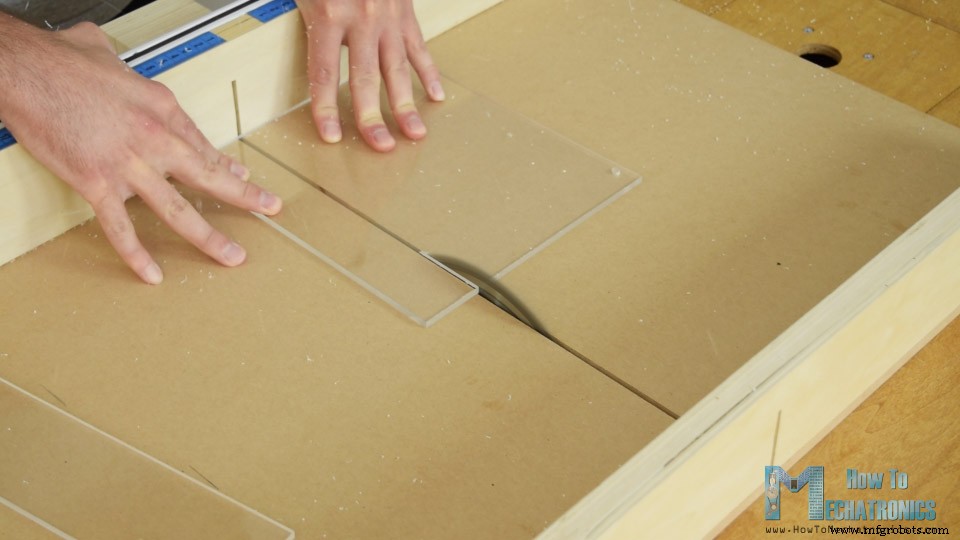
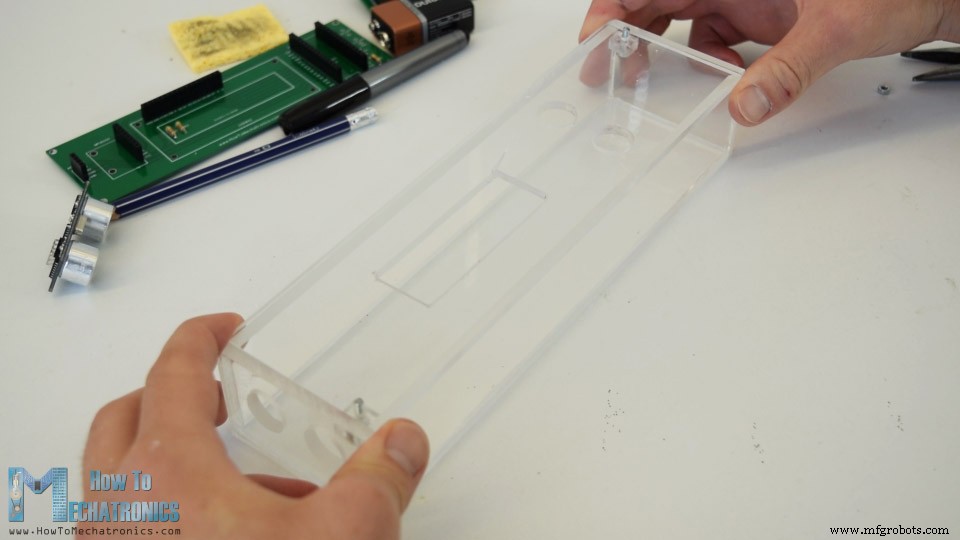
次に、デバイスのケースの作成に進みました。すべての電子部品の美しさを目に見えるようにしたかったので、透明なアクリルを使用することにしました。古いプロジェクトから5mmのダニのアクリルをいくつか持っていて、それをサイズにカットするために円形を使用しました。
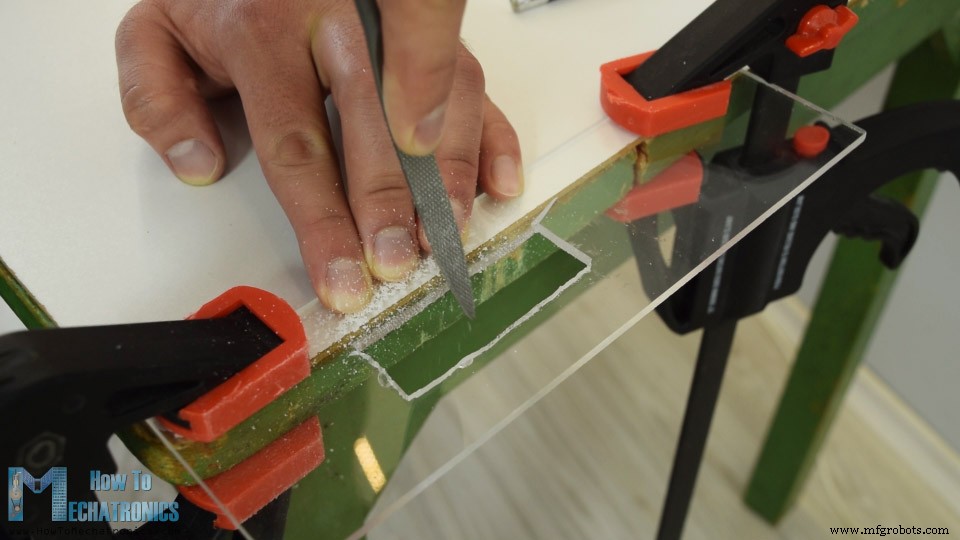
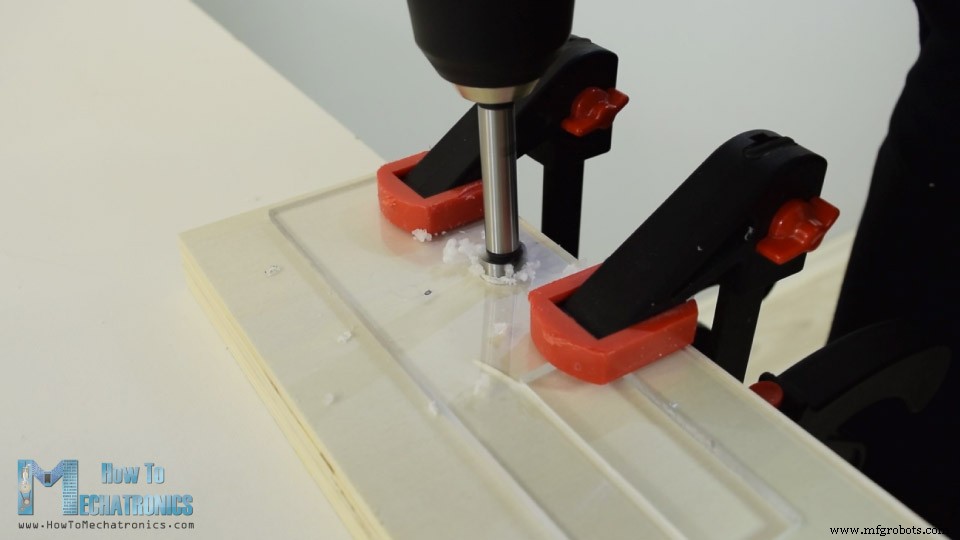
次に、ケースの上面にLCD用の開口部を作成する必要がありました。これは、LCDとの適合性が高いため、実際には4mmの目盛りです。そこで、最初にドリルで2つの穴を開け、次に弓のこを挿入しました。弓のこを使って大まかに開口部を作り、次にラスプを使って、LCDがぴったりと収まるように細い直線を作りました。
次に、フォースナービットを使用して、電源スイッチ、コントロールボタン、および超音波センサー用の開口部を作成しました。
すべての部品の準備ができたら、5分間のエポキシを使用してケースに組み立てました。トップは、トップパネルをナットで差し込んで固定できるボルトを2本差し込んで接着しました。
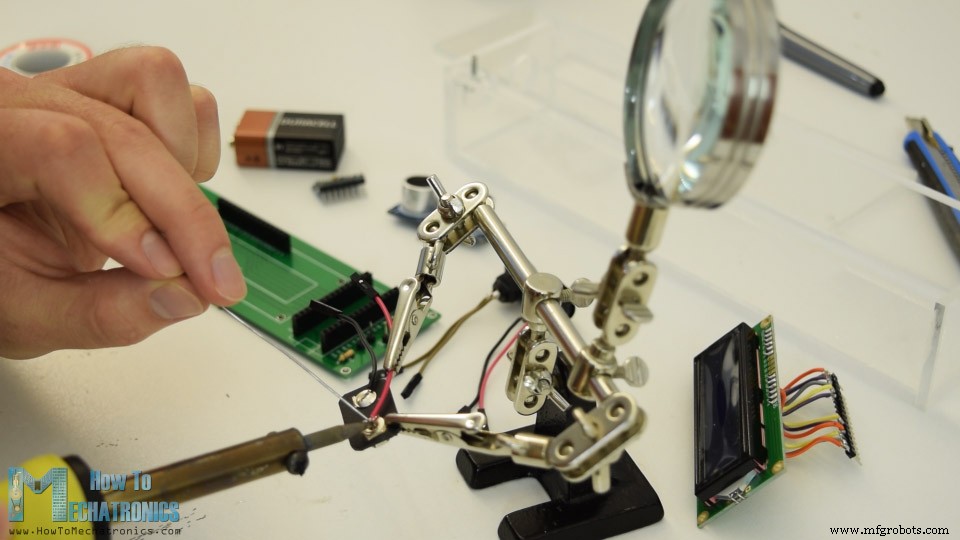
これでケースの準備ができたので、ピンヘッダーをLCDにはんだ付けして、PCBに簡単に取り付けられるようにしました。また、ピンヘッダーまたはジャンプ線を電源スイッチ、ボタン、およびバッテリーコネクタにはんだ付けしました。
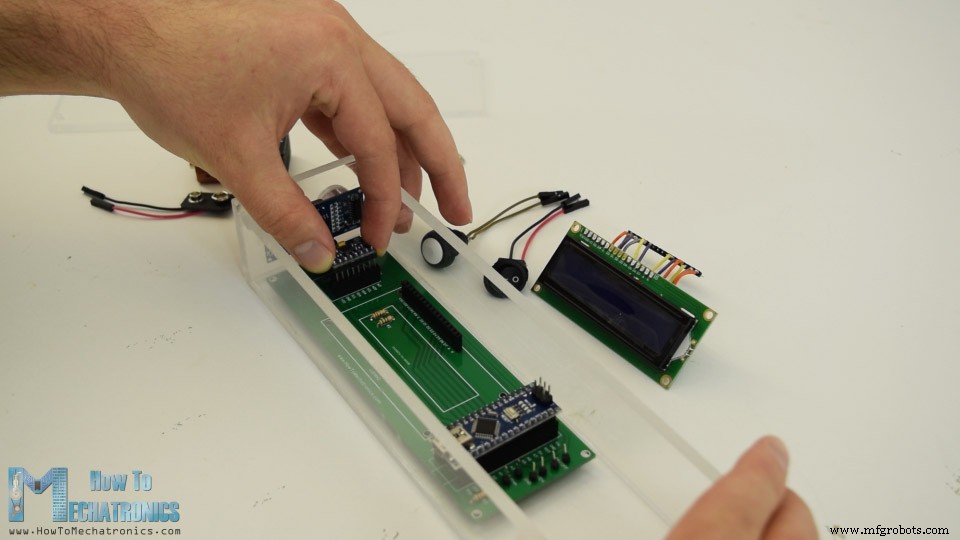
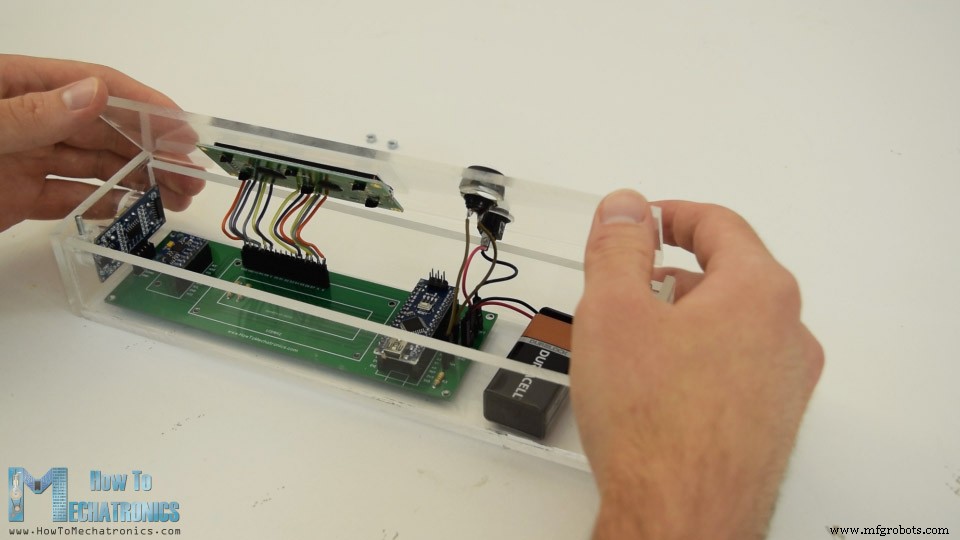
最後に、デバイスを組み立てる準備がすべて整いました。 PCBに超音波センサーを挿入することから始め、次にサイドパネルの穴に通しました。次は、Arduinoボード、加速度計モジュール、およびバッテリーコネクタでした。
トップパネルで、LCD、電源スイッチ、ボタンを固定し、PCBに接続しました。最後に、9V電池をコネクタに挿入し、トップパネルをナットで固定しました。
これで、Arduinoレンジ測定プロジェクトは完了しましたが、このビデオに残っているのは、プログラムがどのように機能するかを説明することなので、Arduinoコードを見てみましょう。
コードが少し長いので、理解を深めるために、プログラムのソースコードを各セクションの説明とともにセクションに投稿します。そして、この記事の最後に、完全なソースコードを投稿します。
したがって、最初に、加速度計のI2C通信用のWire.hライブラリと、LCDを制御するためのLiquidCrystal.hライブラリを含める必要があります。次に、LCD、MPU6050加速度計モジュールのI2Cアドレス、超音波センサーピン、および以下のプログラムに必要ないくつかの変数を定義する必要があります。
セットアップセクションでは、加速度計のI2Cインターフェイスと液晶ディスプレイの両方を初期化し、超音波センサーのトリガーピンとエコーピン、およびボタンピンのピンモードを定義する必要があります。
メインループセクションには、デバイスのさまざまなプログラムを切り替えることができるswitchステートメントがあります。最初のケース番号0では、測定単位を選択します。 lcd.print()関数を使用して、LCDにテキストを印刷し、ifステートメントを使用して4つの測定単位を切り替えます。
ここで、unitSelect変数はgetDistance()cunstom関数でアクションを実行することに注意してください。この関数は、超音波センサーから取得する基本的なcm単位をどの単位に変換するかを実際に指示します。
測定単位を選択し、デバイスの最初のプログラムに参加するには、ボタンを0.5秒以上押し続ける必要があります。
ケース番号1または距離測定プログラムでは、最初にgetDistance()カスタム関数を使用して最も近いオブジェクトまでの距離を取得します。
この関数がどのように機能するか見てみましょう。
ここでは、トリガーピンを使用して、センサーに超音波を生成するように指示します。
次に、エコーピンとpulseIn()関数を使用して、波がセンサーからオブジェクトに移動し、戻ってくる時間を測定します。音速と移動時間を考慮すると、距離を簡単に計算できます。そのため、測定された距離をテキストとともにLCDに印刷し、「if」ステートメントを使用して、ボタンを押すと、最後の2つの測定値を印刷または保存します。
次は、同様の方法を使用している面積を計算するためのプログラムです。それらが形成する正方形の面積を取得するには、2つの垂直な測定を行い、それらを単純に乗算する必要があります。
最後のケースは、角度測定プログラムです。ここでは、X、Y、Zの3つの異なる軸で実際に地球の重力場の強さである加速度計データを読み取る必要があります。各軸の値は2つのレジスタに格納されているため、合計6つのレジスタを読み取る必要があります。適切な値を取得するためにそれらを組み合わせます。
加速度計のX、Y、Z値を取得したら、2つの方程式を使用して、ピッチ角、つまりY軸を中心とした回転、およびロール角、つまりX軸を中心とした回転を計算できます。これらの方程式の詳細については、FreescaleSemiconductorのアプリケーションノート3軸加速度計を使用したチルトセンシングをご覧ください。 。その後、値をテキストとともにLCDに印刷し、ボタンを押すことで、ピッチまたはロール角度にかかわらず、LCDに表示される内容を変更します。
このArduinoレンジ測定器と水準器プロジェクトの完全なソースコードは次のとおりです:
以上で、このArduinoプロジェクトを楽しんで、何か新しいことを学んだことを願っています。以下のコメントセクションでお気軽に質問してください。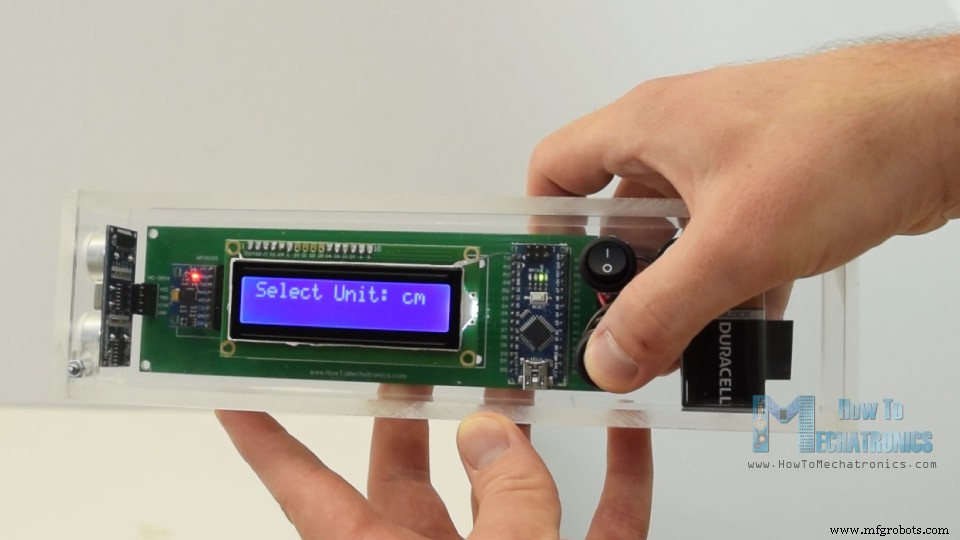
Arduino範囲測定回路回路図
Arduino範囲測定器とデジタル水準器のソースコード
#include<Wire.h> // I2C communication library
#include <LiquidCrystal.h> // includes the LiquidCrystal Library

LiquidCrystal lcd(7, 6, 5, 4, 3, 2); // Creates an LCD object. Parameters: (rs, enable, d4, d5, d6, d7)
const int MPU = 0x68; // I2C address of the MPU6050 accelerometer

#define trigPin 8
#define echoPin 9
#define selectButton 10

int16_t AcX, AcY, AcZ;
long duration;
float distance;
int program = 0;
float d = 0;
float d1 = 0;
float d2 = 0;
float area = 0;
int axis = 0;
int angle = 0;
int unitSelect = 0;
String unit = "cm";Code language: Arduino (arduino)void setup() {
// Initialize interface to the MPU6050
Wire.begin();
Wire.beginTransmission(MPU);
Wire.write(0x6B);
Wire.write(0);
Wire.endTransmission(true);
lcd.begin(16, 2); // Initializes the interface to the LCD screen
pinMode(trigPin, OUTPUT);
pinMode(echoPin, INPUT);
pinMode(selectButton, INPUT_PULLUP);
}Code language: Arduino (arduino)switch (program) { // Switch between different programs
case 0: // Select unit of measurement
lcd.setCursor(0, 0); // Sets the location at which subsequent text written to the LCD will be displayed
lcd.print("Select Unit: ");
lcd.setCursor(13, 0);
lcd.print(unit);
lcd.print(" ");
delay(10);
// If button is pressed - change unit
if (digitalRead(selectButton) == 0) {
if (unitSelect == 0) {
unit = "in";
unitSelect = 1;
}
else if (unitSelect == 1) {
unit = "m";
unitSelect = 2;
}
else if (unitSelect == 2) {
unit = "ft";
unitSelect = 3;
}
else if (unitSelect == 3) {
unit = "cm";
unitSelect = 0;
}
// If button is held longer then half a second - change program
        delay(500);
        if (digitalRead(selectButton) == 0) {
          program = 1;
          lcd.clear();
          delay(500);
        }
      }
break;Code language: Arduino (arduino)/ Converting the units
if (unitSelect == 1) {
distance = distance; // cm to cm
unit = "cm";
}
else if (unitSelect == 2) {
distance = distance * 0.393701; // cm to in
unit = "in";
}
else if (unitSelect == 3) {
distance = distance * 0.01; // cm to m
unit = "m";
}
else if (unitSelect == 0) {
distance = distance * 0.0328; // cm to ft
unit = "ft";
}Code language: Arduino (arduino)// If button is held longer then half a second - change program
delay(500);
if (digitalRead(selectButton) == 0) {
program = 1;
lcd.clear();
delay(500);
}
}
break;Code language: Arduino (arduino)case 1: // Distance measuring program
distance = getDistance(); // Distance to the nearest object
lcd.setCursor(0, 0);
lcd.print("Dist: ");
lcd.print(distance); // Prints the distance value from the sensor
lcd.print(" ");
lcd.setCursor(14, 0);
lcd.print(unit);
delay(10);
lcd.setCursor(0, 1);
lcd.print("d:");
lcd.setCursor(8, 1);
lcd.print("d:");
delay(200);
// Save distance 1
if (digitalRead(selectButton) == 0) {
if (d == 0) {
lcd.setCursor(0, 1);
lcd.print("d: ");
lcd.setCursor(2, 1);
lcd.print(distance);
d = 1;
delay(100);
}
// Save distance 2
else if (d == 1) {
lcd.setCursor(8, 1);
lcd.print("d: ");
lcd.setCursor(10, 1);
lcd.print(distance);
d = 0;
delay(100);
}
// If button is held longer then half sencond change program
delay(500);
if (digitalRead(selectButton) == 0) {
program = 2;
d = 0;
lcd.clear();
delay(500);
}
}
break;Code language: Arduino (arduino)//===== getDistance - Custom Function
float getDistance() {
// Clears the trigPin
digitalWrite(trigPin, LOW);
// Sets the trigPin on HIGH state for 10 micro seconds
digitalWrite(trigPin, HIGH);
delayMicroseconds(10);
digitalWrite(trigPin, LOW);
// Reads the echoPin, returns the sound wave travel time in microseconds
duration = pulseIn(echoPin, HIGH);
// Calculating the distance
distance = duration * 0.034 / 2; // distance in cm
// Converting the units
if (unitSelect == 1) {
distance = distance; // cm to cm
unit = "cm";
}
else if (unitSelect == 2) {
distance = distance * 0.393701; // cm to in
unit = "in";
}
else if (unitSelect == 3) {
distance = distance * 0.01; // cm to m
unit = "m";
}
else if (unitSelect == 0) {
distance = distance * 0.0328; // cm to ft
unit = "ft";
}
return distance;
}Code language: Arduino (arduino)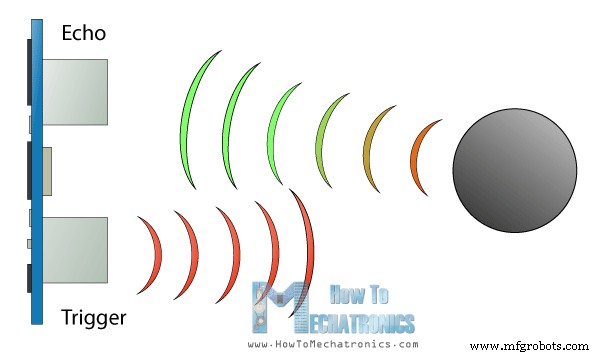
case 2: // Area measuring program
distance = getDistance();
lcd.setCursor(0, 0);
lcd.print("Area: ");
lcd.print(area); // Prints the calculated area from the two measurements
lcd.setCursor(12, 0);
lcd.print(unit); // Prints the selected unit and the square sign below
lcd.print("^2");
delay(200);
if ( d == 0) {
lcd.setCursor(0, 1);
lcd.print("d1: ");
lcd.setCursor(3, 1);
lcd.print(distance);
delay(200);
}
else if (d == 1) {
lcd.setCursor(9, 1);
lcd.print("d2: ");
lcd.setCursor(12, 1);
lcd.print(distance);
delay(200);
}
else if (d == 2) {
lcd.setCursor(6, 0);
lcd.print(area);
delay(200);
}
// Save distance 1
if (digitalRead(selectButton) == 0) {
if (d == 0) {
lcd.setCursor(0, 1);
lcd.print("d1: ");
lcd.setCursor(3, 1);
lcd.print(distance);
d = 1;
d1 = distance;
delay(100);
}
// Save distance 2
else if (d == 1) {
lcd.setCursor(9, 1);
lcd.print("d2: ");
lcd.setCursor(12, 1);
lcd.print(distance);
d = 2;
d2 = distance;
area = d1 * d2; // Calculate the area
delay(100);
}
else if (d == 2) {
lcd.clear();
d = 0;
area = 0;
delay(100);
}
// If button is held longer then half sencond change program
delay(500);
if (digitalRead(selectButton) == 0) {
program = 3;
d = 0;
lcd.clear();
delay(500);
}
}
break;Code language: Arduino (arduino)case 3: // Angle measuring program
// Read the accelerometer data
Wire.beginTransmission(MPU);
Wire.write(0x3B); // Start with register 0x3B (ACCEL_XOUT_H)
Wire.endTransmission(false);
Wire.requestFrom(MPU, 6, true); // Read 6 registers total, each axis value is stored in 2 registers
AcX = Wire.read() << 8 | Wire.read(); // X-axis value
AcY = Wire.read() << 8 | Wire.read(); // Y-axis value
AcZ = Wire.read() << 8 | Wire.read(); // Z-axis value
if ( axis == 0) {
// Calculating the Pitch angle (rotation around Y-axis)
angle = atan(-1 * AcX / sqrt(pow(AcY, 2) + pow(AcZ, 2))) * 180 / PI;
lcd.setCursor(0, 0);
lcd.print("Pitch");
}
else if (axis == 1) {
// Calculating the Roll angle (rotation around X-axis)
angle = atan(-1 * AcY / sqrt(pow(AcX, 2) + pow(AcZ, 2))) * 180 / PI;
lcd.setCursor(0, 0);
lcd.print("Roll ");
}
lcd.setCursor(0, 1);
lcd.print("Angle: ");
lcd.print(abs(angle));
lcd.print(" ");
lcd.setCursor(10, 1);
lcd.print("deg");
delay(200);
// Change axis
if (digitalRead(selectButton) == 0) {
if (axis == 0) {
axis = 1;
delay(100);
}
// Save distance 2
else if (axis == 1) {
axis = 0;
delay(100);
}
// If button is held longer then half sencond change program
delay(500);
if (digitalRead(selectButton) == 0) {
program = 0;
lcd.clear();
delay(500);
}
}
break;Code language: Arduino (arduino)/*
DIY Digital Range Measurer and Spirit Level
by Dejan Nedelkovski,
www.HowToMechatronics.com
*/
#include<Wire.h> // I2C communication library
#include <LiquidCrystal.h> // includes the LiquidCrystal Library
LiquidCrystal lcd(7, 6, 5, 4, 3, 2); // Creates an LCD object. Parameters: (rs, enable, d4, d5, d6, d7)
const int MPU = 0x68; // I2C address of the MPU6050 accelerometer
#define trigPin 8
#define echoPin 9
#define selectButton 10
int16_t AcX, AcY, AcZ;
long duration;
float distance;
int program = 0;
float d = 0;
float d1 = 0;
float d2 = 0;
float area = 0;
int axis = 0;
int angle = 0;
int unitSelect = 0;
String unit = "cm";
void setup() {
// Initialize interface to the MPU6050
Wire.begin();
Wire.beginTransmission(MPU);
Wire.write(0x6B);
Wire.write(0);
Wire.endTransmission(true);
lcd.begin(16, 2); // Initializes the interface to the LCD screen
pinMode(trigPin, OUTPUT);
pinMode(echoPin, INPUT);
pinMode(selectButton, INPUT_PULLUP);
}
void loop() {
switch (program) { // Switch between different programs
case 0: // Select unit of measurement
lcd.setCursor(0, 0); // Sets the location at which subsequent text written to the LCD will be displayed
lcd.print("Select Unit: ");
lcd.setCursor(13, 0);
lcd.print(unit);
lcd.print(" ");
delay(10);
// If button is pressed - change unit
if (digitalRead(selectButton) == 0) {
if (unitSelect == 0) {
unit = "in";
unitSelect = 1;
}
else if (unitSelect == 1) {
unit = "m";
unitSelect = 2;
}
else if (unitSelect == 2) {
unit = "ft";
unitSelect = 3;
}
else if (unitSelect == 3) {
unit = "cm";
unitSelect = 0;
}
// If button is held longer then half a second - change program
delay(500);
if (digitalRead(selectButton) == 0) {
program = 1;
lcd.clear();
delay(500);
}
}
break;
case 1: // Distance measuring program
distance = getDistance(); // Distance to the nearest object
lcd.setCursor(0, 0);
lcd.print("Dist: ");
lcd.print(distance); // Prints the distance value from the sensor
lcd.print(" ");
lcd.setCursor(14, 0);
lcd.print(unit);
delay(10);
lcd.setCursor(0, 1);
lcd.print("d:");
lcd.setCursor(8, 1);
lcd.print("d:");
delay(200);
// Save distance 1
if (digitalRead(selectButton) == 0) {
if (d == 0) {
lcd.setCursor(0, 1);
lcd.print("d: ");
lcd.setCursor(2, 1);
lcd.print(distance);
d = 1;
delay(100);
}
// Save distance 2
else if (d == 1) {
lcd.setCursor(8, 1);
lcd.print("d: ");
lcd.setCursor(10, 1);
lcd.print(distance);
d = 0;
delay(100);
}
// If button is held longer then half sencond change program
delay(500);
if (digitalRead(selectButton) == 0) {
program = 2;
d = 0;
lcd.clear();
delay(500);
}
}
break;
case 2: // Area measuring program
distance = getDistance();
lcd.setCursor(0, 0);
lcd.print("Area: ");
lcd.print(area); // Prints the calculated area from the two measurements
lcd.setCursor(12, 0);
lcd.print(unit); // Prints the selected unit and the square sign below
lcd.print("^2");
delay(200);
if ( d == 0) {
lcd.setCursor(0, 1);
lcd.print("d1: ");
lcd.setCursor(3, 1);
lcd.print(distance);
delay(200);
}
else if (d == 1) {
lcd.setCursor(9, 1);
lcd.print("d2: ");
lcd.setCursor(12, 1);
lcd.print(distance);
delay(200);
}
else if (d == 2) {
lcd.setCursor(6, 0);
lcd.print(area);
delay(200);
}
// Save distance 1
if (digitalRead(selectButton) == 0) {
if (d == 0) {
lcd.setCursor(0, 1);
lcd.print("d1: ");
lcd.setCursor(3, 1);
lcd.print(distance);
d = 1;
d1 = distance;
delay(100);
}
// Save distance 2
else if (d == 1) {
lcd.setCursor(9, 1);
lcd.print("d2: ");
lcd.setCursor(12, 1);
lcd.print(distance);
d = 2;
d2 = distance;
area = d1 * d2; // Calculate the area
delay(100);
}
else if (d == 2) {
lcd.clear();
d = 0;
area = 0;
delay(100);
}
// If button is held longer then half sencond change program
delay(500);
if (digitalRead(selectButton) == 0) {
program = 3;
d = 0;
lcd.clear();
delay(500);
}
}
break;
case 3: // Angle measuring program
// Read the accelerometer data
Wire.beginTransmission(MPU);
Wire.write(0x3B); // Start with register 0x3B (ACCEL_XOUT_H)
Wire.endTransmission(false);
Wire.requestFrom(MPU, 6, true); // Read 6 registers total, each axis value is stored in 2 registers
AcX = Wire.read() << 8 | Wire.read(); // X-axis value
AcY = Wire.read() << 8 | Wire.read(); // Y-axis value
AcZ = Wire.read() << 8 | Wire.read(); // Z-axis value
if ( axis == 0) {
// Calculating the Pitch angle (rotation around Y-axis)
angle = atan(-1 * AcX / sqrt(pow(AcY, 2) + pow(AcZ, 2))) * 180 / PI;
lcd.setCursor(0, 0);
lcd.print("Pitch");
}
else if (axis == 1) {
// Calculating the Roll angle (rotation around X-axis)
angle = atan(-1 * AcY / sqrt(pow(AcX, 2) + pow(AcZ, 2))) * 180 / PI;
lcd.setCursor(0, 0);
lcd.print("Roll ");
}
lcd.setCursor(0, 1);
lcd.print("Angle: ");
lcd.print(abs(angle));
lcd.print(" ");
lcd.setCursor(10, 1);
lcd.print("deg");
delay(200);
// Change axis
if (digitalRead(selectButton) == 0) {
if (axis == 0) {
axis = 1;
delay(100);
}
// Save distance 2
else if (axis == 1) {
axis = 0;
delay(100);
}
// If button is held longer then half sencond change program
delay(500);
if (digitalRead(selectButton) == 0) {
program = 0;
lcd.clear();
delay(500);
}
}
break;
}
}
//===== getDistance - Custom Function
float getDistance() {
  // Clears the trigPin
  digitalWrite(trigPin, LOW);
  // Sets the trigPin on HIGH state for 10 micro seconds
  digitalWrite(trigPin, HIGH);
  delayMicroseconds(10);
  digitalWrite(trigPin, LOW);
  // Reads the echoPin, returns the sound wave travel time in microseconds
  duration = pulseIn(echoPin, HIGH);
  // Calculating the distance
  distance = duration * 0.034 / 2; // distance in cm

  // Converting the units
  if (unitSelect == 1) {
    distance = distance; // cm to cm
    unit = "cm";
  }
  else if (unitSelect == 2) {
    distance = distance *  0.393701; // cm to in
    unit = "in";
  }
  else if (unitSelect == 3) {
    distance = distance * 0.01; // cm to m
    unit = "m";
  }
  else if (unitSelect == 0) {
    distance = distance * 0.0328; // cm to ft
    unit = "ft";
  }
  return distance;
}Code language: Arduino (arduino)
製造プロセス