


Arduinoタッチスクリーンチュートリアル| TFT LCD
このArduinoタッチスクリーンチュートリアルでは、ArduinoでTFTLCDタッチスクリーンを使用する方法を学習します。次のビデオを見るか、以下のチュートリアルを読むことができます。
このチュートリアルでは、3つの例を作成しました。最初の例は、超音波センサーを使用した距離測定です。センサーからの出力、または距離が画面に印刷され、タッチスクリーンを使用して、センチメートルまたはインチのいずれかの単位を選択できます。
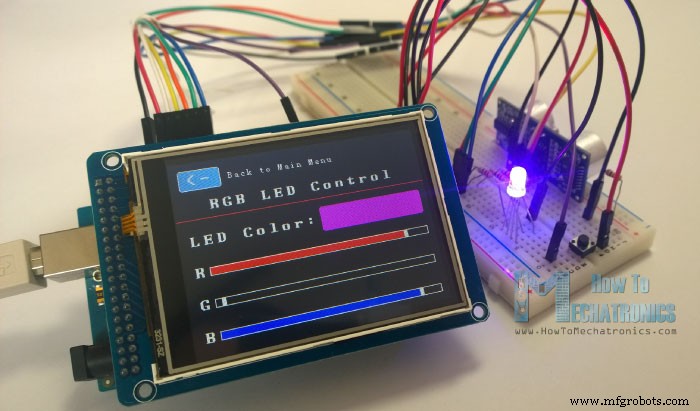
次の例は、これら3つのRGBスライダーを使用してRGBLEDを制御することです。たとえば、青色のスライダーをスライドさせ始めると、LEDが青色に点灯し、最大値に達するにつれて点灯が増加します。そのため、スライダーは0から255まで移動でき、それらの組み合わせを使用してRGB LEDに任意の色を設定できますが、LEDはそれほど正確な色を表すことができないことに注意してください。
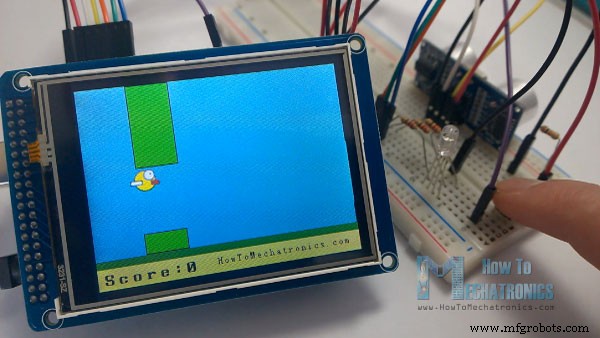
3番目の例はゲームです。実際、これはスマートフォンで人気のあるFlappyBirdゲームのレプリカです。プッシュボタンを使用して、またはタッチスクリーン自体を使用してゲームをプレイできます。
次に、これらの各例を確認し、その背後にあるコードを段階的に説明します。
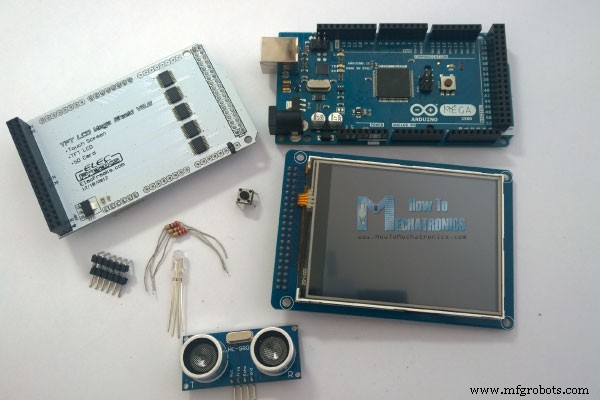
例として、3.2インチTFTタッチスクリーンをTFTLCDArduinoメガシールドと組み合わせて使用しています。 TFTタッチスクリーンは3.3Vで動作し、ArduinoMega出力は5Vであるため、シールドが必要です。最初の例ではHC-SR04超音波センサーを使用し、2番目の例では3つの抵抗とプッシュボタンを備えたRGBLEDを使用しています。ゲームの例です。また、ピンヘッダーをはんだ付けして曲げ、ArduinoボードとTFTシールドの間に挿入できるようにすることで、このようなカスタムメイドのピンヘッダーを作成する必要がありました。
これらのコンポーネントは、以下のいずれかのサイトから入手できます。
これが回路図です。 GNDピン、8〜13のデジタルピン、およびピン番号14を使用します。5VピンはTFTスクリーンですでに使用されているため、ピン番号13をすぐに高く設定してVCCとして使用します。コードのセットアップセクションにあります。
コードは少し長く、理解を深めるために、プログラムのソースコードを各セクションの説明とともにセクションに投稿します。そして、この記事の最後に、完全なソースコードを投稿します。
HenningKarlsenによって作成されたUTFTおよびURTouchライブラリを使用します。ここで、彼の素晴らしい仕事に感謝します。ライブラリは、TFTスクリーンの非常に簡単な使用を可能にし、多くの異なるTFTスクリーンのサイズ、シールド、およびコントローラーで動作します。これらのライブラリは、彼のWebサイトRinkyDinkElectronics.comからダウンロードできます。また、多くのデモ例とそれらの使用方法の詳細なドキュメントを見つけることができます。
ライブラリを含めたら、UTFTオブジェクトとURTouchオブジェクトを作成する必要があります。これらのオブジェクトのパラメータはTFTスクリーンとシールドのモデルによって異なり、これらの詳細はライブラリのドキュメントにも記載されています。
次に、ライブラリに付属しているフォントを定義し、プログラムに必要ないくつかの変数を定義する必要があります。セットアップセクションでは、画面とタッチを開始し、接続されたセンサー、LED、ボタンのピンモードを定義し、最初にプログラムのホーム画面を描画するdrawHomeSreen()カスタム関数を呼び出す必要があります。
それでは、プログラムのホーム画面を作成する方法について説明します。 setBackColor()関数を使用して、テキストの背景色(この場合は黒)を設定する必要があります。次に、色を白に設定し、大きなフォントを設定し、print()関数を使用して、画面の中央と画面のY軸の10ピクセル下に文字列「ArduinoTFTチュートリアル」を印刷する必要があります。次に、色を赤に設定し、テキストの下に赤い線を描画します。その後、色を白に戻し、他の2つの文字列を、小さいフォントを使用して「HowToMechatronics.com」で、大きいフォントを使用して「SelectExample」で印刷する必要があります。
次は距離センサーボタンです。最初に色を設定する必要があり、次にfillRoundRect()関数を使用して、角の丸い長方形を描画します。次に、色を白に戻し、drawRoundRect()関数を使用して、前の長方形の上に別の角の丸い長方形を描画しますが、これは塗りつぶしがないため、ボタンの全体的な外観はフレームがあるように見えます。ボタンの上に、大きなフォントとボタンの塗りつぶしと同じ背景色を使用してテキストを印刷します。同じ手順が他の2つのボタンにも当てはまります。
次に、ボタンを機能させて、ボタンを押したときに適切な例に移動できるようにする必要があります。セットアップセクションでは、文字「0」をcurrentPage変数に設定します。これは、ホーム画面にいることを示します。したがって、それが当てはまり、画面を押すと、このifステートメントが真になり、ここでこれらの行を使用すると、画面が押された場所のX座標とY座標が取得されます。それが最初のボタンをカバーする領域である場合、距離センサーの例をアクティブにするdrawDistanceSensor()カスタム関数を呼び出します。また、文字「1」を変数currentPageに設定します。これは、最初の例にいることを示します。 drawFrame()カスタム関数は、ボタンが押されたときにボタンを強調表示するために使用されます。同じ手順が他の2つのボタンにも当てはまります。
したがって、ホーム画面で説明したのと同様の方法でこの例のすべてのグラフィックを描画するには、ボタンが押されたときにdrawDistanceSensor()カスタム関数を1回だけ呼び出す必要があります。ただし、センサーによって測定された距離の最新の結果を出力するには、getDistance()カスタム関数を繰り返し呼び出す必要があります。
これは、超音波センサーを使用して距離を計算し、SevenSegNumフォントを使用してセンチメートルまたはインチの緑色で値を印刷する関数です。超音波センサーがどのように機能するかについての詳細が必要な場合は、私の特定のチュートリアルを確認できます。ループセクションに戻ると、ユニットの選択ボタンと戻るボタンを押したときに何が起こるかを確認できます。
次はRGBLEDコントロールの例です。 2番目のボタンを押すと、その例のグラフィックを描画するためにdrawLedControl()カスタム関数が1回だけ呼び出され、setLedColor()カスタム関数が繰り返し呼び出されます。この関数では、タッチスクリーンを使用して、3つのスライダーの値を0〜255に設定します。ifステートメントを使用して、各スライダーの領域を制限し、スライダーのX値を取得します。したがって、各スライダーのX座標の値は38〜310ピクセルであり、これらの値を0〜255の値にマッピングする必要があります。これは、LEDを点灯するためのPWM信号として使用されます。 RGB LEDがどのように機能するかについての詳細が必要な場合は、私の特定のチュートリアルでそのことを確認できます。このカスタム関数の残りのコードは、スライダーを描画するためのものです。ループセクションに戻ると、戻るボタンだけがあり、押すとLEDもオフになります。
次はArduinoゲームの例ですが、もう少し複雑なので理解しやすいように、次のチュートリアルに残しておきます。
コードを機能させてコンパイルするには、Arduinoスケッチと同じディレクトリに追加の「.c」ファイルを含める必要があります。このファイルは3番目のゲーム例用であり、鳥のビットマップです。コードのこの部分がどのように機能するかについて詳しくは、私の特定のチュートリアルを確認してください。ここでそのファイルをダウンロードできます:
プログラムの完全なソースコードは次のとおりです: 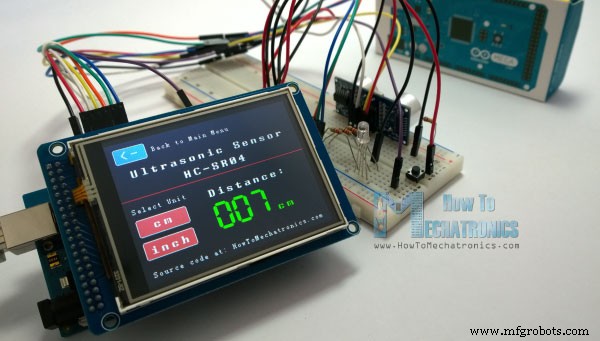
Arduinoタッチスクリーンコード
#include <UTFT.h>
#include <URTouch.h>

//==== Creating Objects
UTFT    myGLCD(SSD1289,38,39,40,41); //Parameters should be adjusted to your Display/Schield model
URTouch  myTouch( 6, 5, 4, 3, 2);

//==== Defining Variables
extern uint8_t SmallFont[];
extern uint8_t BigFont[];
extern uint8_t SevenSegNumFont[];

extern unsigned int bird01[0x41A];

int x, y;

char currentPage, selectedUnit;

//Ultrasonic Sensor
const int VCC = 13;
const int trigPin = 11;
const int echoPin = 12;

long duration;
int distanceInch, distanceCm;

// RGB LEDs
const int redLed = 10;
const int greenLed = 9;
const int blueLed = 8;
int xR=38;
int xG=38;
int xB=38;

// Floppy Bird
int xP = 319;
int yP = 100;
int yB = 30;
int fallRateInt = 0;
float fallRate =0;
int score=0;
const int button = 14;
int buttonState = 0;

void setup() {
// Initial setup
  myGLCD.InitLCD();
  myGLCD.clrScr();
  myTouch.InitTouch();
  myTouch.setPrecision(PREC_MEDIUM);

  // Defining Pin Modes
  pinMode(VCC, OUTPUT); // VCC
  pinMode(trigPin, OUTPUT); // Sets the trigPin as an Output
  pinMode(echoPin, INPUT); // Sets the echoPin as an Input
  pinMode(redLed, OUTPUT);
  pinMode(greenLed, OUTPUT);
  pinMode(blueLed, OUTPUT);
  pinMode(button, INPUT);
  digitalWrite(VCC, HIGH); // +5V - Pin 13 as VCC

  drawHomeScreen();  // Draws the Home Screen
  currentPage = '0'; // Indicates that we are at Home Screen
  selectedUnit = '0'; // Indicates the selected unit for the first example, cms or inches
}Code language: Arduino (arduino)// drawHomeScreen - Custom Function
void drawHomeScreen() {
// Title
myGLCD.setBackColor(0,0,0); // Sets the background color of the area where the text will be printed to black
myGLCD.setColor(255, 255, 255); // Sets color to white
myGLCD.setFont(BigFont); // Sets font to big
myGLCD.print("Arduino TFT Tutorial", CENTER, 10); // Prints the string on the screen
myGLCD.setColor(255, 0, 0); // Sets color to red
myGLCD.drawLine(0,32,319,32); // Draws the red line
myGLCD.setColor(255, 255, 255); // Sets color to white
myGLCD.setFont(SmallFont); // Sets the font to small
myGLCD.print("by HowToMechatronics.com", CENTER, 41); // Prints the string
myGLCD.setFont(BigFont);
myGLCD.print("Select Example", CENTER, 64);
// Button - Distance Sensor
myGLCD.setColor(16, 167, 103); // Sets green color
myGLCD.fillRoundRect (35, 90, 285, 130); // Draws filled rounded rectangle
myGLCD.setColor(255, 255, 255); // Sets color to white
myGLCD.drawRoundRect (35, 90, 285, 130); // Draws rounded rectangle without a fill, so the overall appearance of the button looks like it has a frame
myGLCD.setFont(BigFont); // Sets the font to big
myGLCD.setBackColor(16, 167, 103); // Sets the background color of the area where the text will be printed to green, same as the button
myGLCD.print("DISTANCE SENSOR", CENTER, 102); // Prints the string
// Button - RGB LED Control
myGLCD.setColor(16, 167, 103);
myGLCD.fillRoundRect (35, 140, 285, 180);
myGLCD.setColor(255, 255, 255);
myGLCD.drawRoundRect (35, 140, 285, 180);
myGLCD.setFont(BigFont);
myGLCD.setBackColor(16, 167, 103);
myGLCD.print("RGB LED CONTROL", CENTER, 152);
// Button - Birduino
myGLCD.setColor(16, 167, 103);
myGLCD.fillRoundRect (35, 190, 285, 230);
myGLCD.setColor(255, 255, 255);
myGLCD.drawRoundRect (35, 190, 285, 230);
myGLCD.setFont(BigFont);
myGLCD.setBackColor(16, 167, 103);
myGLCD.print("BIRDUINO GAME", CENTER, 202);
}Code language: Arduino (arduino)//========== The loop section ========
void loop() {
// Home Screen
if (currentPage == '0') {
if (myTouch.dataAvailable()) {
myTouch.read();
x=myTouch.getX(); // X coordinate where the screen has been pressed
y=myTouch.getY(); // Y coordinates where the screen has been pressed
// If we press the Distance Sensor Button
if ((x>=35) && (x<=285) && (y>=90) && (y<=130)) {
drawFrame(35, 90, 285, 130); // Custom Function -Highlighs the buttons when it's pressed
currentPage = '1'; // Indicates that we are the first example
myGLCD.clrScr(); // Clears the screen
drawDistanceSensor(); // It is called only once, because in the next iteration of the loop, this above if statement will be false so this funtion won't be called. This function will draw the graphics of the first example.
}
// If we press the RGB LED Control Button
if ((x>=35) && (x<=285) && (y>=140) && (y<=180)) {
drawFrame(35, 140, 285, 180);
currentPage = '2';
myGLCD.clrScr();
drawLedControl();
}
// If we press the Birduino Game Button
if ((x>=35) && (x<=285) && (y>=190) && (y<=230)) {
drawFrame(35, 190, 285, 230);
currentPage = '3';
myGLCD.clrScr();
myGLCD.setColor(114, 198, 206);
myGLCD.fillRect(0,0,319,239);
drawGround();
drawPilars(xP,yP);
drawBird(30);
delay(1000);
}
}
}
// Distance Sensor Example
if (currentPage == '1') {
getDistance(); // Gets distance from the sensor and this function is repeatedly called while we are at the first example in order to print the lasest results from the distance sensor
if (myTouch.dataAvailable()) {
myTouch.read();
x=myTouch.getX();
y=myTouch.getY();
// If we press the Centimeters Button
if ((x>=10) && (x<=135) &&(y>=90) && (y<=163)) {
selectedUnit = '0';
}
// If we press the Inches Button
if ((x>=10) && (x<=135) &&(y>=173) && (y<=201)) {
selectedUnit = '1';
}
// If we press the Back Button
if ((x>=10) && (x<=60) &&(y>=10) && (y<=36)) {
drawFrame(10, 10, 60, 36);
currentPage = '0'; // Indicates we are at home screen
myGLCD.clrScr();
drawHomeScreen(); // Draws the home screen
}
}
}
// RGB LED Control
if (currentPage == '2') {
setLedColor();
if (myTouch.dataAvailable()) {
myTouch.read();
x=myTouch.getX();
y=myTouch.getY();
//Back button
if ((x>=10) && (x<=60) &&(y>=10) && (y<=36)) {
drawFrame(10, 10, 60, 36);
currentPage = '0';
myGLCD.clrScr();
drawHomeScreen();
// Turns the LED off
analogWrite(redLed, 0);
analogWrite(greenLed, 0);
analogWrite(blueLed, 0);
}
}
}
//==== This section of the code, for the game example, is explained in my next tutorial
// Birduino Game
if (currentPage == '3') {
//delay(1);
xP=xP-3;
drawPilars(xP, yP);
yB+=fallRateInt;
fallRate=fallRate+0.4;
fallRateInt= int(fallRate);
if (yB>=220) {
yB=220;
}
if(yB>=180 || yB<=0){
restartGame();
}
if((xP<=85) && (xP>=30) && (yB<=yP-2)){
restartGame();
}
if((xP<=85) && (xP>=30) && (yB>=yP+60)){
restartGame();
}
drawBird(yB);
if (xP<=-51){
xP=319;
yP = rand() % 100+20;
score++;
}
if (myTouch.dataAvailable()) {
myTouch.read();
x=myTouch.getX();
y=myTouch.getY();
if ((x>=0) && (x<=319) &&(y>=50) && (y<=239)) {
fallRate=-5;
}
}
buttonState = digitalRead(button);
if (buttonState == HIGH) {
fallRate=-5;
}
}
if (myTouch.dataAvailable()) {
myTouch.read();
x=myTouch.getX();
y=myTouch.getY();
if ((x>=10) && (x<=60) &&(y>=10) && (y<=36)) {
drawFrame(10, 10, 60, 36);
currentPage = '0';
myGLCD.clrScr();
drawHomeScreen();
analogWrite(redLed, 0);
analogWrite(greenLed, 0);
analogWrite(blueLed, 0);
}
}
}Code language: Arduino (arduino)//===== getDistance() - Custom Function
void getDistance() {
// Clears the trigPin
digitalWrite(trigPin, LOW);
delayMicroseconds(2);
// Sets the trigPin on HIGH state for 10 micro seconds
digitalWrite(trigPin, HIGH);
delayMicroseconds(10);
digitalWrite(trigPin, LOW);
// Reads the echoPin, returns the sound wave travel time in microseconds
duration = pulseIn(echoPin, HIGH);
// Calculating the distance
distanceCm= duration*0.034/2;
distanceInch= distanceCm/2.53;
// Prints the distance in centimeters
if (selectedUnit == '0' && distanceCm <=400) {
myGLCD.setFont(SevenSegNumFont);
myGLCD.setColor(0, 255, 0);
myGLCD.setBackColor(0, 0, 0);
myGLCD.printNumI(distanceCm,130, 145, 3,'0');
myGLCD.setFont(BigFont);
myGLCD.print("cm ", 235, 178);
}
// Prints the distance in inches
if (selectedUnit == '1' && distanceCm <=160) {
myGLCD.setFont(SevenSegNumFont);
myGLCD.setColor(0, 255, 0);
myGLCD.setBackColor(0, 0, 0);
myGLCD.printNumI(distanceInch,130, 145, 3,'0');
myGLCD.setFont(BigFont);
myGLCD.print("inch", 235, 178);
}
delay(10);
}Code language: Arduino (arduino)//============= setLedColor() - Custom Funtion
void setLedColor() {
if (myTouch.dataAvailable()) {
myTouch.read();
x=myTouch.getX();
y=myTouch.getY();
// Area of the Red color slider
if( (y>=130) && (y<=156)) {
xR=x; // Stores the X value where the screen has been pressed in to variable xR
if (xR<=38) { // Confines the area of the slider to be above 38 pixels
xR=38;
}
if (xR>=303){ /// Confines the area of the slider to be under 310 pixels
xR=303;
}
}
// Area of the Green color slider
if( (y>=170) && (y<=196)) {
xG=x;
if (xG<=38) {
xG=38;
}
if (xG>=303){
xG=303;
}
}
// Area of the Blue color slider
if( (y>=210) && (y<=236)) {
xB=x;
if (xB<=38) {
xB=38;
}
if (xB>=303){
xB=303;
}
}
}
// Maps the values of the X - Axis from 38 to 0 and 310 to 255, because we need values from 0 to 255 for turning on the led
int xRC = map(xR,38,310,0,255);
int xGC = map(xG,38,310,0,255);
int xBC = map(xB,38,310,0,255);
// Sends PWM signal to the pins of the led
analogWrite(redLed, xRC);
analogWrite(greenLed, xGC);
analogWrite(blueLed, xBC);
// Draws a rectangle with the latest color combination
myGLCD.setColor(xRC, xGC, xBC);
myGLCD.fillRoundRect(175, 87, 310, 119);
// Draws the positioners
myGLCD.setColor(255, 255, 255);
myGLCD.fillRect(xR,139,(xR+4),147); // Positioner
myGLCD.setColor(xRC, 0, 0);
myGLCD.fillRect(31, 139, (xR-1), 147);
myGLCD.setColor(0, 0, 0);
myGLCD.fillRect((xR+5), 139, 309, 147);
myGLCD.setColor(255, 255, 255);
myGLCD.fillRect(xG,179,(xG+4),187);
myGLCD.setColor(0, xGC, 0);
myGLCD.fillRect(31, 179, (xG-1), 187);
myGLCD.setColor(0, 0, 0);
myGLCD.fillRect((xG+5), 179, 309, 187);
myGLCD.setColor(255, 255, 255);
myGLCD.fillRect(xB,219,(xB+4),227);
myGLCD.setColor(0, 0, xBC);
myGLCD.fillRect(31, 219, (xB-1), 227);
myGLCD.setColor(0, 0, 0);
myGLCD.fillRect((xB+5), 219, 309, 227);
}Code language: Arduino (arduino)
ArduinoTFTチュートリアルファイル
1ファイル/* Arduino TFT Tutorial
* Program made by Dejan Nedelkovski,
* www.HowToMechatronics.com
*/
/* This program uses the UTFT and URTouch libraries
* made by Henning Karlsen.
* You can find and download them at:
* www.RinkyDinkElectronics.com
*/
#include <UTFT.h>
#include <URTouch.h>
//==== Creating Objects
UTFT myGLCD(SSD1289,38,39,40,41); //Parameters should be adjusted to your Display/Schield model
URTouch myTouch( 6, 5, 4, 3, 2);
//==== Defining Variables
extern uint8_t SmallFont[];
extern uint8_t BigFont[];
extern uint8_t SevenSegNumFont[];
extern unsigned int bird01[0x41A];
int x, y;
char currentPage, selectedUnit;
//Ultrasonic Sensor
const int VCC = 13;
const int trigPin = 11;
const int echoPin = 12;
long duration;
int distanceInch, distanceCm;
// RGB LEDs
const int redLed = 10;
const int greenLed = 9;
const int blueLed = 8;
int xR=38;
int xG=38;
int xB=38;
// Floppy Bird
int xP = 319;
int yP = 100;
int yB = 30;
int fallRateInt = 0;
float fallRate =0;
int score=0;
const int button = 14;
int buttonState = 0;
void setup() {
// Initial setup
myGLCD.InitLCD();
myGLCD.clrScr();
myTouch.InitTouch();
myTouch.setPrecision(PREC_MEDIUM);
// Defining Pin Modes
pinMode(VCC, OUTPUT); // VCC
pinMode(trigPin, OUTPUT); // Sets the trigPin as an Output
pinMode(echoPin, INPUT); // Sets the echoPin as an Input
pinMode(redLed, OUTPUT);
pinMode(greenLed, OUTPUT);
pinMode(blueLed, OUTPUT);
pinMode(button, INPUT);
digitalWrite(VCC, HIGH); // +5V - Pin 13 as VCC
drawHomeScreen(); // Draws the Home Screen
currentPage = '0'; // Indicates that we are at Home Screen
selectedUnit = '0'; // Indicates the selected unit for the first example, cms or inches
}
void loop() {
// Home Screen
if (currentPage == '0') {
if (myTouch.dataAvailable()) {
myTouch.read();
x=myTouch.getX(); // X coordinate where the screen has been pressed
y=myTouch.getY(); // Y coordinates where the screen has been pressed
// If we press the Distance Sensor Button
if ((x>=35) && (x<=285) && (y>=90) && (y<=130)) {
drawFrame(35, 90, 285, 130); // Custom Function -Highlighs the buttons when it's pressed
currentPage = '1'; // Indicates that we are the first example
myGLCD.clrScr(); // Clears the screen
drawDistanceSensor(); // It is called only once, because in the next iteration of the loop, this above if statement will be false so this funtion won't be called. This function will draw the graphics of the first example.
}
// If we press the RGB LED Control Button
if ((x>=35) && (x<=285) && (y>=140) && (y<=180)) {
drawFrame(35, 140, 285, 180);
currentPage = '2';
myGLCD.clrScr();
drawLedControl();
}
// If we press the Birduino Game Button
if ((x>=35) && (x<=285) && (y>=190) && (y<=230)) {
drawFrame(35, 190, 285, 230);
currentPage = '3';
myGLCD.clrScr();
myGLCD.setColor(114, 198, 206);
myGLCD.fillRect(0,0,319,239);
drawGround();
drawPilars(xP,yP);
drawBird(30);
delay(1000);
}
}
}
// Distance Sensor Example
if (currentPage == '1') {
getDistance(); // Gets distance from the sensor and this function is repeatedly called while we are at the first example in order to print the lasest results from the distance sensor
if (myTouch.dataAvailable()) {
myTouch.read();
x=myTouch.getX();
y=myTouch.getY();
// If we press the Centimeters Button
if ((x>=10) && (x<=135) &&(y>=90) && (y<=163)) {
selectedUnit = '0';
}
// If we press the Inches Button
if ((x>=10) && (x<=135) &&(y>=173) && (y<=201)) {
selectedUnit = '1';
}
// If we press the Back Button
if ((x>=10) && (x<=60) &&(y>=10) && (y<=36)) {
drawFrame(10, 10, 60, 36);
currentPage = '0'; // Indicates we are at home screen
myGLCD.clrScr();
drawHomeScreen(); // Draws the home screen
}
}
}
// RGB LED Control
if (currentPage == '2') {
setLedColor();
if (myTouch.dataAvailable()) {
myTouch.read();
x=myTouch.getX();
y=myTouch.getY();
//Back button
if ((x>=10) && (x<=60) &&(y>=10) && (y<=36)) {
drawFrame(10, 10, 60, 36);
currentPage = '0';
myGLCD.clrScr();
drawHomeScreen();
// Turns the LED off
analogWrite(redLed, 0);
analogWrite(greenLed, 0);
analogWrite(blueLed, 0);
}
}
}
//==== This section of the code, for the game example, is explained in my next tutorial
// Birduino Game
if (currentPage == '3') {
//delay(1);
xP=xP-3;
drawPilars(xP, yP);
yB+=fallRateInt;
fallRate=fallRate+0.4;
fallRateInt= int(fallRate);
if (yB>=220) {
yB=220;
}
if(yB>=180 || yB<=0){
restartGame();
}
if((xP<=85) && (xP>=30) && (yB<=yP-2)){
restartGame();
}
if((xP<=85) && (xP>=30) && (yB>=yP+60)){
restartGame();
}
drawBird(yB);
if (xP<=-51){
xP=319;
yP = rand() % 100+20;
score++;
}
if (myTouch.dataAvailable()) {
myTouch.read();
x=myTouch.getX();
y=myTouch.getY();
if ((x>=0) && (x<=319) &&(y>=50) && (y<=239)) {
fallRate=-5;
}
}
buttonState = digitalRead(button);
if (buttonState == HIGH) {
fallRate=-5;
}
}
if (myTouch.dataAvailable()) {
myTouch.read();
x=myTouch.getX();
y=myTouch.getY();
if ((x>=10) && (x<=60) &&(y>=10) && (y<=36)) {
drawFrame(10, 10, 60, 36);
currentPage = '0';
myGLCD.clrScr();
drawHomeScreen();
analogWrite(redLed, 0);
analogWrite(greenLed, 0);
analogWrite(blueLed, 0);
}
}
}
// ====== Custom Funtions ======
// drawHomeScreen - Custom Function
void drawHomeScreen() {
// Title
myGLCD.setBackColor(0,0,0); // Sets the background color of the area where the text will be printed to black
myGLCD.setColor(255, 255, 255); // Sets color to white
myGLCD.setFont(BigFont); // Sets font to big
myGLCD.print("Arduino TFT Tutorial", CENTER, 10); // Prints the string on the screen
myGLCD.setColor(255, 0, 0); // Sets color to red
myGLCD.drawLine(0,32,319,32); // Draws the red line
myGLCD.setColor(255, 255, 255); // Sets color to white
myGLCD.setFont(SmallFont); // Sets the font to small
myGLCD.print("by HowToMechatronics.com", CENTER, 41); // Prints the string
myGLCD.setFont(BigFont);
myGLCD.print("Select Example", CENTER, 64);
// Button - Distance Sensor
myGLCD.setColor(16, 167, 103); // Sets green color
myGLCD.fillRoundRect (35, 90, 285, 130); // Draws filled rounded rectangle
myGLCD.setColor(255, 255, 255); // Sets color to white
myGLCD.drawRoundRect (35, 90, 285, 130); // Draws rounded rectangle without a fill, so the overall appearance of the button looks like it has a frame
myGLCD.setFont(BigFont); // Sets the font to big
myGLCD.setBackColor(16, 167, 103); // Sets the background color of the area where the text will be printed to green, same as the button
myGLCD.print("DISTANCE SENSOR", CENTER, 102); // Prints the string
// Button - RGB LED Control
myGLCD.setColor(16, 167, 103);
myGLCD.fillRoundRect (35, 140, 285, 180);
myGLCD.setColor(255, 255, 255);
myGLCD.drawRoundRect (35, 140, 285, 180);
myGLCD.setFont(BigFont);
myGLCD.setBackColor(16, 167, 103);
myGLCD.print("RGB LED CONTROL", CENTER, 152);
// Button - Birduino
myGLCD.setColor(16, 167, 103);
myGLCD.fillRoundRect (35, 190, 285, 230);
myGLCD.setColor(255, 255, 255);
myGLCD.drawRoundRect (35, 190, 285, 230);
myGLCD.setFont(BigFont);
myGLCD.setBackColor(16, 167, 103);
myGLCD.print("BIRDUINO GAME", CENTER, 202);
}
// Highlights the button when pressed
void drawFrame(int x1, int y1, int x2, int y2) {
myGLCD.setColor(255, 0, 0);
myGLCD.drawRoundRect (x1, y1, x2, y2);
while (myTouch.dataAvailable())
myTouch.read();
myGLCD.setColor(255, 255, 255);
myGLCD.drawRoundRect (x1, y1, x2, y2);
}
//====================================================
void drawDistanceSensor() {
myGLCD.setColor(100, 155, 203);
myGLCD.fillRoundRect (10, 10, 60, 36);
myGLCD.setColor(255, 255, 255);
myGLCD.drawRoundRect (10, 10, 60, 36);
myGLCD.setFont(BigFont);
myGLCD.setBackColor(100, 155, 203);
myGLCD.print("<-", 18, 15);
myGLCD.setBackColor(0, 0, 0);
myGLCD.setFont(SmallFont);
myGLCD.print("Back to Main Menu", 70, 18);
myGLCD.setFont(BigFont);
myGLCD.print("Ultrasonic Sensor", CENTER, 50);
myGLCD.print("HC-SR04", CENTER, 76);
myGLCD.setColor(255, 0, 0);
myGLCD.drawLine(0,100,319,100);
myGLCD.setBackColor(0, 0, 0);
myGLCD.setColor(255, 255, 255);
myGLCD.setFont(SmallFont);
myGLCD.print("Select Unit", 10, 114);
myGLCD.setFont(BigFont);
myGLCD.print("Distance:", 130, 120);
myGLCD.setColor(223, 77, 55);
myGLCD.fillRoundRect (10, 135, 90, 163);
myGLCD.setColor(225, 255, 255);
myGLCD.drawRoundRect (10, 135, 90, 163);
myGLCD.setBackColor(223, 77, 55);
myGLCD.setColor(255, 255, 255);
myGLCD.print("cm", 33, 140);
myGLCD.setColor(223, 77, 55);
myGLCD.fillRoundRect (10, 173, 90, 201);
myGLCD.setColor(255, 255, 255);
myGLCD.drawRoundRect (10, 173, 90, 201);
myGLCD.setBackColor(223, 77, 55);
myGLCD.setColor(255, 255, 255);
myGLCD.print("inch", 17, 180);
myGLCD.setBackColor(0, 0, 0);
myGLCD.setFont(SmallFont);
myGLCD.print("Source code at: HowToMechatronics.com", CENTER, 220);
}
//====================================================
//===== getDistance - Custom Function
void getDistance() {
// Clears the trigPin
digitalWrite(trigPin, LOW);
delayMicroseconds(2);
// Sets the trigPin on HIGH state for 10 micro seconds
digitalWrite(trigPin, HIGH);
delayMicroseconds(10);
digitalWrite(trigPin, LOW);
// Reads the echoPin, returns the sound wave travel time in microseconds
duration = pulseIn(echoPin, HIGH);
// Calculating the distance
distanceCm= duration*0.034/2;
distanceInch= distanceCm/2.53;
// Prints the distance in centimeters
if (selectedUnit == '0' && distanceCm <=400) {
myGLCD.setFont(SevenSegNumFont);
myGLCD.setColor(0, 255, 0);
myGLCD.setBackColor(0, 0, 0);
myGLCD.printNumI(distanceCm,130, 145, 3,'0');
myGLCD.setFont(BigFont);
myGLCD.print("cm ", 235, 178);
}
// Prints the distance in inches
if (selectedUnit == '1' && distanceCm <=160) {
myGLCD.setFont(SevenSegNumFont);
myGLCD.setColor(0, 255, 0);
myGLCD.setBackColor(0, 0, 0);
myGLCD.printNumI(distanceInch,130, 145, 3,'0');
myGLCD.setFont(BigFont);
myGLCD.print("inch", 235, 178);
}
delay(10);
}
//====================================================
void drawLedControl() {
myGLCD.setColor(100, 155, 203);
myGLCD.fillRoundRect (10, 10, 60, 36);
myGLCD.setColor(255, 255, 255);
myGLCD.drawRoundRect (10, 10, 60, 36);
myGLCD.setFont(BigFont);
myGLCD.setBackColor(100, 155, 203);
myGLCD.print("<-", 18, 15);
myGLCD.setBackColor(0, 0, 0);
myGLCD.setFont(SmallFont);
myGLCD.print("Back to Main Menu", 70, 18);
myGLCD.setFont(BigFont);
myGLCD.print("RGB LED Control", CENTER, 50);
myGLCD.print("LED Color:", 10, 95);
myGLCD.print("R", 10, 135);
myGLCD.print("G", 10, 175);
myGLCD.print("B", 10, 215);
myGLCD.setColor(255, 0, 0);
myGLCD.drawLine(0,75,319,75);
myGLCD.setColor(255, 255, 255);
myGLCD.drawRect(30, 138, 310, 148); // R - Slider
myGLCD.drawRect(30, 178, 310, 188);
myGLCD.drawRect(30, 218, 310, 228);
}
//====================================================
//============= setLedColor() - Custom Funtion
void setLedColor() {
if (myTouch.dataAvailable()) {
myTouch.read();
x=myTouch.getX();
y=myTouch.getY();
// Area of the Red color slider
if( (y>=130) && (y<=156)) {
xR=x; // Stores the X value where the screen has been pressed in to variable xR
if (xR<=38) { // Confines the area of the slider to be above 38 pixels
xR=38;
}
if (xR>=303){ /// Confines the area of the slider to be under 310 pixels
xR=303;
}
}
// Area of the Green color slider
if( (y>=170) && (y<=196)) {
xG=x;
if (xG<=38) {
xG=38;
}
if (xG>=303){
xG=303;
}
}
// Area of the Blue color slider
if( (y>=210) && (y<=236)) {
xB=x;
if (xB<=38) {
xB=38;
}
if (xB>=303){
xB=303;
}
}
}
// Maps the values of the X - Axis from 38 to 0 and 310 to 255, because we need values from 0 to 255 for turning on the led
int xRC = map(xR,38,310,0,255);
int xGC = map(xG,38,310,0,255);
int xBC = map(xB,38,310,0,255);
// Sends PWM signal to the pins of the led
analogWrite(redLed, xRC);
analogWrite(greenLed, xGC);
analogWrite(blueLed, xBC);
// Draws a rectangle with the latest color combination
myGLCD.setColor(xRC, xGC, xBC);
myGLCD.fillRoundRect(175, 87, 310, 119);
// Draws the positioners
myGLCD.setColor(255, 255, 255);
myGLCD.fillRect(xR,139,(xR+4),147); // Positioner
myGLCD.setColor(xRC, 0, 0);
myGLCD.fillRect(31, 139, (xR-1), 147);
myGLCD.setColor(0, 0, 0);
myGLCD.fillRect((xR+5), 139, 309, 147);
myGLCD.setColor(255, 255, 255);
myGLCD.fillRect(xG,179,(xG+4),187);
myGLCD.setColor(0, xGC, 0);
myGLCD.fillRect(31, 179, (xG-1), 187);
myGLCD.setColor(0, 0, 0);
myGLCD.fillRect((xG+5), 179, 309, 187);
myGLCD.setColor(255, 255, 255);
myGLCD.fillRect(xB,219,(xB+4),227);
myGLCD.setColor(0, 0, xBC);
myGLCD.fillRect(31, 219, (xB-1), 227);
myGLCD.setColor(0, 0, 0);
myGLCD.fillRect((xB+5), 219, 309, 227);
}
//====================================================
void drawGround() {
myGLCD.setColor(221,216,148);
myGLCD.fillRect(0, 215, 319, 239);
myGLCD.setColor(47,175,68);
myGLCD.fillRect(0, 205, 319, 214);
myGLCD.setColor(0, 0, 0);
myGLCD.setBackColor(221, 216, 148);
myGLCD.setFont(BigFont);
myGLCD.print("Score:",5,220);
myGLCD.setFont(SmallFont);
myGLCD.print("HowToMechatronics.com", 140, 220);
}
void drawPilars(int x, int y) {
if (x>=270){
myGLCD.setColor(0, 200, 20);
myGLCD.fillRect(318, 0, x, y-1);
myGLCD.setColor(0, 0, 0);
myGLCD.drawRect(319, 0, x-1, y);
myGLCD.setColor(0, 200, 20);
myGLCD.fillRect(318, y+81, x, 203);
myGLCD.setColor(0, 0, 0);
myGLCD.drawRect(319, y+80, x-1, 204);
}
else if( x<=268) {
myGLCD.setColor(114, 198, 206);
myGLCD.fillRect(x+51, 0, x+53, y);
myGLCD.setColor(0, 200, 20);
myGLCD.fillRect(x+49, 1, x+1, y-1);
myGLCD.setColor(0, 0, 0);
myGLCD.drawRect(x+50, 0, x, y);
myGLCD.setColor(114, 198, 206);
myGLCD.fillRect(x-1, 0, x-3, y);
myGLCD.setColor(114, 198, 206);
myGLCD.fillRect(x+51, y+80, x+53, 204);
myGLCD.setColor(0, 200, 20);
myGLCD.fillRect(x+49, y+81, x+1, 203);
myGLCD.setColor(0, 0, 0);
myGLCD.drawRect(x+50, y+80, x, 204);
myGLCD.setColor(114, 198, 206);
myGLCD.fillRect(x-1, y+80, x-3, 204);
}
myGLCD.setColor(0, 0, 0);
myGLCD.setBackColor(221, 216, 148);
myGLCD.setFont(BigFont);
myGLCD.printNumI(score, 100, 220);
}
//====================================================
void drawBird(int y) {
if(y<=219) {
myGLCD.drawBitmap (50, y, 35, 30, bird01);
myGLCD.setColor(114, 198, 206);
myGLCD.fillRoundRect(50,y,85,y-6);
myGLCD.fillRoundRect(50,y+30,85,y+36);
}
else if(y>=200) {
myGLCD.drawBitmap (50, 200, 35, 30, bird01);
myGLCD.setColor(114, 198, 206);
myGLCD.fillRoundRect(50,200,85,200-6);
myGLCD.fillRoundRect(50,200+30,85,200+36);
}
}
void gameOver() {
myGLCD.clrScr();
myGLCD.setColor(255, 255, 255);
myGLCD.setBackColor(0, 0, 0);
myGLCD.setFont(BigFont);
myGLCD.print("GAME OVER", CENTER, 40);
myGLCD.print("Score:", 100, 80);
myGLCD.printNumI(score,200, 80);
myGLCD.print("Restarting...", CENTER, 120);
myGLCD.setFont(SevenSegNumFont);
myGLCD.printNumI(2,CENTER, 150);
delay(1000);
myGLCD.printNumI(1,CENTER, 150);
delay(1000);
myGLCD.setColor(114, 198, 206);
myGLCD.fillRect(0,0,319,239);
drawBird(30);
drawGround();
delay(1000);
}
//====================================================
void restartGame() {
delay(1000);
gameOver();
xP=319;
yB=30;
fallRate=0;
score=0;
}
Code language: Arduino (arduino)
製造プロセス