



PythonでgRPCを用いてAXC F 3152のプロセスデータを読み書き
この記事では、AXC F 3152でPythonとgRPCを用いてシンプルなプロセスデータにアクセスし書き込む方法を説明します。(https://www.plcnext.help/te/Service_Components/gRPC_Introduction.htm)
前提条件
まず、PLC外部(例:Windowsマシン)で必要ファイルを準備します。
- Python 3.9をインストール(3.10はエラーの原因になる可能性あり)
- .protoファイルからコード生成するために必要なPythonパッケージをインストール:
pip install grpcio-tools==1.36.1 .protoファイルを含むリポジトリをhttps://github.com/PLCnext/gRPCからダウンロード・解凍
_.protoファイルから_pb2.pyと_pb2_grpc.pyを生成
提供されている.protoファイルから必要なPythonファイルを生成します。後者は以下フォルダにあります:gRPC-master/protobuf.
以下コードでgRPC-masterフォルダにPythonスクリプト(例:generate_grpc.py)を作成。このスクリプトは:
- 必要ファイルを生成し
gRPC-master/pxc_grpcに配置 - インポートパスを調整
 import glob
 import os
 from pathlib import Path
 # create the output directory
 Path('pxc_grpc').mkdir(parents=True, exist_ok=True)
 grpc_command_base = 'python -m grpc_tools.protoc -I./protobuf --python_out=pxc_grpc --grpc_python_out=pxc_grpc '
 import_paths = set()
 # generate the *_pb2.py and *_pb2_grpc.py files
 for filename in glob.iglob('./protobuf/**', recursive=True):
 if filename.endswith('.proto'):
 # store the import path
 path_parts = filename.split(os.sep)
 import_paths.add('.'.join(path_parts[1:-1]))
 grpc_command = ''.join([grpc_command_base, os.path.join('.', os.path.relpath(filename))])
 stream = os.popen(grpc_command)
 output = stream.read()
 if output != '':
 print(''.join(['error/info for file ', os.path.relpath(filename), ' - ', output]))
 # get the python files in the base directory
 base_pys = set()
 for (dirpath, dirnames, filenames) in os.walk('./pxc_grpc'):
 for f in filenames:
 base_pys.add(f.split('.py')[0])
 break
 # reformat the stored paths to adapt the import statements
 try:
 import_paths.remove('')
 except:
 pass
 import_paths = list(import_paths)
 import_paths.sort(key=len)
 import_paths.reverse()
 # adapt the imports
 for filename in glob.iglob('./pxc_grpc/**', recursive=True):
 if filename.endswith('.py'):
 new_lines = []
 with open(filename, 'r') as file:
 lines = file.readlines()
 for line in lines:
 if line.startswith('from'):
 for import_path in import_paths:
 if import_path in line:
 line = line.replace(import_path, ''.join(['pxc_grpc.', import_path]), 1)
 break
 elif line.startswith('import'):
 parts = line.split()
 if parts[1] in base_pys:
 line = line.replace('import', 'from pxc_grpc import')
 new_lines.append(line)
 with open(filename, 'w') as file:
 file.write(''.join(new_lines))
シェルを開きスクリプト実行:pyton generate_grpc.py
PLCnextデモプロジェクト作成
示すプロジェクトはgRPCインターフェースがGDSとどう相互作用するかのデモです。既存プロジェクトを使っても構いません。個別プロジェクトの場合、以下Pythonスクリプトのポート名を適宜編集(例:Arp.Plc.Eclr/MainInstance.strInput)。
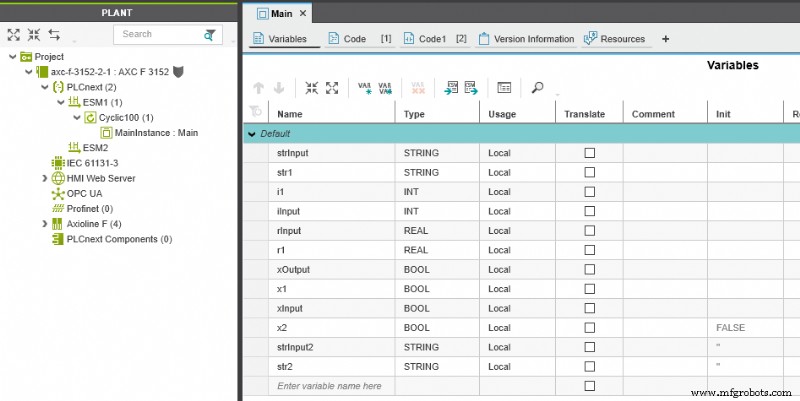
PLC準備
pipをインストールしてPythonパッケージを管理:
- AXC F 3152コントローラーをインターネット接続。
- コマンド
curl https://bootstrap.pypa.io/get-pip.py -o get-pip.py実行。 - コマンド
python3 get-pip.py実行。
必要パッケージインストール:pip install grpcio protobuf==3.20.0
プロジェクトディレクトリ(/opt/plcnext/projects/)にgrpc_testフォルダ作成。
作成したPythonファイルを含むpxc_grpcフォルダをgrpc_testへコピー(WinSCP等使用)。
grpc_testフォルダにgrpc_test.pyというPythonスクリプトを作成し、以下コード挿入:
 import grpc
 from pxc_grpc.Plc.Gds.IDataAccessService_pb2 import IDataAccessServiceReadSingleRequest, \
 IDataAccessServiceReadRequest, IDataAccessServiceWriteSingleRequest, IDataAccessServiceWriteRequest
 from pxc_grpc.Plc.Gds.IDataAccessService_pb2_grpc import IDataAccessServiceStub
 from pxc_grpc.Plc.Gds.WriteItem_pb2 import WriteItem
 def write_single_string(stub, port_name, value):
 single_write_request = IDataAccessServiceWriteSingleRequest()
 single_write_request.data.PortName = port_name
 single_write_request.data.Value.TypeCode = 19
 single_write_request.data.Value.StringValue = value
 return stub.WriteSingle(single_write_request)
 def write_single_int(stub, port_name, value):
 single_write_request = IDataAccessServiceWriteSingleRequest()
 single_write_request.data.PortName = port_name
 single_write_request.data.Value.TypeCode = 6
 single_write_request.data.Value.Int16Value = value
 return stub.WriteSingle(single_write_request)
 def write_multiple_values(stub):
 write_request = IDataAccessServiceWriteRequest()
 wi1 = WriteItem()
 wi1.PortName = 'Arp.Plc.Eclr/MainInstance.strInput'
 wi1.Value.StringValue = "test1"
 wi1.Value.TypeCode = 19
 wi2 = WriteItem()
 wi2.PortName = 'Arp.Plc.Eclr/MainInstance.strInput2'
 wi2.Value.StringValue = "test2"
 wi2.Value.TypeCode = 19
 # add multiple WriteItems at once
 write_request.data.extend([wi1, wi2])
 # add WriteItems separately
 # response1.data.append(wi1)
 # response1.data.append(wi2)
 return stub.Write(write_request)
 def read_single_value(stub, port_name):
 single_read_request = IDataAccessServiceReadSingleRequest()
 single_read_request.portName=port_name
 return stub.ReadSingle(single_read_request)
 def read_multiple_values(stub, port_names):
 read_request = IDataAccessServiceReadRequest()
 read_request.portNames.extend(port_names)
 return stub.Read(read_request)
 if __name__ == "__main__":
 # create channel and stub
 channel = grpc.insecure_channel('unix:/run/plcnext/grpc.sock')
 stub = IDataAccessServiceStub(channel)
 print(write_single_string(stub, 'Arp.Plc.Eclr/MainInstance.strInput', 'test123'))
 print(write_single_int(stub, 'Arp.Plc.Eclr/MainInstance.iInput', 18))
 print(write_multiple_values(stub))
 r = read_single_value(stub, 'Arp.Plc.Eclr/MainInstance.strInput')
 print(r)
 print(r._ReturnValue.Value.TypeCode)
 print(r._ReturnValue.Value.StringValue)
 r = read_multiple_values(stub, ['Arp.Plc.Eclr/MainInstance.iInput', 'Arp.Plc.Eclr/MainInstance.strInput'])
 for value in r._ReturnValue:
 print(value, value.Value.TypeCode)
PLCをPLCnext Engineerに接続、プロジェクトダウンロード、ライブビュー開始。
例の実行
例を実行。SSHでPLCへログインしgrpc_testへ移動、Pythonスクリプト開始:
cd projects/grpc_test/python3 grpc_test.py
gRPCによりGDS変数との相互作用が可能になります。
データ型
変数読み書きにはデータ型が必要。例:wi1.Value.TypeCode = 19。型は生成ファイルgRPC-master/pxc_grpc/ArpTypes_pb2.pyの242行目から定義:
CT_None = 0
CT_End = 0
CT_Void = 1
CT_Boolean = 2
CT_Char = 3
CT_Int8 = 4
CT_Uint8 = 5
CT_Int16 = 6
CT_Uint16 = 7
CT_Int32 = 8
CT_Uint32 = 9
CT_Int64 = 10
CT_Uint64 = 11
CT_Real32 = 12
CT_Real64 = 13
CT_Struct = 18
CT_String = 19
CT_Utf8String = 19
CT_Array = 20
CT_DateTime = 23
CT_Version = 24
CT_Guid = 25
CT_AnsiString = 26
CT_Object = 28
CT_Utf16String = 30
CT_Stream = 34
CT_Enumerator = 35
CT_SecureString = 36
CT_Enum = 37
CT_Dictionary = 38
CT_SecurityToken = 39
CT_Exception = 40
CT_IecTime = 41
CT_IecTime64 = 42
CT_IecDate = 43
CT_IecDate64 = 44
CT_IecDateTime = 45
CT_IecDateTime64 = 46
CT_IecTimeOfDay = 47
CT_IecTimeOfDay64 = 48
対応する値変数(例:r._ReturnValue.Value.StringValue)は同ファイル365行目から(例:BoolValue, Int8Value, StringValue)。
産業技術
- デジタルメモリの基礎:アドレッシング、アクセス、揮発性
- フライス加工(ミリング)完全解説:定義、プロセス、主要操作
- 穴あけ加工(ドリリング)完全ガイド:定義、プロセス、金属加工の12のコツ
- 粉末冶金完全解説:定義、プロセス、メリット、用途、FAQ
- ブローチ加工とは:プロセス、仕組み、主要タイプを徹底解説
- ケミカルマシニング:応力なしで精密に金属を除去する技術
- 超音波加工:原理、種類、用途を徹底解説
- スプレー溶接完全解説:プロセス、技術、安全性
- Apacer、グローバル展開CV110-SD & CV110-MSD高性能フラッシュカードを発表
- Apacer、産業用SV250 SSD発表:読取560MB/s、書込520MB/s
- RTUを活用した産業オペレーションにおけるビッグデータインサイトの獲得