



ThimbleKrox: Arduino MicroとMPU-6050を用いた指装着型マウス制御
部品と材料
| 部品 | 数量 |
|---|---|
| Arduino Micro | 1 |
| MPU-6050(6軸加速度・ジャイロセンサー) | 1 |
| ジャンパーワイヤー(Arduino-MPU接続用) | 4本 |
| Micro USBケーブル(PC接続用) | 1 |
| ゴムバンド(指固定用、任意) | 1 |
必要な工具
- 3Dプリンター(サムブル筐体製作用、任意)
- はんだごて(Arduinoにピンヘッダーが未実装の場合)
- PC(Arduino IDE環境)
プロジェクト概要
人差し指(または任意の指)にはめるサムブル(指貫)型デバイスで、指の動きをマウスカーソル操作に変換する「ThimbleKrox」を製作しました。MPU-6050の加速度・ジャイロデータをArduino Microで読み取り、USB HIDマウスとしてPCに送信します。3Dプリントで専用筐体を作れば、ウェアラブルなポインティングデバイスとして実用的です。
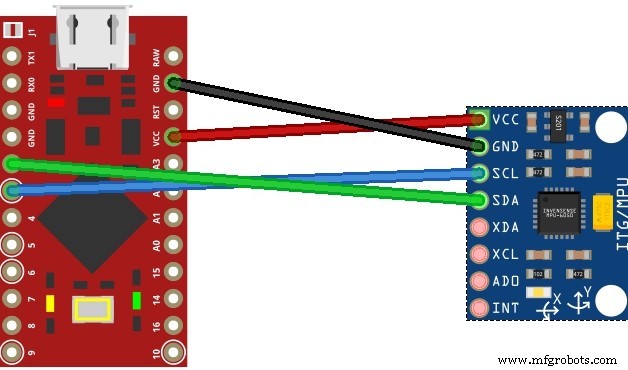
ステップ1: 配線

| Arduino Micro | MPU-6050 |
|---|---|
| VCC | VCC |
| GND | GND |
| Pin 2 (SDA) | SDA |
| Pin 3 (SCL) | SCL |
ステップ2: 3Dプリント筐体(任意)


2種類のデザインを用意:
- クリア版: サポート材不要、コンパクト、透明フィラメントで造形
- スチームパンク版: 装飾的だがやや大型、サポート材必要、塗装推奨
どちらも内部にMPU-6050を収納する空洞と、配線用の溝があります。Thingiverseで公開中(リンクは元記事参照)。
ステップ3: 組み立て
3Dプリント筐体を使用する場合
配線済みのMPU-6050を筐体上部の空洞に収め、ケーブルを下部の溝に通します。Arduino Microは手首側にゴムバンドで固定するか、別途ケースに収納します。
筐体なしの場合
MPU-6050を指の第1関節付近に両面テープやゴムバンドで固定、Arduinoを手の甲や腕に固定して使用します。
ステップ4: キャリブレーションとコード
初回使用時にはキャリブレーションが必須です。以下の手順で行います:
- 必要ライブラリをインストール:
Wire.h,I2Cdev.h,MPU6050.h,Mouse.h - キャリブレーション用スケッチ(
ThimbleKrox calibration code)を書き込み、シリアルモニタを開く(Ctrl+Shift+M) - 指を各方向に動かし、シリアル出力の
ax, ay, az, gx, gy, gz値を観察 - コード内の「// calibration line」とコメントされた閾値を、観測値に合わせて調整
- 調整後、メインスケッチ(
ThimbleKrox code)に同じ閾値を反映して書き込み
キャリブレーション例
// シリアルモニタ出力例
left | gx = 3165 gy = 469 gz = -1055 | ax = 5232 ay = 2064 az = -4496

// キャリブレーションコード(修正前)
if (ax >= 15000) { // calibration line
  right();
}

// 観測値 ax=5232 で "right" と出したいので閾値を下げる
if (ax >= 5000) { // calibration line
  right();
}
X/Y軸の正負とカーソル移動方向の対応を、実際の指の動きに合わせて4方向すべて調整します。
ソースコード
メインスケッチ
// ThimbleKrox メインコード
// キャリブレーション手順: https://www.hackster.io/projects/dd8881/
// "calibration line" の閾値を環境に合わせて調整
// 作者: Magform

#include <Wire.h>
#include <I2Cdev.h>
#include <MPU6050.h>
#include <Mouse.h>

MPU6050 mpu;
int16_t ax, ay, az, gx, gy, gz;
int sensibility = 10;  // 感度調整

void setup() {
  Serial.begin(9600);
  Wire.begin();
  mpu.initialize();
  if (!mpu.testConnection()) { while (1); }  // 接続失敗時は停止
}

void up()    { Mouse.move(0, -sensibility); }
void down()  { Mouse.move(0, sensibility); }
void left()  { Mouse.move(-sensibility, 0); }
void right() { Mouse.move(sensibility, 0); }

void loop() {
  mpu.getMotion6(&ax, &ay, &az, &gx, &gy, &gz);

  if (ax >= 15000) { right(); }   // calibration line
  if (ax <= -9000) { left(); }    // calibration line
  if (ay <= -8000) { up(); }      // calibration line
  if (ay >= 10000) { down(); }    // calibration line

  // クリック機能(開発中)
  /* if (gy >= 20000) { Mouse.click(MOUSE_RIGHT); delay(100); }
  if (gy <= -20000) { Mouse.click(MOUSE_LEFT); delay(100); } */

  delay(10);
}
キャリブレーション用スケッチ
// ThimbleKrox キャリブレーションコード
#include <Wire.h>
#include <I2Cdev.h>
#include <MPU6050.h>
#include <Mouse.h>

MPU6050 mpu;
int16_t ax, ay, az, gx, gy, gz;
int Nwrong = 1;

void setup() {
  Serial.begin(9600);
  Wire.begin();
  mpu.initialize();
  while (Nwrong != 0) {
    if (!mpu.testConnection()) {
      Serial.print("Wrong connection number: "); Serial.println(Nwrong++);
      delay(1000);
    } else { Nwrong = 0; }
  }
}

void up()    { Serial.print(" up "); }
void down()  { Serial.print(" down "); }
void left()  { Serial.print(" left "); }
void right() { Serial.print(" right "); }

void loop() {
  mpu.getMotion6(&ax, &ay, &az, &gx, &gy, &gz);

  if (ax >= 15000) { right(); }   // calibration line
  if (ax <= -9000) { left(); }    // calibration line
  if (ay <= -8000) { up(); }      // calibration line
  if (ay >= 10000) { down(); }    // calibration line

  Serial.print(" | gx="); Serial.print(gx);
  Serial.print(" gy="); Serial.print(gy);
  Serial.print(" gz="); Serial.print(gz);
  Serial.print(" | ax="); Serial.print(ax);
  Serial.print(" ay="); Serial.print(ay);
  Serial.print(" az="); Serial.println(az);
  delay(5000);
}
リソース
- GitHub: https://github.com/Magform/ThimbleKrox
- 3Dモデル (Thingiverse): カスタムパーツとエンクロージャ
回路図
製造プロセス
- Arduino & Raspberry Pi でインターネット制御ビデオストリーミングロボットを構築
- Alexaでシーリングファンを音声制御:ステップバイステップガイド
- スマート貯金箱を作ろう:Arduino Nanoでコインアクセプターを制御
- Arduino電源制御センター:N-FET/P-FET/リレー/RTC搭載キット
- ArduinoでBluetooth経由でLEDを制御 – シンプルDIYガイド
- DIY Arduino加湿器コントローラー:リレーを用いた安全な高電圧制御
- Arduino Nanoとジョイスティックで2軸ステッピングモーターを制御:Visuinoで簡単プログラミング
- Windows 10 CortanaでBluetooth経由でArduinoのLEDを制御
- Arduino IoT CloudとAlexaでテレビを音声操作:ステップバイステップガイド
- スマホで家庭照明をシームレス制御 - 1Sheeld活用
- Arduino Unoで25kHz 4ピンPWMファンを制御 – 製作・コード・テスト