


スマートフォンコントロール付きDIYArduinoロボットアーム
このチュートリアルでは、カスタムビルドのAndroidアプリケーションを使用してワイヤレスで制御およびプログラムできるArduinoロボットアームの作成方法を学習します。ロボット部品の設計と3D印刷、電子部品の接続、Arduinoのプログラミングから、ロボットアームを制御するための独自のAndroidアプリケーションの開発まで、それを構築するプロセス全体を紹介します。
次のビデオを見るか、以下のチュートリアルを読むことができます。
アプリのスライダーを使用して、ロボットアームの各サーボまたは軸の動きを手動で制御できます。また、「保存」ボタンを使用して、各位置またはステップを記録し、ロボットアームを自動的に実行してこれらのステップを繰り返すことができます。同じボタンを使用して、自動操作を一時停止したり、すべてのステップをリセットまたは削除して、新しいステップを記録したりできます。
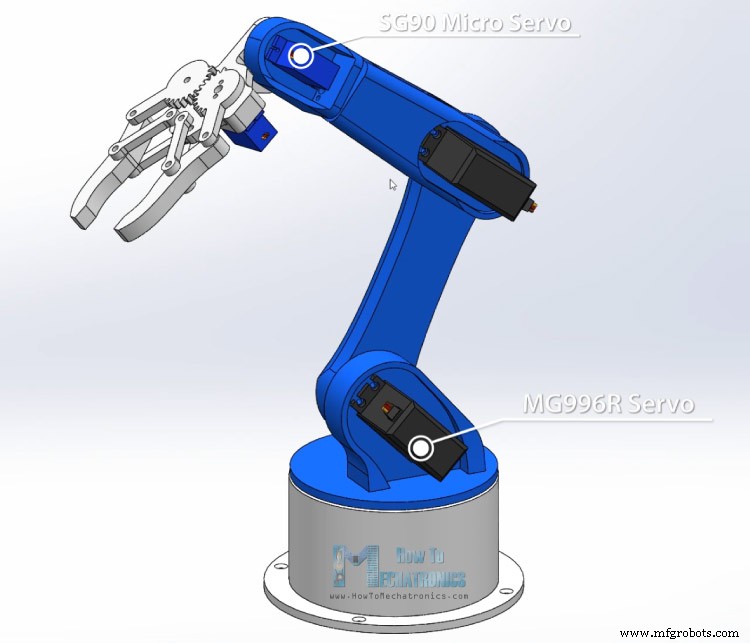
まず、Solidworks3Dモデリングソフトウェアを使用してロボットアームを設計しました。腕には5自由度があります。
最初の3軸、ウエスト、肩、肘にはMG996Rサーボを使用し、他の2軸にはリストロールとリストピッチ、およびグリッパーに小さいSG90マイクロサーボを使用しました。
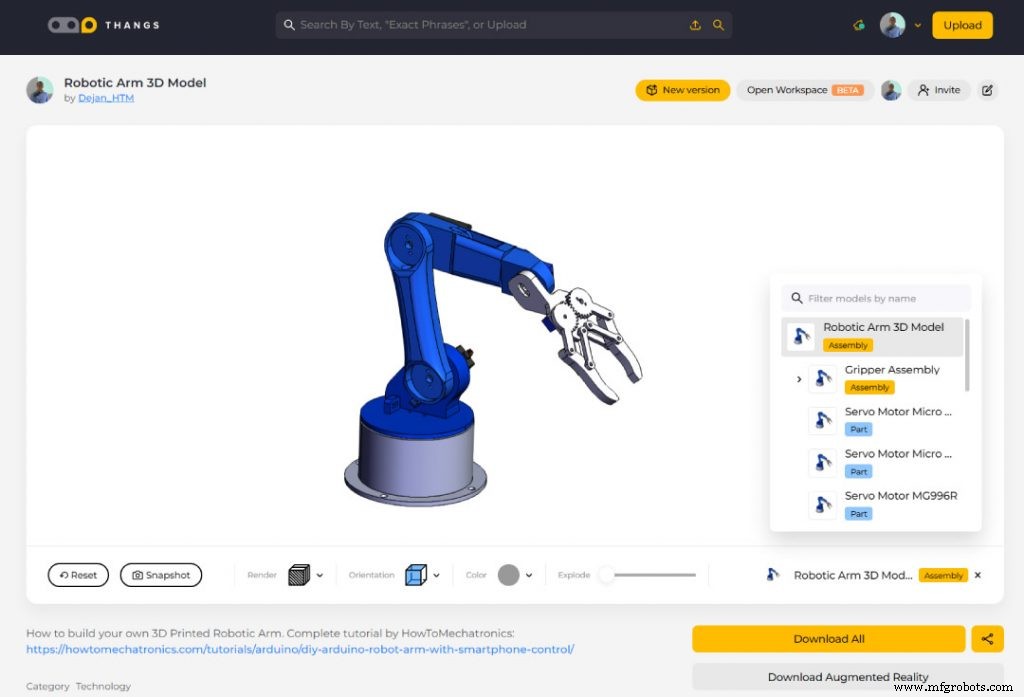
この3Dモデルを見つけてダウンロードしたり、Thangsのブラウザで調べたりすることができます:
Thangsからアセンブリの3Dモデルをダウンロードします。
このチュートリアルをサポートしてくれたThangsに感謝します。
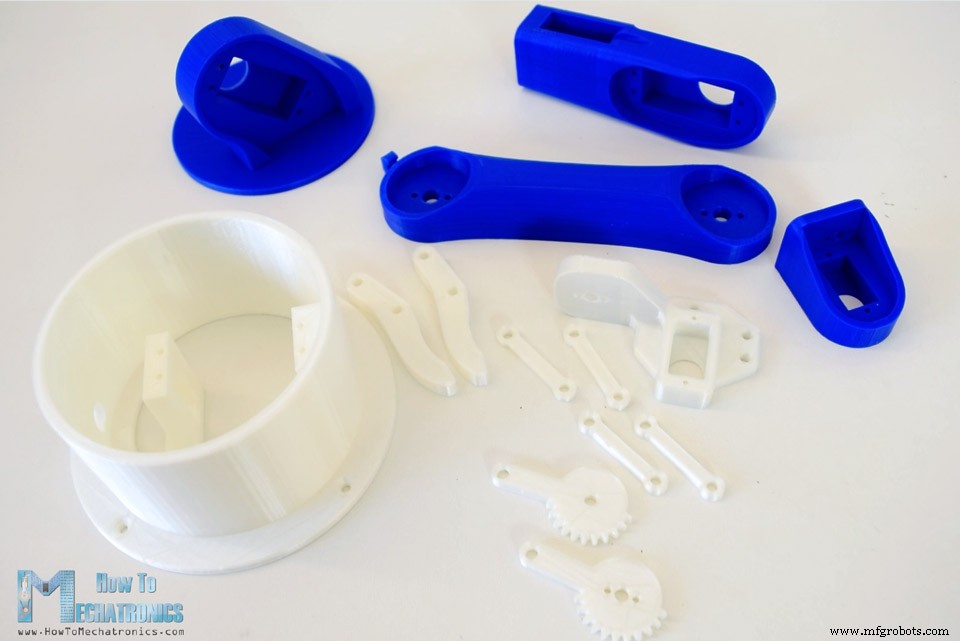
3D印刷用のSTLファイル:
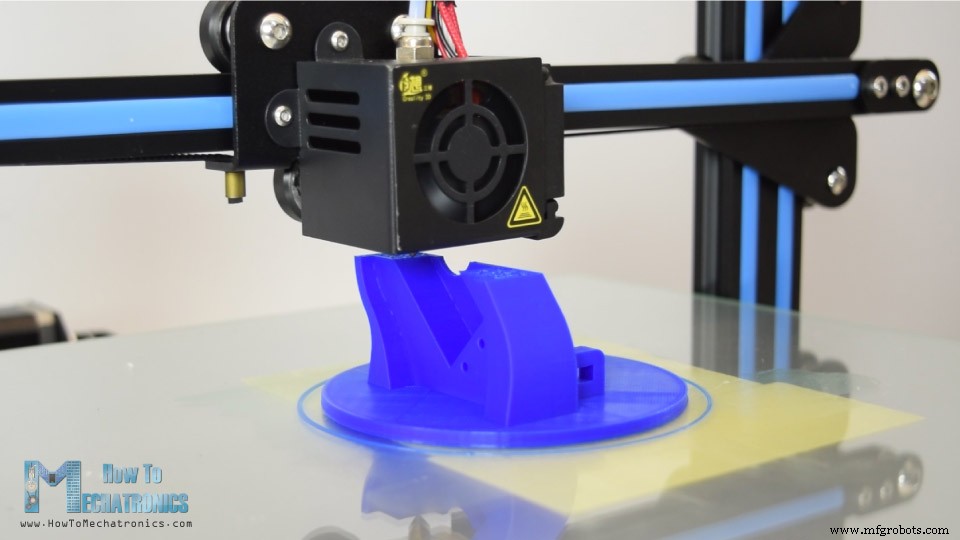
新しい3DプリンターであるCrealityCR-10を使用して、Arduinoロボットアームのすべての部品を3Dプリントしました。
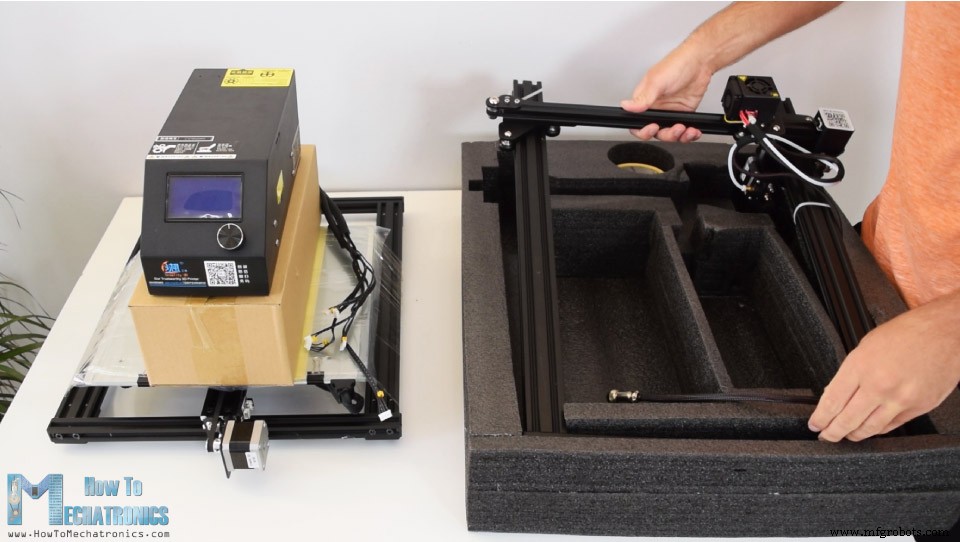
ここで、この素晴らしい3Dプリンターを提供してくれたBanggood.comに一言お願いします。 Creality CR-10の印刷品質は、その価格の点で驚くべきものです。また、ほぼ90%が組み立て済みであるという点も優れています。
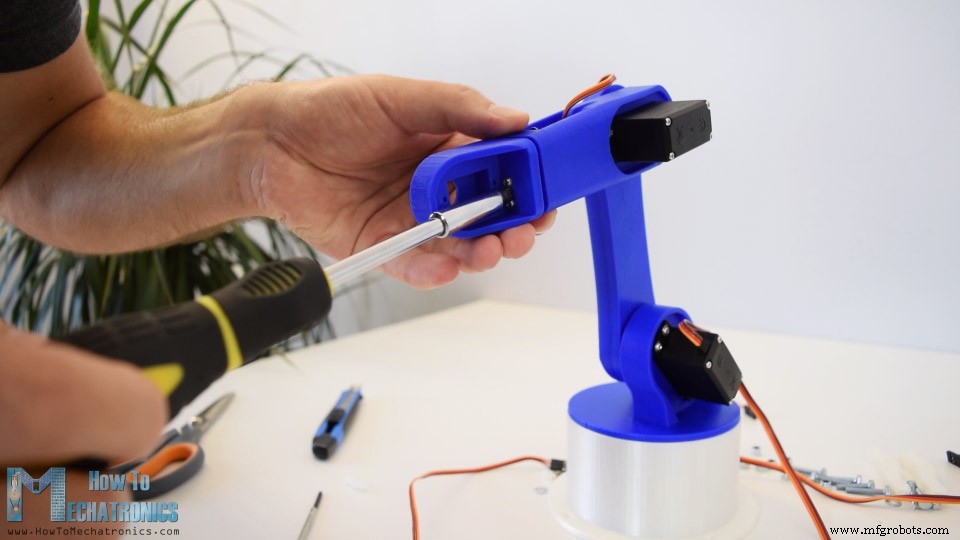
組み立てを完了するには、ボルトとブラケットを使用して上部フレームと下部フレームを接続し、付属のケーブルを使用して電子部品をコントロールボックスに接続するだけです。
試してみる前に、ローラーホイールが十分に締まっているかどうかを確認することをお勧めします。締まっていない場合は、偏心ナットを使用して締めることができます。これで、3D印刷ベッドを水平にした後、3D作品を現実に変える準備が整いました。
Arduinoロボットアームのすべての部品をわずか数時間で準備できました。
続きを読む:トップ15の必須の3Dプリンターアクセサリとツール
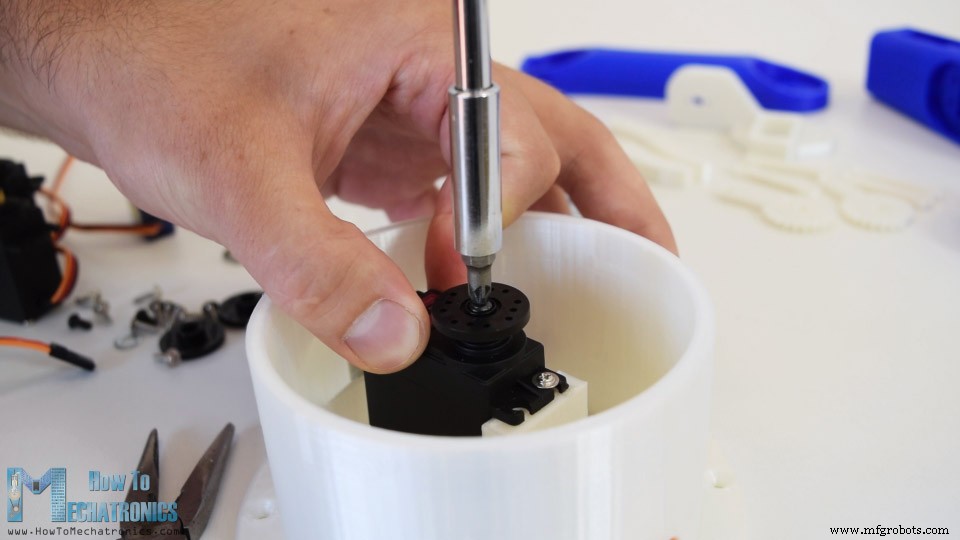
これで、ロボットアームを組み立てる準備が整いました。パッケージに含まれているネジを使用して、最初のサーボモーターを取り付けたベースから始めました。次に、サーボの出力シャフトに丸いホーンをボルトで固定しました。
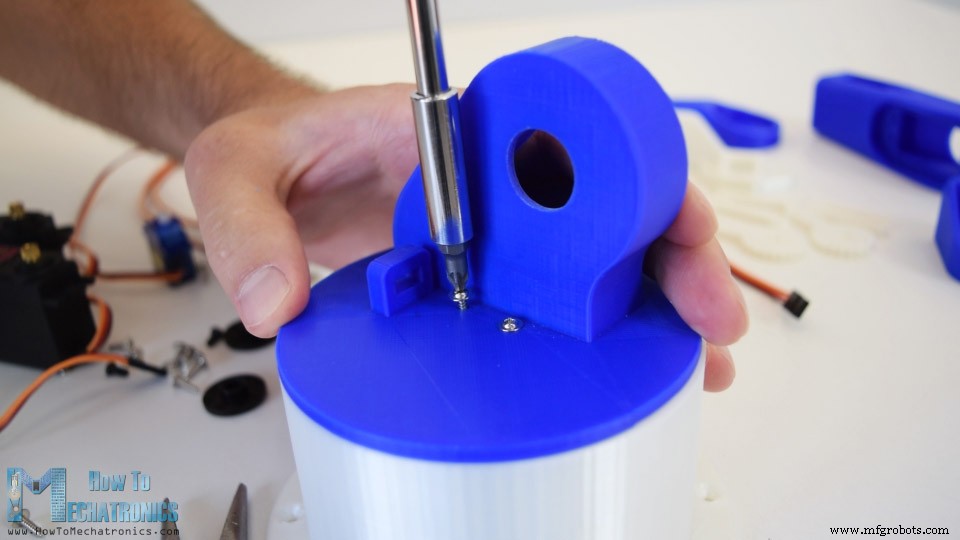
その上に上部を置き、2本のネジで固定しました。
ここでも最初にサーボを使用し、次に丸いホーンを次の部品に移動し、次に出力シャフトのボルトを使用して互いに固定します。
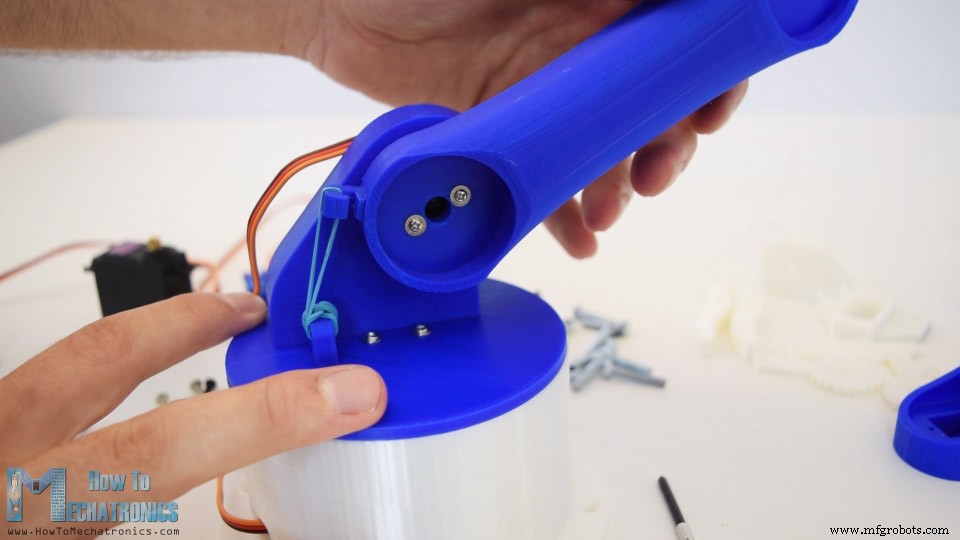
ここで、肩の軸に何らかのスプリングを含めることをお勧めします。私の場合、このサーボはアームの残りの部分の全重量も運ぶため、サーボを助けるために輪ゴムを使用しました。ペイロードとして。
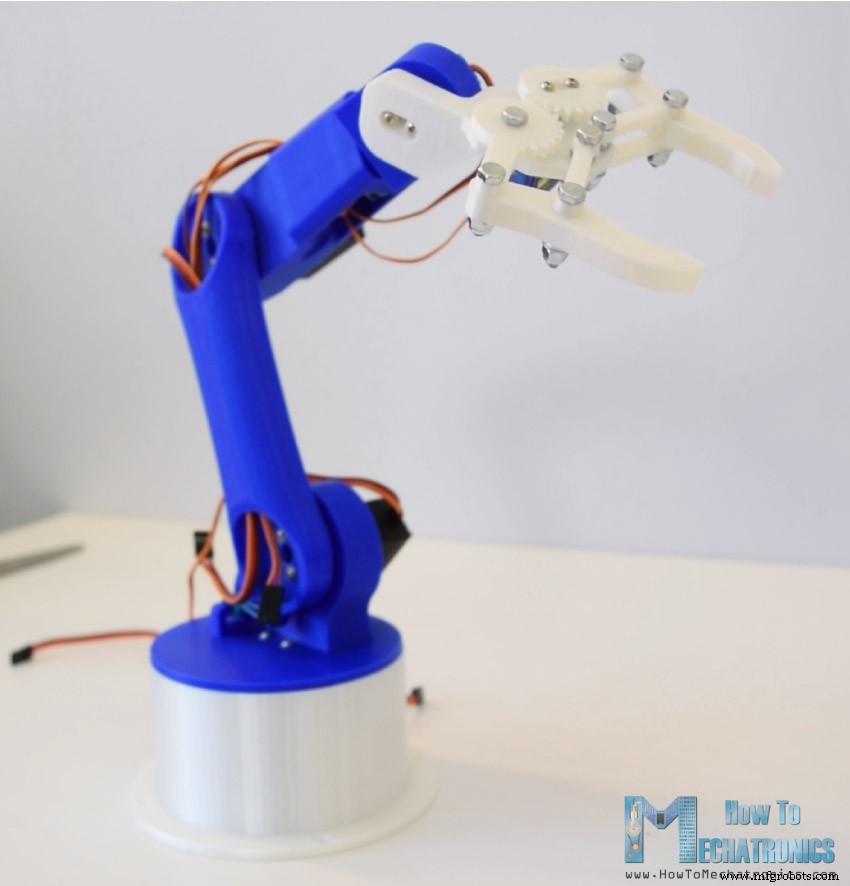
同様の方法で、残りのロボットアームを組み立て続けました。グリッパーのメカニズムについては、4ミリのボルトとナットを使って組み立てました。
最後にグリッパー機構を最後のサーボに取り付け、Arduinoロボットアームが完成しました。
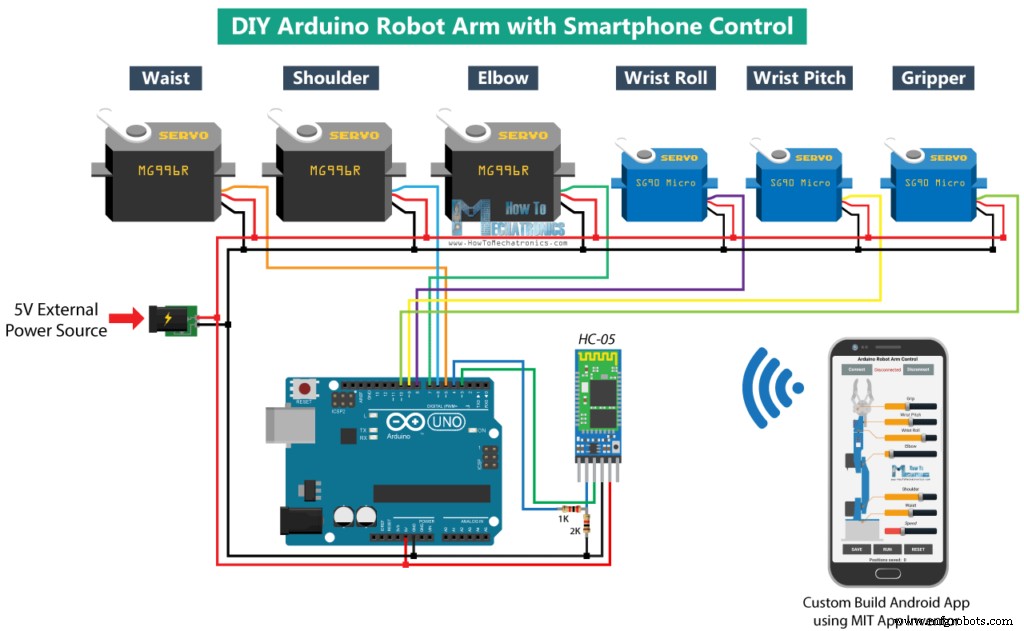
次の段階は、電子機器の接続です。このプロジェクトの回路図は実際には非常に単純です。スマートフォンとの通信には、ArduinoボードとHC-05Bluetoothモジュールが必要です。 6つのサーボモーターの制御ピンは、Arduinoボードの6つのデジタルピンに接続されています。
サーボに電力を供給するために5Vが必要ですが、Arduinoはすべてのサーボが引き込むことができる電流量を処理できないため、これは外部電源から供給される必要があります。電源は、少なくとも2Aの電流を処理できる必要があります。したがって、すべてを接続したら、Arduinoのプログラミングに進み、Androidアプリを作成できます。
この例に必要なコンポーネントは、以下のリンクから入手できます。
コードが少し長いので、理解を深めるために、プログラムのソースコードを各セクションの説明とともにセクションに投稿します。そして、この記事の最後に、完全なソースコードを投稿します。
したがって、最初に、Bluetoothモジュールのシリアル通信用のSoftwareSerialライブラリとサーボライブラリを含める必要があります。これらのライブラリは両方ともArduinoIDEに含まれているため、外部にインストールする必要はありません。次に、6つのサーボ、HC-05 Bluetoothモジュール、サーボの現在および以前の位置を格納するためのいくつかの変数、および自動モードの位置またはステップを格納するための配列を定義する必要があります。
セットアップセクションでは、サーボとBluetoothモジュールを初期化し、ロボットアームを初期位置に移動する必要があります。これは、サーボを0度から180度までの任意の位置に移動するだけのwrite()関数を使用して行います。
次に、ループセクションでは、Bluetooth.available()関数を使用して、スマートフォンからの着信データがあるかどうかを常にチェックします。 trueの場合、readString()関数を使用して、データを文字列として読み取り、dataIn変数に格納します。到着したデータに応じて、ロボットアームに何をすべきかを指示します。
ここでAndroidアプリを見て、実際にArduinoに送信されているデータの種類を確認しましょう。
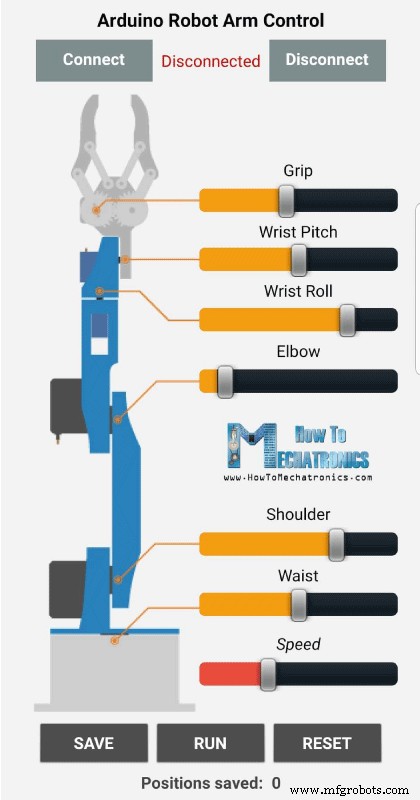
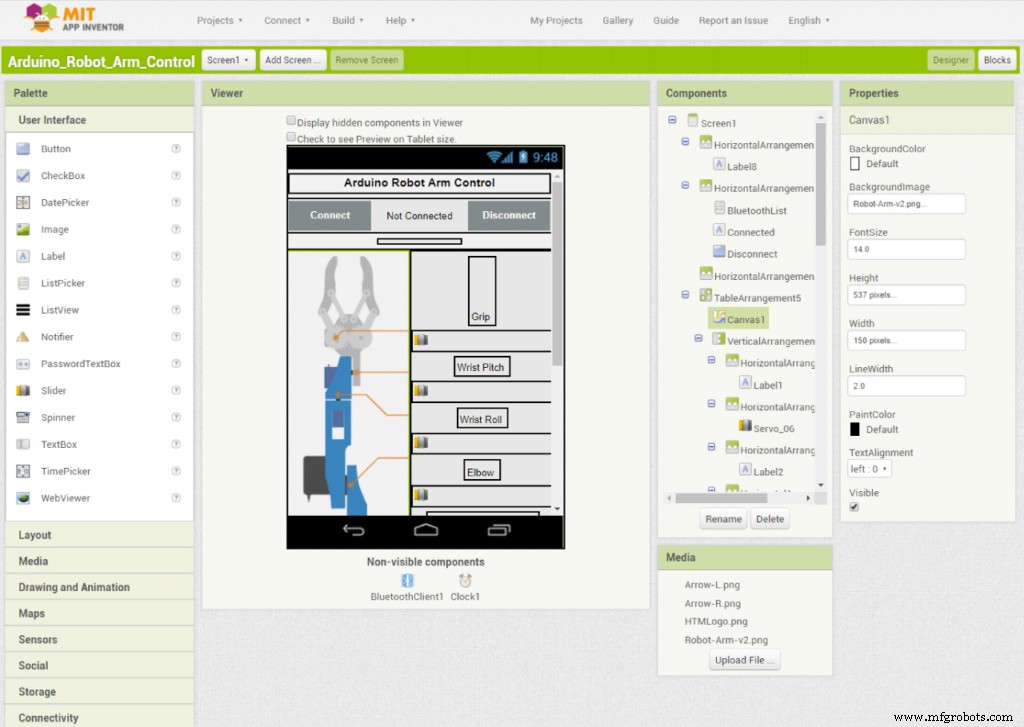
MITAppInventorオンラインアプリケーションを使用してアプリを作成しました。その仕組みは次のとおりです。上部には、スマートフォンをHC-05Bluetoothモジュールに接続するための2つのボタンがあります。次に、左側にロボットアームの画像があり、右側にサーボを制御するための6つのスライダーと、速度制御のための1つのスライダーがあります。
各スライダーには、ロボットアームのジョイントに適した異なる初期値、最小値、および最大値があります。アプリの下部には、保存、実行、リセットの3つのボタンがあり、ロボットアームを自動的に実行するようにプログラムできます。保存したステップ数を示すラベルも下にあります。それでも、MIT App Inventorを使用してこのようなアプリを構築する方法の詳細については、他の詳細なチュートリアルを確認してください。
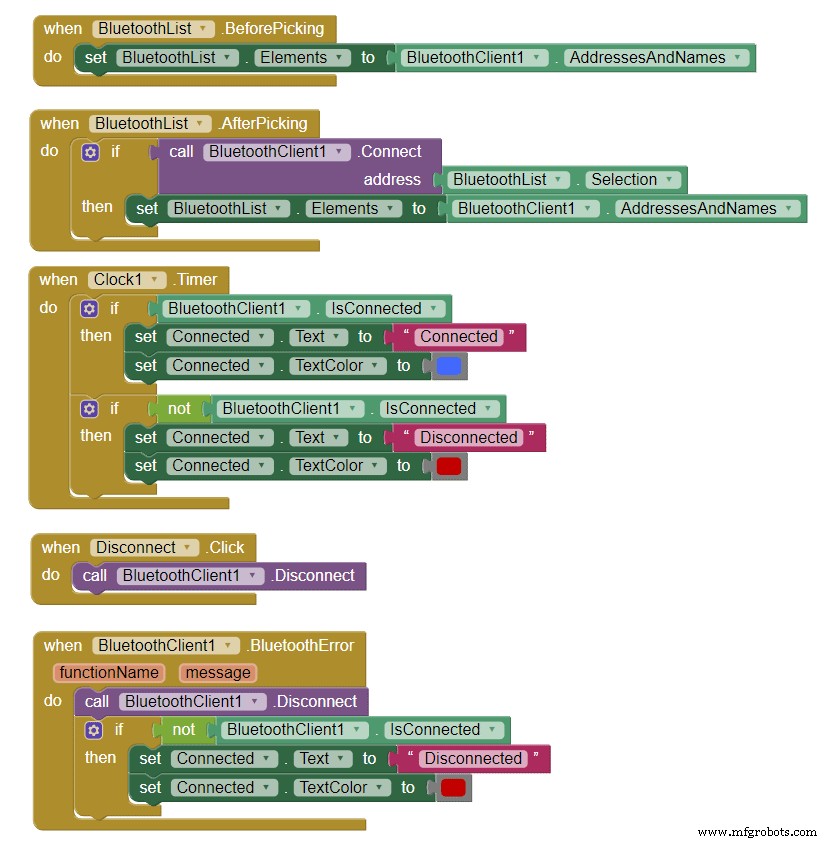
では、プログラムまたはアプリケーションの背後にあるブロックを見てみましょう。まず、左側にスマートフォンをBluetoothモジュールに接続するためのブロックがあります。
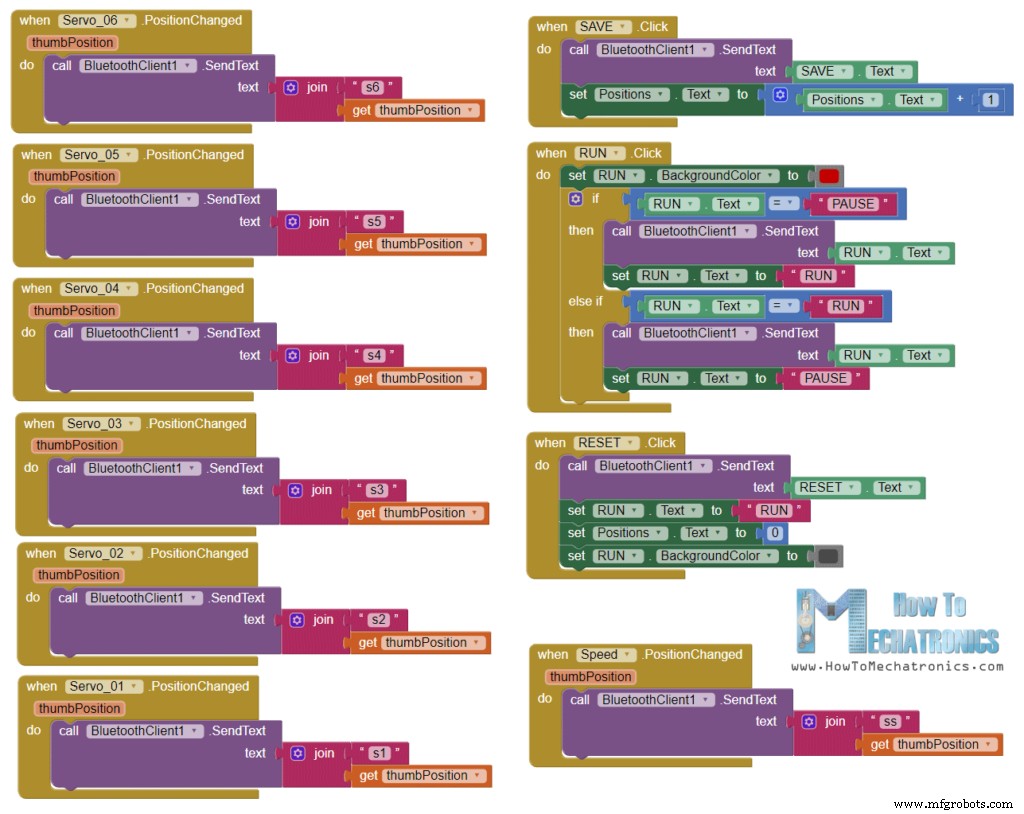
次に、サーボ位置制御用のスライダーブロックと、ロボットアームをプログラムするためのボタンブロックがあります。したがって、Bluetooth関数.SendTextを使用してスライダーの位置を変更すると、Arduinoにテキストが送信されます。このテキストは、変更されたスライダーとスライダーの現在の値を示すプレフィックスで構成されています。
上記のMITAppInventorプロジェクトのダウンロードファイルと、スマートフォンにインストールする準備ができているAndroidアプリは次のとおりです。
したがって、Arduinoでは、startsWith()関数を使用して、各受信データのプレフィックスをチェックし、次に何をするかを知っています。たとえば、プレフィックスが「s1」の場合、サーボ番号1を移動する必要があることがわかります。 substring()関数を使用して、残りのテキストを取得します。つまり、位置の値を整数に変換し、その値を使用してサーボをその位置に移動します。
ここでは、write()関数を呼び出すだけで、サーボはその位置に移動しますが、そのようにすると、サーボはロボットアームには大きすぎる最大速度で実行されます。代わりに、サーボの速度を制御する必要があるため、各反復の間に遅延時間を実装してサーボを前の位置から現在の位置に徐々に移動するために、いくつかのFORループを使用しました。遅延時間を変更することで、サーボの速度を変更できます。
ロボットアームの各軸の駆動にも同じ方法が使用されます。
その下には[保存]ボタンがあります。 SAVEボタンを押すと、各サーボモーターの位置が配列に格納されます。押すたびにインデックスが増加するため、配列は段階的に埋められます。
次に、RUNボタンを押すと、保存されたステップを実行するrunservo()カスタム関数が呼び出されます。この関数を見てみましょう。したがって、ここでは、RESETボタンを押すまで、保存されたステップを繰り返し実行します。 FORループを使用して、配列に格納されているすべての位置を実行すると同時に、スマートフォンからの受信データがあるかどうかを確認します。このデータは、ロボットを一時停止するRUN / PAUSEボタンである可能性があり、もう一度クリックすると自動移動が続行されます。また、速度スライダーの位置を変更する場合は、その値を使用して、サーボモーターの速度を制御する以下のFORループの各反復間の遅延時間を変更します。
これらのIFステートメントとFORループで前に説明したのと同様の方法で、サーボを次の位置に移動します。最後に、RESETボタンを押すと、配列からすべてのデータがゼロにクリアされ、インデックスもゼロにリセットされるため、新しい動きでロボットアームを再プログラムできます。
これで、ロボットアームを楽しんだり楽しんだりできるようになりました。
Arduinoロボットアームの完全なコードは次のとおりです。
このビデオが気に入って、何か新しいことを学んだことを願っています。以下のコメントセクションで質問をして、Arduinoプロジェクトコレクションを確認してください。Arduinoロボットアーム3Dモデル

ArduinoロボットアームSTLファイル
1ファイルロボットアームの3Dプリント


Arduinoロボットアームの回路図
Arduinoロボットアームコード
#include <SoftwareSerial.h>
#include <Servo.h>

Servo servo01;
Servo servo02;
Servo servo03;
Servo servo04;
Servo servo05;
Servo servo06;

SoftwareSerial Bluetooth(3, 4); // Arduino(RX, TX) - HC-05 Bluetooth (TX, RX)

int servo1Pos, servo2Pos, servo3Pos, servo4Pos, servo5Pos, servo6Pos; // current position
int servo1PPos, servo2PPos, servo3PPos, servo4PPos, servo5PPos, servo6PPos; // previous position
int servo01SP[50], servo02SP[50], servo03SP[50], servo04SP[50], servo05SP[50], servo06SP[50]; // for storing positions/steps
int speedDelay = 20;
int index = 0;
String dataIn = "";Code language: Arduino (arduino)void setup() {
servo01.attach(5);
servo02.attach(6);
servo03.attach(7);
servo04.attach(8);
servo05.attach(9);
servo06.attach(10);
Bluetooth.begin(38400); // Default baud rate of the Bluetooth module
Bluetooth.setTimeout(1);
delay(20);
// Robot arm initial position
servo1PPos = 90;
servo01.write(servo1PPos);
servo2PPos = 150;
servo02.write(servo2PPos);
servo3PPos = 35;
servo03.write(servo3PPos);
servo4PPos = 140;
servo04.write(servo4PPos);
servo5PPos = 85;
servo05.write(servo5PPos);
servo6PPos = 80;
servo06.write(servo6PPos);
}Code language: Arduino (arduino)// Check for incoming data
if (Bluetooth.available() > 0) {
dataIn = Bluetooth.readString(); // Read the data as stringCode language: Arduino (arduino)Androidアプリを制御する
ArduinoロボットアームコントロールMITAppInventorプロジェクトファイル
1ファイル ArduinoロボットアームコントロールAndroidアプリ
1ファイル// If "Waist" slider has changed value - Move Servo 1 to position
if (dataIn.startsWith("s1")) {
String dataInS = dataIn.substring(2, dataIn.length()); // Extract only the number. E.g. from "s1120" to "120"
servo1Pos = dataInS.toInt(); // Convert the string into integerCode language: Arduino (arduino)// We use for loops so we can control the speed of the servo
// If previous position is bigger then current position
if (servo1PPos > servo1Pos) {
for ( int j = servo1PPos; j >= servo1Pos; j--) { // Run servo down
servo01.write(j);
delay(20); // defines the speed at which the servo rotates
}
}
// If previous position is smaller then current position
if (servo1PPos < servo1Pos) {
for ( int j = servo1PPos; j <= servo1Pos; j++) { // Run servo up
servo01.write(j);
delay(20);
}
}
servo1PPos = servo1Pos; // set current position as previous position
}Code language: Arduino (arduino)// If button "SAVE" is pressed
if (dataIn.startsWith("SAVE")) {
servo01SP[index] = servo1PPos; // save position into the array
servo02SP[index] = servo2PPos;
servo03SP[index] = servo3PPos;
servo04SP[index] = servo4PPos;
servo05SP[index] = servo5PPos;
servo06SP[index] = servo6PPos;
index++; // Increase the array index
}Code language: Arduino (arduino)// Automatic mode custom function - run the saved steps
void runservo() {
while (dataIn != "RESET") { // Run the steps over and over again until "RESET" button is pressed
for (int i = 0; i <= index - 2; i++) { // Run through all steps(index)
if (Bluetooth.available() > 0) { // Check for incomding data
dataIn = Bluetooth.readString();
if ( dataIn == "PAUSE") { // If button "PAUSE" is pressed
while (dataIn != "RUN") { // Wait until "RUN" is pressed again
if (Bluetooth.available() > 0) {
dataIn = Bluetooth.readString();
if ( dataIn == "RESET") {
break;
}
}
}
}
// If SPEED slider is changed
if (dataIn.startsWith("ss")) {
String dataInS = dataIn.substring(2, dataIn.length());
speedDelay = dataInS.toInt(); // Change servo speed (delay time)
}
}
// Servo 1
if (servo01SP[i] == servo01SP[i + 1]) {
}
if (servo01SP[i] > servo01SP[i + 1]) {
for ( int j = servo01SP[i]; j >= servo01SP[i + 1]; j--) {
servo01.write(j);
delay(speedDelay);
}
}
if (servo01SP[i] < servo01SP[i + 1]) {
for ( int j = servo01SP[i]; j <= servo01SP[i + 1]; j++) {
servo01.write(j);
delay(speedDelay);
}
}Code language: Arduino (arduino)// If button "RESET" is pressed
if ( dataIn == "RESET") {
memset(servo01SP, 0, sizeof(servo01SP)); // Clear the array data to 0
memset(servo02SP, 0, sizeof(servo02SP));
memset(servo03SP, 0, sizeof(servo03SP));
memset(servo04SP, 0, sizeof(servo04SP));
memset(servo05SP, 0, sizeof(servo05SP));
memset(servo06SP, 0, sizeof(servo06SP));
index = 0; // Index to 0
}Code language: Arduino (arduino)/*
DIY Arduino Robot Arm Smartphone Control
by Dejan, www.HowToMechatronics.com
*/
#include <SoftwareSerial.h>
#include <Servo.h>
Servo servo01;
Servo servo02;
Servo servo03;
Servo servo04;
Servo servo05;
Servo servo06;
SoftwareSerial Bluetooth(3, 4); // Arduino(RX, TX) - HC-05 Bluetooth (TX, RX)
int servo1Pos, servo2Pos, servo3Pos, servo4Pos, servo5Pos, servo6Pos; // current position
int servo1PPos, servo2PPos, servo3PPos, servo4PPos, servo5PPos, servo6PPos; // previous position
int servo01SP[50], servo02SP[50], servo03SP[50], servo04SP[50], servo05SP[50], servo06SP[50]; // for storing positions/steps
int speedDelay = 20;
int index = 0;
String dataIn = "";
void setup() {
servo01.attach(5);
servo02.attach(6);
servo03.attach(7);
servo04.attach(8);
servo05.attach(9);
servo06.attach(10);
Bluetooth.begin(38400); // Default baud rate of the Bluetooth module
Bluetooth.setTimeout(1);
delay(20);
// Robot arm initial position
servo1PPos = 90;
servo01.write(servo1PPos);
servo2PPos = 150;
servo02.write(servo2PPos);
servo3PPos = 35;
servo03.write(servo3PPos);
servo4PPos = 140;
servo04.write(servo4PPos);
servo5PPos = 85;
servo05.write(servo5PPos);
servo6PPos = 80;
servo06.write(servo6PPos);
}
void loop() {
// Check for incoming data
if (Bluetooth.available() > 0) {
dataIn = Bluetooth.readString(); // Read the data as string
// If "Waist" slider has changed value - Move Servo 1 to position
if (dataIn.startsWith("s1")) {
String dataInS = dataIn.substring(2, dataIn.length()); // Extract only the number. E.g. from "s1120" to "120"
servo1Pos = dataInS.toInt(); // Convert the string into integer
// We use for loops so we can control the speed of the servo
// If previous position is bigger then current position
if (servo1PPos > servo1Pos) {
for ( int j = servo1PPos; j >= servo1Pos; j--) { // Run servo down
servo01.write(j);
delay(20); // defines the speed at which the servo rotates
}
}
// If previous position is smaller then current position
if (servo1PPos < servo1Pos) {
for ( int j = servo1PPos; j <= servo1Pos; j++) { // Run servo up
servo01.write(j);
delay(20);
}
}
servo1PPos = servo1Pos; // set current position as previous position
}
// Move Servo 2
if (dataIn.startsWith("s2")) {
String dataInS = dataIn.substring(2, dataIn.length());
servo2Pos = dataInS.toInt();
if (servo2PPos > servo2Pos) {
for ( int j = servo2PPos; j >= servo2Pos; j--) {
servo02.write(j);
delay(50);
}
}
if (servo2PPos < servo2Pos) {
for ( int j = servo2PPos; j <= servo2Pos; j++) {
servo02.write(j);
delay(50);
}
}
servo2PPos = servo2Pos;
}
// Move Servo 3
if (dataIn.startsWith("s3")) {
String dataInS = dataIn.substring(2, dataIn.length());
servo3Pos = dataInS.toInt();
if (servo3PPos > servo3Pos) {
for ( int j = servo3PPos; j >= servo3Pos; j--) {
servo03.write(j);
delay(30);
}
}
if (servo3PPos < servo3Pos) {
for ( int j = servo3PPos; j <= servo3Pos; j++) {
servo03.write(j);
delay(30);
}
}
servo3PPos = servo3Pos;
}
// Move Servo 4
if (dataIn.startsWith("s4")) {
String dataInS = dataIn.substring(2, dataIn.length());
servo4Pos = dataInS.toInt();
if (servo4PPos > servo4Pos) {
for ( int j = servo4PPos; j >= servo4Pos; j--) {
servo04.write(j);
delay(30);
}
}
if (servo4PPos < servo4Pos) {
for ( int j = servo4PPos; j <= servo4Pos; j++) {
servo04.write(j);
delay(30);
}
}
servo4PPos = servo4Pos;
}
// Move Servo 5
if (dataIn.startsWith("s5")) {
String dataInS = dataIn.substring(2, dataIn.length());
servo5Pos = dataInS.toInt();
if (servo5PPos > servo5Pos) {
for ( int j = servo5PPos; j >= servo5Pos; j--) {
servo05.write(j);
delay(30);
}
}
if (servo5PPos < servo5Pos) {
for ( int j = servo5PPos; j <= servo5Pos; j++) {
servo05.write(j);
delay(30);
}
}
servo5PPos = servo5Pos;
}
// Move Servo 6
if (dataIn.startsWith("s6")) {
String dataInS = dataIn.substring(2, dataIn.length());
servo6Pos = dataInS.toInt();
if (servo6PPos > servo6Pos) {
for ( int j = servo6PPos; j >= servo6Pos; j--) {
servo06.write(j);
delay(30);
}
}
if (servo6PPos < servo6Pos) {
for ( int j = servo6PPos; j <= servo6Pos; j++) {
servo06.write(j);
delay(30);
}
}
servo6PPos = servo6Pos;
}
// If button "SAVE" is pressed
if (dataIn.startsWith("SAVE")) {
servo01SP[index] = servo1PPos; // save position into the array
servo02SP[index] = servo2PPos;
servo03SP[index] = servo3PPos;
servo04SP[index] = servo4PPos;
servo05SP[index] = servo5PPos;
servo06SP[index] = servo6PPos;
index++; // Increase the array index
}
// If button "RUN" is pressed
if (dataIn.startsWith("RUN")) {
runservo(); // Automatic mode - run the saved steps
}
// If button "RESET" is pressed
if ( dataIn == "RESET") {
memset(servo01SP, 0, sizeof(servo01SP)); // Clear the array data to 0
memset(servo02SP, 0, sizeof(servo02SP));
memset(servo03SP, 0, sizeof(servo03SP));
memset(servo04SP, 0, sizeof(servo04SP));
memset(servo05SP, 0, sizeof(servo05SP));
memset(servo06SP, 0, sizeof(servo06SP));
index = 0; // Index to 0
}
}
}
// Automatic mode custom function - run the saved steps
void runservo() {
while (dataIn != "RESET") { // Run the steps over and over again until "RESET" button is pressed
for (int i = 0; i <= index - 2; i++) { // Run through all steps(index)
if (Bluetooth.available() > 0) { // Check for incomding data
dataIn = Bluetooth.readString();
if ( dataIn == "PAUSE") { // If button "PAUSE" is pressed
while (dataIn != "RUN") { // Wait until "RUN" is pressed again
if (Bluetooth.available() > 0) {
dataIn = Bluetooth.readString();
if ( dataIn == "RESET") {
break;
}
}
}
}
// If speed slider is changed
if (dataIn.startsWith("ss")) {
String dataInS = dataIn.substring(2, dataIn.length());
speedDelay = dataInS.toInt(); // Change servo speed (delay time)
}
}
// Servo 1
if (servo01SP[i] == servo01SP[i + 1]) {
}
if (servo01SP[i] > servo01SP[i + 1]) {
for ( int j = servo01SP[i]; j >= servo01SP[i + 1]; j--) {
servo01.write(j);
delay(speedDelay);
}
}
if (servo01SP[i] < servo01SP[i + 1]) {
for ( int j = servo01SP[i]; j <= servo01SP[i + 1]; j++) {
servo01.write(j);
delay(speedDelay);
}
}
// Servo 2
if (servo02SP[i] == servo02SP[i + 1]) {
}
if (servo02SP[i] > servo02SP[i + 1]) {
for ( int j = servo02SP[i]; j >= servo02SP[i + 1]; j--) {
servo02.write(j);
delay(speedDelay);
}
}
if (servo02SP[i] < servo02SP[i + 1]) {
for ( int j = servo02SP[i]; j <= servo02SP[i + 1]; j++) {
servo02.write(j);
delay(speedDelay);
}
}
// Servo 3
if (servo03SP[i] == servo03SP[i + 1]) {
}
if (servo03SP[i] > servo03SP[i + 1]) {
for ( int j = servo03SP[i]; j >= servo03SP[i + 1]; j--) {
servo03.write(j);
delay(speedDelay);
}
}
if (servo03SP[i] < servo03SP[i + 1]) {
for ( int j = servo03SP[i]; j <= servo03SP[i + 1]; j++) {
servo03.write(j);
delay(speedDelay);
}
}
// Servo 4
if (servo04SP[i] == servo04SP[i + 1]) {
}
if (servo04SP[i] > servo04SP[i + 1]) {
for ( int j = servo04SP[i]; j >= servo04SP[i + 1]; j--) {
servo04.write(j);
delay(speedDelay);
}
}
if (servo04SP[i] < servo04SP[i + 1]) {
for ( int j = servo04SP[i]; j <= servo04SP[i + 1]; j++) {
servo04.write(j);
delay(speedDelay);
}
}
// Servo 5
if (servo05SP[i] == servo05SP[i + 1]) {
}
if (servo05SP[i] > servo05SP[i + 1]) {
for ( int j = servo05SP[i]; j >= servo05SP[i + 1]; j--) {
servo05.write(j);
delay(speedDelay);
}
}
if (servo05SP[i] < servo05SP[i + 1]) {
for ( int j = servo05SP[i]; j <= servo05SP[i + 1]; j++) {
servo05.write(j);
delay(speedDelay);
}
}
// Servo 6
if (servo06SP[i] == servo06SP[i + 1]) {
}
if (servo06SP[i] > servo06SP[i + 1]) {
for ( int j = servo06SP[i]; j >= servo06SP[i + 1]; j--) {
servo06.write(j);
delay(speedDelay);
}
}
if (servo06SP[i] < servo06SP[i + 1]) {
for ( int j = servo06SP[i]; j <= servo06SP[i + 1]; j++) {
servo06.write(j);
delay(speedDelay);
}
}
}
}
}Code language: Arduino (arduino)
製造プロセス
- Arduinoでコインアクセプターを制御する
- Arduinoとスマートフォンを使用したDIY電圧計
- IoTを使用してロボットアームをリモート制御する
- サーボモーター付きロボット回避障害物
- LEDを制御するBluetoothを搭載したArduino!
- Nunchuk制御ロボットアーム(Arduino付き)
- Arduino Nano:ジョイスティックで2つのステッピングモーターを制御
- MobBob:Androidスマートフォンで制御されるDIY Arduino Robot
- Littlearm 2C:3DプリントされたArduinoロボットアームを構築する
- ThimbleKrox-指でマウスを操作する
- ロボットアームを装備したターニングセンター