


Arduinoでコインアクセプターを制御する
コンポーネントと消耗品
>  |
| × | 1 | |||
| × | 1 | ||||
| × | 1 |
アプリとオンラインサービス
>  |
|
このプロジェクトについて
このプロジェクトの目的は、他のプロジェクトで使用できるように、arduinoでコインアクセプターを制御するコードを作成することです。私が念頭に置いていた特定のプロジェクトは、娘のためにバランスを意識した貯金箱を作ることでした。
コード
- Arduinoでコインアクセプターを制御する
Arduino Arduino でコインアクセプターを制御する
// Mario's Ideas // Arduinoでコインアクセプターを制御する#include#include #include //モジュール接続ピン(デジタルピン)#defineCLK 3#define DIO 4TM1637Display display(CLK、DIO); //インパルス間の間隔を測定するための変数の使用inti =0; //検出されたインパルスの数intimpulsCount =0; //挿入されたすべてのコインの合計floattotal_amount =0; void setup(){ // pinMode(2、INPUT_PULLUP); Serial.begin(9600); display.setBrightness(0x0f); //信号がHIGHからLOWに変化したときにIncomingImpuls関数を実行するPIND2に接続された割り込みattachInterrupt(0、incomingImpuls、FALLING); EEPROM.get(0、total_amount); display.clear();} voidcomingImpuls(){impulsCount =impulsCount + 1; i =0;} void loop(){i =i + 1; Serial.print( "i ="); Serial.print(i); Serial.print( "インパルス:"); Serial.print(impulsCount); Serial.print( "合計:"); Serial.println(total_amount); if(i> =30 and impulsCount ==1){total_amount =total_amount + 2; impulsCount =0; EEPROM.put(0、total_amount); } if(i> =30 and impulsCount ==2){total_amount =total_amount + 1; impulsCount =0; EEPROM.put(0、total_amount); } if(i> =30 and impulsCount ==3){total_amount =total_amount + 0.5; impulsCount =0; EEPROM.put(0、total_amount); } if(i> =30 and impulsCount ==4){total_amount =total_amount + 0.2; impulsCount =0; EEPROM.put(0、total_amount); } if(i> =30 and impulsCount ==5){total_amount =total_amount + 0.1; impulsCount =0; EEPROM.put(0、total_amount); } if(total_amount <10)display.showNumberDecEx(total_amount * 10、0b10000000、true、2、2); else display.showNumberDecEx(total_amount * 10、0b00100000、false、4、0);}
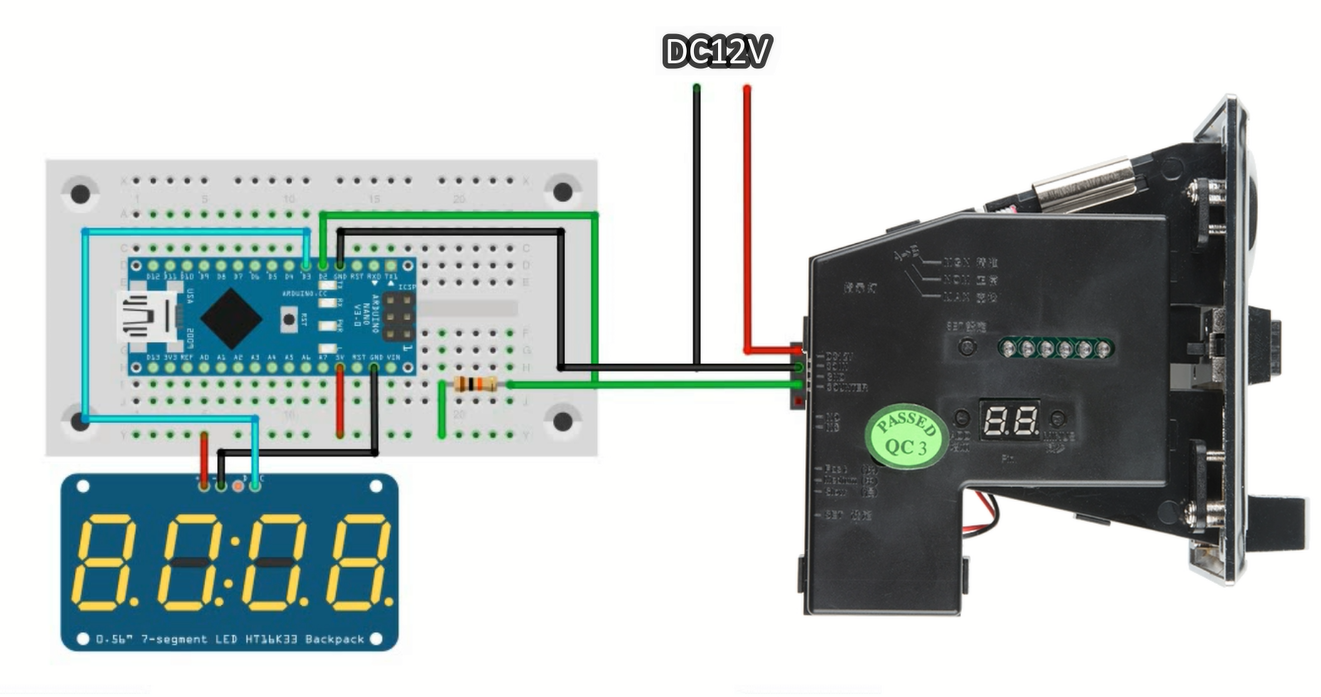
回路図
製造プロセス