



Raspberry Pi 2 + Windows 10 IoT CoreでシリアルBluetooth通信を実現する
必要な部品と用品
| Raspberry Pi 2 Model B | ×1 |
| 汎用Bluetooth USBドングル | ×1 |
| Arduino UNO | ×1 |
| SparkFun Bluetooth Modem - BlueSMiRF Silver | ×1 |
使用するアプリとオンラインサービス
- Microsoft Windows 10 IoT Core
- Microsoft Visual Studio 2015
プロジェクト概要
このプロジェクトは、Raspberry Pi 2(Windows 10 IoT Core搭載)と汎用Bluetooth USBドングルを使い、Bluetoothシリアルポートプロファイル(SPP/RFCOMM)でArduino等の組み込みデバイスとシリアル通信を行うユニバーサルWindowsアプリ(UWP)の実装例です。Microsoft公式サンプルがGATT(BLE)ベースであるのに対し、こちらはより汎用的なクラシックBluetooth SPPに特化し、古いドングルでも動作します。
背景:Bluetoothプロファイルの違い
- SPP (Serial Port Profile):RFCOMMベースの対称的なシリアル通信。生データをやり取り可能。
- GATT (Generic Attribute Profile):BLE用。プロファイル検出・記述サービスを提供し、低電力デバイスから複雑なプロセッサへデータを送る非対称構造が主。
本プロジェクトはSPPのみを扱うため、実装がシンプルです。
IoTアプリの構成
アプリは以下の機能を持ちます:
- ペアリング済みBluetoothデバイスを列挙・リスト表示
- リスト項目をダブルクリックで接続開始
- テキストボックスに入力した文字列を送信ボタンで送信
- 受信データを自動的に受信ボックスに表示(エコーバックテスト用)
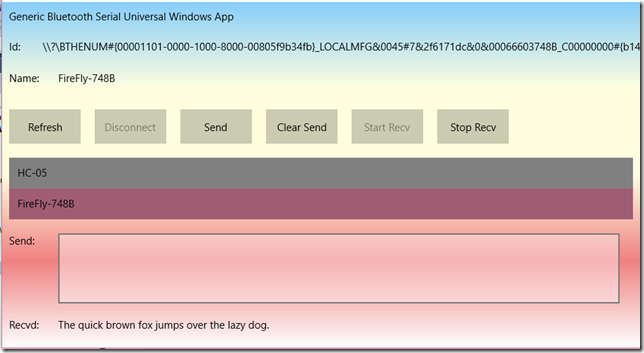
エンドポイント(Arduino側)
Arduino Uno + Bluetoothモデム(BlueSMiRF等)で、受信した文字をそのまま返すエコースケッチを動作させます。
セットアップコード
void setup() {
  Serial.begin(115200);  // BTモデムのボーレートに合わせる
  delay(333);
  while (!Serial) ;
  delay(1000);
  Serial.println("The quick brown fox jumps over the lazy dog!");
}
ループコード
void loop() {
  char ch = Serial.read();
  while (255 == (byte)ch) { ch = Serial.read(); }
  Serial.print(ch);
}
ペアリング
Bluetoothはペアリング必須。IoT Coreはヘッドレスなので、WebポータルまたはSSH経由のコマンドラインでペアリング設定を行います。詳細は「Win 10 IoT-Core: Bluetooth Universal Windows Serial App」を参照。
プロジェクト作成手順
- Visual Studio 2015 で Blank App (Universal Windows) テンプレートから新規作成
- XAMLでUI構築:
- テキスト要素は
TextBlock、送信用のみTextBox - 受信欄は
TextWrapping有効化 StackPanelで行ごとに横並び、さらに縦スタックで全体をレイアウト- デバイスリストは
ListBox、ItemsSourceをPairedDevicesコレクションにバインド、ItemTemplateでNameプロパティを表示
- テキスト要素は
Package.appxmanifestの機能宣言を手動編集(XMLエディタで開く):<Capabilities> <Capability Name="internetClient" /> <DeviceCapability Name="bluetooth.rfcomm"> <Device Id="any"> <Function Type="name:serialPort"/> </Device> </DeviceCapability> </Capabilities>
ペアリングデバイス情報の取得
DeviceInformationCollection DeviceInfoCollection
  = await DeviceInformation.FindAllAsync(
      RfcommDeviceService.GetDeviceSelector(RfcommServiceId.SerialPort));

_pairedDevices = new ObservableCollection<PairedDeviceInfo>();
foreach (var info in DeviceInfoCollection) {
  _pairedDevices.Add(new PairedDeviceInfo {
    Name = info.Name,
    Id = info.Id,
    DeviceInfo = info
  });
}
PairedDeviceInfo クラスは Name, Id, DeviceInfo プロパティを持つ。
接続確立
_service = await RfcommDeviceService.FromIdAsync(DeviceInfo.Id);
_socket = new StreamSocket();
await _socket.ConnectAsync(_service.ConnectionHostName, _service.ConnectionServiceName);
成功すれば _socket が有効になる。try-catchでエラー処理。
受信処理(非同期ループ)
private async void Listen() {
  ReadCancellationTokenSource = new CancellationTokenSource();
  if (_socket.InputStream != null) {
    dataReaderObject = new DataReader(_socket.InputStream);
    while (true) {
      await ReadAsync(ReadCancellationTokenSource.Token);
    }
  }
}

private async Task ReadAsync(CancellationToken cancellationToken) {
  uint ReadBufferLength = 1024;
  cancellationToken.ThrowIfCancellationRequested();
  dataReaderObject.InputStreamOptions = InputStreamOptions.Partial;
  var loadAsyncTask = dataReaderObject.LoadAsync(ReadBufferLength).AsTask(cancellationToken);
  UInt32 bytesRead = await loadAsyncTask;
  if (bytesRead > 0) {
    string recvdtxt = dataReaderObject.ReadString(bytesRead);
    // UI更新等
  }
}
送信処理(同期的)
private async void Send(string msg) {
  DataWriter dataWriteObject = new DataWriter(_socket.OutputStream);
  dataWriteObject.WriteString(msg);
  var storeAsyncTask = dataWriteObject.StoreAsync().AsTask();
  UInt32 bytesWritten = await storeAsyncTask;
}
ボタン状態制御
接続状態に応じて送信/受信開始ボタンの有効/無効を切り替え。
ソースコードリポジトリ
- GitHub: iotbluetoothserial
- Codeplexミラー: iotgenbluetoothserialuwa
製造プロセス
- GoPiGo v2をWindows 10 IoT Coreで拡張 - Raspberry Pi 3対応
- Arduino MegaでPWM制御:プッシュボタン付きLEDフェード制御チュートリアル
- アナログセンサー搭載・高精度圧力&気流測定デバイス
- Arduino NanoとMPU-6050で作るリアルタイムジャイロスコープゲーム
- ESP32-CAMで作る動体検知セキュリティカメラ:Discord通知対応
- DHT11温湿度センサーで作る温度アラート – LEDとピエゾブザーで視覚/聴覚通知
- Unopad: Ableton Live連携シームレスなArduino MIDIコントローラー
- 自作Arduino TVリモコン:電池駆動・3Dプリントケース・省電力設計
- ArduinoでBluetooth経由でLEDを制御 – シンプルDIYガイド
- Arduinoでシンプルな障害物センサーを自作 – IR LEDとフォトダイオード入門
- 音声で家電を操作:GoogleアシスタントとBluetoothでArduino家電制御